Table of contents
Introduction
The Inverno Framework has been created with the objective of facilitating the creation of Java enterprise applications with maximum modularity, performance, maintainability and customizability.
New technologies are emerging all the time questioning what has been working for years, We strongly believe that we must instead recognize and preserve proven solutions and only provide what is missing or change what is no longer in line with widely accepted evolutions. The Java platform has proven to be resilient to change and offers features that make it an ideal choice to create durable and efficient applications in complex technical and organizational environments which is precisely what is expected in an enterprise world. The Inverno Framework is a fully integrated suite of modules built for the Java platform that fully embrace this philosophy by keeping things well organized, strict and explicit with clean APIs and comprehensive documentation.
The Inverno framework is open source and licensed under version 2.0 of the Apache License.
Design principles
A Inverno application is inherently modular, modularity is a key design principle which guarantees a proper separation of concerns providing flexibility, maintainability, stability and ease of development regardless of the lifespan of an application or the number of people involved to develop it. A Inverno module is built as a standard Java module extending the Java module system with Inversion of Control and Dependency Injection performed at compile time.
The Inverno Framework extends the Java compiler to generate code at compile time when it makes sense to do so which is strictly why annotations were initially created for. When done appropriately, code generation can be extremely valuable: issues can be detected ahead of time by analyzing the code during compilation, runtime footprint can be reduced by transferring costly processing like IoC/DI to the compiler improving runtime performance at the same time.
The framework uses a state of the art threading model and it has been designed from the ground up to be fully non-blocking and reactive in order to deliver very high performance while simplifying development of highly distributed applications requiring back pressure management.
The inherent modularity of the framework based on the Java module system guarantees a nice and clean project structure which prevents misuse and abuse by clearly separating the concerns and exposing well designed APIs.
Special attention has been paid to configuration and customization which are often overlooked and yet vital to create applications that can adapt to any environment or context.
Getting help
We provide here a reference guide that starts by an overview of the Inverno core, modules and tools projects which gives a good idea of what can be done with the framework followed by a more comprehensive documentation that should guide you in the creation of an Inverno project using the Inverno distribution, the use of the core IoC/DI framework, the various modules including the configuration and the Web server modules and the tools to run, package and distribute Inverno components and applications.
The API documentation provides plenty of details on how to use the various APIs. The getting started guide is also a good starting point to get into it.
Feel free to report bugs and feature requests or simply ask questions using GitHub's issue tracking system if you ran in any issue or wish to see some new functionalities implemented in the framework.
Overview
Inverno Core
![]()
The Inverno core framework project provides an Inversion of Control and Dependency Injection framework for the Java™ platform. It has the particularity of not using reflection for object instantiation and dependency injection, everything being verified and done statically during compilation.
This approach has many advantages over other IoC/DI solutions starting with the static checking of the bean dependency graph at compile time which guarantees that a program is correct and will run properly. Debugging is also made easier since you can actually access the source code where beans are instantiated and wired together. Finally, the startup time of a program is greatly reduced since everything is known in advance, such program can even be further optimized with ahead of time compilation solutions like GraalVM...
The framework has been designed to build highly modular applications using standard Java modules. An Inverno module supports encapsulation, it only exposes the beans that need to be exposed, and it clearly specifies the dependencies it requires to operate properly. This greatly improves program stability over time and simplifies the use of a module. Since an Inverno module has a very small runtime footprint it can also be easily integrated in any application.
Creating an Inverno module
An Inverno module is a regular Java module, that requires io.inverno.core modules, and which is annotated with @Module annotation. The following hello module is a simple Inverno module:
@io.inverno.core.annotation.Module
module io.inverno.example.hello {
    requires io.inverno.core;
}
An Inverno bean can be a regular Java class annotated with @Bean annotation. A bean represents the basic building block of an application which is typically composed of multiple interconnected beans instances. The following HelloService bean can be used to create a basic application:
package io.inverno.example.hello;

import io.inverno.core.annotation.Bean;

@Bean
public class HelloService {

    public HelloService() {}

    public void sayHello(String name) {
        System.out.println("Hello " + name + "!!!");
    }
}
At compile time, the Inverno framework will generate a module class named after the module, io.inverno.example.hello.Hello in our example. This class contains all the logic required to instantiate and wire the application beans at runtime. It can be used in a Java program to access and use the HelloService. This program can be in the same Java module or in any other Java module which requires module io.inverno.example.hello:
package io.inverno.example.hello;

import io.inverno.core.v1.Application;

public class Main {

    public static void main(String[] args) {
        Hello hello = Application.with(new Hello.Builder()).run();

        hello.helloService().sayHello(args[0]);
    }
}
Building and running with Maven
The development of an Inverno module is pretty easy using Apache Maven, you simply need to create a standard Java project that inherits from io.inverno.dist:inverno-parent project and declare a dependency to io.inverno:inverno-core:
<!-- pom.xml -->
<project xmlns="http://maven.apache.org/POM/4.0.0"
    xmlns:xsi="http://www.w3.org/2001/XMLSchema-instance"
    xsi:schemaLocation="http://maven.apache.org/POM/4.0.0 http://maven.apache.org/xsd/maven-4.0.0.xsd">
    <modelVersion>4.0.0</modelVersion>
    <parent>
        <groupId>io.inverno.dist</groupId>
        <artifactId>inverno-parent</artifactId>
        <version>1.13.0</version>
    </parent>
    <groupId>io.inverno.example</groupId>
    <artifactId>hello</artifactId>
    <version>1.0.0-SNAPSHOT</version>

    <dependencies>
        <dependency>
            <groupId>io.inverno</groupId>
            <artifactId>inverno-core</artifactId>
        </dependency>
    </dependencies>
</project>
Java source files for io.inverno.example.hello module must be placed in src/main/java directory, the module can then be built using Maven:
$ mvn install
You can then run the application:
$ mvn inverno:run -Dinverno.run.arguments=John

[INFO] --- inverno-maven-plugin:1.6.0:run (default-cli) @ app-hello ---
[INFO] Running project: io.inverno.example.hello@1.0.0-SNAPSHOT...
Hello John!!!
Building and running with pure Java
You can also choose to build your Inverno module using pure Java commands. Assuming Inverno framework modules are located under lib/ directory and Java source files for io.inverno.example.hello module are placed in src/io.inverno.example.hello directory, you can build the module with the javac command:
$ javac --processor-module-path lib/ --module-path lib/ --module-source-path src/ -d jmods/ --module io.inverno.example.hello
The application can then be run as follows:
$ java --module-path lib/:jmods/ --module io.inverno.example.hello/io.inverno.example.hello.Main John
Hello John!!!
Inverno Modules
![]()
The Inverno modules framework project provides a collection of components for building highly modular and powerful applications on top of the Inverno IoC/DI framework.
While being fully integrated, any of these modules can also be used individually in any application thanks to the high modularity and low footprint offered by the Inverno framework.
The objective is to provide a complete consistent set of high-end tools and components for the development of fast and maintainable applications.
Using a module
Modules can be used in an Inverno module by defining dependencies in the module descriptor. For instance, you can create a Web application module using the boot and web-server modules:
@io.inverno.core.annotation.Module
module io.inverno.example.webApp {
    requires io.inverno.mod.boot;
    requires io.inverno.mod.web.server;
}
A simple microservice application can then be created in a few lines of code as follows:
import io.inverno.core.annotation.Bean;
import io.inverno.core.v1.Application;
import io.inverno.mod.base.resource.MediaTypes;
import io.inverno.mod.web.server.annotation.WebController;
import io.inverno.mod.web.server.annotation.WebRoute;

@Bean
@WebController
public class MainController {

    @WebRoute( path = "/message", produces = MediaTypes.TEXT_PLAIN)
    public String getMessage() {
        return "Hello, world!";
    }

    public static void main(String[] args) {
        Application.with(new WebApp.Builder()).run();
    }
}
Please refer to Inverno distribution for detailed setup and installation instructions.
Comprehensive reference documentations are available for Inverno core and Inverno modules.
Several example projects showing various features are also available in the Inverno example project. They can also be used as templates to start new Inverno application or component projects.
Feel free to report bugs and feature requests in GitHub's issue tracking system if you ran in any issue or wish to see some new functionalities implemented in the framework.
List of modules
The framework currently provides the following modules.
io.inverno.mod.base
The Inverno base module defines foundational APIs of the Inverno framework modules:
- Conversion API used to convert objects from/to other objects
- Concurrent API defining the reactive threading model API
- Net API providing URI manipulation as well as low level network client and server utilities
- Reflect API for manipulating parameterized type at runtime
- Resource API to read/write any kind of resources (e.g. file, zip, jar, classpath, module...)
io.inverno.mod.boot
The Inverno boot module provides base services to an application:
- the reactor which defines the reactive threading model of an application
- a net service used for the implementation of optimized network clients and servers
- a media type service used to determine resource media types
- a resource service used to access resources based on URIs
- a basic set of converters to decode/encode JSON, parameters (string to primitives or common types), media types (text/plain, application/json, application/x-ndjson...)
- a worker thread pool used to execute tasks asynchronously
- a JSON reader/writer
io.inverno.mod.configuration
The Inverno configuration module defines an application configuration API providing great customization and configuration features to multiple parts of an application (e.g. system configuration, multitenant configuration, user preferences...).
This module also introduces the .cprops configuration file format which facilitates the definition of complex parameterized configuration.
In addition, it also provides implementations for multiple configuration sources:
- a command line configuration source used to load configuration from command line arguments
- a map configuration source used to load configuration stored in map in memory
- a system environment configuration source used to load configuration from environment variables
- a system properties configuration source used to load configuration from system properties
- a
.propertiesfile configuration source used to load configuration stored in a.propertiesfile - a
.cpropsfile configuration source used to load configuration stored in a.cpropsfile - a Redis configuration source used to load/store configuration from/to a Redis data store with supports for configuration versioning
- a composite configuration source used to combine multiple sources with support for smart defaulting
- an application configuration source used to load the system configuration of an application from a set of common configuration sources in a specific order, for instance: command line, system properties, system environment, local
configuration.cpropsfile andconfiguration.cpropsfile resource in the application module
Configurations are defined as simple interfaces in a module which are processed by the Inverno compiler to generate configuration loaders and beans to make them available in an application with no further effort.
io.inverno.mod.discovery
The Inverno discovery module defines the foundational API for service discovery. At its center, the discovery service is used to resolve specific network services from URI identifiers. Requests are submitted to these services whose role is to assign them to the right service instances based on routing rules and/or load balancing strategies.
The module provides supporting classes to ease the development of discovery service implementation, it especially provides:
- base DNS discovery service implementation for resolving services from a hostname using DNS lookup
- base configuration discovery service implementation for resolving services from a specific service descriptor stored in a configuration source
- caching discovery service wrapper for automatically caching and refreshing resolved services
- composite discovery service which combines multiple discovery services into one
- base traffic load balancer implementations for random and round-robin strategies with support for weighted or non-weighted service instances
io.inverno.mod.discovery.http
The Inverno discovery HTTP module specializes the Discovery API for HTTP service resolution by defining a specific HTTP traffic policy and shipping extra least requests and minimum load factor load balancing strategies. It also provides a DNS HTTP discovery service bean for resolving HTTP services through DNS lookup.
The module can be used jointly with the Web client module in order to resolve standard HTTP URIs (i.e. http://, https://, ws:// or wss://).
io.inverno.mod.discovery.http.k8s
The Inverno discovery HTTP Kubernetes module provides discovery service beans resolving HTTP services deployed in a Kubernetes cluster.
It currently exposes an environment based discovery service implementation which resolves service inet socket address (i.e. host and port) from the environment variables defined by Kubernetes for each service in the cluster pods (i.e. <SERVICE_NAME>_SERVICE_HOST and <SERVICE_NAME>_SERVICE_PORT_HTTP).
The module can be used jointly with the Web client module in order to resolve HTTP services from k8s-env://<SERVICE_NAME> URIs in a Kubernetes cluster.
io.inverno.mod.discovery.http.meta
The Inverno discovery HTTP meta module specifies the HTTP meta service which, as its name suggest, allows to combine several other HTTP services into one by routing requests whose content (path, method, content type, headers, query parameters...) matches specific rules to the corresponding service. It also supports request rewriting, including path, request/response headers and query parameters, as well as cross-service load balancing (i.e. load balance requests among multiple services).
The module exposes a configuration based HTTP meta discovery service which resolves HTTP meta service descriptors from a configuration source.
The module can be used jointly with the Web client module in order to resolve HTTP services from conf://<SERVICE_NAME> URIs.
io.inverno.mod.grpc.base
The Inverno gRPC base module provides the foundational API as well as common services for developing gRPC clients and servers, such as message compressors (e.g. gzip, deflate, snappy...).
io.inverno.mod.grpc.client
The Inverno gRPC client module provides a service to convert HTTP client exchange into gRPC client exchanges supporting the gRPC protocol over HTTP/2.
It supports the following features:
- unary, client streaming, server streaming and bidirectional streaming service methods as defined in [gRPC core concepts][]
- metadata encoding and decoding
- RPC cancellation
- message compression (
gzip,deflate,snappy)
Inverno tools provide a gRPC Protocol buffer compiler plugin for generating client stubs for each service definition.
io.inverno.mod.grpc.server
The Inverno gRPC server module provides a service to convert gRPC server exchange handlers supporting the gRPC protocol over HTTP/2 into HTTP server exchange handlers that can be injected in the HTTP server controller or Web routes to expose gRPC endpoints.
It supports the following features:
- unary, client streaming, server streaming and bidirectional streaming service methods as defined in [gRPC core concepts][]
- metadata encoding and decoding
- RPC cancellation
- message compression (
gzip,deflate,snappy)
Inverno tools provide a gRPC Protocol buffer compiler plugin for generating Web routes configurers for each service definition.
io.inverno.mod.http.base
The Inverno HTTP base module provides the foundational API as well as common services for HTTP client and server development, such as an extensible HTTP header service used to decode and encode HTTP headers.
It also provides a generic router API used to create routers to best match an input to a resource based on some set of criteria. This API is especially used in the Web server module for routing Web exchange to Web exchange handlers or in the Web client module for resolving interceptors.
io.inverno.mod.http.client
The Inverno HTTP client module provides a fully reactive HTTP/1.x and HTTP/2 client implementation based on Netty.
It supports the following features:
- SSL
- HTTP compression/decompression
- HTTP/2 over cleartext upgrade
- URL encoded form data
- Multipart form data
- WebSocket
io.inverno.mod.http.server
The Inverno HTTP server module provides a fully reactive HTTP/1.x and HTTP/2 server implementation based on Netty.
It supports the following features:
- SSL
- HTTP compression/decompression
- Server-sent events
- HTTP/2 over cleartext upgrade
- URL encoded form data
- Multipart form data
- WebSocket
io.inverno.mod.irt
The Inverno Reactive Template module provides a reactive template engine including:
- reactive, near zero-copy rendering
- statically types template generated by the Inverno compiler at compile time
- pipes for data transformation
- functional syntax inspired from XSLT and Erlang on top of the Java language that perfectly embraces reactive principles
io.inverno.mod.ldap
The Inverno LDAP module specifies a reactive API for querying LDAP servers. It also includes a basic LDAP client implementation based on the JDK. It supports bind and search operations.
io.inverno.mod.redis
The Inverno Redis client module specifies a reactive API for executing Redis commands on a Redis data store. It supports:
- batch queries
- transaction
io.inverno.mod.redis.lettuce
The Inverno Redis client Lettuce implementation module provides Redis implementation on top of Lettuce async pool.
It also provides a Redis Client bean backed by a Lettuce client and created using the module's configuration. It can be used as is to send commands to a Redis data store.
io.inverno.mod.security
The Inverno Security module specifies an API for authenticating request to an application and controlling the access to protected services or resources. It provides:
- User/password authentication against a user repository (in-memory, Redis...).
- Token based authentication.
- Session-based authentication.
- Strong user identification against a user repository (in-memory, Redis...).
- Secured password encoding using message digest, Argon2, Password-Based Key Derivation Function (PBKDF2), BCrypt, SCrypt...
- Role-based access control.
- Permission-based access control.
io.inverno.mod.security.http
The Inverno Security HTTP module is an extension to the Inverno Security module that provides a specific API and base implementations for securing applications accessed via HTTP. It provides supports for:
- HTTP basic authentication scheme.
- HTTP digest authentication scheme.
- Form based authentication.
- Cross-origin resource sharing support CORS.
- Protection against Cross-site request forgery attack CSRF.
io.inverno.mod.security.ldap
The Inverno Security LDAP module is an extension to the Inverno Security module that provides support for authentication and identification against LDAP and Active Directory servers.
io.inverno.mod.security.jose
The Inverno Security JOSE module is a complete implementation of JSON Object Signing and Encryption RFCs. It provides:
- a JWK service used to manipulate JSON Web Key as specified by RFC 7517 and RFC 7518.
- a JWS service used to create and validate JWS tokens as specified by RFC 7515.
- a JWE service used to create and decrypt JWE tokens as specified by RFC 7516.
- a JWT service used to create, validate or decrypt JSON Web Tokens as JWS or JWE as specified by RFC 7519.
- JWS and JWE compact and JSON representations support.
- JSON Web Key Thumbprint support as specified by RFC 7638.
- support for JWS Unencoded Payload Option as specified by RFC 7797.
- CFRG Elliptic Curve Diffie-Hellman (ECDH) and Signatures support as specified by RFC 8037.
- CBOR Object Signing and Encryption (COSE) as specified by RFC 8812.
io.inverno.mod.session
The Inverno Session module specifies an API for managing session that persist across more than one request to an application. It provides:
- Basic session support with data stored on the application side.
- JWT session support allowing a hybrid approach where stateless data can be stored in a JWT used as session identifier on the client side along with basic session data on the application side.
- In-memory and Redis session store implementations.
io.inverno.mod.session.http
The Inverno Session HTTP module is an extension to the Inverno Session module that provides specific API and components to support session in a Web application.
io.inverno.mod.sql
The Inverno SQL client module specifies a reactive API for executing SQL statements on a RDBMS. It supports:
- prepared statement
- batch execution
- transaction
io.inverno.mod.sql.vertx
The Inverno SQL client Vert.x implementation module provides SQL Client implementations on top of Vert.x pool and pooled client.
It also exposes a pool based Sql Client bean created using the module's configuration that can be used as is to query a RDBMS.
io.inverno.mod.web.base
The Inverno Web base module provides the foundational API as well as common services for Web client and server development, such as a data conversion service used to create inbound data decoder and outbound data encoder for respectively decoding and encoding HTTP or WebSocket payloads based on their media types.
It also defines common request parameter binding annotations for creating declarative Web client or Web server routes.
io.inverno.mod.web.client
The Inverno Web client module provides advanced features on top of the HTTP client module, including:
- path parameters
- exchange interceptors based on path, path pattern, HTTP method, request and response content negotiation including request and response content type and language of the response.
- seamless payload conversion from raw representation (arrays of bytes) to Java objects based on request or response content type as well as WebSocket subprotocol
- seamless parameter (path, cookie, header, query...) conversion from string to Java objects
- a complete set of annotations for creating declarative Web clients
Web clients can be created in a declarative way using annotations which are processed by the Inverno compiler to generate the Web client implementation and expose a corresponding bean in the module.
io.inverno.mod.web.server
The Inverno Web server module provides advanced features on top of the HTTP server module, including:
- path parameters
- request routing based on path, path pattern, HTTP method, request and response content negotiation including request and response content type and language of the response.
- exchange interceptors based on path, path pattern, HTTP method, request and response content negotiation including request and response content type and language of the response.
- transparent payload conversion from raw representation (arrays of bytes) to Java objects based on request or response content type as well as WebSocket subprotocol
- transparent parameter (path, cookie, header, query...) conversion from string to Java objects
- static resource handler to serve static resources from various location based on the resource API
- a complete set of annotations for creating declarative REST controllers
REST controllers can be created in a declarative way using annotations which are processed by the Inverno compiler to generate corresponding Web server routes and register them in the Web server. The compiler also performs some static checks to make sure routes are defined properly and that there are no conflicting routes.
Inverno Tools
![]()
The Inverno framework provides tools for running and building modular Java applications and Inverno applications in particular. It allows for instance to create native runtime and application images providing all the dependencies required to run a modular application. It is also possible to build Docker and OCI images, install them on a local Docker daemon or deploy them on remote registry.
Inverno Build Tools
The Inverno Build Tools is a Java module exposing an API for running, packaging and distributing fully modular applications.
Inverno Maven Plugin
The Inverno Maven Plugin is a Maven plugin based on the Inverno Build tools module which provides multiple goals to:
- run or debug a modular Java application project.
- start/stop a modular Java application during the build process to execute integration tests.
- build native runtime image containing a set of modules and their dependencies creating a light Java runtime.
- build native application image containing an application and all its dependencies into an easy to install platform dependent package (e.g.
.deb,.rpm,.dmg,.exe,.msi...). - build docker or OCI images of an application into a tarball, a Docker daemon or a remote container image registry.
The plugin requires JDK 15+ and Apache Maven 3.6.0 or later.
Inverno gRPC Protocol Buffer compiler plugin
The Inverno gRPC Protoc plugin is a Protocol Buffer plugin for generating Inverno gRPC client and server stubs from Protocol Buffer service definitions.
Inverno Distribution
![]()
The Inverno distribution provides a parent POM io.inverno.dist:inverno-parent and a BOM io.inverno.dist:inverno-dependencies for developing Inverno components and applications.
The parent POM inherits from the BOM which inherits from the Inverno OSS parent POM. It provides basic build configuration for building Inverno components and applications, including dependency management and plugins configuration. It especially includes configuration for the Inverno Maven plugin.
The BOM specifies the Inverno core and Inverno modules dependencies as well as OSS dependencies.
The Inverno distribution thus defines a consistent sets of dependencies and configuration for developing, building, packaging and distributing Inverno components and applications. Upgrading the Inverno framework version of a project boils down to upgrade the Inverno distribution version which is the version of the Inverno parent POM or the Inverno BOM.
Requirements
The Inverno framework requires JDK 21 or later and Apache Maven 3.6.0 or later.
The Inverno compiler (when displaying bean dependency cycles), the Inverno tools (when displaying the progress bar) and the standard application banner (displayed when bootstrapping an Inverno application) output Unicode characters which are supported out of the box by Linux or macOS terminals but unfortunately not by the Windows terminal for which the Unicode support must be enabled explicitly, this can be done in Regional Settings > Administrative > Change System Local > Use Unicode UTF-8 for worldwide language support. Another viable solution is to use the Git bash on Windows which also supports Unicode out of the box. Please note that this is purely cosmetic and has no impact on the applications.
Creating an Inverno project
The recommended way to start a new Inverno project is to create a Maven project which inherits from the io.inverno.dist:inverno-parent project, we might also want to add a dependency to io.inverno:inverno-core in order to create an Inverno module with IoC/DI:
<project xmlns="http://maven.apache.org/POM/4.0.0"
    xmlns:xsi="http://www.w3.org/2001/XMLSchema-instance"
    xsi:schemaLocation="http://maven.apache.org/POM/4.0.0 http://maven.apache.org/xsd/maven-4.0.0.xsd">
    <modelVersion>4.0.0</modelVersion>
    <parent>
        <groupId>io.inverno.dist</groupId>
        <artifactId>inverno-parent</artifactId>
        <version>1.13.0</version>
    </parent>
    <groupId>io.inverno.example</groupId>
    <artifactId>sample-app</artifactId>
    <version>1.0.0-SNAPSHOT</version>

    <dependencies>
        <dependency>
            <groupId>io.inverno</groupId>
            <artifactId>inverno-core</artifactId>
        </dependency>
    </dependencies>
</project>
That is all we need to develop, run, build, package and distribute a basic Inverno component or application. The Inverno parent POM provides dependency management and Java compiler configuration to invoke the Inverno compiler during the build process as well as Inverno tools configuration to be able to run and package the Inverno component or application.
If it is not possible to inherit from the Inverno parent POM, we can also declare the Inverno BOM io.inverno.dist:inverno-dependencies in the <dependencyManagement/> section to benefit from dependency management but loosing plugins configuration which must then be recovered from the Inverno parent POM.
<project>
    <dependencyManagement>
        <dependencies>
            <dependency>
                <groupId>io.inverno.dist</groupId>
                <artifactId>inverno-dependencies</artifactId>
                <version>1.13.0</version>
                <type>pom</type>
                <scope>import</scope>
            </dependency>
        </dependencies>
    </dependencyManagement>
</project>
Inverno modules dependencies can be added in the <dependencies/> section of the project POM. For instance the following dependencies can be added to develop a REST microservice application:
<project>
    <dependencies>
        <dependency>
            <groupId>io.inverno.mod</groupId>
            <artifactId>inverno-boot</artifactId>
        </dependency>
        <dependency>
            <groupId>io.inverno.mod</groupId>
            <artifactId>inverno-web-server</artifactId>
        </dependency>
    </dependencies>
</project>
Please refer to the Inverno core documentation and Inverno modules documentation to learn how to develop with IoC/DI and how to use Inverno modules.
Developing a simple Inverno application
We can now start developing a sample REST application. An Inverno component or application is a regular Java module annotated with @io.inverno.core.annotation.Module, so the first thing we need to do is to create Java module descriptor module-info.java under src/main/java which is where Maven finds the sources to compile.
@io.inverno.core.annotation.Module
module io.inverno.example.sample_app {
    requires io.inverno.mod.boot;
    requires io.inverno.mod.web.server;
}
Note that we declared the io.inverno.mod.boot and io.inverno.mod.web.server module dependencies since we want to create a REST application, please refer to the Inverno modules documentation to learn more.
We then can create the main class of our sample REST application in src/main/java/io/inverno/example/sample_app/App.java:
package io.inverno.example.sample_app;

import io.inverno.core.annotation.Bean;
import io.inverno.core.v1.Application;
import io.inverno.mod.base.resource.MediaTypes;
import io.inverno.mod.web.server.annotation.WebController;
import io.inverno.mod.web.server.annotation.WebRoute;

@Bean
@WebController
public class App {

    @WebRoute( path = "/message", produces = MediaTypes.TEXT_PLAIN)
    public String getMessage() {
        return "Hello, world!";
    }

    public static void main(String[] args) {
        Application.with(new Sample_app.Builder()).run();
    }
}
Configuring logging
Inverno framework is using Log4j 2 for logging, Inverno application logging can be activated by adding the dependency to org.apache.logging.log4j:log4j-core:
<project>
    <dependencies>
        <dependency>
            <groupId>org.apache.logging.log4j</groupId>
            <artifactId>log4j-core</artifactId>
        </dependency>
    </dependencies>
</project>
If you don't include this dependency at runtime, Log4j falls back to the
SimpleLoggerimplementation provided with the API and configured usingorg.apache.logging.log4j.simplelog.*system properties. The log level can then be configured by setting-Dorg.apache.logging.log4j.simplelog.level=INFOsystem property when running the application.
Log4j 2 provides a default configuration with a default root logger level set to ERROR, resulting in no info messages being output when starting an application. This can be changed by setting -Dorg.apache.logging.log4j.level=INFO system property when running the application.
However, the recommended way is to provide a specific log4j2.xml logging configuration file in the project resources under src/main/resources:
<?xml version="1.0" encoding="UTF-8"?>
<Configuration xmlns="http://logging.apache.org/log4j/2.0/config"
    xmlns:xsi="http://www.w3.org/2001/XMLSchema-instance"
    xsi:schemaLocation="http://logging.apache.org/log4j/2.0/config https://raw.githubusercontent.com/apache/logging-log4j2/rel/2.14.0/log4j-core/src/main/resources/Log4j-config.xsd"
    status="WARN" shutdownHook="disable">

    <Appenders>
        <Console name="LogToConsole" target="SYSTEM_OUT">
             <PatternLayout pattern="%d{DEFAULT} %highlight{%-5level} [%t] %c{1.} - %msg%n%ex"/>
        </Console>
    </Appenders>
    <Loggers>
        <Root level="info">
            <AppenderRef ref="LogToConsole"/>
        </Root>
    </Loggers>
</Configuration>
Note that the Log4j shutdown hook must be disabled so as not to interfere with the Inverno application shutdown hook, if it is not disabled, application shutdown logs might be dropped.
We could have chosen to provide a default logging configuration in the Inverno framework itself, but we preferred to stick to standard Log4j 2 configuration rules in order to keep things simple so please refer to the Log4j 2 configuration documentation to learn how to configure logging.
Running the application
The application is now ready and can be run using the inverno:run goal:
$ mvn inverno:run

...
[INFO] --- inverno:1.6.0:run (default-cli) @ sample-app ---
2025-01-06 13:55:28,417 INFO  [main] i.i.c.v.Application - Inverno is starting...                    ] Running project...


     ╔════════════════════════════════════════════════════════════════════════════════════════════╗
     ║                      , ~~ ,                                                                ║
     ║                  , '   /\   ' ,                                                            ║
     ║                 , __   \/   __ ,      _                                                    ║
     ║                ,  \_\_\/\/_/_/  ,    | |  ___  _    _  ___   __  ___   ___                 ║
     ║                ,    _\_\/_/_    ,    | | / _ \\ \  / // _ \ / _|/ _ \ / _ \                ║
     ║                ,   __\_/\_\__   ,    | || | | |\ \/ /|  __/| | | | | | |_| |               ║
     ║                 , /_/ /\/\ \_\ ,     |_||_| |_| \__/  \___||_| |_| |_|\___/                ║
     ║                  ,     /\     ,                                                            ║
     ║                    ,   \/   ,                                  -- 1.6.0 --                 ║
     ║                      ' -- '                                                                ║
     ╠════════════════════════════════════════════════════════════════════════════════════════════╣
     ║ Java runtime        : OpenJDK Runtime Environment                                          ║
     ║ Java version        : 21.0.2+13-58                                                         ║
     ║ Java home           : /home/jkuhn/Devel/jdk/jdk-21.0.2                                     ║
     ║                                                                                            ║
     ║ Application module  : io.inverno.example.sample_app                                        ║
     ║ Application version : 1.0.0-SNAPSHOT                                                       ║
     ║ Application class   : io.inverno.example.sample_app.App                                    ║
     ║                                                                                            ║
     ║ Modules             :                                                                      ║
     ║  * ...                                                                                     ║
     ╚════════════════════════════════════════════════════════════════════════════════════════════╝


2025-01-06 13:55:28,428 INFO  [main] i.i.e.s.Sample_app - Starting Module io.inverno.example.sample_app...
2025-01-06 13:55:28,429 INFO  [main] i.i.m.b.Boot - Starting Module io.inverno.mod.boot...
2025-01-06 13:55:28,652 INFO  [main] i.i.m.b.Boot - Module io.inverno.mod.boot started in 222ms
2025-01-06 13:55:28,652 INFO  [main] i.i.m.w.s.Server - Starting Module io.inverno.mod.web.server...
2025-01-06 13:55:28,653 INFO  [main] i.i.m.h.s.Server - Starting Module io.inverno.mod.http.server...
2025-01-06 13:55:28,653 INFO  [main] i.i.m.h.b.Base - Starting Module io.inverno.mod.http.base...
2025-01-06 13:55:28,658 INFO  [main] i.i.m.h.b.Base - Module io.inverno.mod.http.base started in 4ms
2025-01-06 13:55:28,670 INFO  [main] i.i.m.w.b.Base - Starting Module io.inverno.mod.web.base...
2025-01-06 13:55:28,670 INFO  [main] i.i.m.h.b.Base - Starting Module io.inverno.mod.http.base...
2025-01-06 13:55:28,671 INFO  [main] i.i.m.h.b.Base - Module io.inverno.mod.http.base started in 0ms
2025-01-06 13:55:28,672 INFO  [main] i.i.m.w.b.Base - Module io.inverno.mod.web.base started in 1ms
2025-01-06 13:55:28,724 INFO  [main] i.i.m.h.s.i.HttpServer - HTTP Server (nio) listening on http://0.0.0.0:8080
2025-01-06 13:55:28,725 INFO  [main] i.i.m.h.s.Server - Module io.inverno.mod.http.server started in 72ms
2025-01-06 13:55:28,725 INFO  [main] i.i.m.w.s.Server - Module io.inverno.mod.web.server started in 72ms
2025-01-06 13:55:28,779 INFO  [main] i.i.e.s.Sample_app - Module io.inverno.example.sample_app started in 358ms
2025-01-06 13:55:28,779 INFO  [main] i.i.c.v.Application - Application io.inverno.example.sample_app started in 411ms
We can now test the application:
$ curl http://127.0.0.1:8080/message
Hello, world!
The application can be gracefully shutdown by pressing Ctrl-c.
Packaging the application image
In order to create a native image containing the application and all its dependencies including JDK's dependencies, we can simply invoke the inverno:package-app goal:
$ mvn inverno:package-app

...
 [INFO] --- inverno:1.6.0:package-app (default-cli) @ sample-app ---
[INFO] Building application image: /home/jkuhn/Devel/git/frmk/io.inverno.example.sample-app/target/maven-inverno/application_linux_amd64/sample-app-1.0.0-SNAPSHOT...
 [═════════════════════════════════════════════  69 % ═══════════════>                            ] Packaging project application...
This uses
jpackagetool which is an incubating feature in JDK<16, if you intend to build an application image with an old JDK, you'll need to explicitly add thejdk.incubator.jpackagemodule inMAVEN_OPTS:$ export MAVEN_OPTS="--add-modules jdk.incubator.jpackage"
This will create a ZIP archive containing a native application distribution target/sample-app-1.0.0-SNAPSHOT-application_linux_amd64.zip which will be deployed to the local Maven repository and eventually to a remote Maven repository.
Then in order to install the application on a compatible platform, we just need to download the archive corresponding to the platform, extract it to some location and run the application. Luckily for us this can be done quite easily with Maven dependency plugin:
$ mvn dependency:unpack -Dartifact=io.inverno.example:sample-app:1.0.0-SNAPSHOT:zip:application_linux_amd64 -DoutputDirectory=./
...
$ ./sample-app-1.0.0-SNAPSHOT/bin/sample-app
...
It is also possible to package platform specific application distribution in .deb or .msi package formats and/or zip archive format by defining particular package and/or archive formats in the Inverno Maven plugin configuration:
<project>
    <build>
        <plugins>
            <plugin>
                <groupId>io.inverno.tool</groupId>
                <artifactId>inverno-maven-plugin</artifactId>
                <executions>
                    <execution>
                        <id>package-app</id>
                        <phase>package</phase>
                        <goals>
                            <goal>package-app</goal>
                        </goals>
                        <configuration>
							<packageTypes>
								<packageType>deb</packageType>
							</packageTypes>
                            <archiveFormats>
                                <archiveFormat>zip</archiveFormat>
                            </archiveFormats>
                        </configuration>
                    </execution>
                </executions>
            </plugin>
        </plugins>
    </build>
</project>
$ mvn install
...
Note that there is no cross-platform support and a given platform specific format must be built on the platform it runs on.
Such platform-specific package can then be downloaded and installed using the right package manager:
$ mvn dependency:copy -Dartifact=io.inverno.example:sample-app:1.0.0-SNAPSHOT:deb:application_linux_amd64 -DoutputDirectory=./
...
$ sudo dpkg -i sample-app-1.0.0-SNAPSHOT-application_linux_amd64.deb
...
Inverno Core
Motivation
Inversion of Control and Dependency Injection principles are not new and many Java applications have been developed following these principles over the past two decades using frameworks such as Spring, CDI, Guice... however these recognized solutions might have some issues in practice especially with the way Java has evolved and how applications should be developed nowadays.
Dependency injection errors like a missing dependency or a cycle in the dependency graph are often reported at runtime when the application is started. Most of the time these issues are easy to fix but when considering big applications split into multiple modules developed by different people, it might become more complex. In any case you can't tell for sure if an application will start before you actually start it.
Most IoC/DI frameworks are black boxes, often considered as magical because one gets beans instantiated and wired altogether without understanding what just happened, and it is indeed quite hard to figure out how it actually works. This is not a problem as long as everything works as expected, but it can become one when you actually need to troubleshoot a failing application.
Beans instantiation and wiring are done at runtime using Java reflection which offers all the advantages of Java dynamic linking at the expense of some performance overhead. Classpath scanning, instantiation and wiring process indeed takes some time and prevents just-in-time compilation optimization making application startup quite slow.
Although IoC frameworks make the development of modular applications easier, they often require a rigorous methodology to make it the right way. For instance, you must know precisely what components are provided and/or required by all the modules composing an application and make sure one doesn't provide a component that might interfere with another.
These points are very high level, please have a look at this article if you like to learn more about the general ideas behind the Inverno framework. The Inverno framework proposes a new approach of IoC/DI principles consistent with latest developments of the Java™ platform and perfectly adapted to the development of modern applications in Java.
Prerequisites
In this documentation, we’ll assume that you have a working knowledge of Inversion of Control and Dependency Injection principles as well as Object-Oriented Programming.
Overview
The Inverno framework is different in many ways and tries to address previous issues. Its main difference is that it doesn't rely on Java reflection at all to instantiate the beans composing an application (IoC) and wire them together (DI), this is actually done by a class generated by the Inverno compiler at compile time.
Since beans and their dependencies are determined at compile time, errors can be raised precisely when they make sense during development or at build time.
There is also no need for complex runtime libraries since the complexity is handled by the compiler which generates a readable class providing only what is required at runtime. This presents two advantages, first applications have a small footprint and start fast since most of the processing is already done and no reflection is involved. Secondly you will be able to actually debug all parts of your application since nothing is hidden behind a complex library, you can actually see when the beans are instantiated with the new operator opening rooms to other compile and runtime optimization as well.
The framework also fully embraces the modular system introduced in Java 9 which basically imposes to develop with modularity in mind. An Inverno module only exposes the beans that must be exposed to other modules, and it clearly indicates the beans it requires to operate. All this makes modular development safer, clearer and more natural.
Modules and Beans
Inversion of control and dependency injection principles have proven to be an elegant and efficient way to create applications in an Object-Oriented Programming language. A Java application basically consists in a set of interconnected objects.
An Inverno application adds a modular dimension to these principles, the objects or the beans composing the application are created and connected in one or more isolated modules which are themselves composed in the application.
A module encapsulates several beans and possibly other modules. It specifies the dependencies it needs to operate and only exposes the beans that need to be exposed from the module perspective. As a result it is isolated from the rest of the application, it is unaware of how and where it is used, and it actually doesn't care as long as its requirements are met. It really resembles a class which makes it very familiar to use.
A bean is a component of a module and more widely an application. It has required and optional dependencies provided by the module when a bean instance is created.
The Inverno compiler is an annotation processor which runs inside the Java compiler and generates module classes based on Inverno annotations found on the modules and classes being compiled.
Java module system
Before you can create your first Inverno module, you must first understand what a Java module is and how it might change your life as a Java developer. If you are already familiar with it, you can skip that section and go directly to the project setup section.
The Java module system has been introduced in Java 9 mostly to modularize the overgrowing Java runtime library which is now split into multiple interdependent modules loaded when you need them at runtime or compile time. This basically means that the size of the Java runtime you need to compile and/or run your application now depends on your application's needs which is a pretty big improvement.
If you know OSGI or Maven already, you might say that modules have existed in Java for a long time, but now they are fully integrated into the language, the compiler and the runtime. You can create a Java module, specify what packages are exposed and what dependencies are required and the good part is that both the compiler and JVM tell you when you do something wrong being as close as possible to the code, there’s no more xml or manifest files to care about.
So how do you create a Java module? There is plenty of documentation you can read to have a complete and deep understanding of the Java module system, here we will only explain what you need to know to develop regular Inverno modules.
A Java module is specified in a module-info.java file located in the default package. Let's assume you want to create module io.inverno.example.sample, you can create the following file structure:
src
└── io.inverno.example.sample
    ├── io
    │   └── inverno
    │       └── example
    │           └── sample
    │               ├── internal
    │               │   └── ...
    │               └── ...
    └── module-info.java
This is one way to organize the code, the only important thing is to put the
module-info.javadescriptor in the default package.
Now let's have a closer look at the module descriptor:
module io.inverno.example.sample {      // 1
    exports io.inverno.example.sample;  // 2
}
- A module is declared using a familiar syntax starting with the
modulekeyword followed by the name of the module which must be a valid Java name. - The
io.inverno.example.samplemodule exports theio.inverno.example.samplepackage which means that other modules can only access public types contained in that package. Any type defined in another package within that module is only visible from within the module following usual Java visibility rules (default, public, protected, private). This basically defines a new level of encapsulation at module level. For instance, types in packageio.inverno.example.sample.internalare not accessible to other modules regardless of their visibility.
Now let's say you need to use some external types defined and exported in another module io.inverno.example.other:
src
├── io.inverno.example.sample
│   ├── ...
│   └── module-info.java
└── io.inverno.example.other
    ├── ...
    └── module-info.java
If you try to reference any of these types in io.inverno.example.sample module as is the compiler will complain with explicit visibility errors unless you specify that io.inverno.example.sample module requires io.inverno.example.other module:
module io.inverno.example.sample {
    requires io.inverno.example.other;

    exports io.inverno.example.sample;
}
You should now be able to reference any public types defined in a package exported in io.inverno.example.other module.
The modular system has also changed the way Java applications are built and run. Before we used to specify a classpath listing the locations where the Java compiler and the JVM should look for application's classes whereas now we should specify a module path listing the locations of modules and forget about the classpath.
If we consider previous modules, they are compiled and run as follows:
> javac --module-source-path src -d jmods --module io.inverno.example.sample --module io.inverno.example.other

> java --module-path jmods/ --module io.inverno.example.sample/io.inverno.example.sample.Sample
There are other subtleties like transitive dependencies, service providers or opened modules and cool features like jmod packaging and the jlink tool but for now that's pretty much all you need to know to develop Inverno modules which are basically instrumented Java modules.
You should now have a basic understanding of how an Inverno application is built and what Java technologies are involved. An Inverno application results from the composition of multiple isolated modules which create and wire the beans making up the application. Almost everything is done at compile time when module classes are generated.
Project Setup
Maven
The easiest way to set up an Inverno module project is to start by creating a regular Java Maven project which inherits from io.inverno.dist:inverno-parent project and depends on io.inverno:inverno-core:
<project xmlns="http://maven.apache.org/POM/4.0.0"
    xmlns:xsi="http://www.w3.org/2001/XMLSchema-instance"
    xsi:schemaLocation="http://maven.apache.org/POM/4.0.0 http://maven.apache.org/xsd/maven-4.0.0.xsd">
    <modelVersion>4.0.0</modelVersion>
    <parent>
        <groupId>io.inverno.dist</groupId>
        <artifactId>inverno-parent</artifactId>
        <version>1.13.0</version>
    </parent>
    <groupId>io.inverno.example</groupId>
    <artifactId>sample</artifactId>
    <version>1.0.0-SNAPSHOT</version>

    ...
    <dependencies>
        ...
        <dependency>
            <groupId>io.inverno</groupId>
            <artifactId>inverno-core</artifactId>
        </dependency>
        ...
    </dependencies>
    ...

</project>
Then you have to add a module descriptor to make it a Java module project. An Inverno module requires io.inverno.core and io.inverno.core.annotation modules. If you want your module to be used in other modules it must also export the package where the module class is generated by the Inverno compiler which is the module name by default. Remember that an Inverno module is materialized in a regular Java class subject to the same rules as any other class in a Java module.
module io.inverno.example.sample {
    requires io.inverno.core;
    requires io.inverno.core.annotation;

    exports io.inverno.example.sample;
}
If you do not want your project to inherit from io.inverno.dist:inverno-parent project, you'll have to explicitly specify compiler source and target version (>=9), dependencies version and configure the Maven compiler plugin to invoke the Inverno compiler.
<project xmlns="http://maven.apache.org/POM/4.0.0"
    xmlns:xsi="http://www.w3.org/2001/XMLSchema-instance"
    xsi:schemaLocation="http://maven.apache.org/POM/4.0.0 http://maven.apache.org/xsd/maven-4.0.0.xsd">
    <modelVersion>4.0.0</modelVersion>
    <groupId>io.inverno.example</groupId>
    <artifactId>sample</artifactId>
    <version>1.0.0-SNAPSHOT</version>

    <properties>
        <project.build.sourceEncoding>UTF-8</project.build.sourceEncoding>
        <maven.compiler.source>11</maven.compiler.source>
        <maven.compiler.target>11</maven.compiler.target>
        <version.inverno>1.6.0</version.inverno>
        <version.inverno.dist>1.13.0</version.inverno.dist>
    </properties>

    <dependencyManagement>
        <dependencies>
            <dependency>
                <groupId>io.inverno.dist</groupId>
                <artifactId>inverno-dependencies</artifactId>
                <version>${version.inverno.dist}</version>
                <type>pom</type>
                <scope>import</scope>
            </dependency>
        </dependencies>
    </dependencyManagement>

    <dependencies>
        <dependency>
            <groupId>io.inverno</groupId>
            <artifactId>inverno-core</artifactId>
        </dependency>
    </dependencies>

    <build>
        <plugins>
            ...
            <plugin>
                <artifactId>maven-compiler-plugin</artifactId>
                <configuration>
                    <annotationProcessorPaths>
                        <path>
                            <groupId>io.inverno</groupId>
                            <artifactId>inverno-core-compiler</artifactId>
                            <version>${version.inverno}</version>
                        </path>
                    </annotationProcessorPaths>
                </configuration>
            </plugin>
            ...
        <plugin>
    </build>
</project>
An Inverno module is built just as a regular Maven project using maven commands (compile, package, install...). The module class is generated and compiled during the compile phase and included in the resulting JAR file during the package phase. If anything related to IoC/DI goes wrong during compilation, the compilation fails with explicit compilation errors reported by the Inverno compiler.
Gradle
Since version 6.4, it is also possible to use Gradle to build Inverno module projects. Here is a sample build.gradle file:
plugins {
    id 'application'
}

repositories {
    mavenCentral()
}

dependencies {
    implementation 'io.inverno:inverno-core:1.6.0'
    annotationProcessor 'io.inverno:inverno-core-compiler:1.6.0'
}

java {
    modularity.inferModulePath = true
    sourceCompatibility = JavaVersion.VERSION_11
    targetCompatibility = JavaVersion.VERSION_11
}

application {
    mainModule = 'io.inverno.example.hello'
    mainClassName = 'io.inverno.example.hello.App'
}
Bean
As you already know, a Java application can be reduced to the composition of objects working together. In an Inverno application, these objects are instantiated and injected into each other by one or more modules. Inside a module, a bean basically specifies what it needs to create a bean instance (DI) and how to obtain it (IoC).
A bean and a bean instance are two different things that should not be confused. A bean can result in multiple bean instances in the application whereas a bean instance always refers to exactly one bean. A bean is like a plan used to create instances.
A bean is fully identified by its name and the module in which it resides. The following notation is used to represent a bean qualified name: [MODULE]:[BEAN]. As a consequence, two beans with the same name cannot exist in the same module, but it is safe to have multiple beans with the same name in different modules.
Module Bean
Module bean is the primary type of beans you can create in an Inverno module. It is defined by a concrete class annotated with the @Bean annotation.
import io.inverno.core.annotation.Bean;

@Bean
public class SomeBean {
    ...
}
In the previous code we created a bean of type SomeBean. At compile time, the Inverno compiler will include it in the generated module class that you'll eventually use at runtime to obtain SomeBean instances.
By default, a bean is named after the simple name of the class starting with a lower case (e.g. someBean in our previous example). This can be specified in the annotation using the name attribute:
@Bean(name="customSomeBean")
public class SomeBean {
    ...
}
Wrapper Bean
A wrapper bean is a particular form of bean used to define beans whose code cannot be instrumented with Inverno annotations or that require more complex logic to create the instance. This is especially the case for legacy code or third party libraries.
A wrapper bean is defined by a concrete class annotated with both @Bean and @Wrapper annotations which basically wraps the actual bean instance and include the instantiation, initialization and destruction logic. It must implement the Supplier<E> interface which specifies the actual type of the bean as formal parameter.
@Wrapper
@Bean
public class SomeWrapperBean implements Supplier<SomeLegacyBean> {

    private SomeLegacyBean instance;

    public SomeWrapperBean() {
        // Creates the wrapped instance
        this.instance = ...
    }

    SomeLegacyBean get() {
        // Returns the wrapped instance
        return this.instance;
    }
    ...
}
In the previous code we created a bean of type SomeLegacyBean. One instance of the wrapper class is used to create exactly one bean instance, and it lives as long as the bean instance is referenced.
Since a wrapper bean is annotated with @Bean annotation, it can be configured in the exact same way as a module bean except that it only applies to the wrapper instance which is responsible to configure the actual bean instance. The wrapper instance is never exposed, only the actual bean instance wrapped in it is exposed. As for module beans, SomeLegacyBean instances can be obtained using the generated Module class.
Note that since a new wrapper instance is created every time a new bean instance is requested, a wrapper class is not required to return a new or distinct result in the
get()method, nonetheless a wrapper instance is used to create, initialize and destroy exactly one instance of the supplied type and as a result it is good practice to have the wrapper instance always return the same bean instance. This is especially true and done naturally when initialization or destruction methods are specified.
When designing a prototype wrapper bean, particular care must be taken to make sure the wrapper does not hold a strong reference to the wrapped instance in order to prevent memory leak when a prototype bean instance is requested by the application. It is strongly advised to rely on
WeakReference<>in that particular use case.
Nested Bean
A nested bean is, as its name suggests, a bean inside a bean. A nested bean instance is obtained by invoking a particular method on another bean instance. Instances thus obtained participate in dependency injection but unlike other types of bean they do not follow any particular lifecycle or strategy, the implementor of the nested bean method is free to decide whether a new instance should be returned on each invocation.
A nested bean is declared in the class of a bean, by annotating a non-void method with no arguments with @NestedBean annotation. The name of a nested bean is given by the name of the bean providing the instance and the name of the annotated method following this notation: [MODULE]:[BEAN].[METHOD_NAME].
@Bean
public class SomeBean {

    ...

    @NestedBean
    public SomeNestedBean nestedBean() {
        ...
    }
}
It is also possible to cascade nested beans.
Mutator Bean
A mutator bean allows to mutate a bean instance injected through a socket bean generated by the Inverno compiler. It is essentially a mutating socket bean with the ability to operate or even replace the injected instance before it is actually wired to the module beans. It is typically used for setting up, instrumenting, decorating or completely transforming an external dependency in order to make it usable by the module beans.
A mutator bean must be defined as class implementing Function<T, R> where <T> represents the socket type, basically the type of the instance to inject in the module, and <R> represents the type of the bean exposed in the module.
@Mutator
@Bean
public class SomeMutatorBean implements Function<ExternalType, InternalType> {

    @Override
    public InternalType apply(ExternalType instance) {...}
}
In above example, the compiled module exposes a socket for injecting a ExternalType instance which is transformed to InternalType by the mutator bean when the module is started. Beans inside the module can then define sockets for injecting the resulting InternalType instance.
By default, the Inverno compiler creates a regular socket bean which is simply ignored when it is not wired and made optional when it is only wired to optional sockets. This behaviour can be changed with the required attribute in order to force the creation of a required socket bean and make sure an instance is always injected and the mutator invoked.
@Mutator( required = true )
@Bean
public class SomeMutatorBean implements Function<ExternalType, InternalType> {

    @Override
    public InternalType apply(ExternalType instance) {...}
}
Being able to force the creation of a required socket bean and the execution of the mutator allows to modify an external object using beans or resources from inside the module which can be particularly useful in some applications composing multiple modules, each of which populates a global object.
Overridable
A module bean or a wrapper bean can be declared as overridable which allows to override the bean inside the module by a socket bean of the same type.
An overridable bean is defined as a module bean or a wrapper bean whose class has been annotated with @Overridable. This basically tells the Inverno compiler to create an extra optional socket bean with the particular feature of being able to take over the bean when an instance is provided on module instantiation.
@Overridable
@Bean
public class SomeBean {

}
Lifecycle
All bean instances follow the subsequent lifecycle in a module:
- A bean instance is created
- It is initialized
- It is active
- It is "eventually" destroyed
Let's examine each of these steps in details.
A bean instance is always created in a module, when a bean instance is created greatly depends on the context in which it is used, it can be created when a module instance is started or when it is required in the application. In order to create a bean instance the module must provide all the dependencies required by the bean. After that it sets any optional dependencies available on the instance thus obtained. This is actually when and where dependency injection takes place, this aspect will be covered more in details in following sections, for now all you have to know is that when requested the module creates a fully wired bean instance.
After that the module invokes initialization methods on the bean instance to initialize it. An initialization method is declared on the bean class using the @Init annotation:
@Bean
public class SomeBean {

    @Init
    public void init() {
        ...
    }
}
You can specify multiple initialization methods but the order in which they are invoked is undetermined. Inheritance is not considered here, only the methods annotated on the bean class are considered. Bean initialization is useful when you want to execute some code after dependency injection to make the bean instance fully functional (e.g. initialize a connection pool, start a server socket...).
After that, the bean instance is active and can be used either directly by accessing it from the module or indirectly through another bean instance where it has been injected.
A bean instance is "eventually" destroyed, typically when its enclosing module instance is stopped. Just as you specified initialization methods, you can specify destruction methods to be invoked when a bean instance is destroyed using the @Destroy annotation:
@Bean
public class SomeBean {

    @Destroy
    public void destroy() {
        ...
    }
}
As for initialization methods, you can specify multiple destruction methods but the order in which they are invoked is undetermined and inheritance is also not considered. Bean destruction is useful when you need to free resources that have been allocated by the bean instance during application operation (e.g. shutdown a connection pool, close a server socket...).
In case of wrapper beans, the initialization and destruction of a bean instance is delegated to the initialization and destruction methods specified on the wrapper bean which respectively initialize and destroy the actual bean instance wrapped in the wrapper bean.
@Bean
@Wrapper
public class SomeWrapperBean implements Supplier<SomeLegacyBean> {

    private SomeLegacyBean instance;

    public SomeWrapperBean() {
        // Creates the wrapped instance
        this.instance = ...
    }

    @Init
    public void init() {
        // Initialize the wrapped instance
        this.instance.start();
    }

    @Destroy
    public void destroy() {
        // Destroy the wrapped instance
        this.instance.stop();
    }
    ...
}
We stated here that all bean instances are eventually destroyed but this is actually not always the case. Depending on the bean strategy and the context in which it is used, it might not be destroyed at all, hopefully workarounds exist to make sure a bean instance is always properly destroyed. We'll cover this more in detail when we'll describe bean strategies.
Visibility
A bean can be assigned a public or private visibility. A public bean is exposed by the module to the rest of the application whereas a private bean is only visible from within the module.
Bean visibility is set in the @Bean annotation in the visibility attribute:
@Bean(visibility=Visibility.PUBLIC)
public class SomeBean {

}
Strategy
A bean is always defined with a particular strategy which controls how a module should create a bean instance when one is requested, either during dependency injection when a module requires a bean instance to inject in another bean instance or during application operation when some application code requests a bean instance to a module instance.
Singleton
The singleton strategy is the default strategy used when no explicit strategy is specified on a bean class. An Inverno module only creates one single instance for a singleton bean. That same instance is returned every time an instance of that bean is requested. It is then shared among all dependent beans through dependency injection and also the application if it has requested an instance.
A singleton bean is specified explicitly by setting the strategy attribute to Strategy.SINGLETON in the @Bean annotation:
@Bean(strategy = Strategy.SINGLETON)
public class SomeSingletonBean {

}
Modules easily support the bean lifecyle for singleton beans since a module instance holds singleton bean instances by design, they can then be properly destroyed when the module instance is stopped.
Particular care must be taken when a singleton bean instance is requested to a module instance by the application as the resulting reference will point to a managed instance which will be destroyed when the module instance is stopped leaving the instance referenced in the application in an unpredictable state.
A singleton bean is the basic building block of any application which explains why it is the default strategy. An application is basically made of multiple long living components rather than volatile disposable components. A server is a typical example of singleton bean, it is created when the application is started, initialized to accept requests and destroyed when the application is stopped.
A singleton instance is held by exactly one module instance, if you instantiate a module twice, you'll get two singleton bean instances, one in the first module instance and the other in the second module instance. This basically differs from the standard singleton pattern, you'll see more in detail why this actually matters when we'll describe composite modules.
Prototype
A prototype bean results in the creation of as many instances as requested. All dependent beans in the module get a different bean instance and each time a bean instance is requested to a module instance by the application a new instance is also created.
A prototype bean is specified by setting the strategy attribute to Strategy.PROTOTYPE in the @Bean annotation:
@Bean(strategy = Strategy.PROTOTYPE)
public class SomeBean {

}
Unlike singleton beans, modules can't always fully support the bean lifecycle for prototype beans. All prototype beans instances are kept in the module instance in order to destroy them when it is stopped. Modules use weak references to prevent memory leaks so that dereferenced instances are automatically removed from the internal registry when the garbage collector reclaims them. This works well for prototype bean instances injected into singleton bean instances since they are actually referenced until the module instance is stopped just like any singleton bean instance. It becomes tricky when a prototype bean instance is requested by the application. In that case, the prototype bean instance is removed from the module instance when it is dereferenced from the application and reclaimed by the garbage collector leaving no chance for the module instance to destroy it properly. The actual behavior is more subtle because a dereferenced prototype bean instance might actually be destroyed when a module is stopped before the instance is reclaimed by the garbage collector.
As a result, it is not recommended to define destruction methods on a prototype bean but if you really need to, you can make your bean implement AutoClosable, specify the close() method as the unique destruction method and request prototype bean instances from the application using a try-with-resources block:
@Bean(strategy = Strategy.PROTOTYPE)
public class SomeBean implements AutoCloseable {

    @Destroy
    public void close() throws Exception {
        ...
    }
}
Then when requesting a prototype bean instance from the application:
try(SomeBean bean = module.someBean()) {
    ...
}
As soon as the program exits the try-with-resources block the bean instance is properly destroyed, then dereferenced and eventually reclaimed by the garbage collector and finally removed from the module instance. However, you should make sure that the close() method can be called twice since it actually might.
Prototype beans should be used whenever there is a need to hold a state in a particular context. An HTTP client is a typical example of a stateful instance, different instances should be created and injected in singleton beans so they can deal with concurrency independently to make sure requests are sent only after a response to the previous request has been received.
That might not be the smartest way to use HTTP clients in an application, but it gives you the idea.
Prototype beans can also be used to implement the factory pattern, just like a factory, you can request new bean instances on a module. Inverno framework makes this actually very powerful since there's no runtime overhead, modules can be created and used anywhere, and you never have to worry about the boilerplate code that instantiates the bean since it is generated for you by the framework.
Module
An Inverno module can be seen as an isolated collection of beans. The role of a module is to create and wire bean instances in order to expose logic to the application.
In practice, a module is materialized by the class generated by the Inverno compiler during compilation and which results from the processing of Inverno annotations.
A module is isolated from the rest of the application through its module class which clearly defines the beans exposed by the module and what it needs to operate. As a result, a module doesn’t care when and how it is used in an application as long as its requirements are met.
Isolation is actually what makes the Inverno framework so special as it greatly simplifies the development of complex modular applications.
A module is defined as a regular Java module annotated with the @Module annotation:
@Module
Module io.inverno.sample.sampleModule {
    ...
}
The module class
Java modules annotated with @Module will be processed by the Inverno compiler at compile time. The Inverno compiler generates one module class per module providing all the code required at runtime to create and wire bean instances.
This class is the entry point of a module and serve several purposes:
- encapsulate beans instances creation and wiring logic
- implement bean instance lifecycle
- specify required or optional module dependencies
- expose public beans
- hide private beans
- guarantee a proper isolation of the module within the application
This regular Java class can be instantiated like any other class. It relies on a minimal runtime library barely visible which makes it self-describing and very easy to use.
Let’s see how it looks like for the io.inverno.sample.sampleModule module and SomeBean bean, the module class would be used as follows:
SampleModule module = new SampleModule.Builder().build(); // 1
module.start();                                           // 2

SomeBean someBean = module.someBean();                    // 3
// Do something useful with someBean
module.stop();                                            // 4
- The
SampleModuleclass is instantiated - The module is started
- The
SomeBeaninstance is retrieved - Eventually the module is stopped
There are two important things to notice here, first you control when, where and how many times you want to instantiate a module, which brings great flexibility in the way modules are used in your application. For instance integrating an Inverno module in an existing code is pretty straightforward as it is plain old Java, it is also possible to create and use a module instance during application operation (e.g. when processing a request). Secondly beans are exposed with their actual types through named methods which eventually produces more secure code because static type checking can (finally) be performed by the compiler.
Module classes provide dedicated builders to facilitate the creation of complex modules instances with multiple required and optional dependencies.
By default, the module class is named after the last identifier of the module name and generated in a package named after the module. The full class name can be specified in the annotation using the className attribute:
@Module(className=”io.inverno.sample.CustomSampleModule”)
Module io.inverno.sample.sampleModule {
    ...
}
The module class is like any other class in the module, if you want to use it outside the module you have to explicitly export its package in the module descriptor:
@Module
Module io.inverno.sample.sampleModule {
    exports io.inverno.sample.sampleModule;
}
Most of the time this is something you’ll do especially if you want to create composite modules. However, if you only use the module class from within the module, typically in a main method or embedded in some other class, you won’t have to do it.
Note that the Java compiler fails if you try to export a package which is empty before compilation, since the module class is generated this might actually happen, so you need to make sure the class will be generated in a package containing some code. This is not an ideal situation however a module usually defines and exports a package named after its name so this should solve the issue.
Lifecycle
Just like a bean instance, a module follows a lifecycle:
- A module instance is created
- It is started
- It is active
- It is stopped
Let's examine each of these steps in details.
A module instance can be created directly in the application or indirectly inside a composite module. A module defines a dedicated Builder class that must be used to build the module instance. Relying on a builder is very helpful when considering complex modules with many required and optional dependencies.
The instance must then be started to make it operational. During this phase, all Inverno modules composed in the module are instantiated and started, and all beans defined in the module are created and initialized. Dependency injection is performed naturally during bean creation. Since everything has been validated upfront at compile time, we know for sure that everything will work properly.
A module is actually composed by the beans it defines and the beans defined in the modules it composes. This is discussed in details in the Modular application section.
Once the module instance is active, beans are exposed to the application.
Finally, a module instance is stopped to release resources held by the beans instances. During this phase, beans are destroyed in the reverse order of their creation and composed Inverno modules are stopped.
Module as component
Inverno modules are very flexible and can be used in many situations. You can for instance develop Inverno modules to create reusable software components. Such components would benefit from inversion of control and dependency injection capabilities offered by the framework without interfering with the applications that uses them. An Inverno module has also a very low runtime footprint since it creates objects and wires them in a fixed and deterministic way, it can then be created at any time in any situations.
Standalone component
You can imagine a standalone module used to interface with an external system like a coffee maker module for example. From the outside a coffee maker is actually quite simple:
- it requires electricity to operate
- you have to fill it with coffee beans
- you have to supply some water as well
- then you can make some tasty coffee
From the inside on the other hand it can be much more complex than this, it is probably composed of multiple internal components that you actually don't care about as long as the coffee is good.
Let's try to imagine what kind of interface would be exposed by the io.inverno.sample.coffeeMakerModule module without anticipating any implementation.
First of all it would probably export the module's package as it is intended to be used from outside the module:
module-info.java
@Module
Module io.inverno.sample.coffeeMakerModule {
    exports io.inverno.sample.coffeeMakerModule;
}
It might expose three singleton beans:
io.inverno.sample.coffeeMakerModule:coffeeBeansContainerto be able to fill the coffee maker with beansio.inverno.sample.coffeeMakerModule:waterReservoirfor water supplyio.inverno.sample.coffeeMakerModule:coffeeMakerto actually make some coffee
CoffeeBeansContainer
public interface CoffeeBeansContainer {
    void fill(CoffeeBean[] beans);
}
WaterReservoir
public interface WaterReservoir {
    void fill(int waterQuantity);
}
CoffeeMaker
public interface CoffeeMaker {
    Coffee make();
}
Inside a coffee shop application, you might instantiate multiple coffee maker modules used in the following way:
PowerSupply powerSupply = ...                                                        // Get some power supply

CoffeeMakerModule coffeeMakerModule = new CoffeeMakerModule.Builder(powerSupply).build();
coffeeMakerModule.start();

ArabicaCoffeeBeans[] coffeeBeans = ...                                               // Get some tasty coffee beans
coffeeMakerModule.coffeeBeansContainer().fill(coffeeBeans);                          // fill the coffee beans container
coffeeMakerModule.waterReservoir().fill(1.5);                                        // fill the water reservoir with 1.5 Liters

CoffeeMaker coffeeMaker = coffeeMakerModule.coffeeMaker();                           // Get the coffee maker instance

Coffee coffee_1 = coffeeMaker.make();                                                // Deliver some tasty coffees
...
Coffee coffee_n = coffeeMaker.make();

coffeeMakerModule.stop();
The goal of this example was to show the benefits of using Inverno modules as standalone components in an application. As you can see:
- implementation details are completely hidden: you don't know, and you don't have to know how the beans container, the water reservoir and the coffee maker are working together.
- dependencies are clearly exposed: you must provide some power supply to instantiate the module.
- only significant functionalities are exposed.
- if you look closely, you'll see that no particular technical framework is visible: from a code perspective, the application doesn't see and don't need to know it is using an Inverno module, everything is also statically typed and self-describing.
Factory component
You can also create a module as a generic factory or builder to ease the creation of complex objects. If we consider previous example from a different perspective, we can imagine a factory module that could be used to build coffee makers from raw materials.
It would also probably export the module's package so it can be used from outside the module:
module-info.java
@Module
Module io.inverno.sample.coffeeMakerFactoryModule {
    exports io.inverno.sample.coffeeMakerFactoryModule;
}
Then it would expose the io.inverno.sample.coffeeMakerFactoryModule:coffeeMaker prototype bean:
public interface CoffeeMaker {

    void fillWithCoffeeBeans(CoffeeBeans[] beans);

    void fillWithWater();

    Coffee makeCoffee();
}
Inside a cooking appliances factory application, you might instantiate one or more coffee maker factory module to produce coffee makers:
CoffeeMakerFactoryModule coffeeMakerFactoryModule = new CoffeeMakerFactoryModule.Builder(rawMaterials...).build();
coffeeMakerFactoryModule.start();

CoffeeMaker coffeeMaker_1 = coffeeMakerFactoryModule.coffeeMaker(); // We can massively produce coffee makers
...
CoffeeMaker coffeeMaker_n = coffeeMakerFactoryModule.coffeeMaker();

coffeeMakerFactoryModule.stop();
The context and the approach are clearly different here, the purpose of a factory component module is to enable developers to use IoC/DI to easily create complex objects.
Processing component
Dependency Injection is mostly about interconnecting objects to form an application, but this is more a consequence of how IoC/DI frameworks are designed than an absolute fact. An Inverno module is cheap, it can also be created and used during the operation of an application to process requests. This makes it possible to have data objects or contextual objects injected and used in bean instances.
Let's say we have created a highly customizable coffee maker, capable of producing a coffee based on many parameters: steam pressure, temperature, grinding size... These parameters have to be used in various components of the coffee maker. These data have to be provided each time a customer orders a coffee
Propagating the right data to the right coffee maker component can be a tedious task. An Inverno module can be created to inject data where they are needed based on the dependencies of each bean composing the coffee maker module and eventually process the request.
public Coffee orderCoffee(Param_1 p1, Param_2 p2, ... Param_n pn) {
    // Receive a large amount of parameters to make a coffee

    try {
        CoffeeMakerModule coffeeMakerFactoryModule = new CoffeeMakerFactoryModule.Builder(p1, p2, ... pn).build(); // Parameters are injected only where they are needed
        coffeeMakerModule.start();

        return offeeMakerModule.coffeeMaker().makeCoffee();
    }
    finally {
        coffeeMakerFactoryModule.stop();
    }
}
You can then benefit from dependency injection inside the business logic, performance shouldn't be impacted by bean instantiation or dependency injection logic because the creation of a module instance is no different from creating some objects with the new operator and invoking some setter methods. This is especially interesting when you have to process very complex requests with a lot of input data.
Module as application
An Inverno module can also be used to bootstrap a whole application. In such situation one single Inverno module is started as an application in the main method of a class. This class can be defined in the same module but this is not mandatory as long as it has access to the application module. The role of an application module is to create and start all the components of the application.
public static void main(String[] args) {
    CoffeeMakerModule coffeeMakerModule = Application.with(new CoffeeMakerModule.Builder(...)).run();
    ...
}
An application module is basically a regular module whose lifecycle is managed by the Application class. A module instance is created and started when the run() method is invoked and eventually stopped when the JVM shuts down.
Note that this involves a shutdown hook, as a consequence there is actually no guarantee that the module will be stopped especially if the JVM is not gracefully shut down.
Furthermore, an Inverno application outputs a customizable Banner on startup providing useful environment information in the application log.
mars 04, 2020 1:14:27 PM io.inverno.core.v1.Application run
INFO: Inverno is starting...


     ╔════════════════════════════════════════════════════════════════════════════════════════════╗
     ║                      , ~~ ,                                                                ║
     ║                  , '   /\   ' ,                                                            ║
     ║                 , __   \/   __ ,      _                                                    ║
     ║                ,  \_\_\/\/_/_/  ,    | |  ___  _    _  ___   __  ___   ___                 ║
     ║                ,    _\_\/_/_    ,    | | / _ \\ \  / // _ \ / _|/ _ \ / _ \                ║
     ║                ,   __\_/\_\__   ,    | || | | |\ \/ /|  __/| | | | | | |_| |               ║
     ║                 , /_/ /\/\ \_\ ,     |_||_| |_| \__/  \___||_| |_| |_|\___/                ║
     ║                  ,     /\     ,                                                            ║
     ║                    ,   \/   ,                                  -- 1.6.0 --                 ║
     ║                      ' -- '                                                                ║
     ╠════════════════════════════════════════════════════════════════════════════════════════════╣
     ║ Java runtime        : OpenJDK Runtime Environment                                          ║
     ║ Java version        : 12.0.2+10                                                            ║
     ║ Java home           : /home/jkuhn/Devel/jdk/jdk-12.0.2                                     ║
     ║                                                                                            ║
     ║ Application module  : io.inverno.sample.coffeeMakerModule                                  ║
     ║ Application class   : io.inverno.sample.coffeeMakerModule.App                              ║
     ║                                                                                            ║
     ║ Modules             :                                                                      ║
     ║  * ...                                                                                     ║
     ╚════════════════════════════════════════════════════════════════════════════════════════════╝


mars 04, 2020 1:14:27 PM io.inverno.core.v1.Module start
...
The StandardBanner is displayed by default, but you can specify custom implementations as well:
public static void main(String[] args) {
    CustomBanner customBanner = ...
    CoffeeMakerModule coffeeMakerModule = Application.with(new CoffeeMakerModule.Builder(...)).banner(customBanner).run();
    ...
}
Dependency Injection
Dependency Injection principle is at the heart of the Inverno framework. Inside an Inverno module, beans instances are wired into each other based on their respective types and dependencies.
In order to understand how this works, you could imagine that each bean exposes multiple sockets and that multiple wires leave the bean, as many as necessary. After creating and initializing bean instances, the module has to plug these wires into compatible sockets. The type of the wire, which is the type of the bean, must match the type of the socket, which is the type of the dependency defined in the bean.
The result is modeled in a graph of beans built at compile time by the Inverno compiler which checks that it is a directed acyclic graph (i.e. there's no cycles in the graph) and that there is a plug in each required socket. If everything is correct, a module class implementing the graph is created.
Dependency injection is validated and fully determined at compile time, the module class just instantiates and injects beans in a predetermined order without having to worry about missing dependencies or dependency cycles amongst others.
Bean Socket
A bean socket designates a bean dependency. A bean can have two kinds of dependencies and then define two kinds of sockets: required and optional. Required dependencies must be resolved to create an operational bean instance whereas optional dependencies add extra capabilities to the bean instance. As a consequence, a module has to wire every required sockets, the Inverno compiler actually raises compilation errors on beans with unresolved required sockets.
The Inverno framework tries to be as less intrusive as possible, a bean specifies its sockets using standard Java as constructor arguments for required sockets and setter methods for optional sockets. Creating a bean is then very natural.
A bean socket is fully identified by its name, the name of the bean which defines it and the module in which the bean resides. The following notation is used to represent a bean socket qualified name: [MODULE]:[BEAN]:[SOCKET_NAME]. On a given bean in a given module, it is not possible to specify two sockets with the same name.
Let's go back to our coffee maker example and define the dependencies of the CoffeeMaker bean.
CoffeeMakerImpl
@Bean
public class CoffeeMakerImpl implements CoffeeMaker {

    private PowerSupply powerSupply;

    private WaterReservoir waterReservoir;

    private CoffeeBeansContainer coffeeBeansContainer;

    public CoffeeMakerImpl(PowerSupply powerSupply, WaterReservoir waterReservoir, CoffeeBeansContainer coffeeBeansContainer) {
        this.powerSupply = powerSupply;
        this.waterReservoir = waterReservoir;
        this.coffeeBeansContainer = coffeeBeansContainer;
    }

    public Coffee make() {
        ...
    }
}
The io.inverno.sample.coffeeMakerModule:coffeeMakerImpl bean then specifies three required sockets:
io.inverno.sample.coffeeMakerModule:coffeeMakerImpl:powerSupplyio.inverno.sample.coffeeMakerModule:coffeeMakerImpl:waterReservoirio.inverno.sample.coffeeMakerModule:coffeeMakerImpl:coffeeBeansContainer
There should be only one public constructor defined in a bean class, this is actually proper bean design. Defining multiple constructors means that there are probably some dependencies not really required by the bean to work properly. Only required dependencies should be specified in a single bean constructor and optional dependencies in multiple setter methods. However, if for some reason multiple public constructors are defined on a bean class, you can explicitly specify which constructor to consider using the @BeanSocket annotation.
@Bean
public class CoffeeMakerImpl implements CoffeeMaker {

    @BeanSocket
    public CoffeeMakerImpl(PowerSupply powerSupply, WaterReservoir waterReservoir, CoffeeBeansContainer coffeeBeansContainer) {
        ...
    }

    public CoffeeMakerImpl(PowerSupply powerSupply, WaterReservoir waterReservoir, CoffeeBeansContainer coffeeBeansContainer, SomeOptionalDependency dependency) {
        ...
    }
}
The coffee maker should now have everything it needs to make coffee but let's say we want the coffee maker to be able to make cappuccinos, it will then need a MilkFrother. The coffee maker can use a MilkFrother when available, but it doesn't require a MilkFrother to make coffee, only to make cappuccinos, as a result it should be declared in an optional socket.
@Bean
public class CoffeeMakerImpl implements CoffeeMaker {

    ...
    private MilkFrother milkFrother

    ...
    public void setMilkFrother(MilkFrother milkFrother) {
        this.milkFrother = milkFrother;
    }

    public Coffee make() {
        ...
        if(this.milkFrother != null) {
            // Do something useful with the milk frother
            ...
        }
    }
}
The io.inverno.sample.coffeeMakerModule:coffeeMakerImpl bean now specifies one optional socket: io.inverno.sample.coffeeMakerModule:coffeeMakerImpl:milkFrother.
By convention, every setter method on a bean is considered an optional socket, this enforces proper bean design. However, in some situations you might need to explicitly specify which setter methods are sockets. In order to do that, you need to annotate every socket setter methods of the bean with the @BeanSocket annotation. Any setter method which is not annotated is then ignored by the compiler, but it is also possible to explicitly ignore a setter method by setting the enabled attribute to false.
@Bean
public class CoffeeMakerImpl implements CoffeeMaker {

    ...
    @BeanSocket
    public void setMilkFrother(MilkFrother milkFrother) {
        ...
    }

    ...
    // Implicitly Ignored
    public void setSomethingElse() {
        ...
    }

    // Explicitly Ignored
    @BeanSocket(enabled = false)
    public void setSomethingElseAgain() {
        ...
    }
}
Note that Inverno annotation are not inherited from ancestor class, the Inverno compiler only considers the bean class annotated with
@Beanso you must explicitly override setter methods to specify optional sockets defined in a class ancestor. This might not be obvious, but it is actually the safer way that gives a perfect control on the sockets you want to expose in your beans.
Single and multiple
We can differentiate two kinds of bean socket: single socket and multiple socket. A single socket can be of any type except arrays, java.util.List, java.util.Set and java.util.Collection whereas a multiple socket is necessarily an array, a java.util.List, a java.util.Set or a java.util.Collection. Multiple beans can be wired to a multiple socket whereas only one bean is wired to a single socket.
Lazy
A socket can be annotated with the @Lazy to indicate that a bean instance supplier should be provided instead of an actual bean instance. A lazy socket must then be of type Supplier<E> which specifies the actual type of the socket as formal parameter. In order to lazily inject a list of beans, the socket must be of type List<Supplier<E>>.
A lazy socket allows a dependent bean to lazily retrieve a bean instance. This presents several advantages when prototype beans are wired into a lazy socket, it is then possible to create fully wired bean instances on demand during the operation of a module and use them when processing a request for instance.
Socket Bean
Bean sockets designates the dependencies of a single bean. All beans in a module must be operational for a module to work properly as a consequence all beans required sockets must be resolved but what if one or more plugs are missing inside the module to match all these sockets? The dependency can then be declared at module level using a particular kind of bean: the socket bean.
From inside a module, a socket bean is considered as any regular beans as it takes part in the dependency injection process. From outside the module, it designates a module dependency that is provided when a module is instantiated.
Unlike other type of beans, a socket bean is not a concrete class, it must be an interface annotated with @Bean extending the Supplier<E> interface. The supplier's formal parameter designates the type of the dependency to provide.
Let's say the coffee maker module does not provide any PowerSupply bean internally, this makes sense since a power supply might be required to make coffee, but it is clearly unrelated. We must then find a way to provide a PowerSupply inside the module to make it work. We can then create a PowerSupplySocket socket bean inside the coffee maker module.
@Bean
public interface PowerSupplySocket implements Supplier<PowerSupply> {}
This creates socket bean io.inverno.sample.coffeeMakerModule:powerSupplySocket in the module io.inverno.sample.coffeeMakerModule. As you can imagine, this bean can be injected in other module's beans just like any regular beans.
The module class generated by the Inverno compiler now defines an argument of type PowerSupply in the module's builder constructor, we must then provide a PowerSupply instance in order to instantiate the module.
PowerSupply powerSupply = ...
CoffeeMakerModule coffeeMakerModule = new CoffeeMakerModule.Builder(powerSupply).build();
...
A socket bean appears in the builder constructor when it is wired to a required bean socket inside the module. On the other hand, a socket bean wired to an optional bean socket appears in an extra method of the module's builder class.
We might want to be able to stick a brand sticker on the coffee maker, this is obviously completely optional and external to the coffee maker module. We can then define a BrandStickerSocket in the module.
BrandSticker brandSticker = ...
CoffeeMakerModule coffeeMakerModule = new CoffeeMakerModule.Builder(powerSupply).brandSticker(brandSticker).build();
...
It is interesting to notice here that an Inverno module explicitly specifies its dependencies which is extremely valuable to create complex modular applications involving multiple people working together, one can easily understand how to use another one's module without mentioning the fact that the compiler can actually check that everything fits together since beans, modules and modules builder arguments are all statically typed.
Wiring
The Inverno compiler wires beans together based on the sockets defined in the module. A viable module is a module that has:
- all its required sockets resolved, either internally with another bean in the module or externally through a socket bean
- no cycles in the resulting graph of beans
Autowiring
By default, the Inverno compiler tries to automatically wire the beans in a module based on their respective types and the types of the sockets they expose.
In the coffee maker module we have the following beans:
io.inverno.sample.coffeeMakerModule:coffeeMakerImplio.inverno.sample.coffeeMakerModule:waterReservoirImplio.inverno.sample.coffeeMakerModule:coffeeBeansContainerImplio.inverno.sample.coffeeMakerModule:powerSupply(socket bean)
The io.inverno.sample.coffeeMakerModule:coffeeMakerImpl bean defines the following sockets:
io.inverno.sample.coffeeMakerModule:coffeeMakerImpl:powerSupplyio.inverno.sample.coffeeMakerModule:coffeeMakerImpl:waterReservoirio.inverno.sample.coffeeMakerModule:coffeeMakerImpl:coffeeBeansContainerio.inverno.sample.coffeeMakerModule:coffeeMakerImpl:milkFrother(optional)
This configuration results in the following graph of beans:

The module is viable since all required beans sockets are resolved and the graph of beans is a directed acyclic graph. The Inverno compiler can then generate a module class containing the logic to instantiate the beans in the right order and the dependency injection logic. When an instance of the io.inverno.sample.coffeeMakerModule module is started, the waterReservoirImpl bean and the coffeeBeansContainerImpl are instantiated first then the coffeeMakerImpl bean is instantiated next using previously created instances and the powerSupply instance injected when the module was created.
In case one or more bean sockets cannot be resolved, the Inverno compiler outputs specific compilation errors for each one of them. When this happens, you must either define module beans or socket beans inside the module matching the unresolved sockets in order for the module to compile.
You'll learn in the Modular application section that there is another way to provide beans in a module by composing another Inverno module inside your module.
Explicit wiring
It is not possible for the Inverno compiler to automatically wire module beans when more than one bean matching a socket exists in the module. In that case, the Inverno compiler outputs specific compilation errors on bean sockets presenting such conflicts. In order for the module to compile, these conflicts must be explicitly resolved.
Let's assume we actually have two beans of type WaterReservoir in the coffee maker module: smallWaterReservoir and bigWaterReservoir, the coffeeMakerImpl requires only one WaterReservoir since the waterReservoir socket is a single socket, we clearly have a conflict that the Inverno compiler cannot resolve on its own because it cannot decide for you which water reservoir bean is best suited. So you have to explicitly tell the Inverno compiler what to do using a @Wire annotation on the module definition:
@Module
@Wire(beans="smallWaterReservoir", into="coffeeMakerImpl:waterReservoir")
Module io.inverno.sample.coffeeMakerModule {
    ...
}
In the @Wire annotation the beans attribute is used to specify which beans must be wired into the socket specified in the into attribute.
The beans attribute is an array of bean qualified names of the form ([MODULE]:)?[BEAN]. If the module name is omitted, the compiler will look for beans in the current module. When defining a wire for a single socket, only one bean qualified name is expected.
The into attribute is a bean socket qualified name of the form ([MODULE]|([MODULE]:)?[BEAN]):[SOCKET_NAME]. When specifying a wire on a bean socket name which is necessarily defined in a bean in the current module, the module name can be omitted.
The module name is in fact only necessary when specifying a wire on a socket bean of a module composed in a composite module.
Obviously, multiple @Wire annotations can be specified on a module definition. If a specified bean does not exist, if the specified socket does not exist, if the specified beans does not match the specified socket or if multiple beans were specified for a single socket, the Inverno compiler will raise compilation errors.
Resolving conflicts is one way of using explicit wiring, but in the case of a multiple socket, you can also use a wire to explicitly select which beans you want to inject using the @Wire annotation. For instance, let's say we have a module with four beans of type SomeType: beanA, beanB, beanC, beanD and another bean which defines a multiple socket of the same type (e.g. List<SomeType>), if you do nothing, by default the Inverno compiler will automatically wire all four into the multiple socket, if you want to inject only beanA and beanB you can specify the following on the module definition:
@Module
@Wire(beans={"beanA", "beanB"}, into="someBean:multipleSomeType")
Module someModule {
    ...
}
It's interesting to see that it is not on the socket that the conflict is resolved but on the module that actually created that conflict. This is quite different from other DI frameworks that use qualifiers specified on the conflicting injection point. With such approach, in order to properly separate the concerns a bean should not know the name of the actual bean that will be injected, as a result it is up to the bean to define the qualifiers and up to the other beans to be named or aliased after these qualifiers but this means the bean still know that a conflict exist otherwise it wouldn't need to specify any qualifier. The Inverno framework eliminates this issue to enforce proper separation of concerns.
Selector
Beans are always wired to sockets based on their types, selectors provide another level of filtering. They are used to specify what compile time properties a bean type must have to be wired to a particular socket.
Selectors are annotations annotated with @Selector that can be specified on both bean sockets and socket beans. The framework currently supports the @AnnotationSelector that lets you filter beans based on a particular annotation.
Let's say, you finally decided to provide a milk frother to the coffee maker which is unfortunately only compatible with milk frothers of a particular brand. To do so, you can define a @SuperSteam annotation for the brand and tell the Inverno compiler to make sure the milk forther wired to the coffee maker is annotated with it.
public @interface SuperSteam {}
@Bean
public class CoffeeMakerImpl implements CoffeeMaker {

    ...
    public void setMilkFrother(@AnnotationSelector(SuperSteam.class) MilkFrother milkFrother) {
        ...
    }

}
If no bean of type MilkForther annotated with @SuperSteam exists, a compilation error is raised.
It's important to understand here that the Inverno compiler considers the declared type of the bean which is not necessarily the actual type of the runtime instance. This is especially true when defining a provided type in a bean class, the selector annotation must then be specified on the provided type and not the actual bean class.
Modular application
Modularity is at the heart of the Inverno framework, it has been built on the idea that flexibility, maintainability and stability, especially on large and complex applications can only be achieved through a proper modularization and strict separation of concerns.
So far, we explored how to define and compose beans inside a module to implement a wider component or a standalone application but the Inverno framework also allows the composition of modules to create even more complex components and applications.
Composite module
A composite module is literally a module composed of multiple Inverno modules. Concretely, all public beans exposed in a component module are considered for dependency injection in the composite module. In the same way, socket beans defined in a component module are resolved with the beans available in the composite module.
By default, any Inverno module required in the module descriptor of an Inverno module are composed by the Inverno compiler inside the module class. Component modules public beans are encapsulated in the composite module class and then only accessible from within that module. At runtime, component modules are instantiated and started along with the composite module which wires their public beans into the module's beans sockets or into other component modules socket beans.
Let's assume module io.inverno.sample.milkFrotherModule provides a MilkFrother bean compatible with the coffee maker. You can simply declare it as required in the module descriptor of the io.inverno.sample.coffeeMakerModule module to get the milk frother module created and started along with the coffee maker module and eventually wire the milk frother into the coffee maker.
@Module
Module io.inverno.sample.coffeeMakerModule {
    ...
    requires io.inverno.sample.milkFrotherModule;
    ...
}
The Inverno compiler will find out that the milk frother module provides a bean matching coffee maker optional milk frother socket and do the wiring in the module class.
In some situations, you might want to explicitly include or exclude required modules from the module composition, you can do this using includes and excludes attributes in the @Module annotation. This is useful when you just want to use types from another module without instantiating it.
@Module(includes={"moduleA", "moduleB"})
Module someModule {
    ...
    requires moduleA;
    requires moduleB;
    requires moduleC; // moduleC will be ignored by the Inverno compiler
    ...
}
In order for the module to compile, all required socket beans defined in component modules must be resolved. They can be resolved with any beans available in the composite module including beans, socket beans or any public beans provided in other component modules.
Explicit wiring can be used as described before using fully qualified names for component modules public beans or socket beans.
@Module
@Wire(beans="moduleA:bean1", into="someBean:socket")     // Explicitly wire bean 'bean1' of component module 'moduleA' into bean socket 'socket' in bean 'someBean' of module 'someModule'
@Wire(beans="moduleB:bean2", into="moduleC:socketBean")  // Explicitly wire bean 'bean2' of component module 'moduleB' into socket bean 'socketBean' of module 'moduleC'
Module someModule {
    ...
    requires moduleA;
    requires moduleB;
    requires moduleC;
    ...
}
Module composition offers greater flexibility when using or designing modules. A typical Inverno application module would be a simple composition of multiple Inverno modules implementing different aspects. Multiple modules inside an application can depend on the same module but with different instances which limits the possibility of collisions and increases reusability, indeed when developing a module you don't have to worry about the context in which it will be used or executed, you can focus on the feature it provides, external dependencies can be provided internally through module composition or externally through socket beans.
Provided type
By default, the type of a bean is given by the class defining the bean, for a module bean it is the annotated class and for a wrapper bean it is the formal parameter specified in the Supplier<E> interface.
This basically means that the type of a public bean must be accessible from outside the module, its package must then be exported in the module descriptor. However, you might, and probably will, need to hide bean implementations and only expose public API types.
You can control which type is actually provided by a bean using the @Provide annotation. A bean can only provide one type.
Let's see how it works for the io.inverno.sample.coffeeMakerModule:coffeeMakerImpl bean:
@Bean
public class CoffeeMakerImpl implements @Provide CoffeeMaker {
    ...
}
The CoffeeMakerImpl class can implement several types, but it will be exposed as a CoffeeMaker in the module class.
The
@Provideannotation is only useful on module bean, for w beans the implementation type is already hidden in theSupplier#get()method and the provided type is the formal parameter specified in theSupplier<E>interface.
The provided type is only considered outside the module when used in a composite module or in an application. Inside the module, the actual bean type is used for dependency injection unless the bean is also overridable in which case the provided type is also used internally.
Hiding implementation and only expose public API is very convenient when you developed a component module, and it is a best practice in general if you want to enforce modularity inside an application. Most of the time modules should always depend on public API so from a dependency injection perspective it does not really matter whether a module expose implementation classes, but you can't guarantee that nobody will ever create a dependency on an implementation class if that class is accessible which would be quite bad for maintainability. Being able to control the types actually exposed in a module enforces a proper isolation.
Particular care must be taken when using selectors in a composite module, the type of component modules beans considered by the Inverno compiler will be the provided types, so if you want to specify properties matching selectors, you have to specify them on the provided types and not the actual beans types.
Inverno Modules
Motivation
Built on top of the Inverno core IoC/DI framework, Inverno modules suite aimed to provide a complete set of features to develop high end production-grade applications.
The advent of cloud computing and highly distributed architecture based on microservices has changed the way applications should be conceived, maintained, executed and operated. While it was perfectly fine to have application started in a couple of seconds or even minutes some years ago with long release cycles, today's application must be highly efficient, agile in terms of development and deployment and start in a heart beat.
The Inverno framework was created to reduce framework overhead at runtime to the minimum, allowing to create applications that start in milliseconds. Inverno modules extend this approach to provide functionalities with low footprint, relying on the compiler when it makes sense to generate human-readable code for easy maintenance and improved performance.
An agile application is naturally modular which is the essence of the Inverno framework, but it must also be highly configurable and customizable in many ways using configuration data distributed in various data stores and that greatly depend on the context such as an execution environment: test, production..., a location: US, Europe, Asia..., a particular customer, a particular user... Advanced configuration capabilities are then essential to build modern applications.
Traditional application servers and frameworks used to be based on inefficient threading models that didn't make fair use of hardware resources which make them bad cloud citizens. Inverno applications are one hundred percent reactive making maximum use of the allocated resources.
The primary goals can be summarized as follows:
- provide a complete set of common features to build any kind of applications
- maintain a high level of performance...
- ...but always choose modularity and maintainability over performance to favor agility
- be explicit and consistent, there's nothing worse than ambiguity and disparateness, the you have to knows must be minimal and logical.
- provide advanced configuration and customization features
Prerequisites
Before we can dig into the various modules provided in the framework, it is important to understand how to set up a modular Inverno project, so please have a look at the Inverno distribution documentation which describes in details how to create, build, run, package and distribute a modular Inverno component or application.
Inverno modules are built on top of the Inverno core IoC/DI framework, please refer to the Inverno core documentation to understand how IoC/DI is working in the framework.
The framework is fully reactive thanks to Project Reactor Core library, it is strongly recommended to also look at the reference documentation.
Overview
The basic Inverno application is an Inverno module composing the boot module which provides common services. Other Inverno modules can then be added by defining the corresponding dependencies in the module descriptor.
@io.inverno.core.annotation.Module
module io.inverno.example.app {
    requires io.inverno.mod.boot;
    // Other modules...
}
Declaring a dependency to the boot module automatically includes core IoC/DI modules as well as base module, configuration module and reactive framework dependencies.
A basic application can then be created as follows:
import io.inverno.core.v1.Application;

public class Main {

    public static void main(String[] args) {
        Application.with(new App.Builder()).run();
    }
}
Inverno modules are fully integrated which means they have been designed to work together in an Inverno component or application but this doesn't mean it's not possible to embed them independently in any kind of application following the agile principle. For instance, the configuration module, can be easily used in any application with limited dependency overhead. More generally, an Inverno module can be created and started very easily in pure Java thanks to the Inverno core IoC/DI framework.
For instance, an application can embed an HTTP server as follows:
Boot boot = new Boot.Builder().build();
boot.start();

Server httpServer = new Server.Builder(boot.netService(), boot.resourceService())
    .setHttpServerConfiguration(HttpServerConfigurationLoader.load(conf -> conf.server_port(8080)))
    .setRootHandler(
        exchange -> exchange
            .response()
            .body()
            .raw()
            .value(Unpooled.unreleasableBuffer(Unpooled.copiedBuffer("Hello, world!", Charsets.DEFAULT)))
    )
    .build();

httpServer.start();
...
httpServer.stop();
boot.stop();
Note that as for any Inverno module, dependencies are clearly specified and must be provided when creating a module, in the previous example the HTTP server requires a
NetServiceand aResourceServicewhich are normally provided by the boot module but custom implementations can be provided. It is also possible to create an Inverno module composing the boot and http-server modules to let the framework deal with dependency injection.
Base
The Inverno base module defines the foundational APIs used across all modules, it can be seen as an extension to the java.base module.
In order to use the Inverno base module, we need to declare a dependency in the module descriptor:
module io.inverno.example.app {
    requires io.inverno.mod.base;
}
The base module declares transitive dependencies to reactive APIs which don't need to be re-declared.
We also need to declare that dependency in the build descriptor:
Using Maven:
<project>
    <dependencies>
        <dependency>
            <groupId>io.inverno.mod</groupId>
            <artifactId>inverno-base</artifactId>
        </dependency>
    </dependencies>
</project>
Using Gradle:
compile 'io.inverno.mod:inverno-base:1.13.0'
The base module is usually provided as a transitive dependency by other modules, mainly the boot module, so defining a direct dependency is usually not necessary at least for an application module.
Scope
The Scope interface specifies a way to expose different bean instances depending on particular scope.
For instance, let's say we want to use different instances of a Warehouse bean based on a particular region, we can define a prototype bean for the Warehouse and create the following bean which extends KeyScope:
@Bean
public class WarehouseKeyScope extends KeyScope<Warehouse> {

    private final Supplier<Warehouse> storePrototype;

    public WarehouseKeyScope(@Lazy Supplier<Warehouse> storePrototype) {
        this.storePrototype = storePrototype;
    }

    @Override
    protected Warehouse create() {
        return this.storePrototype.get();
    }
}
We can then inject that bean where we need a Warehouse instance for a particular region:
@Bean
public class WarehouseService {

    private final KeyScope<Warehouse> warehouse;

    public WarehouseService(KeyScope<Warehouse> warehouse) {
        this.warehouse = warehouse;
    }

    public void store(Product product, String region) {
        Warehouse warehouse = this.warehouse.get(region);
        ...
    }
}
The base module expose three base Scope implementations:
- the
KeyScopewhich binds an instance to an arbitrary key - the
ThreadScopewhich binds an instance to the current thread - the
ReactorScopewhich binds an instance to the current reactor's thread. This is very similar to theThreadScopebut this throws anIllegalStateExceptionwhen used outside the scope of the reactor (i.e. the current thread is not a reactor thread).
Particular care must be taken when using this technique in order to avoid resource leaks. For instance, when a scoped instance is no longer in use, it should be cleaned explicitly as references can be strongly reachable. The
KeyScopeexposes theremove()for this purpose. Also when using prototype bean instance, the destroy method, if any, may not be invoked if the instance is reclaimed before it can be destroyed, as a result you should avoid using such bean instances within scope beans.
Concurrent API
The concurrent API defines services facilitating the creation of concurrent multithreaded applications based on a reactor threading model using Netty.
It especially provides the Reactor interface used to obtain EventLoopGroup instances backed by a root event loop group in order to reuse event loops across different network servers or clients running in the same application.
It also defines a lock-free CommandExecutor which guarantees that commands are executed in sequence without thread locking.
Converter API
The converter API provides interfaces and classes for building converters, decoders or encoders which are basically used to decode/encode objects of a given type from/to objects of another type.
Basic converter
The Converter interface defines a basic converter. It simply extends Decoder and Encoder interfaces which defines respectively the basic decoder and the basic encoder.
A basic decoder is used to decode an object of a source type to an object of a target type. For instance, we can create a simple string to integer decoder as follows:
public class StringToIntegerDecoder {

    @Override
    public <T extends Integer> T decode(String value, Class<T> type) throws ConverterException {
        return (T)Integer.valueOf(value);
    }

    @Override
    public <T extends Integer> T decode(String value, Type type) throws ConverterException {
        return (T)Integer.valueOf(value);
    }
}
Decoder<String, Integer>
A basic encoder is used to encode an object of a source type to an object of a target type. For instance, we can create a simple integer to string encoder as follows:
public class IntegerToStringEncoder implements Encoder<Integer, String> {

    @Override
    public <T extends Integer> String encode(T value) throws ConverterException {
        return value.toString();
    }

    @Override
    public <T extends Integer> String encode(T value, Class<T> type) throws ConverterException {
        return value.toString();
    }

    @Override
    public <T extends Integer> String encode(T value, Type type) throws ConverterException {
        return value.toString();
    }
}
A string to integer converter can then be created by combining both implementations.
The previous example while not very representative illustrates the basic decoder and encoder API, you should now wonder how to use this properly in an application and what is the fundamental difference between a decoder and an encoder, the answer actually lies in the names. A decoder is meant to decode data formatted in a particular way into a representation that can be used in an application whereas an encoder is meant to encode an object in an application into data formatted in a particular way. From there, we understand that a converter can be used to read or write raw data (JSON data in an array of bytes for instance) to or from actual usable representations in the form of Java objects, but it can also be used as an object mapper to convert from one representation to another (domain object to data transfer object for instance).
A more realistic example would then be a JSON string to object converter:
public class JsonToObjectConverter implements Converter<String, Object> {

    private ObjectMapper mapper = new ObjectMapper();

    @Override
    public <T> T decode(String value, Class<T> type) throws ConverterException {
        try {
            return this.mapper.readValue(value, type);
        }
        catch (JsonProcessingException e) {
            throw new ConverterException(e);
        }
    }

    @Override
    public <T> T decode(String value, Type type) throws ConverterException {
        ...
    }

    @Override
    public <T> String encode(T value) throws ConverterException {
        try {
            return this.mapper.writeValueAsString(value);
        }
        catch (JsonProcessingException e) {
            throw new ConverterException(e);
        }
    }

    @Override
    public <T> String encode(T value, Class<T> type) throws ConverterException {
        ...
    }

    @Override
    public <T> String encode(T value, Type type) throws ConverterException {
        ...
    }
}
The API provides other interfaces to create converters, decoders and encoders with more capabilities.
Splittable decoder and Joinable encoder
A SplittableDecoder is a particular decoder which allows to decode an object of a source type into multiple objects of a target type. It specifies methods to decode one source instance into an array, a list or a set of target instances.
In the same way, a JoinableEncoder is a particular encoder which allows to encode multiple objects of a source type into one single object of a target type. It specifies methods to encode an array, a list or a set of source instances into a single target instance.
The StringConverter is a typical implementation that can decode or encode multiple parameters values.
StringConverter converter = new StringConverter();

// List.of(1, 2, 3)
List<Integer> l = converter.decodeToList("1,2,3", Integer.class);
// "1,2,3"
String s = converter.encodeList(List.of(1, 2, 3));
Primitive decoder and encoder
A PrimitiveDecoder is fundamentally an object decoder which provides bindings to decode an object of a source type into an object of primitive (boolean, integer...) or common type (string, date, URI...).
In the same way, a PrimitiveEncoder is fundamentally an object encoder which provides bindings to encode an object of a primitive or common type to an object of a target type.
The StringConverter which is meant to convert parameter values is again a typical use case of primitive decoder and encoder.
StringConverter converter = new StringConverter();

// 123l
long l = converter.decodeLong("123");
// ISO-8601 date: "yyyy-MM-dd"
String s = converter.encode(LocalDate.now());
The SplittablePrimitiveDecoder and JoinablePrimitiveEncoder are primitive decoder and encoder that respectively extends SplittableDecoder and JoinableEncoder.
Object converter
An ObjectConverter is a convenient interface for building Object converters. It extends Converter, SplittablePrimitiveDecoder and JoinablePrimitiveEncoder.
Reactive converter
A ReactiveConverter is a particular converter which extends ReactiveDecoder and ReactiveEncoder for building reactive converters which are particularly useful to convert data from non-blocking I/O channels.
The ReactiveDecoder interface defines methods to decode one or many objects of a target type from a stream of objects of a source type. In the same way, the ReactiveEncoder interface defines methods to encode one or many objects of a source type into a stream of objects of target type.
The ByteBufConverter is a typical use case, it is meant to convert data from non-blocking channels like the request or response payloads in a network server or client, or the content of a resource read asynchronously.
ByteBufConverter converter = new ByteBufConverter(new StringConverter());

Publisher<ByteBuf> dataStream = ... // comes from a request or resource

// On subscription, chunk of data accumulates until a complete response can be emitted
Mono<ZonedDateTime> dateTimeMono = converter.decodeOne(dataStream, ZonedDateTime.class);

// On subscription, a stream of integer is mapped to a publisher of ByteBuf
Publisher<ByteBuf> integerStream = converter.encodeMany(Flux.just(1,2,3,4));
Media type converter
A MediaTypeConverter is a particular kind of object converter which supports a specific format specified as a media type and converts object from/to raw data in the supported format. A typical example would be a JSON media type converter used to decode/encode raw JSON data.
The web module relies on such converters to respectively decode end encode HTTP request and HTTP response payloads based on the content type specified in the message headers.
Composite converter
A CompositeConverter is an extensible object converter based on a CompositeDecoder and a CompositeEncoder which themselves rely on multiple CompoundDecoder and CompoundEncoder to extend or override respectively the decoding and encoding capabilities of the converter. In practical terms, it is possible to make a converter able to decode or encode any type of object by providing ad hoc compound decoders and encoders.
The StringCompositeConverter is a composite converter implementation which uses a default StringConverter to convert primitive and common types of objects, it can be extended to convert other types of object.
For instance, let's consider the following Message class:
public static class Message {

    private String message;

    // constructor, getter, setter
    ...
}
We can create specific compound decoder and encoder to respectively decode and encode a Message from/to a string as follows:
public static class MessageDecoder implements CompoundDecoder<String, Message> {

    @SuppressWarnings("unchecked")
    @Override
    public <T extends Message> T decode(String value, Class<T> type) throws ConverterException {
        return (T) new Message(value);
    }

    @SuppressWarnings("unchecked")
    @Override
    public <T extends Message> T decode(String value, Type type) throws ConverterException {
        return (T) new Message(value);
    }

    @Override
    public <T extends Message> boolean canDecode(Class<T> type) {
        return Message.class.equals(type);
    }

    @Override
    public boolean canDecode(Type type) {
        return Message.class.equals(type);
    }
}
public static class MessageEncoder implements CompoundEncoder<Message, String> {

    @Override
    public <T extends Message> String encode(T value) throws ConverterException {
        return value.getMessage();
    }

    @Override
    public <T extends Message> String encode(T value, Class<T> type) throws ConverterException {
        return value.getMessage();
    }

    @Override
    public <T extends Message> String encode(T value, Type type) throws ConverterException {
        return value.getMessage();
    }

    @Override
    public <T extends Message> boolean canEncode(Class<T> type) {
        return Message.class.equals(type);
    }

    @Override
    public boolean canEncode(Type type) {
        return Message.class.equals(type);
    }
}
And inject them into a string composite converter which can then decode/encode Message object:
CompoundDecoder<String, Message> messageDecoder = new MessageDecoder();
CompoundEncoder<Message, String> messageEncoder = new MessageEncoder();

StringCompositeConverter converter = new StringCompositeConverter();
converter.setDecoders(List.of(messageDecoder));
converter.setEncoders(List.of(messageEncoder));

Message decodedMessage = converter.decode("this is an encoded message", Message.class);
String encodedMessage = converter.encode(new Message("this is a decoded message"));
Net API
The Net API provides interfaces and classes to manipulate basic network elements such as URIs or to create basic network clients and servers.
URIs
A URI follows the standard defined by RFC 3986, it is mostly used to identify resources such as file or more specifically a route in a Web server. The JDK provides a standard implementation which is not close to what is required by the web module to name just one.
The URIs utility class is the main entry point for working on URIs in any ways imaginable. It defines methods to create a blank URI or a URI based on a given path or URI. These methods return a URIBuilder instance which is then used to build a URI, a path, a query string or a URI pattern.
A simple URI can then be created as follows:
// http://localhost:8080/path/to/resource?parameter=value
URI uri = URIs.uri()
    .scheme("http")
    .host("localhost")
    .port(8080)
    .path("/path/to/resource")
    .queryParameter("parameter", "value")
    .build();
or from an existing URI as follows:
// https://test-server/path/to/resource
URI uri = URIs.uri(URI.create("http://localhost:8080/path/to?parameter=value"))
    .scheme("https")
    .host("test-server")
    .port(null)
    .segment("resource")
    .clearQuery()
    .build();
A URI can be normalized by enabling the URIs.Option.NORMALIZED option:
// path/to/other
URI uri = URIs.uri("path/to/resource", URIs.Option.NORMALIZED)
    .segment("..")
    .segment("other")
    .build();
A parameterized URI can be created by enabling the URIs.Option#PARAMETERIZED option and specifying parameters of the form {[<name>][:<pattern>]} in the components of the URI. This allows to create URI templates that can be used to generate URIs from a set of parameters.
URIBuilder uriTemplate = URIs.uri(URIs.Option.PARAMETERIZED)
    .scheme("{scheme}")
    .host("{host}")
    .path("/path/to/resource")
    .segment("{id}")
    .queryParameter("format", "{format}");

// http://locahost/path/to/resource/1?format=text
URI uri1 = uriTemplate.build("http", "localhost", "1", "text");

// https://production/path/to/resource/32?format=json
URI uri2 = uriTemplate.build("https", "production", "32", "json");
The URIBuilder also defines methods to create string representations of the whole URI, the path component or the query component.
URIBuilder uriBuilder = URIs.uri()
    .scheme("http")
    .host("localhost")
    .port(8080)
    .path("/path/to/resource")
    .queryParameter("parameter", ""value);

// http://localhost:8080/path/to/resource?parameter=value
String uri = uriBuilder.buildString();

// path/to/resource
String path = uriBuilder.buildPath();

// parameter=value
String query = uriBuilder.buildQuery();
It can also create URIPattern to match a given input against the pattern specified by the URI while extracting parameter values when the URI is parameterized.
URIPattern uriPattern = URIs.uri(URIs.Option.PARAMETERIZED)
    .scheme("{scheme}")
    .host("{host}")
    .path("/path/to/resource")
    .segment("{id}")
    .queryParameter("format", "{format}")
    .buildPattern();

URIMatcher matcher = uriPattern.matcher("http://localhost:8080/path/to/resource/1?format=text");
if(matcher.matches()) {
    // scheme=http, host=localhost, id=1, format=text
    Map<String, String> parameters = matcher.getParameters();
    ...
}
Path patterns are also supported by enabling the URIs.Option#PATH_PATTERN option and allows to create URI patterns with question marks or wildcards.
// Matches all .java files under /src path
URIPattern uriPattern = URIs.uri("/src/**/*.java", URIs.RequestTargetForm.ABSOLUTE, URIs.Option.PATH_PATTERN)
    .buildPathPattern();

// Matches test.jsp, tast.jsp, t1st.jsp...
uriPattern = URIs.uri("/t?st.java", URIs.RequestTargetForm.ABSOLUTE, URIs.Option.PATH_PATTERN)
    .buildPathPattern();
Note that the Path pattern option is not compatible with
ORIGINform request target, as a result the URI must be created using theABSOLUTErequest target form.
It is possible to determine whether a path pattern is included into another. A path pattern is said to be included into another path pattern if and only if the set of URIs matched by this pattern is included in the set of URIs matched by the other pattern.
̀```java URIPattern pathPattern1 = URIs.uri("/src/**", URIs.RequestTargetForm.ABSOLUTE, URIs.Option.PATH_PATTERN) .buildPathPattern();
URIPattern pathPattern2 = URIs.uri("/src/java/**/*.java", URIs.RequestTargetForm.ABSOLUTE, URIs.Option.PATH_PATTERN) .buildPathPattern();
URIPattern.Inclusion inclusion = uriPattern1.includes(uriPattern2); // returns URIPattern.Inclusion.INCLUDED ̀```
The proposed implementation is not exact which is why the includes() method returns INCLUDED when inclusion could be determined with certainty, DISJOINT when exclusion could be determined with certainty and INDETERMINATE when inclusion could not be determined with certainty.
Note that inclusion can only be determined when considering path patterns created using
buildPathPattern()method and containing only a path component. Theincludes()method will always returnINDETERMINATEfor any other type of URI patterns.
Network service
The NetService interface specifies a service for building optimized network clients and servers based on Netty. The base module doesn't provide any implementation, a base implementation is provided in the boot module.
This service especially defines methods to create basic network clients and servers.
NetService netService = ...

ServerBootstrap server = netService.createServer(new InetSocketAddress("127.0.0.1", 1234));
Bootstrap client = netService.createClient(new InetSocketAddress("127.0.0.1", 1234));
The NetService also exposes methods for resolving hostname addresses using DNS resolution.
NetService netService = ...

Mono<InetSocketAddress> exampleOrgAddress = this.resolve("example.org", 80);
Mono<List<InetSocketAddress>> headlessServiceAddresses = this.resolveAll("service.prod.svc.cluster.local", 8080);
Reflection API
The reflection API provides classes and interfaces for building java.lang.reflect.Type instances in order to represent parameterized types at runtime which is otherwise not possible due to type erasure. Such Type instances are used when decoding data into objects of parameterized types.
The Types class is the main entry point for building any kind of Java types.
// java.util.List<? extends java.lang.Comparable<java.lang.String>>
Type type = Types.type(List.class)
    .wildcardType()
        .upperBoundType(Comparable.class)
            .type(String.class).and()
    .and()
    .build();
The reflection API is particularly useful to specify a parameterized type to an object converter. For instance, let's imagine we have a ByteBuf we want to decode to a List<String>, we can do:
ByteBuf input = ...;
ObjectConverter<ByteBuf> converter = ...;

Type listOfStringType = Types.type(List.class)
    .type(String.class).and()
    .build();
List<String> decode = converter.<List<String>>decode(input, listOfStringType);
Resource API
The resource API provides classes and interfaces for accessing resources of different kinds and locations (file, zip, jar, classpath, module...) in a consistent way using a unique Resource interface.
A resource can be created directly using the implementation corresponding to the kind of resource. For instance, in order to access a resource on the class path, you need to choose the ClasspathResource implementation:
ClasspathResource resource = new ClasspathResource(URI.create("classpath:/path/to/resource"));
A resource is identified by a URI whose scheme specifies the kind of resources. The base module provides several implementations with a corresponding scheme.
| Type | URI | Implementation |
|---|---|---|
file |
file:/path/to/resource |
FileResource |
zip |
zip:/path/to/zip!/path/to/resource |
ZipResource |
jar |
jar:/path/to/jar!/path/to/resource |
JarResource |
url |
http|https|ftp://host/path/to/resource |
URLResource |
classpath |
classpath:/path/to/resource |
ClasspathResource |
module |
module://[MODULE_NAME]/path/to/resource |
ModuleResource |
The ResourceService interface specifies a service which provides unified access to resources based only on the resource URI. The base module doesn't provide any implementation, a base implementation is provided in the boot module.
A typical use case is to get a resource from a URI without knowing the actual kind of the resource.
ResourceService resourceService = ...

Resource resource = resourceService.getResource(URI.create("classpath:/path/to/resource"));
The resource service can also be used to list resources at a given location, nonetheless this actually depends on the implementation and the kind of resource, although it is clearly possible to list resources from a file location, it might not be supported to list resources from a class path or URL location.
The boot module implementation supports for instance the listing of resources that match a specific path pattern:
ResourceService resourceService = ...

Stream<Resource> resources = resourceService.getResources(URI.create("file:/path/to/resources/**/*"));
A resource content can be read using a ReadableByteChannel as follows:
try (Resource resource = new FileResource("/path/to/file")) {
    String content = resource.openReadableByteChannel()
        .map(channel -> {
            try (ByteArrayOutputStream out = new ByteArrayOutputStream()) {
                ByteBuffer buffer = ByteBuffer.allocate(256);
                while (channel.read(buffer) > 0) {
                    out.write(buffer.array(), 0, buffer.position());
                    buffer.clear();
                }
                return new String(out.toByteArray(), Charsets.UTF_8);
            }
            finally {
                channel.close();
            }
        })
        .orElseThrow(() -> new IllegalStateException("Resource is not readable"));
}
It can also be read in a reactive way:
try(Resource resource = new FileResource("/path/to/resource")) {
    String content = Flux.from(resource.read())
        .map(chunk -> {
            try {
                return chunk.toString(Charsets.UTF_8);
            }
            finally {
                chunk.release();
            }
        })
        .collect(Collectors.joining())
        .block();
}
In a similar way, content can be written to a resource using a WritableByteChannel as follows:
try (Resource resource = new FileResource("/path/to/file")) {
    resource.openWritableByteChannel()
        .ifPresentOrElse(
            channel -> {
                try {
                    ByteBuffer buffer = ByteBuffer.wrap("Hello world".getBytes(Charsets.UTF_8));
                    channel.write(buffer);
                }
                finally {
                    channel.close();
                }
            },
            () -> {
                throw new IllegalStateException("Resource is not writable");
            }
        );
}
Data can also be written in a reactive way:
try (Resource resource = new FileResource("/path/to/resource")) {
    int nbBytes = Flux.from(resource.write(Flux.just(Unpooled.unreleasableBuffer(Unpooled.wrappedBuffer("Hello world".getBytes(Charsets.UTF_8))))))
        .collect(Collectors.summingInt(i -> i))
        .block();
    System.out.println(nbBytes + " bytes written");
}
The MediaTypeService interface specifies a service used to determine the media type of a resource based on its extension, name, path or URI. As for the resource service, a base implementation is provided in the boot module.
MediaTypeService mediaTypeService = ...

// image/png
String mediaType = mediaTypeService.getForExtension("png");
Boot
The Inverno boot module provides basic services to applications including several base implementation for interfaces defined in the base module.
The Inverno boot module is the basic building block for any application and as such it must be the first module to declare in an application module descriptor.
@io.inverno.core.annotation.Module
module io.inverno.example.app {
    requires io.inverno.mod.boot;
}
The boot module declares transitive dependencies to the core IoC/DI modules as well as base and configuration modules. They don't need to be re-declared.
This dependency must also be declared in the build descriptor:
Using Maven:
<project>
    <dependencies>
        <dependency>
            <groupId>io.inverno.mod</groupId>
            <artifactId>inverno-boot</artifactId>
        </dependency>
    </dependencies>
</project>
Using Gradle:
compile 'io.inverno.mod:inverno-boot:1.13.0'
Configuration
The BootConfiguration is used to configure the beans exposed in the boot module, the Reactor and the NetService in particular. It is itself composed of BootNetClientConfiguration, BootNetServerConfiguration and BootNetAddressResolverConfiguration.
Please refer to the API documentation to have an exhaustive description of the different configuration properties.
Reactor
The module provides two Reactor implementations: one generic implementation which creates a regular Netty event loop group and a Vert.x core implementation which uses the event loops of a Vertx instance. The Vert.x implementation is particularly suited when an Inverno application must integrate Vert.x services such as the PostgreSQL client.
The module exposes a Reactor bean whose implementation depends on the boot module configuration, more precisely the reactor_prefer_vertx parameter, and the presence of the Vert.x core module on the module path.
Net service
The module provides a base NetService implementation exposed as a bean for building network applications based on Netty.
Media type service
The module provides a base MediaTypeService implementation based on the JDK (see Files.probeContentType(Path)) and exposed as an overridable bean allowing custom implementations to be provided.
Resource service
The module provides a base ResourceService implementation exposed as a bean for accessing resources.
This base implementation supports the following schemes: file, zip, jar, classpath, module, http, https and ftp and it allows to list resources for file, zip and jar schemes.
When supported, resources are listed from a base URI specifying a path pattern using the following rules:
?matches one character*matches zero or more characters**matches zero or more directories in a path
For instance:
ResourceService resourceService = ...

// Return: '/base/test1/a', '/base/test1/a/b', '/base/test2/c'...
Stream<Resource> resources = resourceService.getResources(URI.create("file:/base/test?/**/*"));
It is also possible to resolve all resources with a specific name defined in all application modules by specifying '*' instead of the module name in a module URI:
ResourceService resourceService = ...

// all resources named '/path/to/resource' in all application modules
Stream<Resource> resources = resourceService.getResources(URI.create("module://*/path/to/resource"));
This service can be extended by injecting custom ResourceProvider providing resources for a custom URI scheme. For instance, if we create a custom Resource and corresponding ResourceProvider implementations mapped to URI scheme custom, we can extend the resource service so it can create such custom resources.
Boot boot = new Base.Boot()
    .setResourceProviders(List.of(new CustomResourceProvider())
    .build();

boot.start();

Resource customResource = boot.resourceService().get(URI.create("custom:..."));
...

boot.stop();
Converters
The module exposes various Converter implementations used across an application to convert parameter values or message payloads.
This includes the following also exposed as beans:
- a parameter converter for converting strings from/to objects, this converter can be extended by injecting specific compound decoders and encoders in the module as described in the composite converter documentation.
- a JSON
ByteBufconverter for converting raw JSON data inByteBuffrom/to objects in the application. - an
application/jsonmedia type converter for converting message payloads from/to JSON. - an
application/x-ndjsonmedia type converter for converting message payloads from/to Newline Delimited JSON - a
text/plainmedia type converter for converting message payloads from/to plain text.
Worker pool
An Inverno application must be fully reactive, most of the processing is performed in non-blocking I/O threads but sometimes blocking operations might be needed, in such cases, the worker thread pool should be used to execute these blocking operations without impacting the I/O event loop.
The default worker pool bean is a simple cached Thread pool which can be overridden by providing a different instance to the boot module.
Object mapper
A standard JSON reader/writer based on Jackson ObjectMapper is also provided. This instance shall be used across the application to perform JSON conversion operations, a global configuration can then be applied to that particular instance, or it can be overridden when creating the boot module.
The InvernoBaseModule provide serializers/deserializers for specific types defined in the base such as Settable.
The global object mapper is initialized with modules Jdk8Module, JavaTimeModule, AfterburnerModule and InvernoBaseModule() and configured to use JSR310 for dates which are serialized as timestamps following ISO 8601 representation.
Configuration
The Inverno configuration module defines a unified configuration API for building agile and highly configurable applications.
Configuration is one of the most important aspect of an application and sadly one of the most neglected. There are very few decent configuration frameworks and most of the time they relate to one part of the issue. It is important to approach configuration by considering it as a whole and not as something that can be solved by a property file here and a database there. Besides, it must be the first issue to tackle during the design phase as it will impact all aspects of the application. For instance, we can imagine an application where configuration is defined in simple property file, a complete configuration would probably be needed for each environment where the application is deployed, maintenance would be probably problematic even more when we know that configuration properties can be added, modified or removed over time.
In its most basic form, a configuration is not more than a set of properties associating a value to a key. It would be naive to think that this would be enough to build an agile and customizable application, but in the end, the property should always be considered as the basic building block for configurations.
Now, the first thing to notice is that any part of an application can potentially be configurable, from a server IP address to a color of a button in a user interface, there are multiple forms of configuration with different expectations that must coexist in an application. For instance, some parts of the configuration are purely static and do not change during the operation of an application, this is the case of a bootstrap configuration which mostly relates to the operating environment (e.g. a server port). Some other parts, on the other hand, are more dynamic and can change during the operation of an application, this is the case of tenant specific configuration or even user preferences.
Following this, we can see that a configuration greatly depends on the context in which it is loaded. The definition of a configuration, which is basically a list of property names, is dictated by the application, so when the application is running, this definition should be fixed but the context is not. For instance, the bootstrap configuration is different from one operating environment to another, user preferences are not the same from one user to another...
We can summarize this as follows:
- a configuration is a set of configuration properties.
- the configuration of an application is actually composed of multiple configurations with their own specificities.
- the definition of a configuration is bound to the application as a result the only way to change it is to change the application.
- a configuration depends on a particular context which must be considered when setting or getting configuration properties.
The configuration API has been created to address previous points, giving a maximum flexibility to precisely design how an application should be configured.
In order to use the Inverno configuration module, we need to declare a dependency in the module descriptor:
module io.inverno.example.app {
    requires io.inverno.mod.configuration;
}
And also declare that dependency in the build descriptor:
Using Maven:
<project>
    <dependencies>
        <dependency>
            <groupId>io.inverno.mod</groupId>
            <artifactId>inverno-configuration</artifactId>
        </dependency>
    </dependencies>
</project>
Using Gradle:
compile 'io.inverno.mod:inverno-configuration:1.13.0'
Configuration source
A configuration source can be any data store that holds configuration data, the API abstracts configuration data sources to provide unified access to configuration data through the ConfigurationSource interface. Specific implementations should be considered depending on the type of configuration: a bootstrap configuration is most likely to be static and stored in configuration files or environment variables whereas a tenant specific configuration is most likely to be stored in a distributed data store. But this is not a universal rule, depending on the needs we can very well consider any kind of configuration source for any kind of configuration. The configuration source abstracts these concerns from the rest of the application.
The ConfigurationSource is the main entry point for accessing configuration properties, it shall be used every time there's a need to retrieve configuration properties. It defines only one method for creating a ConfigurationQuery eventually executed in order to retrieve one or more configuration properties.
For instance, property server.uri can be retrieved as follows:
ConfigurationSource source = ...

source.get("server.url")                        // 1
    .execute()                                  // 2
    .single()                                   // 3
    .map(queryResult -> queryResult
        .toOptional()                           // 4
        .flatMap(ConfigurationProperty::asURI)  // 5
        .orElse(URI.create("http://localhost")) // 6
    )
    .subscribe(serverURI -> ...);               // 7
In the preceding example:
- create a configuration query to retrieve the
server.urlproperty - execute the query, the API is reactive so nothing will happen until a subscription is actually made on the resulting publisher of
ConfigurationQueryResult - transform the
Fluxto aMonosince we expect a single result - get the resulting configuration property as an
Optional, a query result is always returned even if the property does not exist in the source but that doesn't mean an actual configuration property as been resolved from the configuration source,toOptional()allows to convert result in a configuration propertyOptionalthat lets you decide what to do if the property is missing. Note thatConfigurationQueryResultis similar toOptionaland actually exposes most ofOptionalmethods. - convert the property value to URI if present, a property can be defined in a source with a null value which explains why the property value is also an
Optionaland why we need to useflatMap() - return the actual value if it exists or the specified default value
- subscribe to the
Monowhich actually runs the query in the source and return the property value or the default value if the property value is null or not defined in the source
This seems to be a lot to simply retrieve one property value, but if you look closely you'll understand that each of these steps is actually necessary:
- we want to be able to retrieve multiple properties and/or create more complex queries in a batch so
.execute()is required to mark the end of a batch of queries - we want to be reactive so
.single().map()andsubscribe()are required - we want to have access to the configuration query key at the origin of a property for troubleshooting as a result the query result must expose
getQueryKey()andtoOptional()methods - we want to be able to convert a property value and provide different behaviors when a property does not exist in a source or when it does exist but with a null value, as a result
.flatMap(property -> property.asURI()).orElse(URI.create("http://localhost"))is required
Hopefully, the API provides shortcuts to make above code much more compact:
ConfigurationSource source = ...

source.get("server.url")
    .execute()
    .single()
    .map(queryResult -> queryResult.asURI(URI.create("http://localhost"))) // get or default
    .subscribe(serverURI -> ...);
As we said earlier, a configuration depends on the context: a given property might have different values when considering different contexts. The configuration API defines a configuration property with a name, a value and a set of parameters specifying the context for which the property is defined. Such configuration property is referred to as a parameterized configuration property.
Some configuration source implementations do not support parameterized configuration property, they simply ignore parameters specified in queries and return the value associated to the property name. This is especially the case of environment variables which don't allow to specify property parameters.
In order to retrieve a property in a particular context we can then parameterize the configuration query as follows:
source.get("server.url")
    .withParameters("environment", "production", "zone", "us")
    .execute()
    ...
In the preceding example, we query the source for property server.url defined for the production environment in zone US. To state the obvious, both the list of parameters and their values can be determined at runtime using actual contextual values. This is what makes parameterized properties so powerful as it is suitable for a wide range of use cases. This is all the more true when using defaultable configuration sources which use defaulting strategies to determine the best matching value corresponding to a given query.
As said before the API lets you fluently query multiple properties in a batch and map the results in a configuration object.
source
    .get("server.port", "db.url", "db.user", "db.password").withParameters("environment", "production", "zone", "us")
    .and()
    .get("db.schema").withParameters("environment", "production", "zone", "us", "tenant", "someCompany")
    .execute()
    .reduceWith(
        () -> new ApplicationConfiguration(),
        (config, queryResult) -> {
            switch(queryResult.getQueryKey().getName()) {
                case "db.url": config.setDbURL(queryResult.get().asURL().orElseThrow());
                    break;
                case "db.user": config.setDbUser(queryResult.get().asString("default"));
                    break;
                case "db.password": config.setDbPassword(queryResult.get().asString("password"));
                    break;
                case "db.schema": config.setDbSchema(queryResult.get().asString("default"));
                    break;
            }
            return config;
        }
    );
    .subscribe(config -> {
        ...
    });
The beauty of being reactive is that it comes with a lot of cool features such as the ability to re-execute a query or caching the result. A Flux or a Mono executes on subscriptions, which means we can create a complex query to retrieve a whole configuration, keep the resulting Reactive Streams Publisher and subscribe to it when needed. A Reactive Stream publisher can also cache configuration results.
Mono<ApplicationConfiguration> configurationLoader = ... // see previous example

// Query the source on each subscription
configurationLoader.subscribe(config -> {
    ...
});

// Cache the configuration for five minutes
Mono<ApplicationConfiguration> cachedConfigurationLoader = configurationLoader.cache(Duration.ofMinutes(5));

// Query the source on first subscription, further subscriptions within a window of 5 minutes will get the cached configuration
cachedConfigurationLoader.subscribe(config -> {
    ...
});
Although publisher caching is a cool feature, it might not be ideal for complex caching use cases and more solid solution should be considered.
A configuration source relies on a SplittablePrimitiveDecoder to decode property values. Configuration source implementations usually provide a default decoder, but it is possible to inject custom decoders to decode particular configuration values. The expected decoder implementation depends on the configuration source implementation but most of the time a string to object decoder is expected.
SplittablePrimitiveDecoder<String> customDecoder = ...

PropertyFileConfigurationSource source = new PropertyFileConfigurationSource(new ClasspathResource(URI.create("classpath:/path/to/configuration.properties")), customDecoder)
The regular and most efficient way to query a configuration source is to target specific configuration properties identified by a name and a set of parameters. However, there are some cases that actually require to list all values defined for a particular property name and matching a particular set of parameters.
for instance, this is typically the case when configuring log levels, since we can hardly know the name of each and every logger used in an application, it is easier, safer and more efficient in that case to list all the configuration properties defined for a logging.level property and apply the configuration to the loggers based on the parameters of the returned properties.
For instance, the following properties can be defined in the configuration:
logging.level[]=info
logging.level[logger="logger1"]=debug
logging.level[logger="logger2"]=trace
logging.level[logger="logger3"]=error
These configuration properties can then be listed in the application as follows:
// Returns all logging.level properties defined in the configuration source
List<ConfigurationProperty> result = source.list("logging.level")
    .executeAll()
    .collectList()
    .block();

// Apply logging configuration
for(ConfigurationProperty p : result) {
    Optional<String> loggerName = p.getKey().getParameter("logger");
    Level level = p.as(Level.class).get();
    // Configure logger...
}
The executeAll() method returns all the properties defined in the configuration source for a particular property name and matching the set of parameters defined in the query whether they are defined with extra parameters or not. For instance, if we extend our example by adding an environment parameter:
logging.level[]=info
logging.level[environment="dev",logger="logger1"]=debug
logging.level[environment="prod",logger="logger2"]=trace
logging.level[logger="logger3"]=error
The following list query will return all values that are defined with a logger parameter whether they are defined with an environment parameter or not. Please note how the logger parameter is specified in the query as a wildcard:
// Returns logging.level[environment="dev", logger="logger1"], logging.level[environment="prod", logger="logger2"] and logging.level[logger="logger3"]=error which are all defined with parameter logger
List<ConfigurationProperty> result = source.list("logging.level")
    .withParameters(Parameter.wildcard("logger"))
    .executeAll()
    .collectList()
    .block();
On the other hand, the execute() method is exact and returns all the properties defined in the configuration source for a particular property name and which parameters exactly match the set of parameters defined in the query, excluding those that are defined with extra parameters:
// Returns logging.level[logger="logger3"]=error which exactly defines parameter logger
List<ConfigurationProperty> result = source.list("logging.level")
    .withParameters(Parameter.wildcard("logger"))
    .execute()
    .collectList()
    .block();
Configurable configuration source
A configurable configuration source is a particular configuration source which supports configuration properties updates. The Redis configuration source is an example of configurable configuration source.
The ConfigurableConfigurationSource interface is the main entry point for updating configuration properties, it shall be used every time there's a need to retrieve or set configuration properties.
It extends the ConfigurationSource with one method for creating a ConfigurationUpdate instance eventually executed in order to set one or more configuration properties in the configuration source.
For instance, a parameterized property server.port can be set in a configuration source as follows:
ConfigurableConfigurationSource source = null;

source.set("server.port", 8080)
    .withParameters("environment", "production", "zone", "us")
    .execute()
    .single()
    .subscribe(
        updateResult -> {
            try {
                updateResult.check();
                // Update succeeded
                ...
            }
            catch(ConfigurationSourceException e) {
                // Update failed
                ...
            }
        }
    );
A configurable configuration source relies on a JoinablePrimitiveEncoder to encode property values. Implementations usually provide a default encoder but it is possible to inject custom encoders to encode particular configuration values. The expected encoder implementation depends on the configuration source implementation but most of the time an object to string encoder is expected.
RedisClient redisClient = ...
JoinablePrimitiveEncoder<String> customEncoder = ...
SplittablePrimitiveDecoder<String> customDecoder = ...

RedisConfigurationSource source = new RedisConfigurationSource(redisClient, customEncoder, customDecoder)
Defaultable configuration source
By default, a configuration source returns the result that exactly match the configuration query. When considering parameterized configuration properties, this behaviour can quickly become quite restrictive and a defaulting mechanism that would allow to select the best matching value among those defined in the source could reveal their full potential.
A defaultable configuration source is a particular source that can rely on a defaulting strategy to determine the best matching value for a given configuration query. A defaultable configuration source implements DefaultableConfigurationSource which allows to choose the defaulting strategy to use by wrapping the original source:
DefaultableConfigurationSource source = ...

DefaultableConfigurationSource defaultingSource = source.withDefaultingStrategy(DefaultingStrategy.lookup());

DefaultableConfigurationSource originalSource = defaultingSource.unwrap();
A DefaultingStrategy provides two methods #getDefaultingKeys(ConfigurationKey queryKey) and #getListDefaultingKeys(ConfigurationKey queryKey) which respectively derives the actual keys to retrieve from the source ordered by priorities from the highest to the lowest to determine the best-matching value for the query (the first existing value shall be returned) and the actual keys that must be retained when listing properties. The configuration module provides three implementations: DefaultingStrategy#noOp() strategy, DefaultingStrategy#lookup() and DefaultingStrategy#wildcard().
noOp defaulting strategy
The noOp strategy is used to return exact results. This is the default behaviour for all configuration sources.
lookup defaulting strategy
The lookup strategy prioritizes query parameters from left to right and is used to return the best matching property as the one matching the most continuous parameters from left to right.
If we consider query key property[p1=v1,...pn=vn], it supersedes key property[p1=v1,...pn-1=vn-1] which supersedes key property[p1=v1,...pn-2=vn-2]}... which supersedes key property[]. It basically tells the source to lookup by successively removing the rightmost parameter if no exact result exists for a particular query.
For instance, if we consider a source with the following properties:
log.level[]=INFOlog.level[environment = "prod"]=WARNlog.level[environment = "prod", name = "test1"]=ERROR
We can run the following queries with defaulting:
DefaultableConfigurationSource source = null;
    source = source.withDefaultingStrategy(DefaultingStrategy.lookup());
    source
        .get("log.level").withParameters("environment", "dev", "name", "test1").and()  // 1
        .get("log.level").withParameters("environment", "prod", "name", "test2").and() // 2
        .get("log.level").withParameters("environment", "prod", "name", "test1").and() // 3
        .get("log.level").withParameters("name", "test1").and()                        // 4
        .get("log.level").withParameters("name", "test2", "environment", "prod")       // 5
        .execute()
        ...
- Returns
INFOwhich corresponds tolog.level[]property since propertieslog.level[environment = "dev", name = "test1"]andlog.level[environment = "dev"]are not defined - Returns
WARNwhich corresponds tolog.level[environment = "prod"]since propertylog.level[environment = "dev", name = "test2"]is not defined - Returns
ERRORwhich corresponds to the exact match - Returns
INFOwhich corresponds tolog.level[]property since propertylog.level[name = "test1"]is not defined - Returns
INFOwhich corresponds tolog.level[]properties since propertylog.level[name = "test2", "environment", "prod"]andlog.level[name = "test2"]are not defined
Since parameters are prioritized from left to right, the order into which they are defined in the query is important. As you can see in above example querying log.level[environment = "prod", name = "test2"] is not the same as querying log.level[name = "test2", environment = "prod"].
A query with n parameters results in at most n+1 properties being retrieved from the source depending on the implementation.
wildcard defaulting strategy
The wildcard strategy returns the best matching property as the one matching the most of the query parameters while prioritizing them from left ro right.
If we consider query key property[p1=v1,...pn=vn], the most precise result is the one defining parameters [p1=v1,...pn=vn], it supersedes results that define n-1 query parameters, which supersedes results that define n-2 query parameters... which supersedes results that define no query parameters. Conflicts may arise when a source defines a property with different set of query parameters with the same cardinality (e.g. when it defines properties property[p1=v1,p2=v2] and property[p1=v1,p3=v3]). In such situation, priority is always given to parameters from left to right (therefore property[p1=v1,p2=v2] supersedes property[p1=v1,p3=v3]).
Considering previous example but with the wildcard strategy instead of the lookup strategy, some queries have different results:
DefaultableConfigurationSource source = null;
    source = source.withDefaultingStrategy(DefaultingStrategy.wildcard());
    source
        .get("log.level").withParameters("environment", "dev", "name", "test1").and()  // 1
        .get("log.level").withParameters("environment", "prod", "name", "test2").and() // 2
        .get("log.level").withParameters("environment", "prod", "name", "test1").and() // 3
        .get("log.level").withParameters("name", "test1").and()                        // 4
        .get("log.level").withParameters("name", "test2", "environment", "prod")       // 5
        .execute()
        ...
- Returns
INFOwhich corresponds tolog.level[]property since propertieslog.level[environment = "dev", name = "test1"],log.level[environment = "dev"]andlog.level[name = "test1"]are not defined - Returns
WARNwhich corresponds tolog.level[environment = "prod"]since propertylog.level[environment = "dev", name = "test2"]is not defined and propertylog.level[environment = "prod"]is defined (it would also have superseded propertylog.level[environment = "test2"]if it had been defined) - Returns
ERRORwhich corresponds to the exact match - Returns
INFOwhich corresponds tolog.level[]property since propertylog.level[name = "test1"]is not defined - Returns
WARNwhich corresponds tolog.level[environment = "prod"]since propertieslog.level[name = "test2", environment = "prod"]andlog.level[name = "test2"]are not defined, but propertylog.level[environment = "prod"]is defined
As for the lookup strategy, the order into which they are defined in the query is important and querying log.level[environment = "prod", name = "test2"] is not the same as querying log.level[name = "test2", environment = "prod"].
A query with n parameters results in at most 2n properties being retrieved from the source depending on the implementation.
Map configuration source
The map configuration is the most basic configuration source implementation. It exposes configuration properties stored in a map in memory. It doesn't support parameterized properties, regardless of the parameters specified in a query, only the property name is considered when resolving a value.
MapConfigurationSource source = new MapConfigurationSource(Map.of("server.url", new URL("http://localhost")));
...
This source is defaultable, and it can be used for testing purpose in order to provide a mock configuration source.
System environment configuration source
The system environment configuration source exposes system environment variables as configuration properties. As for the map configuration source, this implementation doesn't support parameterized properties.
$ export SERVER_URL=http://localhost
SystemEnvironmentConfigurationSource source = new SystemEnvironmentConfigurationSource();
...
This implementation can be used to bootstrap an application using system environment variables.
System properties configuration source
The system properties configuration source exposes system properties as configuration properties. As for the two previous implementations, it doesn't support parameterized properties.
$ java -Dserver.url=http://localhost ...
SystemPropertiesConfigurationSource source = new SystemPropertiesConfigurationSource();
...
This implementation can be used to bootstrap an application using system properties.
Command line configuration source
The command line configuration source exposes configuration properties specified as command line arguments of the application. This implementation supports parameterized properties.
Configuration properties must be specified as application arguments using the following syntax: --property[parameter_1=value_1...parameter_n=value_n]=value where property and parameter names are valid Java identifiers and property and parameter values are Java primitives such as integer, boolean, string... A complete description of the syntax can be found in the API documentation.
For instance the following are valid configuration properties specified as command line arguments:
$ java ... Main \
--web.server_port=8080 \
--web.server_port[profile="ssl"]=8443 \
--db.url[env="dev"]="jdbc:oracle:thin:@dev.db.server:1521:sid" \
--db.url[env="prod",zone="eu"]="jdbc:oracle:thin:@prod_eu.db.server:1521:sid" \
--db.url[env="prod",zone="us"]="jdbc:oracle:thin:@prod_us.db.server:1521:sid"
public static void main(String[] args) {
    CommandLineConfigurationSource source = new CommandLineConfigurationSource(args);
    ...
}
...
This implementation is defaultable.
.properties file configuration source
The .properties file configuration source exposes configuration properties specified in a .properties file. This implementation supports parameterized properties.
Configuration properties can be specified in a property file using a syntax similar to the command line configuration source for the property key. Some characters must be escaped with respect to the .properties file format. Property values don't need to follow Java's notation for strings since they are considered as strings by design.
web.server_port=8080
web.server_port[profile\="ssl"]=8443
db.url[env\="dev"]=jdbc:oracle:thin:@dev.db.server:1521:sid
db.url[env\="prod",zone\="eu"]=jdbc:oracle:thin:@prod_eu.db.server:1521:sid
db.url[env\="prod",zone\="us"]=jdbc:oracle:thin:@prod_us.db.server:1521:sid
PropertyFileConfigurationSource source = new PropertyFileConfigurationSource(new ClasspathResource(URI.create("classpath:/path/to/file")));
...
This implementation is defaultable.
.cprops file configuration source
The .cprops file configuration source exposes configuration properties specified in a .cprops file. This implementation supports parameterized properties.
The .cprops file format has been introduced to facilitate the definition and reading of parameterized properties. it allows in particular to regroup the definition of properties with common parameters into sections and many more.
For instance:
### This is a comment
server.port=8080
db.url=jdbc:oracle:thin:@localhost:1521:sid
db.user=user
db.password=password
log.level=ERROR
application.greeting.message="""
 === Welcome! ===

     This is
    a formated
     message.

 ================
"""

[ environment="test" ] {
    db.url=jdbc:oracle:thin:@test:1521:sid
    db.user=user_test
    db.password=password_test
}

[ environment="production" ] {
    db.url=jdbc:oracle:thin:@production:1521:sid
    db.user=user_production
    db.password=password_production

    [ zone="US" ] {
        db.url=jdbc:oracle:thin:@production.us:1521:sid
    }

    [ zone="EU" ] {
        db.url=jdbc:oracle:thin:@production.eu:1521:sid
    }

    [ zone="EU", node="node1" ] {
        log.level=DEBUG
    }
}
A complete JavaCC grammar is available in the source of the configuration module.
CPropsFileConfigurationSource source = new CPropsFileConfigurationSource(new ClasspathResource(URI.create("classpath:/path/to/file")));
...
This implementation is defaultable.
Redis configuration source
The Redis configuration source exposes configuration properties stored in a Redis data store. This implementation supports parameterized properties, and it is also configurable which means it can be used to set configuration properties in the data store at runtime.
The following example shows how to set configuration properties for the dev and prod environment:
RedisClient<String, String> redisClient = ...
RedisConfigurationSource source = new RedisConfigurationSource(redisClient);

source
    .set("db.url", "jdbc:oracle:thin:@dev.db.server:1521:sid").withParameters("environment", "dev").and()
    .set("db.url", "jdbc:oracle:thin:@prod_eu.db.server:1521:sid").withParameters("environment", "prod", "zone", "eu").and()
    .set("db.url", "jdbc:oracle:thin:@prod_us.db.server:1521:sid").withParameters("environment", "prod", "zone", "us")
    .execute()
    .blockLast();
This implementation is defaultable.
Versioned Redis configuration source
The versioned Redis configuration source exposes configuration properties stored in a Redis data store. This implementation supports parameterized properties, and it is also configurable which means it can be used to set configuration properties in the data store at runtime.
The main difference with the Redis configuration source lies in the fact that it also provides a simple but effective versioning system which allows to set multiple properties and activate or revert them atomically. A global revision keeps track of the whole data store, but it is also possible to version a particular branch in the tree of properties.
The following example shows how to set configuration properties for the dev and prod environment and activates them globally or independently:
RedisTransactionalClient<String, String> redisClient = ...
VersionedRedisConfigurationSource source = new VersionedRedisConfigurationSource(redisClient);

source
    .set("db.url", "jdbc:oracle:thin:@dev.db.server:1521:sid").withParameters("environment", "dev").and()
    .set("db.url", "jdbc:oracle:thin:@prod_eu.db.server:1521:sid").withParameters("environment", "prod", "zone", "eu").and()
    .set("db.url", "jdbc:oracle:thin:@prod_us.db.server:1521:sid").withParameters("environment", "prod", "zone", "us")
    .execute()
    .blockLast();

// Activate working revision globally
source.activate().block();

// Activate working revision for dev environment and prod environment independently
source.activate("environment", "dev").block();
source.activate("environment", "prod").block();
It is also possible to fall back to a particular revision by specifying it in the activate() method:
// Activate revision 2 globally
source.activate(2).block();
This implementation is particularly suitable to load tenant specific configuration in a multi-tenant application, or user preferences... basically any kind of configuration that can and will be dynamically changed at runtime and might require atomic activation or fallback.
Parameterized properties and versioning per branch are two simple yet powerful features, but it is important to be picky here otherwise there is a real risk of messing things up. You should thoughtfully decide when a configuration branch can be versioned, for instance the versioned sets of properties must be disjointed (if this is not obvious, think again), this is actually checked in the Redis configuration source and an exception will be thrown if you try to do things like this, basically trying to version the same property twice.
This implementation is defaultable.
Composite Configuration source
The composite configuration source is a configuration source implementation that allows to compose multiple configuration sources into one configuration source.
The property returned for a configuration query key then depends on the order in which configuration sources were defined in the composite configuration source, from the highest priority to the lowest.
The CompositeConfigurationSource resolves a configuration property by querying its sources in sequence from the highest priority to the lowest. It relies on a CompositeConfigurationStrategy to determine at each round which queries to execute and retain the best matching property from the results. The best matching property is the property whose key is the closest to the original configuration query key according to a DefaultingStrategy. The algorithm stops when an exact match is found or when there's no more configuration source to query.
A common defaulting strategy provided by the CompositeConfigurationStrategy is applied to all sources before executing a batch of queries, this allows to remain consistent and use a common defaulting strategy as well as optimizing the queries to execute on each source by keeping track of intermediate results.
For a composite configuration source using a CompositeConfigurationStrategy#lookup() strategy, which is the default, the best matching property for a given original query is determined by prioritizing query parameters from left to right as defined by the lookup defaulting strategy. As a result, an original query with n parameters results in n+1 queries being executed on a source if no property was retained in previous rounds and n-p queries if a property with p parameters (p<n) was retained in previous rounds. Please remember that when using the lookup defaulting strategy the order into which parameters are specified in the original query is significant: property[p1=v1,p2=v2] is not the same as property[p2=v2,p1=v1].
Let's consider two parameterized configuration sources: source1 and source2.
source1 holds the following properties:
server.url[]=nullserver.url[zone="US", environment="production"]="https://prod.us"server.url[zone="EU"]="https://default.eu"
source2 holds the following properties:
server.url[]="https://default"server.url[environment="test"]="https://test"server.url[environment="production"]="https://prod"
We can compose them in a composite configuration source as follows:
ConfigurationSource source1 = ...
ConfigurationSource source2 = ...

CompositeConfigurationSource source = new CompositeConfigurationSource(List.of(source1, source2));

source
    .get("server.url").withParameters("zone", "US", "environment", "production")       // 1
    .and().get("server.url").withParameters("environment", "test")                     // 2
    .and().get("server.url")                                                           // 3
    .and().get("server.url").withParameters("zone", "EU", "environment", "production") // 4
    .and().get("server.url").withParameters("environment", "production", "zone", "EU") // 5
    .subscribe(result -> ...);
In the example above:
server.url[environment="production",zone="US"]is exactly defined insource1=>https://prod.usdefined insource1is returnedserver.url[environment="test"]is not defined insource1but exactly defined insource2=>https://testdefined insource2is returned- Although
server.url[]is defined in bothsource1andsource2,source1has the highest priority and therefore =>nullis returned - There is no exact match for
server.url[zone="EU", environment="production"]in bothsource1andsource2, the priority is given to the parameters from left to right, the property matchingserver.url[zone="EU"]shall be returned =>https://default.eudefined insource1is returned - Here we've simply changed the order of the parameters in the previous query, again the priority is given to parameters from left to right, since there is no match for
server.url[environment="production", zone="EU"],server.url[environment="production"]is considered =>https://proddefined insource2is returned
When considering multiple configuration sources, properties can be defined with the exact same key in two different sources, the source with the highest priority wins. In the last example we've been able to set the value of server.url[] to null in source1. However, null is itself a value with a different meaning than a missing property, the unset value can be used in such situation to unset a property defined in a source with a lower priority.
For instance, considering previous example, we could have defined server.url[]=unset instead of server.url[]=null in source1, the query would then have returned an empty query result indicating an undefined property.
Prioritization and defaulting also apply when listing configuration properties on a composite configuration source. In case of conflict between two configuration sources, the default strategy retains the one defined by the source with the highest priority.
For instance, if we consider the following sources: source1 and source2.
source1 holds the following properties:
logging.level[environment="dev"]=infologging.level[environment="dev",name="test1"]=infologging.level[environment="prod",name="test1"]=infologging.level[environment="prod",name="test4"]=errorlogging.level[environment="prod",name="test5"]=infologging.level[environment="prod",name="test1",node="node-1"]=trace
source2 holds the following properties:
logging.level[environment="dev",node="node-1"]=infologging.level[environment="dev",name="test1"]=debuglogging.level[environment="dev",name="test2"]=debuglogging.level[environment="dev",name="test2",node="node-1"]=debuglogging.level[environment="prod",name="test1"]=warnlogging.level[environment="prod",name="test2"]=errorlogging.level[environment="prod",name="test3"]=info
If we can compose them in a composite configuration source, we can list configuration properties as follows:
ConfigurationSource source1 = ...
ConfigurationSource source2 = ...

CompositeConfigurationSource source = new CompositeConfigurationSource(List.of(source1, source2));

source                                       // 1
    .list("logging.level")
    .withParameters(
        Parameter.of("environment", "prod"),
        Parameter.wildcard("name")
    )
    .execute()
    .subscribe(result -> ...);

source                                       // 2
    .list("logging.level")
    .withParameters(
        Parameter.of("environment", "dev"),
        Parameter.wildcard("name")
    )
    .executeAll()
    .subscribe(result -> ...);
In the example above:
execute()is exact and returns properties defined with parametersenvironmentandname, with parameterenvironmentonly and with no parameter following defaulting rules implemented in the default strategy. As a result the following properties are returned:logging.level[environment="prod",name="test1"]=infodefined insource1and overriding the property defined insource2logging.level[environment="prod",name="test2"]=errordefined insource2logging.level[environment="prod",name="test3"]=infodefined insource2logging.level[environment="prod",name="test4"]=errordefined insource1logging.level[environment="prod",name="test5"]=infodefined insource1
executeAll()returns all properties defined with parametersenvironment,nameand any other parameter, with parameterenvironmentonly and with no parameter following defaulting rules implemented in the default strategy. As a result the following properties are returned:logging.level[environment="dev"]=infodefined insource1which is the property that would be returned when querying the source with an unspecified name (e.g.logging.level[environment="dev",name="unspecifiedLogger"])logging.level[environment="dev",name="test1"]=infodefined insource1and overriding the property defined insource2logging.level[environment="dev",name="test2"]=debugdefined insource2logging.level[environment="dev",name="test2",node="node-1"]=debugdefined insource2
it is important to note that list operations, especially on a very large set of data can become quite expensive and impact performances, as a result they must be used wisely.
Bootstrap configuration source
The bootstrap configuration source is a composite configuration source preset with configuration sources typically used when bootstrapping an application.
This implementation resolves configuration properties from the following sources in that order, from the highest priority to the lowest:
- command line
- system properties
- system environment variables
- the
configuration.cpropsfile in./conf/or${inverno.conf.path}/directories if one exists (if the first one exists the second one is ignored) - the
configuration.cpropsfile in${java.home}directory if it exists - the
configuration.cpropsfile in the application module if it exists
This source is typically created in a main method to load the bootstrap configuration on startup.
public class Application {

    public static void main(String[] args) {
        BootstrapConfigurationSource source = new BootstrapConfigurationSource(Application.class.getModule(), args);

        // Load configuration
        ApplicationConfiguration configuration = ConfigurationLoader
            .withConfiguration(ApplicationConfiguration.class)
            .withSource(source)
            .load()
            .block();

        // Start the application with the configuration
        ...
    }
}
Configuration loader
The API offers a great flexibility but as we've seen it might require some efforts to load a configuration in a usable explicit Java bean. Hopefully, this has been anticipated and the configuration module provides a configuration loader to smoothly load configuration objects in the application.
The ConfigurationLoader interface is the main entry point for loading configuration objects from a configuration source. It can be used in two different ways, either dynamically using Java reflection or statically using the Inverno compiler.
Dynamic loader
A dynamic loader can be created by invoking static method ConfigurationLoader#withConfiguration() which accepts a single Class argument specifying the type of the configuration that must be loaded.
A valid configuration type must be an interface defining configuration properties as non-void no-argument methods whose names correspond to the configuration properties to retrieve and to map to the resulting configuration object, default values can be specified in default methods.
For instance the following interface represents a valid configuration type which can be loaded by a configuration loader:
public interface AppConfiguration {

    // query property 'server_host'
    String server_host();

    // query property 'server_port'
    default int server_port() {
        return 8080;
    }
}
It can be loaded at runtime as follows:
ConfigurationSource source = ...

ConfigurationLoader
    .withConfiguration(AppConfiguration.class)
    .withSource(source)
    .withParameters("environment", "production")
    .load()
    .map(configuration -> startServer(configuration.server_host(), configuration.server_port()))
    .subscribe();
In the above example, the configuration source is queried for properties server_host[environment="production"] and server_port[environment="production"].
The dynamic loader also supports nested configurations when the return type of a method is an interface representing a valid configuration type.
public interface ServerConfiguration {

    // query property 'server_host'
    String server_host();

    // query property 'server_port'
    default int server_port() {
        return 8080;
    }
}
public interface AppConfiguration {

    // Prefix child property names with 'server_configuration'
    ServerConfiguration server_configuration();
}
In the above example, the configuration source is queried for properties server_configuration.server_host[environment="production"] and server_configuration.server_port[environment="production"].
It is also possible to load a configuration by invoking static method ConfigurationLoader#withConfigurator() which allows to load any type of configuration (not only interface) by relying on a configurator and a mapping function.
A configurator defines configuration properties as void single argument methods whose names correspond to the configuration properties to retrieve and inject into a configurator instance using a dynamic configurer Consumer<Configurator>. The mapping function is finally applied to that configurer to actually create the resulting configuration object.
For instance, previous example could have been implemented as follows:
public class AppConfiguration {

    private String server_host;
    private String server_port = 8080;

    // query property 'server_host'
    public void server_host(String server_host) {
        this.server_host = server_host;
    }

    // query property 'server_port'
    public void server_port(int server_port) {
        this.server_port = server_port;
    }

    public String server_host() {
        return server_host;
    }

    public int server_port() {
        return server_port;
    }
}
ConfigurationSource source = ...

ConfigurationLoader
    .withConfigurator(AppConfiguration.class, configurer -> {
        AppConfiguration configuration = new AppConfiguration();
        configurer.apply(configuration);
        return configuration;
    })
    .withSource(source)
    .withParameters("environment", "production")
    .load()
    .map(configuration -> startServer(configuration.server_host(), configuration.server_port()))
    .subscribe();
Static loader
Dynamic loading is fine, but it relies on Java reflection which induces extra processing at runtime and might cause unexpected runtime errors due to the lack of static checking. This is all the more true as most of the time configuration definitions are known at compile time. For these reasons, it is better to create adhoc configuration loader implementations. Fortunately, the configuration Inverno compiler plugin can generate these for us.
In order to create a configuration bean in an Inverno module, we simply need to create an interface for our configuration as specified above and annotates it with @Configuration, this will tell the configuration Inverno compiler plugin to generate a corresponding configuration loader implementation as well as a module bean making our configuration directly available inside our module.
@Configuration
public interface AppConfiguration {

    // query property 'server_host'
    String server_host();

    // query property 'server_port'
    int server_port();
}
The preceding code will result in the generation of class AppConfigurationLoader which can then be used to load configuration at runtime without resorting to reflection.
ConfigurationSource source = ...

new AppConfigurationLoader()
    .withSource(source)
    .withParameters("environment", "production")
    .load()
    .map(configuration -> startServer(configuration.server_host(), configuration.server_port()))
    .subscribe();
A configuration can also be obtained manually as follows:
AppConfiguration defaultConfiguration = AppConfigurationLoader.load(configurator -> configurator.server_host("0.0.0.0"));

AppConfiguration customConfiguration = AppConfigurationLoader.load(configurator -> configurator.server_host("0.0.0.0"));
By default, the generated loader also defines an overridable module bean which loads the configuration in the module. This bean defines three optional sockets:
- configurationSource indicates the configuration source to query when initializing the configuration bean
- parameters indicates the parameters to consider when querying the source
- configurer provides a way to overrides default values
If no configuration source is present, a default configuration is created, otherwise the configuration source is queried with the parameters, the resulting configuration is then patched with the configurer if present. The bean is overridable by default which means we can inject our own implementation if we feel like it.
It is possible to disable the activation of the configuration bean or make it non overridable in the @Configuration interface:
@Configuration(generateBean = false, overridable = false)
public interface AppConfiguration {
    ...
}
Finally, nested beans can be specified in a configuration which is convenient when a module is composing multiple modules, and we wish to aggregate all configurations into one single representation in the composite module.
For instance, we can have the following configuration defined in a component module:
@Configuration
public interface ComponentModuleConfiguration {
    ...
}
and the following configuration defined in the composite module:
@Configuration
public interface CompositeModuleConfiguration {

    @NestedBean
    ComponentModuleConfiguration component_module_configuration();
}
In the preceding example, we basically indicate to the Inverno framework that the ComponentModuleConfiguration defined in the CompositeModuleConfiguration must be injected into the component module instance.
Discovery
The Inverno Discovery module specifies a service discovery API for resolving service instances from a service identifier in the form of a URI.
In a distributed architecture a service is typically served by one or more servers to ensure redundancy and horizontal scalability. A service instance, as the name suggest, represents an instance of a service, it is used within an application to process service requests on a remote server. For instance, an HTTP service instance typically exposes exactly one HTTP endpoint used to send HTTP request to an HTTP server hosting the service.
In order to implement the discovery API for resolving specific service instances we need to declare a dependency to the API in the module descriptor:
module io.inverno.example.discovery.impl {
    requires io.inverno.mod.discovery;
}
And also declare this dependency in the build descriptor:
Using Maven:
<project>
    <dependencies>
        <dependency>
            <groupId>io.inverno.mod</groupId>
            <artifactId>inverno-discovery</artifactId>
        </dependency>
    </dependencies>
</project>
Using Gradle:
compile 'io.inverno.mod:inverno-discovery:1.13.0'
The Inverno framework provides several modules implementing the discovery API resolving different services in various ways:
- the discovery HTTP module defines the HTTP discovery API and provides an HTTP discovery service using simple DNS resolution.
- the discovery HTTP Kubernetes module provides an HTTP discovery service resolving HTTP instances from environment variables defined for Kubernetes services in pods containers.
- the discovery HTTP meta module defines HTTP meta service which supports advanced features such as client-side load balancing, request routing, request rewriting... and provides an HTTP discovery service resolving meta HTTP service descriptors from a configuration source.
Service discovery API
The discovery API defines the DiscoveryService interface which is used to resolve a Service from a ServiceId and a TrafficPolicy. A Service exposes one or more ServiceInstance eventually used to execute a service request. The TrafficPolicy, when applicable, can be used by a service to specify specific configuration for connecting to the service instances and/or to specify how instances are selected for executing a particular request. For that purpose, a TrafficLoadBalancer is obtained from the traffic policy in order to load balance the set of service instances.
Service ID
A service is uniquely identified by a ServiceID which comes down to a URI respecting the following rules:
- It must be absolute (i.e. it must have a scheme).
- If the URI is hierarchical (i.e. its scheme-specific-part starts with a
/) it must define an authority component. - it doesn't define a path component, a query component or a fragment component.
When creating a service ID from a URI, the path, query or fragment components are ignored to only keep the scheme and the scheme-specific-part for opaque URIs and the scheme and the authority for hierarchical URIs.
The scheme designates the type of service, it can be a well known network service protocol such as http://, ftp://... in which case it is used by both the discovery service for resolving the service and the service itself for creating the service instances. The scheme can also designate a logical service such as conf:// or k8s://, this is more intended to be used by a discovery service resolving logical services which compose one or more network services.
ServiceID httpServiceID1 = ServiceID.of("http://example.org");
ServiceID httpServiceID2 = ServiceID.of("http://example.org/some/path"); // equals to httpServiceID1 since path is ignored

ServiceID confService = ServiceID.of("conf://servicename");
Let's consider a sample network service using the sample protocol. A sample service URI can then be defined as a hierarchical URI with the sample scheme, an authority a host and a port.
ServiceID httpServiceID1 = ServiceID.of("sample://host:1234");
Service instance and traffic policy
A service typically designates any network service exposed on one or more servers and accepting requests in a particular protocol, but it can also represent a logical construction of one or more such services (e.g. HTTP meta services). When implementing the discovery API for resolving a particular type of service, specific ServiceInstance and TrafficPolicy shall be defined. From there, multiple DiscoveryService implementations can be provided.
In order to implement sample service discovery we also must have a sample client module that we can use to connect to the sample servers where to send requests using the sample protocol. When resolving a sample service, the service instances provided in the resolved service uses that client module to connect to the particular server instance and send requests.
When establishing a connection, the server, and therefore the client, might require some configuration like for instance credentials, certificates, some specific protocol configuration like timeouts or maximum concurrent requests... Again this configuration is specific to the sample service, it can be either resolved in the sample service where instances are created, in the traffic policy specified when resolving the service or both.
A service can be served by multiple instances resolved inside the service which uses the traffic policy to obtain a TrafficLoadBalancer used when executing a request to select one instance to send it to. The traffic policy then also defines how requests should be load balanced among the service instances. The load balancing strategy can be service-agnostic like basic random or round-robin strategies, or specific to a service when it uses specific information only exposed by a specific instance (e.g. load factor, number of active requests...).
We then need to create a specific ServiceInstance and TrafficPolicy instances for the sample service:
package io.inverno.example.discovery.sample;

import io.inverno.mod.discovery.ServiceID;
import io.inverno.mod.discovery.ServiceInstance;
import java.net.InetSocketAddress;
import reactor.core.publisher.Mono;

public class SampleServiceInstance implements ServiceInstance {

    public final SampleClient client;

    public SampleServiceInstance(InetSocketAddress address, SampleTrafficPolicy trafficPolicy) {
        this.client = new SampleClient(address, trafficPolicy.getUsername(), trafficPolicy.getPassword());
    }

    public Mono<SampleResponse> execute(SampleRequest request) {
        return this.client.send(request);
    }

    public Mono<Void> shutdown() {
        return this.client.shutdown();
    }

    public Mono<Void> shutdownGracefully() {
        return this.client.shutdownGracefully();
    }
}
In the interest of simplification, the SampleTrafficPolicy hereafter always returns a RandomTrafficLoadBalancer.
package io.inverno.example.discovery.sample;

import io.inverno.mod.discovery.RandomTrafficLoadBalancer;
import io.inverno.mod.discovery.TrafficPolicy;

public class SampleTrafficPolicy implements TrafficPolicy<SampleServiceInstance, SampleRequest> {

    private final String username;
    private final String password;

    public SampleTrafficPolicy(String username, String password) {
        this.username = username;
        this.password = password;
    }

    public String getUsername() {
        return this.username;
    }

    public String getPassword() {
        return this.password;
    }

    public TrafficLoadBalancer<SampleServiceInstance, SampleRequest> getLoadBalancer(Collection<SampleServiceInstance> instances) throws IllegalArgumentException {
        return new RandomTrafficLoadBalancer<>(instances);
    }
}
The discovery API supplies basic traffic load balancer implementations: RandomTrafficLoadBalancer, WeightedRandomTrafficLoadBalancer, RoundRobinTrafficLoadBalancer and WeightedRoundRobinTrafficLoadBalancer. Weighted load balancers can load balance WeightedServiceInstance defined with different weights specifying the relative share of requests a given instance can handle. For instance considering a service with two weighted instances with respective weights 1 and 2, the second instance shall then receive twice as many requests as the first.
Service
A Service is returned by a DiscoveryService when a service has been successfully resolved, it holds the resolved service instances and is responsible for selecting them when executing service requests. To do so, it can rely on the traffic policy providing traffic load balancer and/or the request itself which allows for more complex construct such as content based routing.
For instance a sample service request can be executed as follows:
SampleRequest request = ...

Service<SampleServiceInstance, SampleRequest, SampleTrafficPolicy> sampleService = ...

SampleResponse response = sampleService.getInstance(request)
    .flatMap(instance -> instance.execute(request))
    .block();
In the most common case, a service implementation typically gets a TrafficLoadBalancer from the traffic policy and use it to load balance requests among the list of service instances but since the request is passed when resolving an instance, specific implementations can also route a request to a particular matching instance or set of instances based on its content.
A service can be refreshed in order to update its list of service instances which may change over time and/or to change the traffic policy.
// Refresh if older than 30 minutes
if(sampleService.getLastRefreshed() < System.currentTimeMillis() + 1800000) {
    sampleService = sampleService.refresh(newTrafficPolicy).block();
}

// Refresh and change the traffic policy
TrafficPolicy newTrafficPolicy = ...
sampleService = sampleService.refresh(newTrafficPolicy).block();
In above example, remember that
refresh()can return an emptyMonowhich basically indicates that the service is gone.
A service must be eventually disposed when it is no longer useful in order to free resources which basically shutdown the service instances.
A service instance shall never be shutdown directly, the service should always take care of it.
It can be shutdown gracefully or not:
// Graceful shutdown
sampleService.shutdownGracefully().block();

// Hard shutdown
sampleService.shutdown().block();
Discovery service
The main role of a DiscoveryService is to locate the servers serving a service identified by a service ID. It must then create and expose corresponding service instances in a Service. The way servers are resolved depends on the implementation and the type of service considered. For a basic network service such as an HTTP service, it would most likely simply resolve inet socket addresses using DNS lookups. For a logical service, it could resolve complex service descriptors from a configuration source or a service orchestrator (e.g. Kubernetes). In the end, the discovery service must be able to create service instances and expose them in a service.
A discovery service implements a single resolve() that resolves a service identified by a ServiceId with a TrafficPolicy. Since it can only resolve specific types of services, it must also provide a way to determine whether a service, characterized by its URI scheme, can be resolved.
A basic discovery service implementation resolving sample services out of a static map might then look like:
package io.inverno.example.discovery.sample;

import io.invero.mod.discovery.DiscoveryService;
import io.invero.mod.discovery.Service;
import java.net.InetSocketAddress;
import java.util.ArrayList;
import java.util.Collection;
import java.util.List;
import java.util.Map;
import java.util.Set;
import reactor.core.publisher.Flux;
import reactor.core.publisher.Mono;
import reactor.util.concurrent.Queues;

public class SampleDiscoveryService implements DiscoveryService<SampleServiceInstance, SampleRequest, SampleTrafficPolicy> {

    public static Map<ServiceID, List<InetSocketAddress>> SAMPLE_SERVICE_REGISTRY = Map.of(
        ServiceID.of("sample://svc1"), List.of(InetSocketAddress.createUnresolved("svc1-host1", 123), InetSocketAddress.createUnresolved("svc1-host2", 123), InetSocketAddress.createUnresolved("svc1-host3", 123)),
        ServiceID.of("sample://svc2"), List.of(InetSocketAddress.createUnresolved("svc2-host1", 456), InetSocketAddress.createUnresolved("svc1-host2", 456)),
        ServiceID.of("sample://svc3"), List.of(InetSocketAddress.createUnresolved("svc3-host1", 789))
    );

    @Override
    public Set<String> getSupportedSchemes() {
        return Set.of("sample");
    }

    @Override
    public Mono<? extends Service<SampleServiceInstance, SampleRequest, SampleTrafficPolicy>> resolve(ServiceID serviceId, SampleTrafficPolicy trafficPolicy) throws IllegalArgumentException {
        if(!this.supports(serviceId)) {
            throw new IllegalArgumentException("Unsupported scheme: " + serviceId.getScheme());
        }
        return new SampleService(serviceId).refresh(trafficPolicy);
    }

    private static class SampleService implements Service<SampleServiceInstance, SampleRequest, SampleTrafficPolicy> {

        private final ServiceID serviceID;
        private final List<SampleServiceInstance> instances;

        private long lastRefreshed;
        private SampleTrafficPolicy trafficPolicy;
        private TrafficLoadBalancer<SampleServiceInstance, SampleRequest> loadBalancer;

        public SampleService(ServiceID serviceID) {
            this.serviceID = serviceID;
            this.instances = new ArrayList<>();
        }

        @Override
        public ServiceID getID() {
            return this.serviceID;
        }

        @Override
        public SampleTrafficPolicy getTrafficPolicy() {
            return this.trafficPolicy;
        }

        @Override
        public Mono<? extends Service<SampleServiceInstance, SampleRequest, SampleTrafficPolicy>> refresh(SampleTrafficPolicy trafficPolicy) {
            return Mono.fromSupplier(() -> {
                List<InetSocketAddress> serviceNodes = SampleDiscoveryService.SAMPLE_SERVICE_REGISTRY.get(this.serviceID);
                List<SampleServiceInstance> newServiceInstances = new ArrayList<>();
                if(serviceNodes != null && !serviceNodes.isEmpty()) {
                    for(InetSocketAddress address : serviceNodes) {
                        newServiceInstances.add(new SampleServiceInstance(address, trafficPolicy));
                    }
                }

                Collection<SampleServiceInstance> instancesToShutdown = new ArrayList<>(this.instances);
                synchronized(this) {
                    this.trafficPolicy = trafficPolicy;
                    this.loadBalancer = !newServiceInstances.isEmpty() ? trafficPolicy.getLoadBalancer(newServiceInstances) : null;
                    this.instances.clear();
                    this.instances.addAll(newServiceInstances);
                    this.lastRefreshed = System.currentTimeMillis();
                }

                Flux.fromIterable(instancesToShutdown)
                    .flatMap(SampleServiceInstance::shutdownGracefully)
                    .subscribe();

                return this.loadBalancer != null ? this : null;
            });
        }

        @Override
        public Mono<? extends SampleServiceInstance> getInstance(SampleRequest serviceRequest) {
            return this.loadBalancer != null ? this.loadBalancer.next(serviceRequest) : Mono.empty();
        }

        @Override
        public long getLastRefreshed() {
            return this.lastRefreshed;
        }

        @Override
        public Mono<Void> shutdown() {
            return Flux.mergeDelayError(Queues.XS_BUFFER_SIZE, Flux.fromIterable(this.instances).map(SampleServiceInstance::shutdown))
                .doFirst(() -> {
                    this.loadBalancer = null;
                    this.instances.clear();
                    this.lastRefreshed = System.currentTimeMillis();
                })
                .then();
        }

        @Override
        public Mono<Void> shutdownGracefully() {
            return Flux.mergeDelayError(Queues.XS_BUFFER_SIZE, Flux.fromIterable(this.instances).map(SampleServiceInstance::shutdownGracefully))
                .doFirst(() -> {
                    this.loadBalancer = null;
                    this.instances.clear();
                    this.lastRefreshed = System.currentTimeMillis();
                })
                .then();
        }
    }
}
Above sample discovery service implementation resolves services from a static Map: sample://svc1 has three instances, sample://svc2 has two instances and sample://svc3 has one instance. Resolved services load balanced instances using a traffic load balancer obtained from the traffic policy which, in the case of the sample service, is always a random traffic load balancer.
To summarize, a sample service is resolved, refreshed and used as follows:
SampleTrafficPolicy trafficPolicy = new SampleTrafficPolicy("user", "password");
SampleDiscoveryService discoveryService = new SampleDiscoveryService();

SampleRequest request = new SampleRequest("request");

SampleResponse response = discoveryService
    .resolve(ServiceID.of("sample://svc1"), trafficPolicy) // 1
    .flatMap(service -> service.getInstance(request))      // 2
    .flatMap(instance -> instance.execute(request))        // 3
    .block();
- Service
sample://svc1is resolved - A service instance among the three instances is selected using the load balancer
- The request is executed
Implementation support
Implementing complex service discovery can be a cumbersome, hopefully the API provides some base implementations to help with this task.
DNS Discovery Service
The AbstractDnsDiscoveryService can be used to implement discovery services resolving services and instances using DNS resolution with the NetService. Implementors must implement methods createUnresolvedAddress() and createServiceInstance() for respectfully creating an unresolved inet address from a supported service ID and creating a service instance from a service ID, a traffic policy and a resolved inet address.
Considering a sample service URI, the authority part most certainly specifies an unresolved inet address (e.g. HTTP), a DNS based sample discovery service can then be implemented as follows:
package io.inverno.example.discovery.sample;

import io.inverno.mod.base.net.NetService;

public class SampleDnsDiscoveryService extends AbstractDnsDiscoveryService<SampleServiceInstance, SampleRequest, SampleTrafficPolicy> {

    private static final int DEFAULT_SAMPLE_PORT = 1234;

    public SampleDnsDiscoveryService(NetService netService) {
        super(netService, Set.of("sample"));
    }

    @Override
    protected InetSocketAddress createUnresolvedAddress(ServiceID serviceId) {
        String host = serviceId.getURI().getHost();
        int port = serviceId.getURI().getPort();
        return InetSocketAddress.createUnresolved(host, port == -1 ? DEFAULT_SAMPLE_PORT : port);
    }

    @Override
    protected SampleServiceInstance createServiceInstance(ServiceID serviceId, SampleTrafficPolicy trafficPolicy, InetSocketAddress resolvedAddress) {
        return new SampleServiceInstance(resolvedAddress, trafficPolicy);
    }
}
From a single hostname, A DNS lookup can return one or more IP addresses representing multiple service instances. That's basically what you'll get when resolving a headless service with multiple replicas in a Kubernetes cluster.
Configuration Discovery Service
The AbstractConfigurationDiscoveryService can be used to implement discovery services resolving services described in descriptors stored in a configuration source. Implementors must implement methods readServiceDescriptor() and createService() for respectfully parsing the service descriptor resolved from the configuration source as a string and creating the service from the service ID and the service descriptor. The AbstractConfigurationService should then be used to implement the service.
A configuration service URI for the sample service can be defined as sample-conf://<service_key>. A basic service descriptor can be a simple comma separated list of inet socket addresses: <ip>:<port>.
A simple configuration based sample discovery service can then be implemented as follows:
package io.inverno.example.discovery.sample;

import java.net.InetSocketAddress;
import java.util.Set;

public class SampleServiceDescriptor {

    private final Set<InetSocketAddress> addresses;

    public SampleServiceDescriptor(Set<InetSocketAddress> addresses) {
        this.addresses = addresses;
    }

    public Set<InetSocketAddress> getAddresses() {
        return addresses;
    }
}
package io.inverno.example.discovery.sample;

import io.inverno.mod.configuration.ConfigurationSource;
import io.inverno.mod.discovery.AbstractConfigurationDiscoveryService;
import io.inverno.mod.discovery.ServiceID;
import java.util.Arrays;
import java.util.Set;

public class SampleConfigDiscoveryService extends AbstractConfigurationDiscoveryService<SampleServiceInstance, SampleRequest, SampleTrafficPolicy, SampleServiceDescriptor> {

    public SampleConfigDiscoveryService(ConfigurationSource configurationSource) {
        super(Set.of("sample-conf"), "sample.service", configurationSource);
    }

    @Override
    protected SampleServiceDescriptor readServiceDescriptor(String content) throws Exception {
        return new SampleServiceDescriptor(Arrays.stream(content.split(","))
            .map(String::trim)
            .map(addr -> addr.split(":"))
            .map(addr -> new InetSocketAddress(addr[0], Integer.parseInt(addr[1])))
            .collect(Collectors.toSet()));
    }

    @Override
    protected Service<SampleServiceInstance, SampleRequest, SampleTrafficPolicy> createService(ServiceID serviceId, Mono<SampleServiceDescriptor> serviceDescriptor) {
        return new SampleConfigService(serviceId, serviceDescriptor);
    }
}
A sample service descriptor is fetched from the configuration source using the service name specified in the service id prefixed by sample.service.
package io.inverno.example.discovery.sample;

import io.inverno.mod.discovery.AbstractConfigurationService;
import io.inverno.mod.discovery.TrafficLoadBalancer;
import java.util.ArrayList;
import java.util.Collection;
import java.util.List;
import reactor.core.publisher.Flux;
import reactor.core.publisher.Mono;
import reactor.util.concurrent.Queues;

public class SampleConfigService extends AbstractConfigurationService<SampleServiceInstance, SampleRequest, SampleTrafficPolicy, SampleServiceDescriptor> {

    private final volatile List<SampleServiceInstance> instances;

    private volatile TrafficLoadBalancer<SampleServiceInstance, SampleRequest> loadBalancer;

    public SampleConfigService(ServiceID serviceId, Mono<SampleServiceDescriptor> serviceMetadata) {
        super(serviceId, serviceMetadata);
        this.instances = new ArrayList<>();
    }

    @Override
    protected Mono<? extends Service<SampleServiceInstance, SampleRequest, SampleTrafficPolicy>> doRefresh(SampleTrafficPolicy trafficPolicy, SampleServiceDescriptor serviceMetadata) {
        return Mono.fromSupplier(() -> {
            List<SampleServiceInstance> newServiceInstances = serviceMetadata.getAddresses().stream()
                .map(address -> new SampleServiceInstance(address, trafficPolicy))
                .collect(Collectors.toList());

            Collection<SampleServiceInstance> instancesToShutdown = new ArrayList<>(this.instances);
            synchronized(this) {
                this.trafficPolicy = trafficPolicy;
                this.loadBalancer = !newServiceInstances.isEmpty() ? trafficPolicy.getLoadBalancer(newServiceInstances) : null;
                this.instances.clear();
                this.instances.addAll(newServiceInstances);
            }

            Flux.fromIterable(instancesToShutdown)
                .flatMap(SampleServiceInstance::shutdownGracefully)
                .subscribe();

            return this.loadBalancer != null ? this : null;
        });
    }

    @Override
    public Mono<? extends SampleServiceInstance> getInstance(SampleRequest serviceRequest) {
        return this.loadBalancer != null ? this.loadBalancer.next(serviceRequest) : Mono.empty();
    }

    @Override
    public Mono<Void> shutdown() {
        return Flux.mergeDelayError(Queues.XS_BUFFER_SIZE, Flux.fromIterable(this.instances).map(SampleServiceInstance::shutdown))
            .doFirst(() -> {
                this.loadBalancer = null;
                this.instances.clear();
            })
            .then();
    }

    @Override
    public Mono<Void> shutdownGracefully() {
        return Flux.mergeDelayError(Queues.XS_BUFFER_SIZE, Flux.fromIterable(this.instances).map(SampleServiceInstance::shutdownGracefully))
            .doFirst(() -> {
                this.loadBalancer = null;
                this.instances.clear();
            })
            .then();
    }
}
Service sample-conf://mySuperSampleService can then be defined with two instances in a configuration source as follows:
sample.service.mySuperSampleService=1.2.3.4:1234,5.6.7.8:567
Using a service descriptor is very flexible and allows to implement complex behaviours. For instance HTTP meta services support request routing, request rewriting, advanced load balancing... defined in HTTP meta descriptors.
Composite Discovery Service
A CompositeDiscoveryService allows to aggregate multiple discovery services supporting different schemes into one discovery service.
The SampleDnsDiscoveryService and the SampleConfigDiscoveryService can be aggregated as follows:
package io.inverno.example.discovery.sample;

import io.inverno.mod.discovery.CompositeDiscoveryService;

public class CompositeSampleDiscoveryService extends CompositeDiscoveryService<SampleServiceInstance, SampleRequest, SampleTrafficPolicy> {

    public CompositeSampleDiscoveryService(SampleConfigDiscoveryService configDiscoveryService, SampleDnsDiscoveryService dnsDiscoveryService) throws IllegalArgumentException {
        super(List.of(configDiscoveryService, dnsDiscoveryService));
    }
}
Caching Discovery Service
A CachingDiscoveryService allows to wrap a discovery service, cache resolved services and refresh them periodically to avoid stale configurations. Caching services is useful to share and optimize resource usage in an application. It is important to remember that a service holds one or more service instances which in turn holds one or more connections to remote servers, being able to use same service instances in a multithreaded application is therefore crucial.
The CompositeSampleDiscoveryService can be cached as follows:
package io.inverno.example.discovery.sample;

import io.inverno.mod.discovery.CachingDiscoveryService;

public class CachingSampleDiscoveryService extends CachingDiscoveryService<SampleServiceInstance, SampleRequest, SampleTrafficPolicy> {

    public CachingSampleDiscoveryService(Reactor reactor, CompositeSampleDiscoveryService sampleDiscoveryService) {
        super(reactor, sampleDiscoveryService);
    }

    public CachingSampleDiscoveryService(Reactor reactor, CompositeSampleDiscoveryService sampleDiscoveryService, long timeToLive) {
        super(reactor, sampleDiscoveryService, timeToLive);
    }
}
The timeToLive parameter defines the time to live in milliseconds of a resolved service before being refreshed.
The CachingSampleDiscoveryService is thread-safe and resolves sample services using DNS lookup (sample://hostname:port) or from a configuration source (sample-conf://mySuperSampleService), caches them and periodically refreshes them.
Discovery HTTP
The Inverno Discovery HTTP module extends the Service Discovery API for HTTP services and provides a DNS based HTTP discovery service bean.
This module requires the NetService and the HttpClient which are respectively provided by the boot module and the http-client module, so in order to use the Inverno discovery-http module, we need to declare the following dependencies in the module descriptor:
@io.inverno.core.annotation.Module
module io.inverno.example.discovery.http {
    requires io.inverno.mod.boot;
    requires io.inverno.mod.http.client;
}
We also need to declare these dependencies in the build descriptor:
Using Maven:
<project>
    <dependencies>
        <dependency>
            <groupId>io.inverno.mod</groupId>
            <artifactId>inverno-boot</artifactId>
        </dependency>
        <dependency>
            <groupId>io.inverno.mod</groupId>
            <artifactId>inverno-http-client</artifactId>
        </dependency>
    </dependencies>
</project>
Using Gradle:
compile 'io.inverno.mod:inverno-boot:1.13.0'
compile 'io.inverno.mod:inverno-http-client:1.13.0'
HTTP Service discovery API
The HTTP discovery API extends the discovery API for resolving HTTP services. It basically defines specific HttpTrafficPolicy, HttpDiscoveryService and HttpServiceInstance.
An HTTP service instance is backed by an HTTP client Endpoint pointing to an HTTP server exposing the service and where HTTP requests are sent.
HTTP traffic policy
The HttpTrafficPolicy provides optional HTTP client and network configuration which are used when building the HTTP client endpoints. When specified, they override the default configurations provided in the http-client module.
It also exposes the TrafficLoadBalancer.Factory creating the specific HTTP load balancer used to load balance requests among HTTP service instances.
An HTTP client Endpoint exposes two indicators describing its current load: the number of active requests and the load factor which is the ratio between the number of active requests and the defined endpoint capacity.
The LeastRequestTrafficLoadBalancer is a weighted load balancer that uses the active requests indicator to load balance requests to HTTP service instances with the least active requests. When an instance is requested, the resolved HTTP service selects a random set of instances (2 by default), calculates a score for each of them using the following formula and returns the instance with the highest score:
$$score = \frac{weight}{(activeRequests + 1)^{bias}}$$
weight is the weight of the instance, activeRequests is the number of active requests and bias (1 by default) is used to increase the importance of active requests: the greater it is, the more instances with lower active requests count are selected.
The MinLoadFactorTrafficLoadBalancer is a weighted load balancer that uses the load factor indicator to load balance requests to HTTP service instances with the smallest load factor. When an instance is requested, the resolved HTTP service selects a random set of instances (2 by default), calculates a score for each of them using the following formula and returns the instance with the highest score:
$$score = weight\times{}(1 - loadFactor)^{bias}$$
weight is the weight of the instance, loadFactor is the endpoint load factor and bias (1 by default) is used to increase the importance of the load factor: the greater it is, the more instances with lower load factor are selected.
An HttpTrafficPolicy overriding HTTP client configuration and creating custom least request load balancer can be built as follows:
HttpTrafficPolicy trafficPolicy = HttpTrafficPolicy.builder()
    .configuration(HttpClientConfigurationLoader.load(configuration -> configuration
        .pool_max_size(3) // Overrides HTTP client configuration
    ))
    .leastRequestLoadBalancer(3, 2) // choose up to 3 instances and set bias to 2
    .build();
HTTP Service instance
The HttpServiceInstance exposes the HTTP client endpoint pointing to an HTTP server exposing the service. The Endpoint instance is eventually used to process service requests.
Note that endpoints returned by service instances must not be shut down directly, service instances are managed in an enclosing service which must be used to shut down both service instances and HTTP client endpoints, trying to shut down a service instance endpoint will result in an error.
HTTP Discovery service
The HttpDiscoveryService is using an HttpTrafficPolicy for resolving HTTP services pointing to one or more HttpServiceInstance.
An HTTP service is resolved and a request processed as follows:
HttpClient httpClient = null;
HttpDiscoveryService discoveryService = null;

String responseBody = discoveryService.resolve(ServiceID.of("http://hostname:8080"), trafficPolicy)
    .flatMap(service -> httpClient.exchange(Method.GET, "/path/to/resource")
        .flatMap(exchange -> service.getInstance(exchange)
            .map(instance -> instance.bind(exchange))
        )
    )
    .flatMap(Exchange::response)
    .flatMapMany(response -> response.body().string().stream())
    .collect(Collectors.joining())
    .block();
DNS HTTP Discovery service
The http-discovery-http module exposes the dnsHttpDiscoveryService bean that uses the DNS resolution methods provided in the NetService in order to resolve the unresolved inet socket address (i.e. HOSTNAME+PORT) deduced from a service ID URL (i.e. http(s)://<HOSTNAME>:<PORT>) and obtain the set of resolved inet socket addresses (i.e IP+PORT) of the servers exposing the service.
Multiple IP addresses can be associated to a single hostname, this is especially the case with Kubernetes headless services with multiple replicas.
The DNS discovery service supports http://, https://, ws:// and wss:// schemes, resolved HTTP client endpoints are automatically configured with TLS in the presence of a secured protocol (i.e. https:// or wss://) overriding the configuration provided in both the HTTP client and HTTP traffic policy.
The following code shows how the DNS discovery could be used in a service bean to resolve an API service and consume a REST resource:
package io.inverno.example.discovery.http.sample;

import io.inverno.core.annotation.Bean;
import io.inverno.core.annotation.Destroy;
import io.inverno.core.annotation.Init;
import io.inverno.mod.discovery.Service;
import io.inverno.mod.discovery.ServiceID;
import io.inverno.mod.discovery.http.HttpDiscoveryService;
import io.inverno.mod.discovery.http.HttpTrafficPolicy;
import io.inverno.mod.http.base.Method;
import io.inverno.mod.http.client.Exchange;
import io.inverno.mod.http.client.UnboundExchange;
import io.inverno.mod.http.client.HttpClient;
import java.util.stream.Collectors;
import reactor.core.publisher.Mono;

@Bean
public class SomeService {

    private final HttpClient httpClient;
    private final HttpDiscoveryService dnsHttpDiscoveryService;
    private final HttpTrafficPolicy httpTrafficPolicy;

    private Service<HttpServiceInstance, UnboundExchange<?>, HttpTrafficPolicy> apiService;

    public SomeService(HttpClient httpClient, HttpDiscoveryService dnsHttpDiscoveryService) {
        this.httpClient = httpClient;
        this.dnsHttpDiscoveryService = dnsHttpDiscoveryService;

        this.httpTrafficPolicy = HttpTrafficPolicy.builder().build();
    }

    @Init
    public void init() {
        this.apiService = this.dnsHttpDiscoveryService
            .resolve(ServiceID.of("https://api.example.org"), this.httpTrafficPolicy)
            .block();
    }

    @Destroy
    public void destroy() {
        this.apiService.shutdown().block();
    }

    public Mono<String> get(String id) {
        return httpClient.exchange(Method.GET, "/v1/some/service/" + id)
            .flatMap(exchange -> this.apiService.getInstance(exchange)
                .map(instance -> instance.bind(exchange))
            )
            .flatMap(Exchange::response)
            .flatMapMany(response -> response.body().string().stream())
            .collect(Collectors.joining());
    }
}
Above example is a showcase, not ideally suited for an actual application as it is blocking during the initialization process when resolving the service which is also never refreshed. You might probably prefer using a
CachingDiscoveryServicethat caches and silently refreshes services or use the web-client module which provides higher level features such as automatic content encoding and manages all these aspects.
Discovery HTTP Meta services
The Inverno Discovery HTTP meta module defines HTTP meta services which support advanced features such as:
- client-side load balancing: requests are load balanced across multiple destinations using various strategies: round-robin, random, least requests, minimum load factor...
- request rewriting: path can be changed with parameter support, headers can be added, updated or removed in both request and response...
- content based routing: request can be routed to a specific destination based on matching path, method, headers, query parameters...
- service composition: as its name suggest a meta service allows to compose multiple services into one service.
- specific client configuration: HTTP client configurations can be provided per service, per route and/or per destination.
The module provides an HTTP meta discovery service implementation which resolves HTTP meta service descriptors from a configuration source.
This module requires a ConfigurationSource where to look for JSON HTTP meta service descriptors, an ObjectMapper to parse descriptors and a set of HttpDiscoveryService to resolve services composed in the HTTP meta services. A default ObjectMapper is provided. However, in a regular Inverno application the one provided in the boot module shall be injected. HTTP discovery services can be provided by including dependencies to discovery-http, discovery-http-k8s or any module providing HttpDiscoveryService beans. In order to use the Inverno discovery-http-meta module, a basic setup would then require to define the following dependencies in the module descriptor:
@io.inverno.core.annotation.Module
module io.inverno.example.discovery.http.k8s {
    requires io.inverno.mod.boot;
    requires io.inverno.mod.discovery.http;
}
We also need to declare these dependencies in the build descriptor:
Using Maven:
<project>
    <dependencies>
        <dependency>
            <groupId>io.inverno.mod</groupId>
            <artifactId>inverno-boot</artifactId>
        </dependency>
        <dependency>
            <groupId>io.inverno.mod</groupId>
            <artifactId>inverno-discovery-http</artifactId>
        </dependency>
    </dependencies>
</project>
Using Gradle:
compile 'io.inverno.mod:inverno-boot:1.13.0'
compile 'io.inverno.mod:inverno-discovery-http:1.13.0'
Before looking into the details, let's consider simple use cases to better understand the purpose of HTTP meta services.
At its simplest, an HTTP meta service can be used to abstract the service location from the application code which can then simply reference a key to the actual destination stored in a configuration source for instance:
io.inverno.mod.discovery.http.meta.service.someService = "http://someService"
Inside the application we can then just resolve the service using conf://someService service ID which will eventually resolve whatever service ID is specified in the configuration.
HttpClient httpClient = ...;
HttpDiscoveryService httpMetaDiscoveryService = ...;
Mono<? extends Service<HttpServiceInstance, UnboundExchange<?>, HttpTrafficPolicy>> service = httpMetaDiscoveryService.resolve(ServiceID.of("conf://someService").cache();

Mono<Strin> responseBody = httpClient.exchange(Method.GET, "/path/to/resource")
    .flatMap(exchange -> service.getInstance(exchange).map(instance -> instance.bind(exchange)))
    .flatMap(Exchange::response)
    .flatMapMany(response -> response.body().string().stream())
    .collect(Collectors.joining());
The cached service instance could also be refreshed on configuration change. A
CachingDiscoveryService, which caches and periodically refreshes the service, can also be used.
Now let's say we have a REST API in version v1 running in some cluster (Docker, Kubernetes or bare metal), a new version v2 is available, and we would like to gradually shift the traffic from v1 to v2. The HTTP meta service descriptor can now be written as follows to control the traffic shares between v1 and v2 destinations with 80% of the requests routed to someService-v1 and the remaining 20% to someService-v2:
[
    {"uri": "http://someService-v1", "weight": 80},
    {"uri": "http://someService-v2", "weight": 20}
]
The resolved service now returns someService-v1 instances 80% of the time and someService-v2 instances the rest of the time. The descriptor in the configuration can be updated and the service refreshed (explicitly, periodically, on update...) making it possible to gradually shift the traffic.
Now let's consider another REST API exposing two resources: http://service/fruit and http://service/vegetable that we want to refactor in two distinct services: http://fruit and http://vegetable. This would normally require to refactor any client consuming the original service. Using an HTTP meta service, it is possible to create a service that can route traffic to the right destinations keeping the original API. In that particular case, routing is based on the request path which also have to be rewritten to match the new APIs:
{
    "routes": [
        {
            "path": [
                {"path":"/fruit/**"}
            ],
            "transformRequest": {
                "translatePath":{
                    "/fruit/{path:**}": "/{path:**}"
                }
            },
            "destinations": [
                {"uri": "http://fruit/"}
            ]
        },
        {
            "path": [
                {"path":"/vegetable/**"}
            ],
            "transformRequest": {
                "translatePath":{
                    "/vegetable/{path:**}": "/{path:**}"
                }
            },
            "destinations": [
                {"uri": "http://vegetable"}
            ]
        }
    ]
}
A request to conf://service/fruit/apple is then routed to http://fruit/apple and a request to conf://service/vegetable/cucumber to http://vegetable/cucumber.
In above examples, destination services (i.e. http://...) are resolved using the standard DNS based discovery service initially injected in the discovery-http-meta module.
HTTP meta service descriptor
The HttpMetaServiceDescriptor is used to define an HTTP meta service, typically using JSON notation, in a configuration property or any other source supported in an HTTP discovery service implementation.
The discovery-http-meta currently provides a configuration based implementation, but it would be entirely possible to create implementations reading service descriptors from a Zookeeper cluster or a Kubernetes control plane for instance.
An HTTP meta service is composed of one or more routes targeting one or more destinations. When resolving a service instance, an HTTP meta service selects the route matching the request based on criteria specified in the route before returning a service instance from one of the route's destinations.
The traffic policy can be overridden at the top level. In the following descriptor the traffic policy provided when resolving the service is overridden, including the HTTP client configuration and the traffic load balancer:
{
    "configuration": {
        "http_protocol_versions": ["HTTP_2_0"],
        "user_agent": "Discovery example client"
    },
    "loadBalancer": {
        "strategy": "LEAST_REQUEST",
        "choiceCount": 3,
        "bias": 2
    },
    "routes": [...]
}
The fact that the traffic policy in the descriptor overrides the one provided programmatically might appear counterintuitive, but it is actually a logical choice considering that the traffic policy can also be overridden at route and destination level. If the provided traffic policy were to override the descriptor, it would apply to all routes and destinations policies which is actually less flexible. A good way to look at this is to consider the provided traffic policy to be meant to override the default HTTP client configuration and provide a preferred load balancing strategy that can both be overridden in the HTTP meta service descriptor.
Routes
An HTTP meta service route basically defines a list of rules and a list of destinations. An HTTP meta service can define one or more routes with different rules that are used to match requests based on their content (e.g. method, path, query parameters, headers...) in order to route them to the right destinations.
When resolving a service instance for a given request, routes are evaluated in sequence in the order in which they appear in the service descriptor. A request is matching a route when it matches all rules defined in the route, in which case, a service instance resolved from the list of destinations is returned, otherwise no service instance is returned.
For instance, considering the following HTTP meta service descriptor, requests matching /service1/** are routed to http://service1 destination, requests to /service2/** are routed to http://service2 destination and all other requests are routed to http://default:
{
    "routes": [
        {
            "path": [
                {"path":"/service1/**"}
            ],
            "destinations": [
                {"uri":"http://service1"}
            ]
        },
        {
            "path": [
                {"path":"/service2/**"}
            ],
            "destinations": [
                {"uri":"http://service2"}
            ]
        },
        {
            "destinations": [
                {"uri":"http://default"}
            ]
        }
    ]
}
A route with no rules is the default route, it matches any request and as a result it should be defined last.
How destination service instances are selected in a route depends on the route's traffic policy and especially the load balancing strategy. The route traffic policy is obtained by overriding the initial traffic policy with the configuration and load balancer configuration provided at the service level and then at the route level.
In the following descriptor, the traffic policy is overridden globally and in the first route. All service routes are set to use a random load balancing strategy when resolving destination service instances except the first route which uses the least request strategy. The first route is also configured to create HTTP client endpoints with up to 10 connections:
{
    "loadBalancer": {
        "strategy": "RANDOM"
    },
    "routes": [
        {
            "configuration": {
                "http_protocol_versions": ["HTTP_2_0"],
                "pool_max_size": 10
            },
            "loadBalancer": {
                "strategy": "LEAST_REQUEST"
            },
            "path": [
                {"path":"/service1/**"}
            ],
            "destinations":[
                {"uri":"http://service1"}
            ]
        },
        ...
    ]
}
Traffic policies are propagated and overridden top to bottom up to the destinations which use them to resolve the services that process requests.
Routing rules
A route can be defined with rules used to match requests based on their content. Different kind of rules can be defined in the route descriptor to match different parts of the request. A request must match all the rules defined in the route to be routed to that route's destinations. A route with no rules matches all request, it should normally appear last in the list of routes.
Authority rule
An authority rule is used to match a request authority (Host header in HTTP/1.x or :authority pseudo header in HTTP/2). It is defined using one or more value matchers allowing to define exact matching values or regular expressions. A request matches an authority rule when it matches any of the value matchers:
{
    "routes": [
        {
            "authority": [
                {"value": "service-1"},
                {"value": "service-2"}
            ],
            "destinations": [
                {"uri": "http://service-1-or-2"}
            ]
        },
        {
            "authority": [
                {"regex": "service-.*"}
            ],
            "destinations": [
                {"uri": "http://service-others"}
            ]
        },
        ...
    ]
}
Path rule
A path rule is used to match the requested path. It is defined with one or more path matchers which can be defined as static values or path pattern values (see URIPattern in base module) with or without matching trailing slash. A request matches a path rule when it matches any of the path matchers:
{
    "routes": [
        {
            "path": [
                {"path": "/service/fruit/**"},
                {"path": "/service/vegetable/**"}
            ],
            "destinations": [
                {"uri": "http://service-fruit-or-vegetable"}
            ]
        },
        {
            "path": [
                {"path": "/service/**"}
            ],
            "destinations": [
                {"uri": "http://service-others"}
            ]
        },
        ...
    ]
}
In above descriptor, requests to /service/fruit/apple or /service/vergetable/carrot are routed to http://service-fruit-or-vegetable/service/fruit/apple or http://service-fruit-or-vegetable/service/vegetable/carrot respectively.
Path can be rewritten at route or destination level using a request transformer.
Method rule
A method rule is used to match the request method. It is defined as a list of HTTP methods. A request matches a method rule when it matches any of the methods:
{
    "routes": [
        {
            "method": [ "POST", "PUT" ],
            "destinations": [
                {"uri": "http://service-post-or-put"}
            ]
        },
        {
            "method": [ "GET" ],
            "destinations": [
                {"uri": "http://service-get"}
            ]
        },
        ...
    ]
}
Content type rule
A content type rule is used to match the request content type (defined in content-type header). It is defined as a list of media ranges (e.g. application/json, */xml...). A request matches a content type rule when its content type matches any of the media ranges:
{
    "routes": [
        {
            "contentType": [ "application/json" ],
            "destinations":[
                {"uri": "http://service-json"}
            ]
        },
        {
            "contentType": [ "*/xml" ],
            "destinations":[
                {"uri": "http://service-xml"}
            ]
        },
        ...
    ]
}
Accept rule
An accept rule is used to match the request accepted media types (defined in accept header). It is defined as a list of media types (e.g. application/json). A request matches an accept rule when it accepts one of the media types:
{
    "routes": [
        {
            "accept": [ "application/json" ],
            "destinations":[
                {"uri": "http://service-json"}
            ]
        },
        {
            "accept": [ "application/xml", "text/xml" ],
            "destinations":[
                {"uri": "http://service-xml"}
            ]
        },
        ...
    ]
}
Language rule
A language rule is used to match the request accepted languages (defined in language header). It is defined as a list of language tags (e.g. en, fr-FR...). A request matches a language rule when it accepts any of the language tags:
{
    "routes": [
        {
            "language": [ "en-US", "en-GB" ],
            "destinations":[
                {"uri": "http://service-en"}
            ]
        },
        {
            "accept": [ "fr" ],
            "destinations":[
                {"uri": "http://service-fr"}
            ]
        },
        ...
    ]
}
Headers rule
A headers rule is used to match request headers. It is defined as a map of header value matchers. A request matches a header rule when its headers match all entries in the map, that is to say when every headers match any of their corresponding value matchers:
{
    "routes": [
        {
            "headers": {
                "version": [
                    {"value": "v1"},
                    {"value": "v2"}
                ],
                "environment": [
                    {"value": "prod"}
                ]
            },
            "destinations":[
                {"uri": "http://service-v1-or-v2-and-env-prod"}
            ]
        },
        {
            "headers": {
                "version": [
                    {"regex": "v[3-7]"}
                ],
                "environment": [
                    {"value": "dev"}
                ]
            },
            "destinations":[
                {"uri": "http://service-v3to7-and-env-dev"}
            ]
        },
        ...
    ]
}
Query parameters rule
A query parameters rule is used to match request query parameters (?key=value). It is defined as a map of parameter value matchers. A request matches a query parameter rule when its query parameters match all entries in the map, that is to say when every parameters match any of their corresponding value matchers:
{
    "routes": [
        {
            "queryParameters": {
                "zone": [
                    {"value": "us-east"}
                ],
                "organization": [
                    {"value": "org-1"},
                    {"value": "org-2"}
                ]
            },
            "destinations":[
                {"uri": "http://service-us-east-and-org1-or-org2"}
            ]
        },
        {
            "queryParameters": {
                "zone": [
                    {"value": "eu-west"}
                ],
                "organization": [
                    {"regex": "org-[a-z]*"}
                ]
            },
            "destinations":[
                {"uri": "http://service-eu-west-and-alphabetic-org"}
            ]
        },
        ...
    ]
}
Destinations
A route destination specifies a service where requests matching a route are routed. It essentially comes down to a URI which conveys the targeted service ID URI, a root path and optional query parameters.
For instance, with the following descriptor, a request to /resource?id=123 with header organization: org-1 is routed to service http://service and its path gets translated to /path/to/resource?id=123&organization=org-1:
{
"routes": [
{
"headers": {
"organization": [ {"value": "org-1"} ]
},
"destinations": [
{
"uri": "http://service/path/to?organization=org-1"
}
]
},
...
]
}
As for services and routes, the traffic policy can be overridden at destination level, the resulting traffic policy is used when resolving the destination service:
{
"routes": [
{
"destinations":[
{
"configuration": {
"pool_max_size": 5
},
"loadBalancer": {
"strategy": "LEAST_REQUEST"
},
"uri": "http://service"
}
]
},
...
]
}
At least one destination must be defined in a route, this is the usual case where requests are routed to a single service and load balanced among the service instances. There are however cases where multiple destinations can be specified.
For instance, multiple destinations can be defined with different weights in order to gradually shift the traffic to a newer version of the service:
{
"routes": [
{
"destinations": [
{ "uri": "http://service-v1", "weight": 80 },
{ "uri": "http://service-v2", "weight": 20 }
]
}
]
}
In the same way, A/B testing can be achieved by routing a small part of the traffic to an experimental destination:
{
"routes": [
{
"destinations": [
{ "uri": "http://service", "weight": 90 },
{ "uri": "http://service-test", "weight": 10 }
]
}
]
}
If a service is deployed on bare metal servers with different capacities, it is possible to assign more traffic to the node that can handle it:
{
"routes": [
{
"destinations": [
{ "uri": "http://big-server", "weight": 3 },
{ "uri": "http://medium-server", "weight": 2 },
{ "uri": "http://small-server", "weight": 1 }
]
}
]
}
Traffic is load balanced among destinations service instances using the load balancing strategy specified at the route level if and only if all resolved destination services are manageable implementing ManageableService. Destination services in an HTTP meta service are resolved using one or more HTTP discovery services which basically determines the kind of services that can be specified in a destination URI (i.e. the supported schemes), resolved services may or may not implement ManageableService which exposes the underlying service instances. When they do, an HTTP meta service is then able to manage service instances for them and handle load balancing across service instances from multiple destinations, otherwise traffic can only be load balanced among destination services which limits the choice of load balancing strategy. In the presence of an unmanaged service, a route can only use RANDOM or ROUND_ROBIN load balancing strategies. MIN_LOAD_FACTOR or LEAST_REQUEST cannot be used because they require access to the service instances to get the load factor or the active request count. Trying to apply an unsupported strategy in the route will result in an IllegalStateException being raised. It is however still possible to set up any strategy at destination level.
In the following example, service conf://unmanaged-service/ is unmanaged, as a result the route can only rely on RANDOM or ROUND_ROBIN load balancing strategies but the destination itself is set to load balance its requests among its service instances using the LEAST_REQUEST:
{
"routes": [
{
"loadBalancer": {
"strategy": "RANDOM"
},
"destinations": [
{
"uri": "http://managed-service",
"weight": 60
},
{
"loadBalancer": {
"strategy": "LEAST_REQUEST"
},
"uri": "conf://unmanaged-service",
"weight": 40
}
]
}
]
}
In above example, 60% of the requests are routed to http://managed-service service and the remaining 40% to conf://unmanaged-service using RANDOM load balancing strategy. Each of these services then internally load balance their respective shares of requests. The http://managed-service service inherits the traffic policy from the route so it is implicitly set to use the RANDOM load balancing strategy whereas the conf://unmanaged-service is explicitly set to use LEAST_REQUEST load balancing strategy.
HTTP meta services are a typical example of unmanageable services since they do not create or use service instances directly, and they are unable to expose service instances by nature.
Transformers
Transformers can be defined in the HTTP meta service descriptor at route and/or destination level in order to modify the path, the authority or the headers of a request before it is actually sent to an endpoint as well as modifying headers from a received response.
Path translation
The path of a request processed in an HTTP meta service can be translated by defining a request transformer. It relies on the URIPattern and has the ability to capture parameters in the original path and reference them in the translated path.
In the following example, path matching /api/{version}/{resource}/{path:**} are translated to /{resource}/{version}/{path:**}:
{
"routes": [
{
"transformRequest": {
"translatePath":{
"/api/{version}/{resource}/{path:**}": "/{resource}/{version}/{path:**}"
}
},
"destinations": [
{ "uri": "http://service" }
]
},
...
]
}
Only paths matching the source pattern are translated. In above example, path /api/v1/fruits/apple/gala which is matching /api/{version}/{resource}/{path:**} is translated to fruits/v1/apple/gala but path /v1/vegetables/zucchini is left untouched. When used in conjunction with route path matching rules, not all requests matching a route a path rule will be translated if the transformer source path pattern does not exactly match the rule path pattern (i.e. if the set of paths matched by the route is larger than the set of paths matched by the transformer).
Multiple path translations can be specified in a transformer, they are evaluated in sequence until the request path matches a source pattern.
Note that the destination URI can also modify the request path, but it only provides a root path and can't be used to rewrite the path.
Authority
The request authority, host header in HTTP/1.x and :authority pseudo-header in HTTP/2, can be set explicitly in a request transformer in order to override the original authority:
{
"routes": [
{
"transformRequest": {
"authority": "authority.com"
},
"destinations": [
{ "uri": "http://service" }
]
},
...
]
}
Headers
Request headers can be added, set or removed as follows:
{
"routes": [
{
"transformRequest": {
"addHeaders": {
"some-header": "1234"
},
"removeHeaders": [ "variant" ]
},
"destinations": [
{
"uri": "http://service-A",
"transformRequest": {
"setHeaders": {
"variant": "a"
}
},
"weight": 80
},
{
"uri": "http://service-B",
"transformRequest": {
"setHeaders": {
"variant": "b"
}
},
"weight": 20
}
]
},
...
]
}
Above example illustrates how requests can be flagged per destination for A/B testing monitoring. Header variant is removed from the original request at route level and then set again at destination level.
In a similar way, headers can be added, set or removed in a response by defining a response transformer:
{
"routes": [
{
"transformResponse": {
"setHeaders": {
"route": "A"
}
},
"destinations": [
{
"uri": "http://service",
"transformResponse": {
"addHeaders": {
"destination": "1"
}
}
}
]
},
...
]
}
Configuration HTTP meta discovery service
The discovery-http-meta module exposes the configurationHttpMetaDiscoveryService bean that resolves HTTP meta services in a configuration source. It supports the conf:// scheme, an HTTP meta service ID URI conveys the service name used to resolve the descriptor from the configuration source. The configuration property name is obtained by appending the service name to a configuration key prefix used to avoid name collisions, it is defined in HttpMetaDiscoveryConfiguration#meta_service_configuration_key_prefix() and defaults to io.inverno.mod.discovery.http.meta.service. For instance, the descriptor for service conf://myService shall be defined in io.inverno.mod.discovery.http.meta.service.myService configuration property in the ConfigurationSource injected into the module.
The configurationHttpMetaDiscoveryService bean creates a CompositeDiscoveryService with the set of HTTP discovery services injected in the module and its own instance to resolve destination services. Any service scheme supported by one of the injected discovery service, with the addition of conf://, can then be used in destination URIs.
Since the configuration discovery service is also included, it is possible to reference HTTP meta services from other HTTP meta services which can be handy in various situations.
The following code shows how the configuration HTTP meta discovery service can be used to resolve and consume a meta service whose descriptor is defined in a configuration source:
package io.inverno.example.discovery.http.k8s.sample;
import io.inverno.core.annotation.Bean;
import io.inverno.mod.discovery.ServiceID;
import io.inverno.mod.discovery.http.HttpDiscoveryService;
import io.inverno.mod.discovery.http.HttpTrafficPolicy;
import io.inverno.mod.http.base.Method;
import io.inverno.mod.http.client.Exchange;
import io.inverno.mod.http.client.HttpClient;
import java.util.stream.Collectors;
import reactor.core.publisher.Mono;
@Bean
public class SomeService {
private final HttpClient httpClient;
private final HttpDiscoveryService k8sHttpDiscoveryService;
private final HttpTrafficPolicy httpTrafficPolicy;
private final HttpClient httpClient;
private final HttpDiscoveryService configurationHttpMetaDiscoveryService;
private final HttpTrafficPolicy httpTrafficPolicy;
public SomeService(HttpClient httpClient, HttpDiscoveryService configurationHttpMetaDiscoveryService) {
this.httpClient = httpClient;
this.configurationHttpMetaDiscoveryService = configurationHttpMetaDiscoveryService;
this.httpTrafficPolicy = HttpTrafficPolicy.builder().build();
}
public Mono<String> execute() {
return this.httpClient.exchange(Method.GET, "/path/to/resource")
.flatMap(exchange -> this.configurationHttpMetaDiscoveryService.resolve(ServiceID.of("conf://myService"))
.flatMap(service -> service.getInstance(exchange))
.map(instance -> instance.bind(exchange))
)
.flatMap(Exchange::response)
.flatMapMany(response -> response.body().string().stream())
.collect(Collectors.joining());
}
}
Assuming the service is running on port 80 on nodes http://192.168.1.10, http://192.168.1.11 and http://192.168.1.12, configuration can then be defined as:
io.inverno.mod.discovery.http.meta.service.myService = """
{
"routes": [
{
"loadBalancer": {
"strategy": "ROUND_ROBIN"
},
"destinations":[
{ "uri": "http://192.168.1.10", "weight": 80 },
{ "uri": "http://192.168.1.11", "weight": 10 },
{ "uri": "http://192.168.1.12", "weight": 10 }
]
}
]
}
"""
In above example, the service is resolved on each request which is not suitable for a real-life application. Several options exist to make it more robust: cache the service using reactor API (e.g. using
cache()methods) or define a globalCachingDiscoveryServicewhich also regularly refreshes services. The web-client module has been designed to silently take care of these aspects, so unless you need explicit control, it is recommended to use it as a replacement of the HTTP client.
Discovery HTTP Kubernetes
The Inverno Discovery HTTP Kubernetes module provides HTTP discovery services for resolving HTTP services running in a Kubernetes cluster.
This module is still work-in-progress, it currently only provides a discovery service based on Kubernetes service environment variables, future developments include providing a discovery service using the Kubernetes API.
This module requires the HttpClient which is provided by the http-client module, so in order to use the Inverno discovery-http module, we need to declare the following dependency in the module descriptor:
@io.inverno.core.annotation.Module
module io.inverno.example.discovery.http.k8s {
requires io.inverno.mod.http.client;
}
We also need to declare this dependency in the build descriptor:
Using Maven:
<project>
<dependencies>
<dependency>
<groupId>io.inverno.mod</groupId>
<artifactId>inverno-http-client</artifactId>
</dependency>
</dependencies>
</project>
Using Gradle:
compile 'io.inverno.mod:inverno-http-client:1.13.0'
Kubernetes environment variables discovery service
The module exposes the k8sEnvHttpDiscoveryService bean that resolves Kubernetes services from environment variables set by Kubernetes in service containers (pods) for each service.
An HTTP service can be deployed on a Kubernetes cluster. A deployment descriptor is used to define the application image, configuration as well as the number of replicas resulting in one or more pods being started in the cluster. A service descriptor defines how the application is exposed in the cluster typically using a clusterIP.
The following descriptor show how a simple HTTP service can be deployed using three replicas:
apiVersion: v1
kind: Service
metadata:
name: http-testserver
labels:
app: http-testserver
service: http-testserver
spec:
ports:
- name: http
port: 8080
appProtocol: http
selector:
app: http-testserver
---
apiVersion: apps/v1
kind: Deployment
metadata:
name: http-testserver
labels:
app: http-testserver
spec:
replicas: 3
selector:
matchLabels:
app: http-testserver
template:
metadata:
labels:
app: http-testserver
spec:
containers:
- name: http-testserver
image: http-testserver:1.0.0
ports:
- containerPort: 8080
---
Kubernetes defines environment variables and iptables rules in any pod started after deploying above configuration These variables basically expose the cluster IP and port of the service and the iptables rules are used to load balance connections between the service replicas.
For a given service, Kubernetes creates a variable exposing the cluster IP: <SERVICE_NAME>_SERVICE_HOST and one variable per port or application protocol: <SERVICE_NAME>_SERVICE_PORT_<APPLICATION_PROTOCOL>. Considering above configuration, the following variables should be defined:
HTTP_TESTSERVER_SERVICE_HOST=10.244.0.50
HTTP_TESTSERVER_SERVICE_PORT_HTTP=8080
The Kubernetes environment discovery service supports k8s-env:// scheme, resolved HTTP client endpoints are automatically configured with TLS in the presence of an *_PORT_HTTPS variable overriding the configuration provided in both the HTTP client and HTTP traffic policy. HTTPS is preferred by default when a service exposes both HTTP and HTTPS ports, this behaviour can be changed by configuration in K8sHttpDiscoveryConfiguration.
The following code shows how the Kubernetes discovery service can be used to resolve and consume a service:
package io.inverno.example.discovery.http.k8s.sample;
import io.inverno.core.annotation.Bean;
import io.inverno.mod.discovery.ServiceID;
import io.inverno.mod.discovery.http.HttpDiscoveryService;
import io.inverno.mod.discovery.http.HttpTrafficPolicy;
import io.inverno.mod.http.base.Method;
import io.inverno.mod.http.client.Exchange;
import io.inverno.mod.http.client.HttpClient;
import java.util.stream.Collectors;
import reactor.core.publisher.Mono;
@Bean
public class SomeService {
private final HttpClient httpClient;
private final HttpDiscoveryService k8sHttpDiscoveryService;
private final HttpTrafficPolicy httpTrafficPolicy;
public SomeService(HttpClient httpClient, HttpDiscoveryService k8sHttpDiscoveryService) {
this.httpClient = httpClient;
this.k8sHttpDiscoveryService = k8sHttpDiscoveryService;
this.httpTrafficPolicy = HttpTrafficPolicy.builder().build();
}
public Mono<String> execute() {
return this.httpClient.exchange(Method.GET, "/path/to/resource")
.flatMap(exchange -> this.k8sHttpDiscoveryService.resolve(ServiceID.of("http://some-service"))
.flatMap(service -> service.getInstance(exchange))
.map(instance -> instance.bind(exchange))
)
.flatMap(Exchange::response)
.flatMapMany(response -> response.body().string().stream())
.collect(Collectors.joining());
}
}
In above example, the service is resolved on each request which is not suitable for a real-life application. Several options exist to make it more robust: cache the service using reactor API (e.g. using
cache()methods) or define a globalCachingDiscoveryServicewhich also regularly refreshes services. The web-client module has been designed to silently take care of these aspects, so unless you need explicit control, it is recommended to use it as a replacement of the HTTP client.
HTTP Base
The Inverno http-base module defines the foundational API for creating HTTP clients and servers. It also provides common HTTP services such as the header service.
In order to use the Inverno http-base module, we need to declare a dependency in the module descriptor:
module io.inverno.example.app {
requires io.inverno.mod.http.base;
...
}
And also declare that dependency in the build descriptor:
Using Maven:
<project>
<dependencies>
<dependency>
<groupId>io.inverno.mod</groupId>
<artifactId>inverno-http-base</artifactId>
</dependency>
</dependencies>
</project>
Using Gradle:
compile 'io.inverno.mod:inverno-http-base:1.13.0'
The http-base module is usually provided as a transitive dependency by other HTTP modules, the http-client, http-server or the web modules in particular, so it might not be necessary to include it explicitly.
HTTP base API
The base HTTP base API defines common classes and interfaces for implementing applications or modules using HTTP/1.x or HTTP/2 protocols. This includes:
- common HTTP exchange API
- HTTP methods and status enumerations
- Exception bindings for HTTP errors:
BadRequestException,InternalServerErrorException... - basic building blocks such as
Parameterwhich defines the base interface for any HTTP component that can be represented as a key/value pair (eg. query parameter, header, cookie...) - Cookie types:
CookieandSetCookie - Common HTTP header names (
Headers.NAME_*) and values (Headers.VALUE_*) constants - Common HTTP header types:
Headers.ContentType,Headers.Accept... - HTTP header codec API for implementing HTTP header codec used to decode a raw HTTP header in a specific
Headerobject - A HTTP header service used to encode/decode HTTP headers from/to specific
Headerobjects
HTTP router API
The HTTP router API defines building blocks for the development of advanced routers that can be used in various situations: in a Web server to route an exchange to an exchange handler based on criteria extracted from the request, in A Web client to resolve the exchange interceptors to invoke before sending the request...
The AbstractRouter class defines the base Router implementation, it is based on a routing chain used to resolve the resource or resources (e.g. handler, interceptor...) that are best matching an input. It is composed of multiple RoutingLink, each link being responsible for resolving the next link in the chain based on a specific criteria extracted from the input.
Considering an HTTP server, a request needs to be routed to a specific handler based on the request path, method, content type, accepted content types, accepted languages... The following routing chain could then be used to implement such router:
var routingChain = RoutingLink
.<ExchangeHandler<ExchangeContext>, Exchange<ExchangeContext>, SampleRoute, SampleRouteExtractor>link(next -> new PathRoutingLink<>(next) {...})
.link(next -> new MethodRoutingLink<>(next) {...})
.link(next -> new ContentRoutingLink<>(next) {...})
.link(next -> new OutboundAcceptContentRoutingLink<>(next) {...})
.link(next -> new AcceptLanguageRoutingLink<>(next) {...})
.getRoutingChain();
In above example, ExchangeHandler<ExchangeContext> resources are stored in the routing chain and the expected type of input is Exchange<ExchangeContext>. When resolving a handler from an exchange, routing links are invoked top to bottom: the path routing is invoked first to return the next best matching link from the path specified in the input exchange, if no matching route was defined (i.e. there is no route in the routing chain that matches the path) the default next link is returned (matching all paths), the next link, the method routing link in above routing chain, is then invoked until we either reach a terminal link (no resource was defined past that link) or the end of chain and the resource if any was defined is then returned. This approach ensures that a single best matching resource is returned.
The routing chain accepts SampleRoute which must implement PathRoute, MethodRoute, ContentRoute, AcceptContentRoute and AcceptLanguageContentRoute which are respectively required by PathRoutingLink, MethodRoutingLink, ContentRoutingLink, OutboundAcceptContentRoutingLink and AcceptLanguageRoutingLink. Routes can be extracted from the chain using a SampleRouteExtractor
When implementing an AbstractRouter, a routing chain must be set in the constructor and AbstractRoute, AbstractRouteManager and AbstractRouteExtractor implementation must be provided.
public class SampleRouter extends AbstractRouter<ExchangeHandler<ExchangeContext>, Exchange<ExchangeContext>, SampleRoute, SampleRouteManager, SampleRouter, SampleRouteExtractor> {
public TestRouter() {
super(RoutingLink
.<ExchangeHandler<ExchangeContext>, Exchange<ExchangeContext>, SampleRoute, SampleRouteExtractor>link(next -> new PathRoutingLink<>(next) {...})
.link(next -> new MethodRoutingLink<>(next) {...})
.link(next -> new ContentRoutingLink<>(next) {...})
.link(next -> new OutboundAcceptContentRoutingLink<>(next) {...})
.link(next -> new AcceptLanguageRoutingLink<>(next) {...})
);
}
....
}
The API provides several base RoutingLink implementations that can be used to create HTTP routers:
AcceptLanguageRoutingLinkfor resolving resources based on input accepted languagesAuthorityRoutingLinkfor resolving resources based on input authorityContentRoutingLinkfor resolving resources based on input content typeErrorRoutingLinkfor resolving resources based on input errorHeadersRoutingLinkfor resolving resources based on input headersInboundAcceptContentRoutingLinkfor resolving resources based on input accepted content (for Web client)OutboundAcceptContentRoutingLinkfor resolving resources based on input accepted content (for Web server)PathRoutingLinkfor resolving resources based on input pathQueryParametersRoutingLinkfor resolving resources based on input query parametersURIRoutingLinkfor resolving resources based on input URIWebSocketSubprotocolRoutingLinkfor resolving resources based on input accepted WebSocket subprotocols
This API is currently used in multiple modules which requires routing capabilities: in the web-server module for routing Web exchanges to Web exchange handlers or error Web exchange to error Web exchange handlers, in the web-client module for resolving the interceptors to apply to a Web exchange before sending the request to the server, in the discovery-http module for resolving the endpoints where to send a request.
Although it can be considered as internal, it is generic enough to have value on its own whenever there's a need to best match inputs to resources based on some set of criteria.
HTTP header service
The HTTP header service is the main entry point for decoding and encoding HTTP headers.
The HeaderService interface defines method to decode/encode Header object from/to String or ByteBuf.
For instance, a content-type header can be parsed as follows:
Base httpBase = ...
HeaderService headerService = httpBase.headerService();
Headers.ContentType contentType = headerService.<Headers.ContentType>decode("content-type", "application/xml;charset=utf-8");
// application/xml
String mediaType = contentType.getMediaType();
// utf-8
Charset charset = contentType.getCharset();
The http-base module provides a default implementation exposed as a bean which relies on a set of HeaderCodec objects to support specific headers. Custom header codecs can then be injected in the module to extend its capabilities.
For instance, we can create an ApplicationContextHeaderCodec codec in order for the header service to decode custom application-context headers to ApplicationContextHeader instances. The codec must be injected in the http-base module either explicitly when creating the module or through dependency injection.
Base httpBase = new Base.Builder()
.setHeaderCodecs(List.of(new ApplicationContextHeaderCodec())
.build();
httpBase.start();
ApplicationContextHeaderCodec decodedHeader = httpBase.headerService().<ApplicationContextHeaderCodec>.decode("...")
...
httpBase.stop();
Most of the time the http-base module is composed in a composite module and as a result dependency injection should work just fine, so we simply need to declare the codec as a bean in the module composing the http-base module to extend the header service.
By default, the http-base module provides codecs for the following headers:
acceptas defined by RFC 7231 Section 5.3.2accept-languageas defined by RFC 7231 Section 5.3.5authorizationas defined by RFC 7235 Section 4.2content-dispositionas defined by RFC 6266content-typeas defined by RFC 7231 Section 3.1.1.5cookieas defined by RFC 6265 Section 4.2set-cookieas defined by RFC 6265 Section 4.1
HTTP Client
The Inverno http-client module provides a fully reactive HTTP/1.x and HTTP/2 client based on Netty.
It especially supports:
- HTTP/1.x pipelining
- HTTP/2 over cleartext
- WebSocket
- HTTP Compression
- TLS/mTLS
- Interceptors
- Strongly typed contexts
application/x-www-form-urlencodedbody encodingmultipart/form-databody encoding- Cookies
- zero-copy file transfer when supported for fast resource transfer
- parameter conversion
The client is fully reactive, based on the reactor pattern and non-blocking sockets which means it requires a limited number of threads to supports thousands of connections with high-end performances. Connections are managed per endpoint (i.e. HTTP server) in dedicated pools. It is then easy to create multiple HTTP clients in an application with specific configurations: pool size, timeouts, allocated I/O threads...
This module requires basic services like the NetService, the Reactor and the ResourceService which are usually provided by the boot module, so in order to use the Inverno http-client module, we need to declare the following dependency in the module descriptor:
@io.inverno.core.annotation.Module
module io.inverno.example.app_http_client {
requires io.inverno.mod.boot;
}
The http-base module which provides base HTTP API and services is composed as a transitive dependency in the http-client module and as a result it doesn't need to be specified here nor provided in an enclosing module.
We also need to declare these dependencies in the build descriptor:
Using Maven:
<project>
<dependencies>
<dependency>
<groupId>io.inverno.mod</groupId>
<artifactId>inverno-boot</artifactId>
</dependency>
</dependencies>
</project>
Using Gradle:
compile 'io.inverno.mod:inverno-boot:1.13.0'
An HTTP client is basically created from the HttpClient service exposed in the module and which is used to create the Endpoint connecting to the HTTP server:
package io.inverno.example.app_http_client;
import io.inverno.core.annotation.Bean;
import io.inverno.core.v1.Application;
import io.inverno.mod.http.client.Endpoint;
import io.inverno.mod.http.client.HttpClient;
import io.inverno.mod.http.base.Method;
import java.util.stream.Collectors;
public class Main {
/**
* Connects to example.org
*/
@Bean
public static class Example {
private final Endpoint<ExchangeContext> endpoint;
public Example(HttpClient httpClient) {
this.endpoint = httpClient
.endpoint("example.org", 80)
.build(); // Create the endpoint
}
public String get(String path) {
return this.endpoint
.exchange(Method.GET, path) // Create the client exchange
.flatMap(Exchange::response)
.flatMapMany(response -> response // Stream the response body
.body()
.string().stream()
)
.collect(Collectors.joining()) // Aggregate the response
.block(); // Send the request when the response publisher is subscribed
}
}
public static void main(String[] args) {
App_http_client app_http_client = Application.with(new App_http_client.Builder()).run();
try {
String response = app_http_client.example().get("/");
System.out.println(response);
}
finally {
app_http_client.stop();
}
}
}
In above example, module app_http_client creates the Example bean which uses the HttpClient to obtain an Endpoint to connect to example.org in plain HTTP. An exchange to get the server root is then created from the endpoint, the request is sent when the response publisher is subscribed and the response body eventually returned and displayed to the standard output before the module is finally stopped.
13:52:32.850 [main] INFO io.inverno.core.v1.Application - Inverno is starting...
╔════════════════════════════════════════════════════════════════════════════════════════════╗
║ , ~~ , ║
║ , ' /\ ' , ║
║ , __ \/ __ , _ ║
║ , \_\_\/\/_/_/ , | | ___ _ _ ___ __ ___ ___ ║
║ , _\_\/_/_ , | | / _ \\ \ / // _ \ / _|/ _ \ / _ \ ║
║ , __\_/\_\__ , | || | | |\ \/ /| __/| | | | | | |_| | ║
║ , /_/ /\/\ \_\ , |_||_| |_| \__/ \___||_| |_| |_|\___/ ║
║ , /\ , ║
║ , \/ , -- 1.6.0 -- ║
║ ' -- ' ║
╠════════════════════════════════════════════════════════════════════════════════════════════╣
║ Java runtime : OpenJDK Runtime Environment ║
║ Java version : 21.0.1+12-29 ║
║ Java home : /home/jkuhn/Devel/jdk/jdk-21.0.1 ║
║ ║
║ Application module : io.inverno.example.app_http_client ║
║ Application version : 1.0.0-SNAPSHOT ║
║ Application class : io.inverno.example.app_http_client.Main ║
║ ║
║ Modules : ║
║ ... ║
╚════════════════════════════════════════════════════════════════════════════════════════════╝
13:52:32.858 [main] INFO io.inverno.example.app_http_client.App_http_client - Starting Module io.inverno.example.app_http_client...
13:52:32.859 [main] INFO io.inverno.mod.boot.Boot - Starting Module io.inverno.mod.boot...
13:52:33.073 [main] INFO io.inverno.mod.boot.Boot - Module io.inverno.mod.boot started in 214ms
13:52:33.074 [main] INFO io.inverno.mod.http.client.Client - Starting Module io.inverno.mod.http.client...
13:52:33.074 [main] INFO io.inverno.mod.http.base.Base - Starting Module io.inverno.mod.http.base...
13:52:33.078 [main] INFO io.inverno.mod.http.base.Base - Module io.inverno.mod.http.base started in 4ms
13:52:33.085 [main] INFO io.inverno.mod.http.client.Client - Module io.inverno.mod.http.client started in 11ms
13:52:33.099 [main] INFO io.inverno.example.app_http_client.App_http_client - Module io.inverno.example.app_http_client started in 247ms
13:52:33.100 [main] INFO io.inverno.core.v1.Application - Application io.inverno.example.app_http_client started in 289ms
13:52:33.361 [inverno-io-nio-1-1] INFO io.inverno.mod.http.client.internal.AbstractEndpoint - HTTP/1.1 Client (nio) connected to http://example.org:80
<!doctype html>
<html>
<head>
<title>Example Domain</title>
<meta charset="utf-8" />
<meta http-equiv="Content-type" content="text/html; charset=utf-8" />
<meta name="viewport" content="width=device-width, initial-scale=1" />
<style type="text/css">
body {
background-color: #f0f0f2;
margin: 0;
padding: 0;
font-family: -apple-system, system-ui, BlinkMacSystemFont, "Segoe UI", "Open Sans", "Helvetica Neue", Helvetica, Arial, sans-serif;
}
div {
width: 600px;
margin: 5em auto;
padding: 2em;
background-color: #fdfdff;
border-radius: 0.5em;
box-shadow: 2px 3px 7px 2px rgba(0,0,0,0.02);
}
a:link, a:visited {
color: #38488f;
text-decoration: none;
}
@media (max-width: 700px) {
div {
margin: 0 auto;
width: auto;
}
}
</style>
</head>
<body>
<div>
<h1>Example Domain</h1>
<p>This domain is for use in illustrative examples in documents. You may use this
domain in literature without prior coordination or asking for permission.</p>
<p><a href="https://www.iana.org/domains/example">More information...</a></p>
</div>
</body>
</html>
13:52:33.635 [main] INFO io.inverno.example.app_http_client.App_http_client - Stopping Module io.inverno.example.app_http_client...
13:52:33.638 [main] INFO io.inverno.mod.boot.Boot - Stopping Module io.inverno.mod.boot...
13:52:33.639 [main] INFO io.inverno.mod.boot.Boot - Module io.inverno.mod.boot stopped in 0ms
13:52:33.639 [main] INFO io.inverno.mod.http.client.Client - Stopping Module io.inverno.mod.http.client...
13:52:33.639 [main] INFO io.inverno.mod.http.base.Base - Stopping Module io.inverno.mod.http.base...
13:52:33.639 [main] INFO io.inverno.mod.http.base.Base - Module io.inverno.mod.http.base stopped in 0ms
13:52:33.639 [main] INFO io.inverno.mod.http.client.Client - Module io.inverno.mod.http.client stopped in 0ms
13:52:33.640 [main] INFO io.inverno.example.app_http_client.App_http_client - Module io.inverno.example.app_http_client stopped in 5ms
13:52:34.049 [Thread-0] INFO io.inverno.example.app_http_client.App_http_client - Stopping Module io.inverno.example.app_http_client...
13:52:34.050 [Thread-0] INFO io.inverno.mod.boot.Boot - Stopping Module io.inverno.mod.boot...
13:52:34.051 [Thread-0] INFO io.inverno.mod.boot.Boot - Module io.inverno.mod.boot stopped in 0ms
13:52:34.051 [Thread-0] INFO io.inverno.mod.http.client.Client - Stopping Module io.inverno.mod.http.client...
13:52:34.051 [Thread-0] INFO io.inverno.mod.http.base.Base - Stopping Module io.inverno.mod.http.base...
13:52:34.052 [Thread-0] INFO io.inverno.mod.http.base.Base - Module io.inverno.mod.http.base stopped in 0ms
13:52:34.052 [Thread-0] INFO io.inverno.mod.http.client.Client - Module io.inverno.mod.http.client stopped in 0ms
13:52:34.052 [Thread-0] INFO io.inverno.example.app_http_client.App_http_client - Module io.inverno.example.app_http_client stopped in 2ms
Configuration
The http-client module is configured in the BootConfiguration defined in the boot module for low level client network configuration and in HttpClientConfiguration in the http-client module for the HTTP client itself. A specific configuration can be created in the application module to easily override the default configurations:
package io.inverno.example.app_http_client;
import io.inverno.core.annotation.NestedBean;
import io.inverno.mod.boot.BootConfiguration;
import io.inverno.mod.configuration.Configuration;
import io.inverno.mod.http.server.HttpServerConfiguration;
@Configuration
public interface App_http_clientConfiguration {
@NestedBean
BootConfiguration boot();
@NestedBean
HttpClientConfiguration http_client();
}
This should be enough for exposing a configuration bean in the app_http_client module that let us set up the client:
package io.inverno.example.app_http_client;
import io.inverno.core.annotation.Bean;
import io.inverno.core.v1.Application;
import io.inverno.mod.http.client.Endpoint;
import io.inverno.mod.http.client.HttpClient;
import io.inverno.mod.http.base.HttpVersion;
import io.inverno.mod.http.base.Method;
import java.util.Set;
import java.util.stream.Collectors;
public class Main {
...
public static void main(String[] args) {
App_http_client http_client = Application.with(new App_http_client.Builder()
.setApp_http_clientConfiguration(
App_http_clientConfigurationLoader.load(configuration -> configuration
.http_client(client -> client
.http_protocol_versions(Set.of(HttpVersion.HTTP_1_1))
.pool_max_size(3)
)
.boot(boot -> boot
.net_client(netClient -> netClient
.connect_timeout(30000)
)
.reactor_event_loop_group_size(4)
)
)
)
).run();
...
}
}
In above code, we have set:
- the client to connect using HTTP/1.1 protocol only (default includes both HTTP/1.1 and HTTP/2 which is used first when the server supports it)
- the connection pool max size to 3 for the Endpoint (endpoints will use up to 3 connections to send requests to the HTTP server)
- the low level connection timeout to 30 seconds
- the number of thread allocated to the reactor core IO event loop group to 4
This configuration is basically used to override the default values globally, these settings are applied for all Endpoint instances created with the HttpClient. For instance, the connection pool size will then be the same for all endpoints. However, if we consider an application creating multiple endpoints to connect to multiple HTTP servers, it is usually useful to apply different configurations per endpoint. Hopefully specific HttpClientConfiguration and NetClientConfiguration can also be specified when creating an endpoint:
package io.inverno.example.app_http_client;
...
public class Main {
@Bean
public static class Example {
...
public Example(HttpClient httpClient, App_http_clientConfiguration baseConfiguration) {
this.endpoint = httpClient.endpoint("example.org", 80) // Creates the endpoint
.configuration(
HttpClientConfigurationLoader.load(baseConfiguration.http_client(), configuration -> configuration
.pool_max_size(5)
)
)
.build();
}
...
}
...
}
In above code, the connection pool max size was set to 5 for example.org endpoint overriding the baseConfiguration that was set in the application module.
Please refer to the API documentation to have an exhaustive description of the different configuration properties. We can for instance configure low level network settings like TCP keep alive or TCP no delay as well as HTTP related settings like compression or TLS.
You can also refer to the configuration module documentation to get more details on how configuration works and more especially how you can from here define the HTTP client configuration in command line arguments, property files...
Transport
By default, the HTTP client uses the Java NIO transport, but it is possible to use native epoll transport on Linux or kqueue transport on BSD-like systems for optimized performances. This can be done by adding the corresponding Netty dependencies with the right classifier in the project descriptor:
<project>
<dependencies>
<dependency>
<groupId>io.netty</groupId>
<artifactId>netty-transport-classes-epoll</artifactId>
</dependency>
<dependency>
<groupId>io.netty</groupId>
<artifactId>netty-transport-native-epoll</artifactId>
<classifier>linux-x86_64</classifier>
</dependency>
</dependencies>
</project>
or
<project>
<dependencies>
<dependency>
<groupId>io.netty</groupId>
<artifactId>netty-transport-classes-kqueue</artifactId>
</dependency>
<dependency>
<groupId>io.netty</groupId>
<artifactId>netty-transport-native-kqueue</artifactId>
<classifier>osx-x86_64</classifier>
</dependency>
</dependencies>
</project>
When these dependencies are declared on the JVM module path, the corresponding Java modules must be added explicitly when running the application. This is typically the case when the application is run or packaged as an application image using the Inverno Maven plugin.
This can be done by defining the corresponding dependencies in the module descriptor:
@io.inverno.core.annotation.Module module io.inverno.example.app { ... requires io.netty.transport.unix.common; requires io.netty.transport.classes.epoll, requires io.netty.transport.epoll.linux.x86_64; }This approach is fine as long as we are sure the application will run on Linux, but in order to create a properly portable application, we should prefer adding the modules explicitly when running the application:
$ java --add-modules io.netty.transport.unix.common,io.netty.transport.classes.epoll,io.netty.transport.epoll.linux.x86_64 ...When building an application image, this can be specified in the Inverno Maven plugin configuration:
<project> <build> <plugins> <plugin> <groupId>io.inverno.tool</groupId> <artifactId>inverno-maven-plugin</artifactId> <executions> <execution> <configuration> <vmOptions>--add-modules io.netty.transport.unix.common,io.netty.transport.classes.epoll,io.netty.transport.epoll.linux.x86_64</vmOptions> </configuration> </execution> </executions> </plugin> </plugins> </build> </project>
HTTP protocol versions
The HTTP client supports HTTP/1.1, HTTP/2 and HTTP/2 over cleartext (H2C) protocols, the protocol chosen by the endpoint to connects to an HTTP server is resolved from the configuration.
The http_protocol_versions parameter defines the set of HTTP protocol versions that the client considers when negotiating the protocol with the server. When supported by both client and server, the HTTP/2 protocol should be always preferred over HTTP/1.1.
When the tls_enabled parameter is enabled, protocol negotiation is done through ALPN, the client submits the protocols defined in the http_protocol_versions parameter, the server then responds with its preferred protocol version and the connection is established. The connection is rejected when the server doesn't support any of the protocol versions proposed by the client (e.g. client only provides HTTP/2 whereas the server only supports HTTP/1.1).
The following configuration allows to create HTTP endpoints using secured HTTP/2.0 or HTTP/1.1 connections:
this.endpoint = httpClient.endpoint("example.org", 80) // Creates the endpoint
.configuration(
HttpClientConfigurationLoader.load(baseConfiguration.http_client(), configuration -> configuration
.tls_enabled(true)
.http_protocol_versions(Set.of(HttpVersion.HTTP_2_0, HttpVersion.HTTP_1_1))
)
)
.build();
)
When the tls_enabled parameter is disabled and both HTTP/2 and HTTP/1.1 protocols are defined in http_protocol_versions parameter, the client will include HTTP/2 over cleartext upgrade headers in the initial HTTP/1.1 request to upgrade the connection to use HTTP/2 protocol when the server supports it.
The following configuration allows to create HTTP endpoints using HTTP/2.0 over cleartext or HTTP/1.1 connections:
this.endpoint = httpClient.endpoint("example.org", 80) // Creates the endpoint
.configuration(
HttpClientConfigurationLoader.load(baseConfiguration.http_client(), configuration -> configuration
.tls_enabled(false)
.http_protocol_versions(Set.of(HttpVersion.HTTP_2_0, HttpVersion.HTTP_1_1))
)
)
.build();
)
Note that it is possible to only set HTTP/2 protocol with TLS disabled, in which case the client will communicate with the server directly using the HTTP/2 protocol. Although this might be a valid use case no HTTP servers actually supports it, so you should always provide HTTP/1.1 protocol along with HTTP/2 protocol in
http_protocol_versionswhen the connection is not secured. Accepted protocol combinations should include: HTTP/2 over TLS, HTTP/1.1 over TLS, HTTP/2 and HTTP/1.1 over TLS, HTTP/2 and HTTP/1.1 over clear text or HTTP/1.1 over clear text.
HTTP compression
HTTP compression can be activated by configuration for request and/or response. For instance:
this.endpoint = httpClient.endpoint("example.org", 80) // Creates the endpoint
.configuration(
HttpClientConfigurationLoader.load(baseConfiguration.http_client(), configuration -> configuration
.decompression_enabled(true)
.compression_enabled(true)
)
)
.build();
)
deflate and gzip compression algorithms are supported by default, Zstandard or Brotli support can be added by adding corresponding dependencies to the project, for instance:
<dependency>
<groupId>com.aayushatharva.brotli4j</groupId>
<artifactId>brotli4j</artifactId>
</dependency>
<dependency>
<groupId>com.aayushatharva.brotli4j</groupId>
<artifactId>native-linux-x86_64</artifactId>
</dependency>
TLS
TLS can be enabled by configuration to create secured connections as follows:
this.endpoint = httpClient.endpoint("example.org", 80) // Creates the endpoint
.configuration(
HttpClientConfigurationLoader.load(baseConfiguration.http_client(), configuration -> configuration
.tls_enabled(true)
)
)
.build();
)
Untrustworthy connections are discarded by default. For instance, connecting to a server using a self-signed certificate will fail which can become an issue on development or testing environments.
By default, the client relies on JDK's truststore ($JAVA_HOME/lib/security/cacerts) but it can also be configured with a specific trust store:
this.endpoint = httpClient.endpoint("example.org", 80) // Creates the endpoint
.configuration(
HttpClientConfigurationLoader.load(baseConfiguration.http_client(), configuration -> configuration
.tls_enabled(true)
.tls_trust_store(URI.create("file:/path/to/truststore.p12"))
.tls_trust_store_type("PKCS12")
.tls_trust_store_password("password")
)
)
.build();
)
It is also possible to trust all certificates which can be convenient in a testing environment:
this.endpoint = httpClient.endpoint("example.org", 80) // Creates the endpoint
.configuration(
HttpClientConfigurationLoader.load(baseConfiguration.http_client(), configuration -> configuration
.tls_enabled(true)
.tls_trust_all(true)
)
)
.build();
)
A custom
TrustManagerFactorycan also be set intls_trust_manager_factoryconfiguration parameter to fully customize how certificates are verified.
The HTTP client can also be configured to support Mutual TLS authentication (mTLS) by specifying a keystore containing the client certificate and private key (which should then be trusted by the server for the authentication to succeed):
this.endpoint = httpClient.endpoint("example.org", 80) // Creates the endpoint
.configuration(
HttpClientConfigurationLoader.load(baseConfiguration.http_client(), configuration -> configuration
.tls_enabled(true)
.tls_key_store(URI.create("module://io.inverno.example.app_http/keystore.jks"))
.tls_key_store_password("password")
.tls_trust_store(URI.create("file:/path/to/truststore.p12"))
.tls_trust_store_password("password")
)
)
.build();
)
When an application using the http-client module is packaged as an application image, you'll need to make sure TLS related modules from the JDK are included in the runtime image otherwise TLS might not work. You can refer to the JDK providers documentation in the security developer's guide to find out which modules should be added depending on your needs. Most of the time you'll simply add
jdk.crypto.ecmodule in the Inverno Maven plugin configuration:<project> <build> <plugins> <plugin> <groupId>io.inverno.tool</groupId> <artifactId>inverno-maven-plugin</artifactId> <executions> <execution> <configuration> <addModules>jdk.crypto.ec</addModules> </configuration> </execution> </executions> </plugin> </plugins> </build> </project>
##### Proxy
The client and subsequently an endpoint can be configured to connect through a proxy using HTTP, SOCKS V4 or SOCKS V5 protocols with or without basic authentication credentials.
this.endpoint = httpClient.endpoint("example.org", 80) // Creates the endpoint
.configuration(
HttpClientConfigurationLoader.load(baseConfiguration.http_client(), configuration -> configuration
.proxy_host("some.proxy.server")
.proxy_port(8080)
.proxy_protocol(ProxyProtocol.HTTP)
.proxy_username("proxy_user")
.proxy_password("proxy_password")
)
)
.build();
)
Note that both host and port must be specified in the configuration to initiate a proxy connection.
Endpoint
The Endpoint represents the terminal end in an HTTP communication from a client to a server. From the client perspective this is basically a bridge to an HTTP server. It is responsible to establish and manage the connections to a single HTTP server on which HTTP requests are sent by the application.
An application can create many endpoint to connect to many HTTP servers. An Endpoint instance is obtained from the HttpClient service by specifying the host and the port of the HTTP server:
httpClient.endpoint("example.org", 80)
.build();
Specific HttpClientConfiguration and/or an NetClientConfiguration can also be provided when building the endpoint. By default, global modules configurations are applied if none are specified.
HttpClient httpClient = ...
Endpoint<ExchangeContext> endpoint = httpClient.endpoint("example.org", 80)
.configuration(
HttpClientConfigurationLoader.load(baseConfiguration.http_client(), configuration -> configuration
.tls_enabled(true)
.http_protocol_versions(Set.of(HttpVersion.HTTP_2_0))
.request_timeout(30000l)
)
)
.build();
An HTTP exchange can be created and a request sent fluently from the Endpoint instance:
Flux<String> responseBody = endpoint
.exchange()
.flatMap(exchange -> {
exchange.request() // 1
.method(Method.GET)
.path("/");
return exchange.response(); // 2
})
.flatMapMany(response -> response // 3
.body()
.string().stream()
)
.subscribe(bodyPart -> {}); // 2
- Populate the request to
GETthe server's root path. - The actual request is only sent to the server when the exchange response publisher is subscribed.
- When the client receives a response from the server the
Responseis emitted.
When the response publisher is subscribed, an HTTP connection is obtained from the Endpoint and the request eventually sent to the server.
It is possible to specify the HTTP method and the request target directly when creating the exchange, above example could have also been written:
Flux<String> responseBody = endpoint
.exchange(Method.GET, "/")
.flatMap(Exchange::response)
.flatMapMany(response -> response
.body()
.string().stream()
)
.subscribe(bodyPart -> {});
Note that when an exchange is created with no arguments it is set to send a
GETrequest to the root path by default.
HTTP client and server APIs are built on top of http-base module API and as a result client and server
ExchangeAPI are very alike and used in a similar way.
Request
The Request allows to specify headers, cookies and the request body.
Request headers
Request headers can be added or set fluently using a configurator as follows:
endpoint
.exchange(Method.GET, "/")
.flatMap(exchange -> {
exchange.request().headers(headers -> headers
.contentType(MediaTypes.APPLICATION_JSON)
.add("SomeHeader", "SomeValue")
);
return exchange.response();
})
...
Request cookies
Request cookies can be set fluently using a configurator as follows:
endpoint
.exchange(Method.GET, "/")
.flatMap(exchange -> {
exchange.request().headers(headers -> headers
.cookies(cookies -> cookies
.addCookie("cookie", "12345")
);
return exchange.response();
})
...
Query parameters
Query parameters must be provided in the request target when creating the request, they are later exposed in the exchange as convertible parameters:
endpoint
.exchange(Method.GET, "/some/path/id?some-integer=123&some-string=abc")
.flatMap(exchange -> {
...
// get a specific query parameter, if there are multiple parameters with the same name, the first one is returned
Integer someInteger = exchange.request().queryParameters().get("some-integer").map(Parameter::asInteger).orElse(null);
// get all query parameters with a given name
List<Integer> someIntegers = exchange.request().queryParameters().getAll("some-integer").stream().map(Parameter::asInteger).collect(Collectors.toList());
// get all query parameters
Map<String, List<Parameter>> queryParameters = exchange.request().queryParameters().getAll();
...
return exchange.response();
})
...
A request can't be parameterized, the request target path specified when creating the request is the one included in the request sent to the server. It is however easy to get around this using a
URIBuilder:Map<String, ?> values = null; endpoint .exchange( Method.GET, URIs.uri( "/some/path/{id}?p1={p1}", URIs.Option.NORMALIZED, URIs.Option.PARAMETERIZED ) .buildString(values) ) ...
Request body
The request body can also be specified fluently before sending the request. Since the HTTP client is fully reactive, the body must be specified as a publisher which is subscribed only when the request is sent to the server.
Note that the body is only made available when the request method allows it (i.e.
POST,PUT,PATCHorDELETE).
String
A simple string can be set in the request body as follows:
endpoint
.exchange(Method.POST, "/some/path")
.flatMap(exchange -> {
exchange.request().body().get().string().value("Hello world!"));
return exchange.response();
})
...
The body can also be specified in a reactive way as a publisher of CharSequence:
endpoint
.exchange(Method.POST, "/some/path")
.flatMap(exchange -> {
exchange.request().body().get().string().stream(Flux.just("Hello", " ", "world", "!"));
return exchange.response();
})
...
Raw
Raw data (i.e. bytes) can also be sent in the request. As for the string request body, it can be a single byte buffer or a stream of byte buffers:
The body can be specified as a publisher of ByteBuf:
endpoint
.exchange(Method.POST, "/some/path")
.flatMap(exchange -> {
exchange.request().body().get().raw().stream(
Flux.just(
Unpooled.unreleasableBuffer(Unpooled.copiedBuffer("Hello", Charsets.DEFAULT)),
Unpooled.unreleasableBuffer(Unpooled.copiedBuffer(" world!", Charsets.DEFAULT))
)
);
return exchange.response();
})
...
Provided
ByteBufare released when they are sent to the server.
Resource
A resource can be sent in a request body. When possible the client uses low-level (zero-copy) API for fast resource transfer.
endpoint
.exchange(Method.GET, "/some/path")
.flatMap(exchange -> {
exchange.request().body().get().resource().value(new FileResource("/path/to/resource"));
return exchange.response();
})
...
The media type of the resource is resolved using a media type service and automatically set in the request content-type header field.
If a specific resource is created as in above example the media type service used is the one defined when creating the resource or a default implementation if none was specified. If the resource is obtained with the resource service provided in the boot module the media type service used is the one provided in the boot module.
URL encoded form
HTML form data of the form of key/value pairs encoded in application/x-www-form-urlencoded format can be sent in the request body of a POST as follows:
endpoint
.exchange(Method.POST, "/some/path")
.flatMap(exchange -> {
// param1=1234¶m2=abc
exchange.request().body().get().urlEncoded()
.from((factory, data) -> data.stream(
Flux.just(
factory.create("param1", 1234),
factory.create("param2", "abc")
)
));
return exchange.response();
})
...
When setting a URL encoded body, the request content-type header is automatically set to application/x-www-form-urlencoded. Parameter values are automatically converted to string using the ParameterConverter set in the http-client module and obviously percent-encoded to comply with application/x-www-form-urlencoded format.
Multipart form
When the request body must be split into multiple parts of different types or more basically when there is a need to upload one or more files along with other form data, a Multipart/form-data request body can be specified as follows:
endpoint
.exchange(Method.POST, "/some/path")
.flatMap(exchange -> {
// param1=1234¶m2=abc
exchange.request().body().get().multipart()
.from((factory, output) -> output.stream(Flux.just(
factory.string(part -> part
.name("param1")
.headers(headers -> headers
.contentType(MediaTypes.TEXT_PLAIN)
)
.value("1234")
),
factory.string(part -> part
.name("param2")
.headers(headers -> headers
.contentType(MediaTypes.APPLICATION_JSON)
)
.value("{\"value\":123}")
),
factory.resource(part -> part
.name("file")
.value(new FileResource("/path/to/resource"))
)
)));
return exchange.response();
})
...
The media type of a resource part is resolved using a media type service and automatically set in the part content-type header field. If no explicit filename parameter has been specified in the part, it is also automatically set to the filename of the resource.
Response
The Response is made available in the Exchange after the request has been sent to the server and response headers has been received, it exposes headers, cookies and the response body.
Response headers/trailers
Response headers can be obtained as string values as follows:
endpoint
.exchange(Method.GET, "/some/path")
.flatMap(Exchange::response)
.map(response -> {
// Returns the value of the first occurrence of 'some-header' as string or returns null
String someHeaderValue = response.headers().get("some-header").orElse(null);
// Returns all 'some-header' values as strings
List<String> someHeaderValues = response.headers().getAll("some-header");
// Returns all headers as strings
List<Map.Entry<String, String>> allHeadersValues = response.headers().getAll();
...
})
...
It is also possible to get headers as Parameter which allows to easily convert the value using a parameter converter:
endpoint
.exchange(Method.GET, "/some/path")
.flatMap(Exchange::response)
.map(response -> {
// Returns the value of the first occurrence of 'some-header' as LocalDateTime or returns null
LocalDateTime someHeaderValue = response.headers().getParameter("some-header").map(Parameter::asLocalDateTime).orElse(null);
// Returns all 'some-header' values as LocalDateTime
List<LocalDateTime> someHeaderValues = response.headers().getAllParameter("some-header").stream().map(Parameter::asLocalDateTime).collect(Collectors.toList());
// Returns all headers as parameters
List<Parameter> allHeadersParameters = response.headers().getAllParameter();
...
})
...
The http-client module can also use the header service provided by the http-base module to decode HTTP headers:
endpoint
.request(Method.GET, "/some/path")
.flatMap(Exchange::response)
.map(response -> {
// Returns the decoded 'content-type' header or null
Headers.ContentType contentType = response.headers().<Headers.ContentType>getHeader(Headers.NAME_CONTENT_TYPE).orElse(null);
String mediaType = contentType.getMediaType();
Charset charset = contentType.getCharset();
...
});
The header service can be extended with custom HTTP
HeaderCodec. Please refer to Extending HTTP services and the http-base module for more information.
Response status
The response status is exposed as part of the headers:
endpoint
.request(Method.GET, "/some/path")
.flatMap(Exchange::response)
.map(response -> {
if(response.headers().getStatus().getCode() >= 400) {
// Report Error
...
}
...
});
Response cookies
Response cookies can be obtained as convertible Parameter from the headers as follows:
endpoint
.request(Method.GET, "/some/path")
.flatMap(Exchange::response)
.map(response -> {
// Returns the value of the first occurrence of 'some-cookie' as LocalDateTime or returns null
LocalDateTime someCookieValue = response.headers().cookies().get("some-cookie").map(Parameter::asLocalDateTime).orElse(null);
// Returns all 'some-cookie' values as LocalDateTime
List<LocalDateTime> someCookieValues = response.headers().cookies().getAll("some-cookie").stream().map(Parameter::asLocalDateTime).collect(Collectors.toList());
// Returns all cookies as set-cookie parameters
Map<String, List<SetCookieParameter>> allCookieParameters = response.headers().cookies().getAll();
...
})
...
SetCookieParameter extends both SetCookie and Parameter to also expose set-cookie header attributes as defined by RFC 6265 Section 4.1:
endpoint
.request(Method.GET, "/some/path")
.flatMap(Exchange::response)
.map(response -> {
SetCookieParameter someCookie = response.headers().cookies().get("some-cookie").orElse(null);
ZonedDateTime expires = someCookie.getExpires();
int maxAge = someCookie.getMaxAge();
String domain = someCookie.getDomain();
String path = someCookie.getPath();
boolean isSecure = someCookie.isSecure();
boolean isHttp = someCookie.isHttpOnly();
Headers.SetCookie.SameSitePolicy sameSitePolicy = someCookie.getSameSite();
...
});
Response body
The response body is exposed in a reactive way which allows to process it while it is being received by the client.
In order to prevent locking and possible memory leaks, the underlying connection will discard unsubscribed data after receiving the final response content, it is therefore important to subscribe to the payload data publisher immediately when the exchange is emitted which happens after the beginning of the response is received (start line and headers) and before the payload is received.
string
The response body can be consumed as CharSequence as follows:
endpoint
.request(Method.GET, "/some/path")
.flatMap(Exchange::response)
.flatMapMany(response -> response.body().string().stream())
.subscribe(bodyPart -> {
// Do something useful with the payload
...
});
In above example, response body string publisher is streamed from the exchange, the resulting flow of data (server can decide to respond with multiple chunk of data) is then subscribed and the payload processed as it is received.
raw
The response body can also be consumed as raw data as follows:
endpoint
.request(Method.GET, "/some/path")
.flatMap(Exchange::response)
.flatMapMany(response -> response.body().raw().stream())
.subscribe((ByteBuf chunk) -> {
try {
// Do something useful with the payload
...
}
finally {
chunk.release();
}
});
When response payload is consumed as a flow of ByteBuf, it is the responsibility of the subscriber to release chunks in order to avoid memory leaks.
Exchange interceptor
An ExchangeInterceptor can be specified when building an Endpoint, it is applied to all exchange created with the resulting instance right before the request is sent to the server. An interceptor can be used to preprocess a request before it is sent or a response before it is emitted in the response publisher. For instance, it is possible to add some security headers to the request, initialize some context (tracing, metrics...) or decorate the request and response bodies.
The intercept() method in the ExchangeInterceptor returns a Mono which makes it reactive and allows to invoke non-blocking operations before the request is actually sent.
The following code shows how to set an interceptor to log request and response bodies:
Endpoint<ExchangeContext> endpoint = httpClient
.endpoint("example.org", 80)
.interceptor(exchange -> {
final StringBuilder requestBodyBuilder = new StringBuilder();
exchange.request().body().ifPresent(body -> body.transform(data -> Flux.from(data)
.doOnNext(buf -> requestBodyBuilder.append(buf.toString(Charsets.UTF_8)))
.doOnComplete(() -> LOGGER.info("Request Body: \n" + requestBodyBuilder.toString()))
));
final StringBuilder responseBodyBuilder = new StringBuilder();
exchange.response().body().transform(data -> Flux.from(data)
.doOnNext(buf -> responseBodyBuilder.append(buf.toString(Charsets.UTF_8)))
.doOnComplete(() -> LOGGER.info("Response Body: \n" + responseBodyBuilder.toString()))
);
return Mono.just(exchange);
})
.build();
endpoint
.exchange(Method.POST, "/some/path")
.flatMap(exchange -> {
exchange.request().body().get().string().value("This is an example"));
return exchange.response();
})
.flatMapMany(response -> response.body().string().stream())
.collect(Collectors.joining())
.block(); // logs request and response body
An interceptor also allows to abort sending the actual HTTP request by returning an empty publisher in which case the current intercepted exchange with a locally populated response is emitted.
The following example shows how to abort all HTTP requests to /some/path and return a local response:
Endpoint<ExchangeContext> endpoint = httpClient
.endpoint("example.org", 80)
.interceptor(exchange -> {
if(exchange.request().getPath().equals("/some/path")) {
// Abort '/some/path' requests only
exchange.response()
.headers(headers -> headers
.status(Status.OK)
)
.body().string().value("You have been intercepted");
return Mono.empty();
}
return Mono.just(exchange);
})
.build();
endpoint
.exchange(Method.POST, "/some/path")
.flatMap(Exchange::response)
.flatMapMany(response -> response.body().string().stream())
.collect(Collectors.joining())
.block(); // returns "You have been intercepted"
Multiple interceptors can be chained by invoking intercept() method multiple times:
Endpoint<ExchangeContext> endpoint = httpClient
.endpoint("example.org", 80)
.interceptor(interceptor1)
.interceptor(interceptor2)
.interceptor(interceptor3)
.build();
...
Exchange context
A strongly typed context is exposed in the Exchange, it allows to store or access data and to provide contextual operations throughout the process of the exchange. Such context can be provided when creating the exchange, the actual context type is specified when creating the Endpoint.
For instance, it is possible to propagate a security context from an ExchangeInterceptor:
Endpoint<SecurityContext> securedEndpoint = client.<SecurityContext>endpoint("secured", 8443)
.interceptor(exchange -> {
exchange.request().headers(headers -> headers
.add(Headers.NAME_AUTHORIZATION, "Bearer " + exchange.context().getToken())
);
return Mono.just(exchange);
})
.build();
SecurityContext context = ...
endpoint
.exchange(Method.GET, path, context)
.flatMap(Exchange::response)
...
The advantage of using strongly types context is that the compiler can perform static type checking but also to avoid the usage of an untyped map of attributes which is less performant and provides no control over contextual data. Since the developer defines the context type, it can also embed specific logic.
The choice has been made to fix the context type on the endpoint following what was done in the Web server module: the exchange context is meant to be defined at application level covering all use cases as such there can only be one exchange type. We could have decided to fix the exchange type on the HttpClient itself but generics are not supported on beans, besides this gives us a little more flexibility anyway.
Connection pool
The http-client module provides an Endpoint implementation based on a connection pool which allows it to be resilient, stale connections being automatically recreated, and to scale up and down automatically based on application workload.
An HTTP connection is only created when a request is sent on an Endpoint and no connection is currently available to process that request. This is especially the case when there is no active connection in the pool (e.g. when the endpoint has just been created) are full (i.e. max concurrent requests threshold has been reached). The pooled endpoint can create up to a certain amount of connections before buffering requests also up to a certain threshold above which a ConnectionPoolException is finally thrown. When the workload decreases, the endpoint parks unnecessary connections and eventually close them when they time out, this allows to put them back in the active pool in case new requests are issued.
The endpoint connection pool behaviour is controlled by configuration with the following parameters:
- pool_max_size: the maximum number of connections that can exist in a pool (defaults to 2).
- pool_clean_period: the frequency at which the pool parks unnecessary connections or closes timed out connection (defaults to 1000ms).
- pool_buffer_size: the size of the request buffer used to buffer requests when all connections in the pool are full (defaults to
nullfor no limit). - pool_keep_alive_timeout: how much time the pool needs to keep a parked connection in the pool before actually closing it (defaults to 60000ms).
- pool_connect_timeout: how much time to wait for the pool to return a connection when a request is sent before raising a
ConnectionTimeoutException. - http1_max_concurrent_requests and http2_max_concurrent_streams: the maximum number of concurrent requests a connection can handle (pipelining for HTTP/1.1 connections and concurrent streams for HTTP/2 connections).
Note that HTTP client configuration pool_connect_timeout parameter should not be confused with Net configuration connect_timeout parameter which specify the connection timeout at network level (i.e. used when the client tries to open the socket to the server).
At any moment, the endpoint will try its best to optimize connection usage by distributing request to the least loaded connection and only create connection when necessary. It also has the ability to reinstate parked connections which are still active if the workload demands it.
Error handling
Http client errors such as connection errors, timeout errors or any Http client related errors are raised on the response publisher exposed on the exchange, they can then be handled as for any error on a reactive stream:
endpoint
.exchange(Method.GET, "/some/path")
.flatMap(Exchange::response)
.flatMapMany(response -> response.body().string().stream())
.collect(Collectors.joining())
.subscribe(
body -> {
},
error -> LOGGER.error("There was an error requesting the server", error)
);
Being reactive allows interesting constructs, such as retries on error:
endpoint
.exchange(Method.GET, "/some/path")
.flatMap(Exchange::response)
.retry(5) // see
...
Reactor library provides advanced retry strategies such as backoff, fixed delay, max in a row... Please refer to Reactor API documentation.
WebSocket
The http-client module allows to open WebSocket connections as defined by RFC 6455. The webSocket() method exposed in the Exchange returns a WebSocketExchange publisher which is used to send a specific HTTP request that upgrades a dedicated HTTP/1.1 connection to the WebSocket protocol. As for the response publisher, the WebSocket connection is only created when the WebSocket publisher is subscribed.
A WebSocket connection can then be created as follows:
endpoint
.exchange("/some/path/ws")
.flatMap(Exchange::webSocket)
.subscribe(webSocketExchange -> {
// write to outbound and read from inbound...
...
});
In case the server does not support or accept the upgrade a WebSocketClientHandshakeException is raised in the WebSocketExchange publisher otherwise a WebSocketExchange is emitted exposing inbound and outbound frames or messages.
Note that a WebSocket connection is dedicated and lives outside the connection pool managed by the endpoint and as such doesn't count in pool's capacity. It is closed as soon as the WebSocket is closed either by the client or the server.
As for a regular HTTP request, headers and cookies can be specified as follows:
endpoint
.exchange("/some/path/ws")
.flatMap(exchange -> {
exchange.request().headers(headers -> headers
.add("some-header", "value")
.cookies(cookies -> cookies.addCookie("some-cookie", 123))
);
return exchange.webSocket();
})
.subscribe(webSocketExchange -> {
...
});
The subprotocol to use by both client and server to communicate can also be specified:
endpoint
.exchange("/some/path/ws")
.flatMap(exchange -> exchange.webSocket("xml"))
.subscribe(webSocketExchange -> {
...
});
The upgrading HTTP request basically contains the requested subprotocol which must be supported by the server for the connection to be established. Depending on servers implementation, the WebSocket handshake might fail eventually if the server doesn't support it and a WebSocketClientHandshakeException shall be raised.
WebSocket exchange
The WebSocketExchange also exposes:
- the original HTTP request,
webSocketExchange.request();
- the exchange context:
webSocketExchange.context();
- the negotiated subprotocol:
webSocketExchange.getSubProtocol();
- multiple methods for closing the WebSocket:
webSocketExchange.close(WebSocketStatus.NORMAL_CLOSURE);
webSocketExchange.close((short)1000, "Goodbye!");
A WebSocket exchange finalizer can be specified to free resources once the WebSocket is closed:
webSocketExchange.finalizer(Mono.fromRunnable(() -> {
// Release some resources
...
}));
The WebSocket protocol is bidirectional and allows sending and receiving data on both ends exposed by inbound() and outbound() methods in the WebSocket exchange.
Inbound
In a WebSocket exchange, the Inbound exposes the stream of frames received by the client from the server. It allows to consume WebSocket frames (text or binary) or messages (text or binary).
The following example shows how to log every incoming frames:
endpoint
.exchange("/some/path/ws")
.flatMap(Exchange::webSocket)
.flatMapMany(wsExchange -> wsExchange.inbound().frames())
.subscribe(frame -> {
try {
LOGGER.info("Received WebSocket frame: kind = " + frame.getKind() + ", final = " + frame.isFinal() + ", size = " + frame.getBinaryData().readableBytes());
}
finally {
frame.release();
}
});
As for response body ByteBuf data, WebSocket frames are reference counted, and they must be released where they are consumed. In previous example, inbound frames are consumed in the subscriber which must then release them.
The WebSocket protocol supports fragmentation as defined by [RFC 6455 Section 5.4][rfc-6455-5.4], a WebSocket message can be fragmented into multiple frames, the final frame being flagged as final to indicate the end of the message. The Inbound can handle fragmented WebSocket messages and allows to consume corresponding fragmented data in multiple ways.
endpoint
.exchange("/some/path/ws")
.flatMap(Exchange::webSocket)
.flatMapMany(wsExchange -> wsExchange.inbound().messages())
.flatMap(message -> {
// The stream of frames composing the message
Publisher<WebSocketFrame> frames = message.frames();
// The message data as stream of ByteBuf
Publisher<ByteBuf> binary = message.raw();
// The message data as stream of String
Publisher<String> text = message.string();
// Aggregate all fragments into a single ByteBuf
Mono<ByteBuf> reducedRaw = message.rawReduced();
// Aggregate all fragments into a single String
Mono<String> reducedText = message.stringReduced();
...
});
Note that the different publishers in previous example are all variants of the frames publisher, as a result they are exclusive and it is only possible to subscribe once to only one of them.
Unlike WebSocket frames, WebSocket messages are not reference counted. However, message fragments, which are basically frames, must be released when consumed as WebSocket frames or ByteBuf.
Messages can be filtered by type (text or binary) by invoking WebSocketExchange.Inbound#textMessages() and WebSocketExchange.Inbound#binaryMessages().
Outbound
In a WebSocket exchange, the Outbound exposes the stream of frames sent by the client to the server. It allows to specify the stream of WebSocket frames (text or binary) or messages (text or binary) to send. WebSocket frames and messages are created using provided factories.
In the following example, a sink is used to create the frame publisher specified in the WebSocket outbound:
Sinks.Many<String> framesSink = Sinks.many().unicast().onBackpressureBuffer();
endpoint
.exchange("/some/path/ws")
.flatMap(Exchange::webSocket)
.flatMapMany(wsExchange -> {
wsExchange.outbound()
.frames(factory -> framesSink.asFlux().map(factory::text));
return wsExchange.inbound().frames();
})
.subscribe(frame -> {
try {
LOGGER.info("Received WebSocket frame: kind = " + frame.getKind() + ", final = " + frame.isFinal() + ", size = " + frame.getBinaryData().readableBytes());
}
finally {
frame.release();
}
});
framesSink.tryEmitNext("test1");
framesSink.tryEmitNext("test2");
framesSink.tryEmitNext("test3");
framesSink.tryEmitComplete();
Likewise, a message publisher can be specified to send messages composed of multiple frames. Frames and messages publisher are exclusive, only one of them can be specified.
Sinks.Many<List<String>> messagesSink = Sinks.many().unicast().onBackpressureBuffer();
endpoint
.exchange("/some/path/ws")
.flatMap(Exchange::webSocket)
.flatMapMany(wsExchange -> {
wsExchange.outbound()
.closeOnComplete(true)
.messages(factory -> messagesSink.asFlux().map(Flux::fromIterable).map(factory::text));
return wsExchange.inbound().messages();
})
.flatMap(WebSocketMessage::reducedText)
.subscribe(message -> {
LOGGER.info("Received WebSocket message: {}", message );
});
messagesSink.tryEmitNext(List.of("One frame"));
messagesSink.tryEmitNext(List.of("Multiple ", "frames"));
messagesSink.tryEmitComplete();
By default, a close frame is automatically sent when the outbound publisher terminates. This behaviour can be changed by configuration by setting the ws_close_on_outbound_complete parameter to ̀false or on the Outbound itself using the closeOnComplete() method:
Sinks.Many<String> framesSink = Sinks.many().unicast().onBackpressureBuffer();
endpoint
.exchange("/some/path/ws")
.flatMap(Exchange::webSocket)
.flatMapMany(wsExchange -> {
wsExchange.outbound()
.closeOnComplete(false)
.frames(factory -> framesSink.asFlux().map(factory::text));
return wsExchange.inbound().frames();
})
...
After a close frame has been sent, if the inbound publisher has not been subscribed or if it has terminated, the connection is closed right away, otherwise the client waits up to a configured timeout (ws_inbound_close_frame_timeout defaults to 60000ms) for the server to respond with a corresponding close frame before closing the connection. This allows the server to properly close the WebSocket as defined by RFC 6455 Section 5.5.1.
Extending HTTP services
The http-client module also defines a socket to plug a custom parameter converter which is a basic StringConverter by default. Since we created the app_http_client module by composing boot and http-client modules, the parameter converter provided by the boot module should then override the default. This converter is a StringCompositeConverter which can be extended by injecting custom CompoundDecoder and/or CompoundEncoder instances in the boot module as described in the composite converter documentation.
The HeaderService provided by the http-basic module composed in the http-client module can also be extended by injecting custom HeaderCodec instances used to encode/decode custom HTTP headers.
In practice, all we have to do to extend these services is to provide HeaderCodec, CompoundDecoder or CompoundEncoder beans in the app_http_client module.
HTTP Server
The Inverno http-server module provides a fully reactive HTTP/1.x and HTTP/2 server based on Netty.
It especially supports:
- HTTP/1.x pipelining
- HTTP/2 over cleartext
- WebSocket
- HTTP Compression
- TLS
- Interceptors
- Strongly typed contexts
application/x-www-form-urlencodedbody decodingmultipart/form-databody decoding- Server-sent events
- Cookies
- zero-copy file transfer when supported for fast resource transfer
- parameter conversion
The server is fully reactive, based on the reactor pattern and non-blocking sockets which means it requires a limited number of threads to supports thousands of connections with high-end performances. This design offers multiple advantages starting with maximizing the usage of resources. It is also easy to scale the server up and down by specifying the number of threads we want to allocate to the server, which ideally corresponds to the number of CPU cores. All this makes it a perfect choice for microservices applications running in containers in the cloud.
This module lays the foundational service and API for building HTTP servers with more complex and advanced features, that is why you might sometimes find it a little bit low level but that is the price of performance. If you require higher level functionalities like request routing, content negotiation and automatic payload conversion please consider the web server module.
This module requires basic services like a net service and a resource service which are usually provided by the boot module, so in order to use the Inverno http-server module, we should declare the following dependencies in the module descriptor:
@io.inverno.core.annotation.Module
module io.inverno.example.app_http {
requires io.inverno.mod.boot;
requires io.inverno.mod.http.server;
}
The http-base module which provides base HTTP API and services is composed as a transitive dependency in the http-server module and as a result it doesn't need to be specified here nor provided in an enclosing module.
We also need to declare these dependencies in the build descriptor:
Using Maven:
<project>
<dependencies>
<dependency>
<groupId>io.inverno.mod</groupId>
<artifactId>inverno-boot</artifactId>
</dependency>
<dependency>
<groupId>io.inverno.mod</groupId>
<artifactId>inverno-http-server</artifactId>
</dependency>
</dependencies>
</project>
Using Gradle:
compile 'io.inverno.mod:inverno-boot:1.13.0'
compile 'io.inverno.mod:inverno-http-server:1.13.0'
The resulting app_http module, thus created, can then be started as an application as follows:
package io.inverno.example.app_http;
import io.inverno.core.v1.Application;
public class Main {
public static void main(String[] args) {
Application.with(new App_http.Builder()).run();
}
}
The above example starts an HTTP/1.x server using default configuration and a default server controller.
2021-04-14 09:51:46,329 INFO [main] i.w.c.v.Application - Inverno is starting...
╔════════════════════════════════════════════════════════════════════════════════════════════╗
║ , ~~ , ║
║ , ' /\ ' , ║
║ , __ \/ __ , _ ║
║ , \_\_\/\/_/_/ , | | ___ _ _ ___ __ ___ ___ ║
║ , _\_\/_/_ , | | / _ \\ \ / // _ \ / _|/ _ \ / _ \ ║
║ , __\_/\_\__ , | || | | |\ \/ /| __/| | | | | | |_| | ║
║ , /_/ /\/\ \_\ , |_||_| |_| \__/ \___||_| |_| |_|\___/ ║
║ , /\ , ║
║ , \/ , -- 1.6.0 -- ║
║ ' -- ' ║
╠════════════════════════════════════════════════════════════════════════════════════════════╣
║ Java runtime : OpenJDK Runtime Environment ║
║ Java version : 16+36-2231 ║
║ Java home : /home/jkuhn/Devel/jdk/jdk-16 ║
║ ║
║ Application module : io.inverno.example.app_http ║
║ Application version : 1.0.0-SNAPSHOT ║
║ Application class : io.inverno.example.app_http.Main ║
║ ║
║ Modules : ║
║ ... ║
╚════════════════════════════════════════════════════════════════════════════════════════════╝
2021-04-14 09:53:21,829 INFO [main] i.w.e.a.App_http - Starting Module io.inverno.example.app_http...
2021-04-14 09:53:21,829 INFO [main] i.w.m.b.Boot - Starting Module io.inverno.mod.boot...
2021-04-14 09:53:22,025 INFO [main] i.w.m.b.Boot - Module io.inverno.mod.boot started in 195ms
2021-04-14 09:53:22,025 INFO [main] i.w.m.h.s.Server - Starting Module io.inverno.mod.http.server...
2021-04-14 09:53:22,025 INFO [main] i.w.m.h.b.Base - Starting Module io.inverno.mod.http.base...
2021-04-14 09:53:22,029 INFO [main] i.w.m.h.b.Base - Module io.inverno.mod.http.base started in 3ms
2021-04-14 09:53:22,080 INFO [main] i.w.m.h.s.i.HttpServer - HTTP Server (nio) listening on http://0.0.0.0:8080
2021-04-14 09:53:22,080 INFO [main] i.w.m.h.s.Server - Module io.inverno.mod.http.server started in 55ms
2021-04-14 09:53:22,080 INFO [main] i.w.e.a.App_http - Module io.inverno.example.app_http started in 252ms
You should be able to send a request to the server:
$ curl -i http://localhost:8080/
HTTP/1.1 200
content-length: 5
Hello
The HTTP server uses a server controller to handle client request. The module provides a default implementation as overridable bean, a custom server controller can then be injected when creating the http-server module.
this module can also be used to embed an HTTP server in any application, unlike other application frameworks, Inverno core IoC/DI framework is not pervasive and any Inverno modules can be safely used in various contexts and applications.
Configuration
The first thing we might want to do is to create a configuration in the app_http module for easy http-server module setup. The HTTP server configuration is actually done in the BootConfiguration defined in the boot module for low level network configuration and in HttpServerConfiguration defined in the http-server module for the HTTP server itself.
The following configuration can then be created in the app_http module:
package io.inverno.example.app_http;
import io.inverno.core.annotation.NestedBean;
import io.inverno.mod.boot.BootConfiguration;
import io.inverno.mod.configuration.Configuration;
import io.inverno.mod.http.server.HttpServerConfiguration;
@Configuration
public interface App_httpConfiguration {
@NestedBean
BootConfiguration boot();
@NestedBean
HttpServerConfiguration http_server();
}
This should be enough for exposing a configuration in the app_http module that let us set up the server:
package io.inverno.example.app_http;
import io.inverno.core.v1.Application;
public class Main {
public static void main(String[] args) {
Application.with(new App_http.Builder()
.setApp_httpConfiguration(
App_httpConfigurationLoader.load(configuration -> configuration
.http_server(server -> server
.server_port(8081)
.h2_enabled(true)
)
.boot(boot -> boot
.reactor_event_loop_group_size(4)
)
)
)
).run();
}
}
In the above code, we have set the server port to 8081, enabled HTTP/2 over cleartext and set the number of thread allocated to the reactor core IO event loop group to 4.
h2_enabledproperty defaults totruewhen TLS is configured and tofalseotherwise, in order to activate HTTP/2 over cleartext, it must be set to true explicitly.
Please refer to the API documentation to have an exhaustive description of the different configuration properties. We can for instance configure low level network settings like TCP keep alive or TCP no delay as well as HTTP related settings like compression or TLS.
You can also refer to the configuration module documentation to get more details on how configuration works and more especially how you can from here define the HTTP server configuration in command line arguments, property files...
Logging
The HTTP server logs error events at ERRORlevel with theio.inverno.mod.http.server.ErrorExchangelogger and access events atINFOlevel with theio.inverno.mod.http.server.Exchangelogger when theHttpAccessLogsInterceptor` has been registered to the server controller exchange handlers (see HTTP access logs interceptor).
These loggers can be configured as follows:
<?xml version="1.0" encoding="UTF-8"?>
<Configuration xmlns="http://logging.apache.org/log4j/2.0/config"
xmlns:xsi="http://www.w3.org/2001/XMLSchema-instance"
xsi:schemaLocation="http://logging.apache.org/log4j/2.0/config https://raw.githubusercontent.com/apache/logging-log4j2/rel/2.14.0/log4j-core/src/main/resources/Log4j-config.xsd"
status="WARN" shutdownHook="disable">
<Appenders>
<Console name="LogToConsole" target="SYSTEM_OUT">
<PatternLayout pattern="%d{DEFAULT} %highlight{%-5level} [%t] %c{1.} - %msg%n%ex"/>
</Console>
</Appenders>
<Loggers>
<!-- Disable HTTP server access and error logs -->
<Logger name="io.inverno.mod.http.server.Exchange" additivity="false" level="off" />
<Logger name="io.inverno.mod.http.server.ErrorExchange" additivity="false" level="off" />
<Root level="info">
<AppenderRef ref="LogToConsole"/>
</Root>
</Loggers>
</Configuration>
We can also create a more production-like logging configuration for a standard HTTP server that asynchronously logs access and error events in separate files in a JSON format for easy integration with log processing tools with a rolling strategy.
<?xml version="1.0" encoding="UTF-8"?>
<Configuration status="WARN" name="Website" shutdownHook="disable">
<Appenders>
<Console name="Console" target="SYSTEM_OUT">
<PatternLayout pattern="%d{DEFAULT} %highlight{%-5level} [%t] %c{1.} - %msg%n%ex"/>
</Console>
<!-- Access log -->
<RollingRandomAccessFile name="AccessRollingFile" fileName="logs/access.log" filePattern="logs/access-%d{yyyy-MM-dd}-%i.log.gz">
<JsonTemplateLayout/>
<Policies>
<TimeBasedTriggeringPolicy />
<SizeBasedTriggeringPolicy size="10 MB"/>
</Policies>
<DefaultRolloverStrategy>
<Delete basePath="logs" maxDepth="2">
<IfFileName glob="access-*.log.gz" />
<IfLastModified age="10d" />
</Delete>
</DefaultRolloverStrategy>
</RollingRandomAccessFile>
<Async name="AsyncAccessRollingFile">
<AppenderRef ref="AccessRollingFile"/>
</Async>
<!-- Error log -->
<RollingRandomAccessFile name="ErrorRollingFile" fileName="logs/error.log" filePattern="logs/error-%d{yyyy-MM-dd}-%i.log.gz">
<JsonTemplateLayout/>
<Policies>
<TimeBasedTriggeringPolicy />
<SizeBasedTriggeringPolicy size="10 MB"/>
</Policies>
<DefaultRolloverStrategy>
<Delete basePath="logs" maxDepth="2">
<IfFileName glob="error-*.log.gz" />
<IfLastModified age="10d" />
</Delete>
</DefaultRolloverStrategy>
</RollingRandomAccessFile>
<Async name="AsyncErrorRollingFile">
<AppenderRef ref="ErrorRollingFile"/>
</Async>
</Appenders>
<Loggers>
<Logger name="io.inverno.mod.http.server.Exchange" additivity="false" level="info">
<AppenderRef ref="AsyncAccessRollingFile" level="info"/>
</Logger>
<Logger name="io.inverno.mod.http.server.ErrorExchange" additivity="false" level="error">
<AppenderRef ref="AsyncErrorRollingFile" level="error"/>
</Logger>
<Root level="info" additivity="false">
<AppenderRef ref="Console" level="info" />
<AppenderRef ref="AsyncErrorRollingFile" level="error"/>
</Root>
</Loggers>
</Configuration>
Transport
By default, the HTTP server uses the Java NIO transport, but it is possible to use native epoll transport on Linux or kqueue transport on BSD-like systems for optimized performances. This can be done by adding the corresponding Netty dependencies with the right classifier in the project descriptor:
<project>
<dependencies>
<dependency>
<groupId>io.netty</groupId>
<artifactId>netty-transport-classes-epoll</artifactId>
</dependency>
<dependency>
<groupId>io.netty</groupId>
<artifactId>netty-transport-native-epoll</artifactId>
<classifier>linux-x86_64</classifier>
</dependency>
</dependencies>
</project>
or
<project>
<dependencies>
<dependency>
<groupId>io.netty</groupId>
<artifactId>netty-transport-classes-kqueue</artifactId>
</dependency>
<dependency>
<groupId>io.netty</groupId>
<artifactId>netty-transport-native-kqueue</artifactId>
<classifier>osx-x86_64</classifier>
</dependency>
</dependencies>
</project>
When these dependencies are declared on the JVM module path, the corresponding Java modules must be added explicitly when running the application. This is typically the case when the application is run or packaged as an application image using the Inverno Maven plugin.
This can be done by defining the corresponding dependencies in the module descriptor:
@io.inverno.core.annotation.Module module io.inverno.example.app { ... requires io.netty.transport.unix.common; requires io.netty.transport.classes.epoll, requires io.netty.transport.epoll.linux.x86_64; }This approach is fine as long as we are sure the application will run on Linux, but in order to create a properly portable application, we should prefer adding the modules explicitly when running the application:
$ java --add-modules io.netty.transport.unix.common,io.netty.transport.classes.epoll,io.netty.transport.epoll.linux.x86_64 ...When building an application image, this can be specified in the Inverno Maven plugin configuration:
<project> <build> <plugins> <plugin> <groupId>io.inverno.tool</groupId> <artifactId>inverno-maven-plugin</artifactId> <executions> <execution> <configuration> <vmOptions>--add-modules io.netty.transport.unix.common,io.netty.transport.classes.epoll,io.netty.transport.epoll.linux.x86_64</vmOptions> </configuration> </execution> </executions> </plugin> </plugins> </build> </project>
HTTP compression
HTTP compression can be activated by configuration for request and/or response. For instance:
public class Main {
public static void main(String[] args) {
Application.with(new App_http.Builder()
.setApp_httpConfiguration(
App_httpConfigurationLoader.load(configuration -> configuration
.http_server(server -> server
.decompression_enabled(true)
.compression_enabled(true)
)
)
)
).run();
}
}
Now if we send a request which accepts compression to the server, we should now receive a compressed response:
$ curl -i --compressed -H 'accept-encoding: gzip, deflate' http://localhost:8080
HTTP/1.1 200 OK
content-type: text/plain
server: inverno
content-encoding: gzip
content-length: 39
Hello
deflate and gzip compression algorithms are supported by default, Zstandard or Brotli support can be added by adding corresponding dependencies to the project, for instance:
<dependency>
<groupId>com.aayushatharva.brotli4j</groupId>
<artifactId>brotli4j</artifactId>
</dependency>
<dependency>
<groupId>com.aayushatharva.brotli4j</groupId>
<artifactId>native-linux-x86_64</artifactId>
</dependency>
TLS
In order to activate TLS, we need first to obtain a private key and a certificate stored in a keystore.
A self-signed certificate can be generated using keytool, the resulting keystore should be placed in src/main/resources to make it available as a module resource:
$ keytool -genkey -keyalg RSA -alias selfsigned -keystore keystore.jks -storepass password -validity 360 -keysize 2048
Then we need to configure the server to activate TLS using the certificate:
public class Main {
public static void main(String[] args) {
Application.with(new App_http.Builder()
.setApp_httpConfiguration(
App_httpConfigurationLoader.load(configuration -> configuration
.http_server(server -> server
.server_port(8443)
.tls_enabled(true)
.tls_key_store(URI.create("module://io.inverno.example.app_http/keystore.jks"))
.tls_key_alias("selfsigned")
.tls_key_store_password("password")
)
)
)
).run();
}
}
The HTTP server can also be configured to support Mutual TLS authentication (mTLS) by specifying a truststore containing the client CA certificate and the client authentication type which must be either REQUESTED (the TLS handshake won't fail if the client does not provide authentication) or REQUIRED (the TLS exchange will fail if the client does not provide authentication).
public class Main {
public static void main(String[] args) {
Application.with(new App_http.Builder()
.setApp_httpConfiguration(
App_httpConfigurationLoader.load(configuration -> configuration
.http_server(server -> server
.server_port(8443)
.tls_enabled(true)
.tls_key_store(URI.create("module://io.inverno.example.app_http/keystore.jks"))
.tls_key_store_password("password")
.tls_client_auth(HttpServerConfiguration.ClientAuth.REQUESTED)
.tls_trust_store(URI.create("module://io.inverno.example.app_http/truststore.jks"))
.tls_trust_store_password("password")
)
)
)
).run();
}
}
When an application using the http-server module is packaged as an application image, you'll need to make sure TLS related modules from the JDK are included in the runtime image otherwise TLS might not work. You can refer to the JDK providers documentation in the security developer's guide to find out which modules should be added depending on your needs. Most of the time you'll simply add
jdk.crypto.ecmodule in the Inverno Maven plugin configuration:<project> <build> <plugins> <plugin> <groupId>io.inverno.tool</groupId> <artifactId>inverno-maven-plugin</artifactId> <executions> <execution> <configuration> <addModules>jdk.crypto.ec</addModules> </configuration> </execution> </executions> </plugin> </plugins> </build> </project>
Server Controller
The server controller specifies how exchanges and errors are handled by the server. It also provides the exchange context created and attached to the exchange by the server.
The ServerController interface basically defines the following methods:
Mono<Void> defer(Exchange<ExchangeContext> exchange)which is used to handle an exchangeMono<Void> defer(ErrorExchange<ExchangeContext> errorExchange)which is used to handle an error exchangeExchangeContext createContext()which provides the context attached to an exchange
Methods
void handle(Exchange<ExchangeContext> exchange)andvoid handle(ErrorExchange<ExchangeContext> errorExchange)are also defined, they can be more convenient when the handling logic does not have to be reactive. Note that the server will always invokedefer()methods which must then be properly implemented.
As stated before, the http-server module provides a default ServerController implementation which returns Hello when a request is made to the root path / and (404) not found error otherwise. By default, no context is created and exchange.context() returns null.
A custom server controller can be injected when creating the app_http module. In the following code, a socket bean is defined to inject the custom server controller and starts an HTTP server which responds with Hello from app_http module! to any request:
package io.inverno.example.app_http;
import io.inverno.core.annotation.Bean;
import io.inverno.core.v1.Application;
import io.inverno.mod.http.base.ExchangeContext;
import io.inverno.mod.http.server.ErrorExchange;
import io.inverno.mod.http.server.Exchange;
import io.inverno.mod.http.server.ServerController;
import java.util.function.Supplier;
public class Main {
@Bean
public static interface Controller extends Supplier<ServerController<ExchangeContext, Exchange<ExchangeContext>, ErrorExchange<ExchangeContext>>> {}
public static void main(String[] args) {
Application.with(new App_http.Builder()
.setController(
exchange -> exchange.response().body().string().value("Hello from app_http module!")
)
).run();
}
}
The ServerController interface also exposes static methods to easily create a server controller with custom exchange and error exchange handlers:
package io.inverno.example.app_http;
import io.inverno.core.annotation.Bean;
import io.inverno.core.v1.Application;
import io.inverno.mod.http.base.ExchangeContext;
import io.inverno.mod.http.server.ErrorExchange;
import io.inverno.mod.http.server.Exchange;
import io.inverno.mod.http.server.ServerController;
import java.util.function.Supplier;
public class Main {
@Bean
public static interface Controller extends Supplier<ServerController<ExchangeContext, Exchange<ExchangeContext>, ErrorExchange<ExchangeContext>>> {}
public static void main(String[] args) {
Application.with(new App_http.Builder()
.setController(
ServerController.from(
exchange -> {
exchange.response()
.body().string().value("Hello from app_http module!");
},
errorExchange -> {
errorExchange.response()
.headers(headers -> headers.status(Status.INTERNAL_SERVER_ERROR))
.body().string().value(errorExchange.getError().getMessage());
}
)
)
).run();
}
}
It is also possible to provide a server controller bean in the app_http module:
package io.inverno.example.app_http;
import io.inverno.core.annotation.Bean;
import io.inverno.mod.http.base.HttpException;
import io.inverno.mod.http.base.ExchangeContext;
import io.inverno.mod.http.server.ErrorExchange;
import io.inverno.mod.http.server.Exchange;
import io.inverno.mod.http.server.ServerController;
@Bean
public class App_httpServerController implements ServerController<App_httpServerController.CustomContext, Exchange<App_httpServerController.CustomContext>, ErrorExchange<App_httpServerController.CustomContext>>{
@Override
public void handle(Exchange<CustomContext> exchange) throws HttpException {
exchange.response().body().string().value("Hello " + exchange.context().getName() + " from app_http module!");
}
@Override
public CustomContext createContext() {
return new CustomContext();
}
public static class CustomContext implements ExchangeContext {
private String name = "anonymous";
public String getName() {
return name;
}
public void setName(String name) {
this.name = name;
}
}
}
This bean is automatically wired to the server controller socket defined by the http-server module overriding the default server controller.
Note that above implementation still uses the default error handler.
With this approach there is no need for a server controller socket bean and the server can be simply started as before:
package io.inverno.example.app_http;
import io.inverno.core.v1.Application;
public class Main {
public static void main(String[] args) {
Application.with(new App_http.Builder()).run();
}
}
2022-07-18 11:12:57,710 INFO [main] i.i.c.v.Application - Inverno is starting...
╔════════════════════════════════════════════════════════════════════════════════════════════╗
║ , ~~ , ║
║ , ' /\ ' , ║
║ , __ \/ __ , _ ║
║ , \_\_\/\/_/_/ , | | ___ _ _ ___ __ ___ ___ ║
║ , _\_\/_/_ , | | / _ \\ \ / // _ \ / _|/ _ \ / _ \ ║
║ , __\_/\_\__ , | || | | |\ \/ /| __/| | | | | | |_| | ║
║ , /_/ /\/\ \_\ , |_||_| |_| \__/ \___||_| |_| |_|\___/ ║
║ , /\ , ║
║ , \/ , -- 1.6.0 -- ║
║ ' -- ' ║
╠════════════════════════════════════════════════════════════════════════════════════════════╣
║ Java runtime : OpenJDK Runtime Environment ║
║ Java version : 17.0.2+8-86 ║
║ Java home : /home/jkuhn/Devel/jdk/jdk-17.0.2 ║
║ ║
║ Application module : io.inverno.example.app_http ║
║ Application version : 1.0.0-SNAPSHOT ║
║ Application class : io.inverno.example.app_http.Main ║
║ ║
║ Modules : ║
║ .... ║
╚════════════════════════════════════════════════════════════════════════════════════════════╝
2022-07-18 11:12:57,713 INFO [main] i.i.e.a.App_http - Starting Module io.inverno.example.app_http...
2022-07-18 11:12:57,713 INFO [main] i.i.m.b.Boot - Starting Module io.inverno.mod.boot...
2022-07-18 11:12:57,935 INFO [main] i.i.m.b.Boot - Module io.inverno.mod.boot started in 221ms
2022-07-18 11:12:57,935 INFO [main] i.i.m.h.s.Server - Starting Module io.inverno.mod.http.server...
2022-07-18 11:12:57,935 INFO [main] i.i.m.h.b.Base - Starting Module io.inverno.mod.http.base...
2022-07-18 11:12:57,940 INFO [main] i.i.m.h.b.Base - Module io.inverno.mod.http.base started in 5ms
2022-07-18 11:12:57,994 INFO [main] i.i.m.h.s.i.HttpServer - HTTP Server (nio) listening on http://0.0.0.0:8080
2022-07-18 11:12:57,995 INFO [main] i.i.m.h.s.Server - Module io.inverno.mod.http.server started in 59ms
2022-07-18 11:12:57,995 INFO [main] i.i.e.a.App_http - Module io.inverno.example.app_http started in 283ms
2022-07-18 11:12:57,998 INFO [main] i.i.c.v.Application - Application io.inverno.example.app_http started in 333ms
Now if we send a request to the server we should get the following response:
$ curl -i http://localhost:8080
HTTP/1.1 200 OK
content-length: 37
Hello anonymous from app_http module!
HTTP Server API
The module defines classes and interfaces to handle HTTP requests sent by a client or errors raised during that process.
As we just saw, a ServerController must be provided to handle Exchange and ErrorExchange. An exchange represents an HTTP communication between a client and a server, it is composed of a Request, a Response and an ExchangeContext. An error exchange is created whenever an error is raised during the normal processing of an exchange and allows to report the error to the client. The API has been designed to be fluent and reactive in order for the request to be streamed down to the response.
Exchange handler
An exchange handler is defined in a server controller and used to handle client-server exchanges. The ReactiveExchangeHandler is a functional interface defining method Mono<Void> defer(Exchange<ExchangeContext> exchange) which is used to handle server exchanges in a reactive way. It is for instance possible to execute non-blocking operations before actually handling the exchange.
Authentication is a typical example of a non-blocking operation that might be executed before handling the request.
Under the hood, the server first subscribes to the returned
Mono, when it completes the server then subscribes to the response body data publisher and eventually sends a response to the client.
The ExchangeHandler extends the ReactiveExchangeHandler with method void handle(Exchange<ExchangeContext> exchange) which is more convenient than defer() when no non-blocking operation other than the generation of the client response is required.
A basic exchange handler can then be created as follows:
ExchangeHandler<ExchangeContext, Exchange<ExchangeContext>> handler = exchange -> {
exchange.response().body().string().value("Hello, world!");
};
The above exchange handler sends a Hello, world! message in response to any request.
Response body
A response body must be sent back to the client in order to terminate the exchange, the API exposes several ways to provide response data and therefore terminate the exchange.
Empty
An exchange can be ended with no response body as follows:
ExchangeHandler<ExchangeContext, Exchange<ExchangeContext>> handler = exchange -> {
exchange.response().body().empty();
};
String
We already saw how to send a single string response, but we might also want to send the response in a reactive way as a stream of data in case the entire response payload is not available right away, if it doesn't fit in memory or if we simply want to send a response in multiple parts as soon as they become available (e.g. progressive display).
ExchangeHandler<ExchangeContext, Exchange<ExchangeContext>> handler = exchange -> {
exchange.response().body().string().stream(Flux.just("Hello", ", world!"));
};
Raw
Raw data (i.e. bytes) can also be sent in response to a request. As for the string response, the response can be a single byte buffer or a stream of byte buffers:
ExchangeHandler<ExchangeContext, Exchange<ExchangeContext>> handler = exchange -> {
Flux<ByteBuf> dataStream = Flux.just(
Unpooled.unreleasableBuffer(Unpooled.copiedBuffer("Hello", Charsets.DEFAULT)),
Unpooled.unreleasableBuffer(Unpooled.copiedBuffer(", world!", Charsets.DEFAULT))
);
exchange.response().body().raw().stream(dataStream);
};
Returned
ByteBufare released as soon as they are sent to the client.
Resource
A resource can be sent in a response body. When possible the server uses low-level (zero-copy) API for fast resource transfer.
ExchangeHandler<ExchangeContext, Exchange<ExchangeContext>> handler = exchange -> {
exchange.response()
.body().resource().value(new FileResource("/path/to/resource"));
};
The media type of the resource is resolved using a media type service and automatically set in the response content-type header field.
If a specific resource is created as in above example the media type service used is the one defined when creating the resource or a default implementation if none was specified. If the resource is obtained with the resource service provided in the boot module the media type service used is the one provided in the boot module.
Server-sent events
Server-sent events provide a way to send server push notifications to a client. It is based on chunked transfer encoding over HTTP/1.x and regular streams over HTTP/2. The API provides an easy way to create SSE endpoints.
ExchangeHandler<ExchangeContext, Exchange<ExchangeContext>> handler = exchange -> {
exchange.response().body().sse().from(
(events, data) -> data.stream(Flux.interval(Duration.ofSeconds(1))
.map(seq -> events.create(event -> event
.id(Long.toString(seq))
.event("seq")
.comment("Some comment")
.value(Unpooled.unreleasableBuffer(Unpooled.copiedBuffer("Event #" + seq, Charsets.DEFAULT))))
)
)
);
};
In the above example, server-sent events are emitted every second and streamed to the response. This is done in a function accepting the server-sent event factory used to create events and the response data producer.
Request body
Request body can be handled in a similar way. The reactive API allows to process the payload of a request as the server receives it and therefore progressively build and send the corresponding response.
A request body is however optional as not all HTTP request has a body.
String
The request body can be consumed as CharSequence as follows:
ExchangeHandler<ExchangeContext, Exchange<ExchangeContext>> handler = exchange -> {
exchange.response()
.body().string().stream(exchange.request().body()
.map(body -> Flux.from(body.string().stream()).map(s -> Integer.toString(s.length())))
.orElse(Flux.just("0"))
);
};
In the above example, if a client sends a payload in the request, the server responds with the number of characters of each string received, or it responds 0 if the request payload is empty. As before, request body is processed as a flow of data.
Raw
It can also be consumed as raw data as follows:
ExchangeHandler<ExchangeContext, Exchange<ExchangeContext>> handler = exchange -> {
exchange.response()
.body().raw().stream(exchange.request().body()
.map(body -> Flux.from(body.raw().stream())
.map(chunk -> {
try {
return Unpooled.unreleasableBuffer(Unpooled.buffer(4).writeInt(chunk.readableBytes()));
}
finally {
chunk.release();
}
})
)
.orElse(Flux.just(Unpooled.unreleasableBuffer(Unpooled.buffer(4).writeInt(0))))
);
};
In the above example, if a client sends a payload in the request, the server responds with the number of bytes of each chunk of data it receives, or it responds 0 if the request payload is empty. This simple example illustrates how we can process requests as flow of data.
Note that request's
ByteBufdata must be released when they are consumed in the exchange handler.
URL Encoded form
HTML form data are sent in the body of a POST request in the form of key/value pairs encoded in application/x-www-form-urlencoded format. The resulting list of Parameter can be obtained as follows:
ExchangeHandler<ExchangeContext, Exchange<ExchangeContext>> handler = exchange -> {
exchange.response()
.body().string().stream(Flux.from(exchange.request().body().get().urlEncoded().stream())
.map(parameter -> "Received parameter " + parameter.getName() + " with value " + parameter.getValue())
);
}
In the above example, for each form parameters the server responds with a message describing the parameters it just received. Again this shows that the API is fully reactive and form parameters can be processed as they are decoded.
A more traditional example though would be to obtain the map of parameters grouped by names (because multiple parameters with the same name can be sent):
ExchangeHandler<ExchangeContext, Exchange<ExchangeContext>> handler = exchange -> {
exchange.response()
.body().string().stream(Flux.from(exchange.request().body().get().urlEncoded().stream())
.collectMultimap(Parameter::getName)
.map(formParameters -> "User selected options: " + formParameters.get("options").stream().map(Parameter::getValue).collect(Collectors.joining(", ")))
);
}
Here we may think that the aggregation of parameters in a map could block the I/O thread but this is actually not true, when a parameter is decoded, the reactive framework is notified and the parameter is stored in a map, after that the I/O thread can be reallocated. When the parameters publisher completes the resulting map is emitted to the mapping function which build the response. During all this process, no thread is ever waiting for anything.
Multipart form
A multipart/form-data request can be handled in a similar way. Form parts can be obtained as follows:
ExchangeHandler<ExchangeContext, Exchange<ExchangeContext>> handler = exchange -> {
exchange.response()
.body().string().stream(Flux.from(exchange.request().body().get().multipart().stream())
.map(part -> "Received part " + part.getName())
);
};
Multipart form data is most commonly used for uploading files over HTTP. Such handler can be implemented as follows using the resource API to store uploaded files:
ExchangeHandler<ExchangeContext, Exchange<ExchangeContext>> handler = exchange -> {
exchange.response().body().string().stream(
Flux.from(exchange.request().body().get().multipart().stream()) // 1
.flatMap(part -> part.getFilename() // 2
.map(fileName -> Flux.<CharSequence, FileResource>using( // 3
() -> new FileResource("uploads/" + part.getFilename().get()), // 4
file -> Flux.from(file.write(part.raw().stream())) // 5
.reduce(0, (acc, cur) -> acc + cur)
.map(size -> "Uploaded " + fileName + "(" + part.headers().getContentType() + "): " + size + " Bytes\n"),
FileResource::close // 6
))
.orElseThrow(() -> new BadRequestException("Not a file part")) // 7
)
);
};
The above code uses multiple elements and deserves a detailed explanation:
- get the stream of parts
- map the part to the response stream by starting to determine whether the part is a file part
- if the part is a file part, map the part to the response stream by creating a Flux with a file resource
- in this case the resource is the target file where the uploaded file will be stored
- stream the part's payload to the target file resource and eventually provides the response in the form of a message stating that a file with a given size and media type has been uploaded
- close the file resource when the publisher completes
- if the part is not a file part respond with a bad request error
The Flux.using() construct is the reactive counterpart of a try-with-resource statement. It is interesting to note that the content of the file is streamed up to the file, and it is then never entirely loaded in memory. From there, it is quite easy to stop the upload of a file if a given size threshold is exceeded. We can also imagine how we could create a progress bar in a client UI to show the progression of the upload.
In the above code we uploaded one or more file and stored their content on the local file system and during all that process, the I/O thread was never blocked.
Note that since part's
ByteBufdata are consumed by the target file resource, there is no need to release them in the exchange handler.
Error exchange handler
An error exchange handler is defined in a server controller and used to handle errors raised during the normal processing of an exchange in the exchange handler.
It is basically an ExchangeHandler of ErrorExchange. An error exchange exposes the original error, it is then possible to implement different behaviours based on the type of error:
ExchangeHandler<ExchangeContext, ErrorExchange<ExchangeContext>> errorHandler = errorExchange -> {
if(errorExchange.getError() instanceof BadRequestException) {
errorExchange.response().body().raw().value(Unpooled.unreleasableBuffer(Unpooled.copiedBuffer("client sent an invalid request", Charsets.DEFAULT)));
}
else {
errorExchange.response().body().raw().value(Unpooled.unreleasableBuffer(Unpooled.copiedBuffer("Unknown server error", Charsets.DEFAULT)));
}
};
Exchange interceptor
An exchange handler can be intercepted using an ExchangeInterceptor. An interceptor can be used to preprocess an exchange in order to check preconditions and potentially respond to the client instead of the handler, initialize a context (tracing, metrics...), decorate the exchange...
The intercept() method returns a Mono which makes it reactive and allows to invoke non-blocking operations before invoking the handler.
An intercepted exchange handler can be created as follows:
ExchangeHandler<ExchangeContext, Exchange<ExchangeContext>> handler = exchange -> {...};
ExchangeInterceptor<ExchangeContext, Exchange<ExchangeContext>> interceptor = exchange -> {
LOGGER.info("Path: " + exchange.request().getPath());
// exchange is returned unchanged and will be processed by the handler
return Mono.just(exchange);
};
ReactiveExchangeHandler<ExchangeContext, Exchange<ExchangeContext>> interceptedHandler = handler.intercept(interceptor);
An interceptor can also end an exchange, in which case it must return an empty Mono to stop the exchange handling chain.
ExchangeInterceptor<ExchangeContext, Exchange<ExchangeContext>> interceptor = exchange -> {
// Check some preconditions...
if(...) {
// Do some processing and terminate the exchange
exchange.response().body().empty();
// the exchange has been processed by the interceptor, and it won't be processed by the handler
return Mono.empty();
}
return Mono.just(exchange);
}
Multiple interceptors can be chained by invoking intercept() method multiple times:
// exchange handling chain: interceptor3 -> interceptor2 -> interceptor1 -> handler
handler.intercept(interceptor1).intercept(interceptor2).intercept(interceptor3);
HTTP access logs interceptor
The HttpAccessLogsInterceptor is used to log Http access when the processing of an exchange completes and a response is sent to the client. It must be registered to the server controller's exchange and error exchange handlers.
ServerController.<ExchangeContext, Exchange<ExchangeContext>, ErrorExchange<ExchangeContext>>from(
((ExchangeHandler<ExchangeContext, Exchange<ExchangeContext>>)(exchange -> {
...
})).intercept(new HttpAccessLogsInterceptor<>()),
((ExchangeHandler<ExchangeContext, ErrorExchange<ExchangeContext>>)(errorExchange -> {
...
})).intercept(new HttpAccessLogsInterceptor<>())
)
Assuming logging is properly configured, io.inverno.mod.http.server.Exchange logger should output an access log for each processed request:
2024-04-25 11:32:56,123 INFO [inverno-io-epoll-1-1] i.i.m.h.s.Exchange - 127.0.0.1 "GET /plaintext" 200 12 "" "curl/7.88.1"
2024-04-25 11:32:57,285 INFO [inverno-io-epoll-1-1] i.i.m.h.s.Exchange - 127.0.0.1 "GET /plaintext" 500 16 "" "curl/7.88.1"
Exchange context
A strongly typed context is exposed in the Exchange, it allows to store or access data and to provide contextual operations throughout the process of the exchange. The server creates the context along with the exchange using the server controller. It is then possible to customize the exchange with a specific strongly types context.
The advantage of this approach is that the compiler can perform static type checking but also to avoid the usage of an untyped map of attributes which is less performant and provides no control over contextual data. Since the developer defines the context type, he can also implement logic inside.
A context can be used to store security information, tracing information, metrics... For instance, if we combine this with exchange interceptors:
ExchangeHandler<SecurityContext, Exchange<SecurityContext>> handler = exchange -> {
if(exchange.context().isAuthenticated()) {
exchange.response().body().string().value("Hello, world!");
}
else {
exchange.response().body().empty();
}
};
ExchangeInterceptor<SecurityContext, Exchange<SecurityContext>> securityInterceptor = exchange -> {
// Authenticate the request
if(...) {
exchange.context().setAuthenticated(true);
}
return Mono.just(exchange);
}
ReactiveExchangeHandler<SecurityContext, Exchange<SecurityContext>> interceptedHandler = handler.intercept(securityInterceptor);
The server relies on the
ServerControllerin order to create the context. Please refer to the Server Controller section which explains this in details and describes how to set up the HTTP server.
Misc
The API is fluent and mostly self-describing as a result it should be easy to find out how to do something in particular, even so here are some miscellaneous elements
Request headers
Request headers can be obtained as string values as follows:
handler = exchange -> {
// Returns the value of the first occurrence of 'some-header' as string or returns null
String someHeaderValue = exchange.request().headers().get("some-header").orElse(null);
// Returns all 'some-header' values as strings
List<String> someHeaderValues = exchange.request().headers().getAll("some-header");
// Returns all headers as strings
List<Map.Entry<String, String>> allHeadersValues = exchange.request().headers().getAll();
};
It is also possible to get headers as Parameter which allows to easily convert the value using a parameter converter:
handler = exchange -> {
// Returns the value of the first occurrence of 'some-header' as LocalDateTime or returns null
LocalDateTime someHeaderValue = exchange.request().headers().getParameter("some-header").map(Parameter::asLocalDateTime).orElse(null);
// Returns all 'some-header' values as LocalDateTime
List<LocalDateTime> someHeaderValues = exchange.request().headers().getAllParameter("some-header").stream().map(Parameter::asLocalDateTime).collect(Collectors.toList());
// Returns all headers as parameters
List<Parameter> allHeadersParameters = exchange.request().headers().getAllParameter();
};
The http-server module can also use the header service provided by the http-base module to decode HTTP headers:
ExchangeHandler<ExchangeContext, Exchange<ExchangeContext>> handler = exchange -> {
// Returns the decoded 'content-type' header or null
Headers.ContentType contentType = exchange.request().headers().<Headers.ContentType>getHeader(Headers.NAME_CONTENT_TYPE).orElse(null);
String mediaType = contentType.getMediaType();
Charset charset = contentType.getCharset();
...
};
The header service can be extended with custom HTTP
HeaderCodec. Please refer to Extending HTTP services and the http-base module for more information.
Query parameters
Query parameters in the request can be obtained as follows:
ExchangeHandler<ExchangeContext, Exchange<ExchangeContext>> handler = exchange -> {
...
// get a specific query parameter, if there are multiple parameters with the same name, the first one is returned
int someInteger = exchange.request().queryParameters().get("some-integer").map(Parameter::asInteger).orElseThrow(() -> new BadRequestException("Missing some-integer"));
// get all query parameters with a given name
List<Integer> someIntegers = exchange.request().queryParameters().getAll("some-integer").stream().map(Parameter::asInteger).collect(Collectors.toList());
// get all query parameters
Map<String, List<Parameter>> queryParameters = exchange.request().queryParameters().getAll();
...
};
Request cookies
Request cookie can be obtained in a similar way as follows:
ExchangeHandler<ExchangeContext, Exchange<ExchangeContext>> handler = exchange -> {
...
// get a specific cookie, if there are multiple cookie with the same name, the first one is returned
int someInteger = exchange.request().headers().cookies().get("some-integer").map(Parameter::asInteger).orElseThrow(() -> new BadRequestException("Missing some-integer"));
// get all cookies with a given name
List<Integer> someIntegers = exchange.request().headers().cookies().getAll("some-integer").stream().map(Parameter::asInteger).collect(Collectors.toList());
// get all cookies
Map<String, List<CookieParameter>> queryParameters = exchange.request().headers().cookies().getAll();
...
};
Request components
The API also gives access to multiple request related information such as:
- the HTTP method:
exchange.request().getMethod();
- the scheme (
httporhttps):
exchange.request().getScheme();
- the authority part of the requested URI (
hostheader in HTTP/1.x and:authoritypseudo-header in HTTP/2):
exchange.request().getAuthority();
- the requested path including query string:
exchange.request().getPath();
- the absolute path which is the normalized requested path without the query string:
exchange.request().getAbsolutePath();
- the
URIBuildercorresponding to the requested path to build relative paths:
exchange.request().getPathBuilder().path("path/to/child/resource").build();
- the query string:
exchange.request().getQuery();
- the socket address of the client or last proxy that sent the request:
exchange.request().getRemoteAddress();
- the certificates chain sent by the authenticated client:
exchange.request().getRemoteCertificates();
The server must be configured with mTLS support
Response status
The response status can be set in the response headers following HTTP/2 specification as defined by RFC 7540 Section 8.1.2.4.
ExchangeHandler<ExchangeContext, Exchange<ExchangeContext>> handler = exchange -> {
exchange.response()
.headers(headers -> headers.status(Status.OK))
.body().raw();
};
Response headers/trailers
Response headers can be added or set fluently using a configurator as follows:
ExchangeHandler<ExchangeContext, Exchange<ExchangeContext>> handler = exchange -> {
exchange.response()
.headers(headers -> headers
.contentType(MediaTypes.TEXT_PLAIN)
.set(Headers.NAME_SERVER, "inverno")
.add("custom-header", "abc")
)
.body().raw()...;
};
Response trailers can be set in the exact same way:
ExchangeHandler<ExchangeContext, Exchange<ExchangeContext>> handler = exchange -> {
exchange.response()
.trailers(headers -> headers
.add("some-trailer", "abc")
)
.body().raw()...;
};
Response cookies
Response cookies can be set fluently using a configurator as follows:
ExchangeHandler<ExchangeContext, Exchange<ExchangeContext>> handler = exchange -> {
exchange.response()
.cookies(cookies -> cookies
.addCookie(cookie -> cookie.name("cookie1")
.httpOnly(true)
.secure(true)
.maxAge(3600)
.value("abc")
)
.addCookie(cookie -> cookie.name("cookie2")
.httpOnly(true)
.secure(true)
.maxAge(3600)
.value("def")
)
)
.body().raw()...;
};
Web Socket
An HTTP exchange can be upgraded to a WebSocket exchange as defined by RFC 6455.
The webSocket() method exposed on the Exchange allows to upgrade to the WebSocket protocol, it returns an optional WebSocket which might be empty if the original exchange does not support the upgrade. This is especially the case when using HTTP/2 for which Websocket upgrade is not supported or if the state of the exchange prevents the upgrade (e.g. error exchange).
Note that HTTP/2 over cleartext must be disabled for the Web Socket upgrade to be successful.
The resulting WebSocket allows specifying a WebSocketExchangeHandler and a default action in case the WebSocket opening handshake fails (e.g. the client did not provide the correct headers for the upgrade...). A WebSocket exchange handler is used to handle the resulting WebSocketExchange which exposes WebSocket inbound and outbound data.
In the following example, the original HTTP Exchange is upgraded to a WebSocketExchange and all inbound frames are sent back to the client. An internal server error (500) is returned if WebSocket upgrade is not supported and a bad request error (400) is returned if the opening handshake failed:
ExchangeHandler<ExchangeContext, Exchange<ExchangeContext>> handler = exchange -> {
exchange.webSocket()
.orElseThrow(() -> new InternalServerErrorException("WebSocket not supported"))
.handler(webSocketExchange -> {
webSocketExchange.outbound().frames(factory -> webSocketExchange.inbound().frames());
})
.or(() -> {
throw new BadRequestException("Web socket handshake failed");
});
};
It is possible to specify the supported subprotocols when creating the WebSocket, an UnsupportedProtocolException shall be raised if the subprotocol negotiation fails (i.e. the client requested a protocol that is not supported by the server)
ExchangeHandler<ExchangeContext, Exchange<ExchangeContext>> handler = exchange -> {
// Indicates that the server supports the 'chat' subprotocol
exchange.webSocket("chat")
...
};
WebSocket exchange
The WebSocketExchange also exposes:
- the original HTTP request,
webSocketExchange.request();
- the exchange context:
webSocketExchange.context();
- the negotiated subprotocol:
webSocketExchange.getSubProtocol();
- multiple methods for closing the WebSocket:
webSocketExchange.close(WebSocketStatus.NORMAL_CLOSURE);
webSocketExchange.close((short)1000, "Goodbye!");
A WebSocket exchange finalizer can be specified to free resources once the WebSocket is closed:
webSocketExchange.finalizer(Mono.fromRunnable(() -> {
// Release some resources
...
}));
The WebSocket protocol is bidirectional and allows sending and receiving data on both ends exposed by inbound() and outbound() methods in the WebSocket exchange.
Inbound
In a WebSocket exchange, the Inbound exposes the stream of frames received by the server from the client. It allows to consume WebSocket frames (text or binary) or messages (text or binary).
The following handler simply logs incoming frames:
ExchangeHandler<ExchangeContext, Exchange<ExchangeContext>> handler = exchange -> {
exchange.webSocket()
.orElseThrow(() -> new InternalServerErrorException())
.handler(webSocketExchange -> {
Flux.from(webSocketExchange.inbound().frames()).subscribe(frame -> {
try {
LOGGER.info("Received WebSocket frame: kind = " + frame.getKind() + ", final = " + frame.isFinal() + ", size = " + frame.getRawData().readableBytes());
}
finally {
frame.release();
}
});
});
};
As for request body ByteBuf data, WebSocket frames are reference counted, and they must be released where they are consumed. In previous example, inbound frames are consumed in the handler which must release them.
The WebSocket protocol supports fragmentation as defined by RFC 6455 Section 5.4, a WebSocket message can be fragmented into multiple frames, the final frame being flagged as final to indicate the end of the message. The Inbound can handle fragmented WebSocket messages and allows to consume corresponding fragmented data in multiple ways.
ExchangeHandler<ExchangeContext, Exchange<ExchangeContext>> handler = exchange -> {
exchange.webSocket()
.orElseThrow(() -> new InternalServerErrorException())
.handler(webSocketExchange -> {
Flux.from(webSocketExchange.inbound().messages()).subscribe(message -> {
// The stream of frames composing the message
Publisher<WebSocketFrame> frames = message.frames();
// The message data as stream of ByteBuf
Publisher<ByteBuf> binary = message.raw();
// The message data as stream of String
Publisher<String> text = message.string();
// Aggregate all fragments into a single ByteBuf
Mono<ByteBuf> reducedBinary = message.rawReduced();
// Aggregate all fragments into a single String
Mono<String> reducedText = message.stringReduced();
...
});
});
};
Note that the different publishers in previous example are all variants of the frames publisher, as a result they are exclusive and it is only possible to subscribe once to only one of them.
Unlike WebSocket frames, WebSocket messages are not reference counted. However, message fragments, which are basically frames, must be released when consumed as WebSocket frames or ByteBuf.
Messages can be filtered by type (text or binary) by invoking WebSocketExchange.Inbound#textMessages() and WebSocketExchange.Inbound#binaryMessages().
Outbound
In a WebSocket exchange, the Outbound exposes the stream of frames sent by the server to the client. It allows to specify the stream of WebSocket frames (text or binary) or messages (text or binary) to send to the client. WebSocket frames and messages are created using provided factories.
The following handler simply sends three text frames to the client.
ExchangeHandler<ExchangeContext, Exchange<ExchangeContext>> handler = exchange -> {
exchange.webSocket()
.orElseThrow(() -> new InternalServerErrorException())
.handler(webSocketExchange -> {
webSocketExchange.outbound()
.frames(factory -> Flux.just("ONE", "TWO", "THREE").map(factory::text));
});
}
Likewise, we can send messages to the client, in the following example three Websocket frames are sent to the client per message: the constant message:, the actual message content and an empty final frame which marks the end of the message. Frames and messages publisher are exclusive, only one of them can be specified.
ExchangeHandler<ExchangeContext, Exchange<ExchangeContext>> handler = exchange -> {
exchange.webSocket()
.orElseThrow(() -> new InternalServerErrorException())
.handler(webSocketExchange -> {
webSocketExchange.outbound()
.messages(factory -> Flux.just("ONE", "TWO", "THREE").map(content -> factory.text(Flux.just("message: ", content))));
});
}
By default, a close frame is automatically sent when the outbound publisher terminates. This behaviour can be changed by configuration by setting the ws_close_on_outbound_complete parameter to ̀false or on the Outbound itself using the closeOnComplete() method:
ExchangeHandler<ExchangeContext, Exchange<ExchangeContext>> handler = exchange -> {
exchange.webSocket()
.orElseThrow(() -> new InternalServerErrorException())
.handler(webSocketExchange -> {
webSocketExchange.outbound()
.closeOnComplete(false)
.frames(factory -> Flux.just("ONE", "TWO", "THREE").map(factory::text));
});
}
After a close frame has been sent, if the inbound publisher has not been subscribed or if it has terminated, the connection is closed right away, otherwise the server waits up to a configured timeout (ws_inbound_close_frame_timeout defaults to 60000ms) for the client to respond with a corresponding close frame before closing the connection.
A simple chat server
Using the reactive API, a simple chat server can be implemented quite easily. The following exchange handler uses a sink to broadcast the frames received to every connected clients:
package io.inverno.example.app_http_websocket;
import io.inverno.core.annotation.Bean;
import io.inverno.core.annotation.Destroy;
import io.inverno.core.annotation.Init;
import io.inverno.mod.base.resource.MediaTypes;
import io.inverno.mod.base.resource.PathResource;
import io.inverno.mod.base.resource.Resource;
import io.inverno.mod.http.base.ExchangeContext;
import io.inverno.mod.http.base.HttpException;
import io.inverno.mod.http.base.ws.WebSocketFrame;
import io.inverno.mod.http.server.ErrorExchange;
import io.inverno.mod.http.server.Exchange;
import io.inverno.mod.http.server.ServerController;
import reactor.core.publisher.Flux;
import reactor.core.publisher.Sinks;
@Bean
public class ChatServerController implements ServerController<ExchangeContext, Exchange<ExchangeContext>, ErrorExchange<ExchangeContext>> {
private Sinks.Many<WebSocketFrame> chatSink;
@Init
public void init() {
this.chatSink = Sinks.many().multicast().onBackpressureBuffer(16, false); // 1
}
@Destroy
public void destroy() {
this.chatSink.tryEmitComplete();
}
@Override
public void handle(Exchange<ExchangeContext> exchange) throws HttpException {
exchange.webSocket().ifPresentOrElse(
websocket -> websocket
.handler(webSocketExchange -> {
Flux.from(webSocketExchange.inbound().frames()) // 2
.subscribe(frame -> { // 3
try {
this.chatSink.tryEmitNext(frame); // 4
}
finally {
frame.release(); // 5
}
});
webSocketExchange.outbound().frames(factory -> this.chatSink.asFlux().map(WebSocketFrame::retainedDuplicate)); // 6
})
.or(() -> exchange.response()
.body().string().value("Web socket handshake failed")
),
() -> exchange.response()
.body().string().value("WebSocket not supported")
);
}
}
- Create a multicast chat sink with auto-cancel set to false in order to broadcast inbound frames to all connected clients.
- When receiving a new connection, get the inbound frames stream.
- Subscribe to the inbound frames stream.
- For each frame received, broadcast the frame using the chat sink.
- Release the inbound frame.
- Set the WebSocket outbound using the chat sink: on each frame, retain and duplicate.
As stated before, WebSocket frames are reference counted and inbound WebSocket frames must be released since the handler is the one consuming them. Furthermore for each connected client, the frame must be duplicated, since it is written multiple times, and retained to increment the reference counter, since it must stay in memory until it has been sent to all connected clients.
This chat server could have been implemented more simply without bothering with reference counting by emitting string data instead of frames in the chat sink. But this would actually be far less optimal as it would involve memory copy. In above solution, the incoming data is never copied into memory, there is only one
ByteBufwritten to all connected client. As always, it is important to find the right balance between performance, simplicity and readability.
Extending HTTP services
The http-server module also defines a socket to plug a custom parameter converter which is a basic StringConverter by default. Since we created the app_http module by composing boot and http-server modules, the parameter converter provided by the boot module should then override the default. This converter is a StringCompositeConverter which can be extended by injecting custom CompoundDecoder and/or CompoundEncoder instances in the boot module as described in the composite converter documentation.
The HeaderService provided by the http-basic module composed in the http-server module can also be extended by injecting custom HeaderCodec instances used to encode/decode custom HTTP headers.
In practice, all we have to do to extend these services is to provide HeaderCodec, CompoundDecoder or CompoundEncoder beans in the app_http module.
Wrap-up
If we put all we've just seen together, here is a complete example showing how to create an HTTP/2 server with HTTP compression using a custom server controller:
package io.inverno.example.app_http;
import io.inverno.core.annotation.Bean;
import io.inverno.core.v1.Application;
import io.inverno.mod.base.Charsets;
import io.inverno.mod.http.base.ExchangeContext;
import io.inverno.mod.http.server.ErrorExchange;
import io.inverno.mod.http.server.Exchange;
import io.inverno.mod.http.server.ServerController;
import io.netty.buffer.Unpooled;
import java.net.URI;
import java.util.function.Supplier;
public class Main {
@Bean
public static interface Controller extends Supplier<ServerController<ExchangeContext, Exchange<ExchangeContext>, ErrorExchange<ExchangeContext>>> {}
public static void main(String[] args) {
// Starts the server
Application.run(new App_http.Builder()
// Setups the server
.setApp_httpConfiguration(
App_httpConfigurationLoader.load(configuration -> configuration
.http_server(server -> server
// HTTP compression
.decompression_enabled(true)
.compression_enabled(true)
// TLS
.server_port(8443)
.tls_enabled(true)
.tls_key_store(URI.create("module:/keystore.jks"))
.tls_key_store_password("password")
// Enable HTTP/2
.h2_enabled(true)
)
)
)
// Sets the server controller
.setController(ServerController.from(
exchange -> {
exchange.response()
.body().raw().value(Unpooled.unreleasableBuffer(Unpooled.copiedBuffer("Hello from main!", Charsets.DEFAULT)));
},
errorExchange -> {
errorExchange.response()
.headers(headers -> headers.status(500))
.body().raw().value(Unpooled.unreleasableBuffer(Unpooled.copiedBuffer("Error: " + errorExchange.getError().getMessage(), Charsets.DEFAULT)));
}
))
);
}
}
$ curl -i --insecure https://localhost:8443/
HTTP/2 200
content-length: 16
Hello from main!
Web Client
The Inverno web-client module provides extended functionalities on top of the http-client module for developing high-end Web and RESTfull clients.
It especially provides:
- HTTP request interception
- automatic message payload conversion
- parameterized path and query parameters
- service discovery integration
- declarative Web/REST clients
- an Inverno compiler plugin for generating the module's Web client bean and statically validating the routes
The web-client module combines the HTTP client with service discovery capabilities into a single Web client making it possible to seamlessly send requests to remote servers without having to deal directly with HTTP connections or service resolution. The HttpClient is provided by the http-client module and standard HTTP discovery services are provided by discovery-http, discovery-http-k8s and discovery-http-meta modules, additional custom discovery services can be created by implementing the HttpDiscoveryService interface. The module does not compose these modules, as a result above dependencies must be provided externally when initializing the module, typically by composing all modules into the application module.
The Web client also supports automatic message payload conversion which requires a list of media type converters. The boot module provides basic implementations for application/json, application/x-ndjson and text/plain media types. Additional media type converters can also be provided by implementing the MediaTypeConverter interface. The Reactor, also provided by the boot module, is required to create the main caching discovery service wrapping the set of discovery services and which periodically refreshes requested services in an event loop.
In order to use the Inverno web-client module, we should then declare the following dependencies in the module descriptor:
@io.inverno.core.annotation.Module
module io.inverno.example.app_web_client {
requires io.inverno.mod.boot;
requires io.inverno.mod.configuration; // configuration source for HTTP meta discovery service
requires io.inverno.mod.discovery.http; // DNS based discovery service
requires io.inverno.mod.discovery.http.meta; // Configuration based HTTP meta discovery service
requires io.inverno.mod.http.client;
requires io.inverno.mod.web.client;
}
You might probably always want to include discovery-http and discovery-http-meta modules for a regular application. Together, they support basic HTTP schemes
http://,https://,ws://,wss://as well as theconf://scheme for defining HTTP meta services in configuration.
We also need to declare these dependencies in the build descriptor:
Using Maven:
<project>
<dependencies>
<dependency>
<groupId>io.inverno.mod</groupId>
<artifactId>inverno-boot</artifactId>
</dependency>
<dependency>
<groupId>io.inverno.mod</groupId>
<artifactId>inverno-configuration</artifactId>
</dependency>
<dependency>
<groupId>io.inverno.mod</groupId>
<artifactId>inverno-discovery-http</artifactId>
</dependency>
<dependency>
<groupId>io.inverno.mod</groupId>
<artifactId>inverno-discovery-http-meta</artifactId>
</dependency>
<dependency>
<groupId>io.inverno.mod</groupId>
<artifactId>inverno-http-client</artifactId>
</dependency>
<dependency>
<groupId>io.inverno.mod</groupId>
<artifactId>inverno-web-client</artifactId>
</dependency>
</dependencies>
</project>
Using Gradle:
compile 'io.inverno.mod:inverno-boot:1.13.0'
compile 'io.inverno.mod:inverno-configuration:1.13.0'
compile 'io.inverno.mod:inverno-discovery-http:1.13.0'
compile 'io.inverno.mod:inverno-discovery-http-meta:1.13.0'
compile 'io.inverno.mod:inverno-http-client:1.13.0'
compile 'io.inverno.mod:inverno-web-client:1.13.0'
Using a WebClient a request can be sent to a remote service seamlessly resolved with one of the provided discovery services:
package io.inverno.example.app_web_client;
import io.inverno.core.annotation.Bean;
import io.inverno.mod.base.resource.MediaTypes;
import io.inverno.mod.http.base.ExchangeContext;
import io.inverno.mod.http.base.Method;
import io.inverno.mod.web.client.WebClient;
import reactor.core.publisher.Mono;
@Bean
public class TimeService {
public record CurrentTime(
int year,
int month,
int day,
int hour,
int minute,
int seconds,
int milliSeconds,
String dateTime,
String date,
String time,
String timeZone,
String dayOfWeek,
boolean dstActive
) {}
public final WebClient<? extends ExchangeContext> webClient;
public TimeService(WebClient<? extends ExchangeContext> webClient) {
this.webClient = webClient;
}
public Mono<CurrentTime> getTime(String timeZone) {
return this.webClient
.exchange(URI.create("https://timeapi.io/api/time/current/zone?timeZone=" + timeZone))
.flatMap(WebExchange::response)
.flatMap(response -> response.body().decoder(CurrentTime.class).one());
}
}
In above example, service https://timeapi.io is resolved using the DNS discovery service and cached, subsequent requests therefore won't need to resolve it anymore. The service will be regularly refreshed by the internal caching discovery service so it never gets stale. The resolved service can hold one or more service instances each bound to an HTTP client Endpoint and among which requests are load balanced.
Web Client API
The Web client API extends the HTTP client API and mainly defines the WebClient interface which is the entry point for sending HTTP requests or creating intercepted Web clients. Unlike the HttpClient, the WebClient abstracts connections to remote HTTP servers which are entirely managed internally. A WebExchange is obtained from a single URI providing the target service ID and the request path. A WebClient implementation typically relies on a caching HttpDiscoveryService to seamlessly resolve services from the requested service ID when the Web exchange response Mono is subscribed.
Mono<String> responseBody = webClient
.exchange(URI.create("https://service/path/to/resource")) // 1
.flatMap(WebExchange::response) // 2
.flatMapMany(response -> response.body().string().stream()) // 3
.collect(Collectors.joining());
- Create the
WebExchangetargeting servicehttps://serviceand resource/path/to/resource. - When subscribing to the response
Mono, servicehttps://serviceis first resolved using an internalHttpDiscoveryService, a service instance is obtained for that particular exchange which is then processed by that instance and a request is eventually sent to the remote server exposing the service. - Process the response.
The HTTP discovery services injected when creating the web-client module are used by the Web client to resolve services, as a result the schemes supported by these discovery services determine the kind of URIs that can be specified when creating an exchange. For instance, requests can be sent to an HTTP meta service defined in a configuration source (e.g.
conf://metaService/path/to/resource) only in the presence of the configuration HTTP meta discovery service.
Intercepted Web clients can be created in order to intercept requests matching specific rules. Interceptors are defined on a WebClient instance, resulting in the creation of a WebClient.Intercepted instance on which further interceptors can be specified eventually leading to the creation of a chain of intercepted Web clients. When processing an exchange created on an intercepted client, all interceptors defined by that particular client and its ancestors are evaluated.
In the following example, requests to any https service whose path matches /fruit/** will be intercepted:
WebClient.Intercepted<? extends ExchangeContext> interceptedWebClient = webClient.intercept()
.method(Method.GET)
.uri(uri -> uri.scheme("https").host("{:*}").path("/fruit/**"))
.interceptor(exchange -> {
LOGGER.info("Exchange was intercepted!");
return Mono.just(exchange);
});
Mono<? extends WebExchange<? extends ExchangeContext>> interceptedGetAppleExchange = interceptedWebClient.exchange(URI.create("https://service/fruit/apple"));
Mono<? extends WebExchange<? extends ExchangeContext>> getTomatoExchange = interceptedWebClient.exchange(URI.create("https://service/vegetable/tomato"));
The Web client API inherits the HTTP client API, please refer to the http-client module for detailed usage documentation on core HTTP client features.
Web exchange
The web-client defines the client WebExchange composed of a WebRequest/WebResponse pair in an HTTP communication between a client and a server, extending interfaces Exchange, Request and Response defined in the http-client module. A client Web exchange provides additional features such as request/response body encoder/decoder based on the content type and WebSocket inbound/outbound data decoder/encoder based on the negotiated subprotocol.
A WebExchange is basically obtained by invoking one of the exchange() methods on the WebClient, typically with a URI and an HTTP method (GET by default):
Mono<? extends WebExchange<? extends ExchangeContext>> getExchange = webClient.exchange(URI.create("https://service/path/to/resource"));
Mono<? extends WebExchange<? extends ExchangeContext>> getExchange = webClient.exchange(Method.POST, URI.create("https://service/path/to/resource"));
Note that a
WebExchangeinstance is stateful and as a result can't be used to send a request multiple times, a new instance must be created for each request.
More complex constructs are possible by using a WebClient.WebExchangeBuilder which supports parameterized path and allows to append query parameters.
Mono<WebExchange> exchange = webClient
.exchange("https://service")
.method(Method.GET)
.path("/fruit/{name}")
.pathParameter("name", "apple")
.queryParameter("debug", true)
.build();
The builder implements Cloneable in order to be able to create different exchange from a base builder instance.
WebClient.WebExchangeBuilder<? extends ExchangeContext> getFruitExchangeBuilder = webClient
.exchange("https://service")
.method(Method.GET)
.path("/fruit/{name}");
Mono<? extends WebExchange<? extends ExchangeContext>> getAppleExchange = getFruitExchangeBuilder.clone().pathParameter("name", "apple").build();
Mono<? extends WebExchange<? extends ExchangeContext>> getOrangeExchange = getFruitExchangeBuilder.clone().pathParameter("name", "orange").build();
Mono<? extends WebExchange<? extends ExchangeContext>> getBananaExchange = getFruitExchangeBuilder.clone().pathParameter("name", "banana").build();
Path parameters
Being able to create parameterized requests can be very useful in order to factorize common requests. There are basically two ways to create requests with parameterized paths.
The first approach, is to build the exchange URI explicitly using a simple String or a URIBuilder which is probably the most simple and flexible approach as it is not limited to the path, any part of the URI can basically be parameterized that way.
URIBuilder productURIBuilder = URIs.uri(URIs.Option.NORMALIZED, URIs.Option.PATH_PATTERN, URIs.Option.PARAMETERIZED)
.scheme("https")
.host("service")
.path("/api/{productFamily}/{productName}");
Mono<? extends WebExchange<? extends ExchangeContext>> getAppleExchange = webClient.exchange(productURIBuilder.build("fruit", "apple"));
Mono<? extends WebExchange<? extends ExchangeContext>> getLeekExchange = webClient.exchange(productURIBuilder.build("vegetable", "leek"));
The drawback is that parameter values have to be converted to String explicitly which can be sometimes problematic and might leak conversion logic. The ObjectConverter<String> has been created for that purpose in order to streamline objects marshalling/unmarshalling logic and especially for converting request parameters (e.g. path, header, cookie or query parameters) in both client and server. A global instance is provided in the boot module which is typically injected in the web-client module which uses it to convert path parameters creating an exchange using a WebClient.WebExchangeBuilder.
Above example can then be rewritten as follows in order to use the module's ObjectConverter to convert parameter values:
WebClient.WebExchangeBuilder<? extends ExchangeContext> getProductExchangeBuilder = webClient.exchange("https://service/api/{productFamily}/{productName}");
Mono<? extends WebExchange<? extends ExchangeContext>> getAppleExchange = getProductExchangeBuilder.clone()
.pathParameter("productFamily", "fruit")
.pathParameter("productName", "apple")
.build();
Mono<? extends WebExchange<? extends ExchangeContext>> getLeekExchange = getProductExchangeBuilder.clone()
.pathParameter("productFamily", "vegetable")
.pathParameter("productName", "leek")
.build();
In above example, parameter values are strings already so the ObjectConverter has little interest, but when considering lists or custom types, it is the way to go. This is especially useful when considering query parameters. The global converter has built-in support for many basic types and enums, it is also extensible and custom serializers/deserializers can be provided.
The builder is mutable for performance reasons, it implements
Cloneablewhich allows to create different exchange from a base builder instance which is simply cloned to build new requests.
Query parameters
As for path parameters, query parameters can be parameterized using a URIBuilder or a WebClient.WebExchangeBuilder.
Using a URIBuilder, parameters can be declared in the query component of the URI:
URIBuilder productURIBuilder = URIs.uri(URIs.Option.NORMALIZED, URIs.Option.PATH_PATTERN, URIs.Option.PARAMETERIZED)
.scheme("https")
.host("service")
.path("/api/get-time")
.query("timezone={timezone}");
Mono<? extends WebExchange<? extends ExchangeContext>> getParisTimeExchange = webClient.exchange(productURIBuilder.build("Europe/Paris"));
Mono<? extends WebExchange<? extends ExchangeContext>> getESTTimeExchange = webClient.exchange(productURIBuilder.build("US/Eastern"));
Using a WebClient.WebExchangeBuilder, query parameters are simply added to the builder:
WebClient.WebExchangeBuilder<? extends ExchangeContext> getProductExchangeBuilder = webClient.exchange("https://service/api/get-times");
Mono<? extends WebExchange<? extends ExchangeContext>> getTimesExchange = getProductExchangeBuilder.clone()
.queryParameter("timezone", List.of(ZoneId.of("Europe/Paris"), ZoneId.of("US/Eastern")), Types.type(List.class).type(ZoneId.class).and().build())
.build();
The interesting part is that the builder can accept values with complex types because an ObjectConverter<String> is used internally to convert them to String. In above example, the converter serializes the list of zone IDs into a comma-separated list of serialized Zone IDs (e.g. Europe/Paris,US/Eastern) which can be deserialized on the server, most likely using an ObjectConverter<String>, into the original list.
Note that in the context of serialization, specifying the
List<ZoneId>type when defining the query parameter is not mandatory since the parameter value already conveyed the type, but it can be useful to specify it to optimize serialization or explicitly set the target type from the parameter value's type hierarchy.
Request body encoder
The request body can be encoded based on the content type defined in the request headers.
package io.inverno.example.app_web_client;
import io.inverno.core.annotation.Bean;
import io.inverno.mod.base.resource.MediaTypes;
import io.inverno.mod.http.base.ExchangeContext;
import io.inverno.mod.http.base.Method;
import io.inverno.mod.web.client.WebClient;
import reactor.core.publisher.Mono;
@Bean
public static class FruitService {
public record Fruit(
String name,
String color,
String unit,
float price,
String currency
) {}
public final WebClient<? extends ExchangeContext> webClient;
public FruitService(WebClient<? extends ExchangeContext> webClient) {
this.webClient = webClient;
}
public Mono<Void> addFruit(Fruit fruit) {
return this.webClient.exchange(Method.POST, URI.create("https://service/api/fruit"))
.flatMap(exchange -> {
exchange.request()
.headers(headers -> headers.contentType(MediaTypes.APPLICATION_JSON))
.body().encoder().one(fruit);
return exchange.response();
})
.then();
}
}
When invoking the encoder() method, a media type converter corresponding to the request content type is selected to encode the payload. The content-type header MUST be specified in the request, otherwise an IllegalStateException reporting an empty media type is thrown. If there is no converter corresponding to the media type, a MissingConverterException is thrown.
It is not required to explicitly specify the type of the object to encode as it is implicitly conveyed with the instance. It might however be interesting to specify it to optimize serialization process or, when using inheritance, to control the serialized representation. Parameterized Types can be built at runtime using the reflection API.
The encoder is fully reactive, a single object is encoded by invoking method one() with an actual instance or a Mono<T> and multiple objects can be encoded by invoking method many() with an Iterable<T> or a Flux<T>. Sending multiple objects in a stream is particularly suited for streaming payload to the server and limit resource usage since the complete message doesn't have to be loaded into the memory all at once.
For instance many elements could be streamed to the server as follows:
public Mono<Void> addFruits(Flux<Fruit> fruits) {
return this.webClient.exchange(Method.POST, URI.create("https://service/api/fruit"))
.flatMap(exchange -> {
exchange.request()
.headers(headers -> headers.contentType(MediaTypes.APPLICATION_JSON))
.body().encoder().many(fruits);
return exchange.response();
})
.then();
}
The part body in a multipart form data request can also be encoded in a similar way based on the content type defined in the part headers:
public Mono<Void> addFruitsMultipart(Flux<Fruit> fruits) {
return this.webClient.exchange(Method.POST, URI.create("https://service/api/fruit"))
.flatMap(exchange -> {
exchange.request()
.body().multipart().from((factory, data) -> data.stream(
fruits.map(fruit -> factory.encoded(
part -> part
.name(fruit.getName())
.headers(headers -> headers.contentType(MediaTypes.APPLICATION_JSON))
.value(fruit),
Fruit.class
)
)));
return exchange.response();
})
.then();
}
Response body decoder
Conversely, the response body can be decoded based on the content type defined in the response headers.
public Mono<Fruit> getFruit(String name) {
return this.webClient.exchange(URI.create("https://service/api/fruit/" + name))
.flatMap(exchange -> {
exchange.request().headers(headers -> headers.accept(MediaTypes.APPLICATION_JSON));
return exchange.response();
})
.flatMap(response -> response.body().decoder(Fruit.class).one());
}
When invoking the decoder() method, a media type converter corresponding to the response content type is selected to decode the payload. The content-type header MUST be present in the response, otherwise an IllegalStateException is thrown indicating that a response with an empty media type was received. If there is no converter corresponding to the media type, a MissingConverterException is thrown.
A decoder is obtained by specifying the type of the object to decode in the decoder() method, the type can be a Class<T> or a java.lang.reflect.Type which allows to decode parameterized types at runtime bypassing type erasure. Parameterized Types can be built at runtime using the reflection API.
A single object is decoded by invoking method one() and multiple objects can be decoded by invoking method many(), both are reactive, when returning multiple objects the client decodes and streams the results as they are received from the server which means the first element can be processed before the last one has been actually received.
public Flux<Fruit> listFruits() {
return this.webClient.exchange(URI.create("https://service/api/fruit"))
.flatMap(exchange -> {
exchange.request().headers(headers -> headers.accept(MediaTypes.APPLICATION_JSON));
return exchange.response();
})
.flatMapMany(response -> response.body().decoder(Fruit.class).many());
}
WebSocket exchange
A WebSocket exchange is obtained by upgrading the Web exchange using the webSocket() method. The resulting Web2SocketExchange allows to seamlessly convert WebSocket inbound and outbound messages based on the subprotocol negotiated during the opening handshake.
As for request and response payloads, a media type converter corresponding to the subprotocol is selected to decode/encode inbound and outbound messages. If there is no converter corresponding to the subprotocol, a WebSocketException is thrown indicating that no converter was found matching the subprotocol.
The subprotocol must then correspond to a valid media type. Unlike request and response payloads which expect strict media type representation, compact application/ media type representation can be specified as subprotocol. In practice, it is possible to open a WebSocket connection with subprotocol json to select the application/json media type converter.
As defined by RFC 6455, a WebSocket subprotocol is not a media type and is registered separately. However, using media type is very handy in this case as it allows to reuse the data conversion facility. Using compact
application/media type representation mitigates this specification violation as it is then possible to specify a valid subprotocol while still being able to select a media type converter. Let's consider the registered subprotocolv2.bookings.example.net(taken from RFC 6455 Section 1.9), we can then create a media type converter forapplication/v2.bookings.example.netthat will be selected when opening connection using that particular subprotocol.
The following example shows how to open a WebSocket to a simple chat server sending and receiving text messages formated in JSON:
package io.inverno.example.app_web_client;
import io.inverno.core.annotation.Bean;
import io.inverno.mod.http.base.ExchangeContext;
import io.inverno.mod.web.client.WebClient;
import reactor.core.publisher.Flux;
@Bean
public static class ChatClient {
public record Message(
String nickname,
String message
) {}
public final WebClient<? extends ExchangeContext> webClient;
public ChatClient(WebClient<? extends ExchangeContext> webClient) {
this.webClient = webClient;
}
public Flux<Message> join(Flux<Message> inbound) {
return this.webClient.exchange(URI.create("https://service/chat"))
.flatMap(exchange -> exchange.webSocket("json"))
.flatMapMany(wsExchange -> {
wsExchange.outbound().encodeTextMessages(inbound, Message.class);
return wsExchange.inbound().decodeTextMessages(Message.class);
});
}
}
Web route interceptor
A Web route interceptor specifies an ExchangeInterceptor and the rules a Web exchange created on an intercepted Web client must match to be intercepted by that interceptor. A Web route Interceptor is defined on the WebClient using a WebRouteInterceptorManager resulting in the creation of a WebClient.Intercepted instance on which further Web route interceptors can be defined resulting in the creation of a tree of intercepted Web clients each of which inherits interceptors from its ancestors.
The WebRouteInterceptor interface, implemented by the WebClient, defines a fluent API for the definition of Web interceptors. The following is an example of the definition of a Web route interceptor that is applied to exchange matching POST method and producing application/json request:
WebClient.Intercepted<? extends ExchangeContext> interceptedWebClient = webClient.intercept()
.method(Method.POST)
.produce(MediaTypes.APPLICATION_JSON)
.interceptor(exchange -> {
LOGGER.info("Intercepted!");
return Mono.just(exchange);
});
The resulting intercepted Web client can then be used to send requests eventually intercepted when they match the rules defined in above Web interceptor route.
Mono<? extends WebExchange<? extends ExchangeContext>> interceptedExchange = interceptedWebClient
.exchange(Method.POST, URI.create("https://service/path/to/resource"))
.doOnNext(exchange -> exchange.request()
.headers(headers -> headers.contentType(MediaTypes.APPLICATION_JSON))
.body().string().value("{\"message\":\"Hello world!\"}")
);
Mono<? extends WebExchange<? extends ExchangeContext>> notInterceptedExchange = interceptedWebClient
.exchange(Method.GET, URI.create("https://service/path/to/resource"));
Defining another Web route interceptor on the intercepted Web client will result in the creation of a child intercepted Web client which inherits interceptors from its parent.
WebClient.Intercepted<? extends ExchangeContext> childInterceptedWebClient = interceptedWebClient.intercept()
.method(Method.GET)
.interceptor(exchange -> {
LOGGER.info("Intercepted GET request!");
return Mono.just(exchange);
});
All GET exchanges will be intercepted by above interceptor when created with the childInterceptedWebClient, but GET exchanges creates with the parent interceptedWebClient still won't be intercepted.
Mono<? extends WebExchange<? extends ExchangeContext>> interceptedGetExchange = childInterceptedWebClient
.exchange(Method.GET, URI.create("https://service/path/to/resource"));
Mono<? extends WebExchange<? extends ExchangeContext>> stillNotInterceptedGetExchange = interceptedWebClient
.exchange(Method.GET, URI.create("https://service/path/to/resource"));
Arranging interceptors in chains of Web clients is particularly useful in a multimodule application where the
WebClientbean is injected in component modules which must be able to define their own interceptors in complete isolation without impacting other modules. For instance, global interceptors can be defined in an application module and the resulting intercepted Web client injected into multiple submodules which can then define their own interceptors on top in perfect isolation.
Multiple Web interceptor routes can be created at once using a WebRouteInterceptor.Configurer. For instance previous interceptors could have been defined at once in a single intercepted Web client as follows:
WebClient.Intercepted<? extends ExchangeContext> interceptedWebClient = webClient.configureInterceptors(interceptors -> interceptors
.intercept()
.method(Method.POST)
.produce(MediaTypes.APPLICATION_JSON)
.interceptor(exchange -> {
LOGGER.info("Intercepted!");
return Mono.just(exchange);
})
.intercept()
.method(Method.GET)
.interceptor(exchange -> {
LOGGER.info("Intercepted GET request!");
return Mono.just(exchange);
})
);
It is important to return the final
WebRouteInterceptorin the configurer in order to include all defined interceptors in the resulting intercepted Web client. For instance, considering the following example, the last interceptor won't be included:webClient.configureInterceptors(interceptors -> { WebRouteInterceptor<ExchangeContext> interceptor = interceptors.intercept() .interceptor(exchange -> { LOGGER.info("I'm included"); return Mono.just(exchange); }); interceptor.intercept() .method(Method.GET) .interceptor(exchange -> { LOGGER.info("I'm just ignored"); return Mono.just(exchange); }); return interceptor; });
The same exchange interceptor can be defined for multiple routes at once by defining multiple routing rules, the following example actually results in 4 individual routes being defined (GET+JSON, GET+XML, POST+JSON and POST+XML):
WebClient.Intercepted<? extends ExchangeContext> childInterceptedWebClient = interceptedWebClient.intercept()
.method(Method.GET)
.method(Method.POST)
.produce(MediaTypes.APPLICATION_JSON)
.produce(MediaTypes.APPLICATION_XML)
.interceptor(exchange -> {
LOGGER.info("Intercepted GET request!");
return Mono.just(exchange);
});
The following rules can be used to defined Web route interceptors: URI, method, consume, produce and language. They are evaluated in that order by the intercepted Web client when processing an exchange.
URI routing rule
The URI routing rule matches the exchange URI, namely scheme, authority and path components. It is defined using a WebRouteInterceptorManager.UriConfigurator. The Web client implementation relies on the URIMatcher to match request URIs, it supports parameterized values, allowing regular expressions and path patterns (i.e. ?, * and **) to be defined in URI components values.
The following example shows how to define a URI routing rule matching https URIs targeting host service on default port and whose path is matching /api/fruits/**:
WebClient.Intercepted<? extends ExchangeContext> interceptedWebClient = webClient.intercept()
.uri(uri -> uri
.scheme("https")
.host("service")
.path("/api/fruit/**")
)
.interceptor(exchange -> {
...
});
A regular expression can be defined in order to match both schemes http and https:
WebClient.Intercepted<? extends ExchangeContext> interceptedWebClient = webClient.intercept()
.uri(uri -> uri
.scheme("{:(http|https)}")
.host("service")
.path("/api/fruit/**")
)
.interceptor(exchange -> Mono.just(exchange));
Note that defining two Web interceptor routes, one matching
httpscheme and the other onehttpswith the same exchange interceptor would produce the same effect.
Pattern * can be used in the host component to match any host:
WebClient.Intercepted<? extends ExchangeContext> interceptedWebClient = webClient.intercept()
.uri(uri -> uri
.scheme("{:(http|https)}")
.host("{:*}")
.path("/api/fruit/**")
)
.interceptor(exchange -> {
...
});
Unlike the path component, patterns must be defined in an unnamed parameter using {:...} notation in scheme, host, port or authority components. The ** is also specific to the path component and can't be used elsewhere.
The URI routing rule strictly matches the request URI, this concretely means that https://service:443/api/fruit/apple is not matched by above rules which do not define the port component even if 443 is implicit here. Multiple rules have to be defined to obtain that behaviour.
WebClient.Intercepted<? extends ExchangeContext> interceptedWebClient = webClient.intercept()
.uri(uri -> uri
.scheme("{:(http|https)}")
.host("{:*}")
.path("/api/fruit/**")
)
.uri(uri -> uri
.scheme("{:(http|https)}")
.host("{:*}")
.port(443)
.path("/api/fruit/**")
)
.interceptor(exchange -> {
...
});
When defined, the authority component overrides the host and port components and vice versa:
WebClient.Intercepted<? extends ExchangeContext> interceptedWebClient = webClient.intercept()
.uri(uri -> uri
.scheme("http")
.host("localhost")
.port(8080)
.authority("127.0.0.1:8080") // overrides localhost and 8080
)
.interceptor(exchange -> {
...
});
Method routing rule
The method routing rule matches exchanges sent with a particular HTTP method.
In order to handle all GET exchanges, we can do:
WebClient.Intercepted<? extends ExchangeContext> interceptedWebClient = webClient.intercept()
.method(Method.GET)
.interceptor(exchange -> {
...
});
Consume routing rule
The consume routing rule matches exchanges based on the request accepted content types specified in the accept header. It is defined by specifying a media range (e.g. application/*), an exchange interceptor is executed whenever an exchange request accepted media ranges matches that media range.
In the following example, all exchanges accepting application/json media types are intercepted, including exchanges with accept headers containing application/json but also application/*, */json or */* and excluding those with accept headers containing application/xml for instance:
WebClient.Intercepted<? extends ExchangeContext> interceptedWebClient = this.webClient.intercept()
.consume(MediaTypes.APPLICATION_JSON) // matches application/json, application/*, */json and */*
.interceptor(exchange -> Mono.just(exchange));
A media range is specified using wildcards making it possible to intercept exchange accepting for instance application type with any subtype:
WebClient.Intercepted<? extends ExchangeContext> interceptedWebClient = this.webClient.intercept()
.consume("application/*") // matches application/json, application/xml
.interceptor(exchange -> Mono.just(exchange));
It is important to remember that exchanges are intercepted before a request is actually sent to the server, the response is not known when interceptor routes are resolved, it is not possible to anticipate the actual response content type. Behaviour here is then actually similar to the language routing rules and how the
accept-languageheader is working.
Produce routing rule
The produce routing rule matches an exchange based on the request content type provided in the content-type header. As for the consume routing rule, it is defined by specifying a media range (e.g. application/*), an exchange interceptor is executed whenever an exchange request content type matches that media range.
In the following example, all exchanges producing application/json are intercepted:
WebClient.Intercepted<? extends ExchangeContext> interceptedWebClient = this.webClient.intercept()
.produce(MediaTypes.APPLICATION_JSON) // matches application/json only
.interceptor(exchange -> Mono.just(exchange));
A media range is specified using wildcards making it possible to intercept exchange producing application type with any subtype:
WebClient.Intercepted<? extends ExchangeContext> interceptedWebClient = this.webClient.intercept()
.produce("application/*") // matches application/json, application/xml...
.interceptor(exchange -> Mono.just(exchange));
Note that unlike the Web server which selects the best matching route when routing a request to the exchange handler, the Web client will execute every route interceptor matching an exchange request content type will be executed.
Language routing rule
Tha language routing rule matches exchanges based on the request accepted languages specified in the accept-language header. It is defined by specifying a language range (e.g. * or fr-FR), an exchange interceptor is executed whenever an exchange request accepted languages matches that language range.
In the following example, all exchanges accepting fr-FR language are intercepted, including fr
WebClient.Intercepted<? extends ExchangeContext> interceptedWebClient = this.webClient.intercept()
.language("fr-FR") // matches fr-FR, fr or *
.interceptor(exchange -> Mono.just(exchange));
A wildcard can also be specified to match any language (which is basically equivalent to not specifying any language rule):
WebClient.Intercepted<? extends ExchangeContext> interceptedWebClient = this.webClient.intercept()
.language("*") // matches any language
.interceptor(exchange -> Mono.just(exchange));
Web Client
The web-client implements the Web client API using http-client and discovery-http modules which are not composed inside the module, as a result it doesn't instantiate these modules and required dependencies are defined instead for injecting the Reactor, the HttpClient and a list of HttpDiscoveryService which are used to create exchanges and resolve HTTP services eventually used to process them. Internally the list of HTTP discovery services is wrapped in a CompositeDiscoveryService itself wrapped in a CachingDiscoveryService which allows services to be resolved once for a whole application and regularly refreshed in an event loop obtained from the Reactor to avoid stale services.
This makes the web-client module configurable and extensible by providing different sets of HTTP discovery services which may include custom implementations, it is possible to precisely select the kind of services that can be requested to the Web client: http://, conf://, k8s-env...
For instance the following application module descriptor includes the basic DNS based HTTP discovery service exposed in discovery-http (http://, https://, ws:// and wss://), the configuration based HTTP meta discovery service (conf://) exposed in discovery-htt-meta module and the environment variables based Kubernetes discovery service (k8s-env://) exposed in discovery-http-k8s module:
@io.inverno.core.annotation.Module
module io.inverno.example.app_web_client {
requires io.inverno.mod.boot; // provides Reactor
requires io.inverno.mod.configuration; // configuration source for HTTP meta discovery service
requires io.inverno.mod.http.client; // provides HttpClient
requires io.inverno.mod.discovery.http; // DNS based discovery service
requires io.inverno.mod.discovery.http.meta; // Configuration based HTTP meta discovery service
requires io.inverno.mod.discovery.http.k8s; // Kubernetes discovery service
requires io.inverno.mod.web.client;
exports io.inverno.example.app_web_client;
}
We can create a simple TimeService in the app_web_client module for querying a time zone API:
package io.inverno.example.app_web_client;
import io.inverno.core.annotation.Bean;
import io.inverno.mod.base.resource.MediaTypes;
import io.inverno.mod.http.base.ExchangeContext;
import io.inverno.mod.web.client.WebClient;
import java.net.URI;
import reactor.core.publisher.Mono;
@Bean
public class TimeService {
public record CurrentTime(
int year,
int month,
int day,
int hour,
int minute,
int seconds,
int milliSeconds,
String dateTime,
String date,
String time,
String timeZone,
String dayOfWeek,
boolean dstActive
) {}
public final WebClient<? extends ExchangeContext> webClient;
public TimeService(WebClient<? extends ExchangeContext> webClient) {
this.webClient = webClient;
}
public Mono<CurrentTime> getTime(String timeZone) {
return this.webClient
.exchange(URI.create("https://timeapi.io/api/time/current/zone?timeZone=" + timeZone))
.flatMap(exchange -> {
exchange.request()
.headers(headers -> headers
.accept(MediaTypes.APPLICATION_JSON)
);
return exchange.response();
})
.flatMap(response -> response.body().decoder(CurrentTime.class).one());
}
}
The app_web_client module can be started as an application and the time service invoked as follows:
package io.inverno.example.app_web_client;
import io.inverno.core.annotation.Bean;
import io.inverno.core.v1.Application;
import io.inverno.mod.configuration.ConfigurationSource;
import io.inverno.mod.configuration.source.BootstrapConfigurationSource;
import java.io.IOException;
import java.util.function.Supplier;
public class Main {
@Bean
public interface ServiceConfigurationSource extends Supplier<ConfigurationSource> {}
public static void main(String[] args) throws IOException {
App_web_client webClientApp = Application.run(new App_web_client.Builder(new BootstrapConfigurationSource(Main.class.getModule(), args)));
try {
System.out.println(webClientApp.timeService().getTime("america/los_angeles").block());
}
finally {
webClientApp.stop();
}
}
}
The serviceConfigurationSource socket bean must be defined to provide a ConfigurationSource into the module which is required by the configurationHttpMetaDiscoveryService provided by the discovery-http-meta and injected into the web-client module which uses a configuration source for resolving conf:// services.
We injected a
BootstrapConfigurationSourcewhich is usually used to configure modules settings. As a result HTTP meta service descriptors can be defined along other properties in configuration files, environment variables, system properties or even directly in the command line. But we could also have created dedicated sources for HTTP services and application configuration.
In above example, the application sends a GET query to https://timeapi.io/api/time/current/zone?timeZone=america/los_angeles and outputs the TimeService.CurrentTime describing the current time at the requested timezone:
INFO Application Inverno is starting...
╔════════════════════════════════════════════════════════════════════════════════════════════╗
║ , ~~ , ║
║ , ' /\ ' , ║
║ , __ \/ __ , _ ║
║ , \_\_\/\/_/_/ , | | ___ _ _ ___ __ ___ ___ ║
║ , _\_\/_/_ , | | / _ \\ \ / // _ \ / _|/ _ \ / _ \ ║
║ , __\_/\_\__ , | || | | |\ \/ /| __/| | | | | | |_| | ║
║ , /_/ /\/\ \_\ , |_||_| |_| \__/ \___||_| |_| |_|\___/ ║
║ , /\ , ║
║ , \/ , -- 1.6.0 -- ║
║ ' -- ' ║
╠════════════════════════════════════════════════════════════════════════════════════════════╣
║ Java runtime : OpenJDK Runtime Environment ║
║ Java version : 21.0.2+13-58 ║
║ Java home : /home/jkuhn/Devel/jdk/jdk-21.0.2 ║
║ ║
║ Application module : io.inverno.example.app_web_client ║
║ Application version : 1.0.0-SNAPSHOT ║
║ Application class : io.inverno.example.app_web_client.Main ║
║ ║
║ Modules : ║
║ ... ║
╚════════════════════════════════════════════════════════════════════════════════════════════╝
INFO App_web_client Starting Module io.inverno.example.app_web_client...
INFO Boot Starting Module io.inverno.mod.boot...
INFO Boot Module io.inverno.mod.boot started in 293ms
INFO Http Starting Module io.inverno.mod.discovery.http...
INFO Client Starting Module io.inverno.mod.http.client...
INFO Base Starting Module io.inverno.mod.http.base...
INFO Base Module io.inverno.mod.http.base started in 4ms
INFO Client Module io.inverno.mod.http.client started in 12ms
INFO Http Module io.inverno.mod.discovery.http started in 13ms
INFO K8s Starting Module io.inverno.mod.discovery.http.k8s...
INFO K8s Module io.inverno.mod.discovery.http.k8s started in 1ms
INFO Meta Starting Module io.inverno.mod.discovery.http.meta...
INFO Meta Module io.inverno.mod.discovery.http.meta started in 67ms
INFO Client Starting Module io.inverno.mod.web.client...
INFO Base Starting Module io.inverno.mod.web.base...
INFO Base Starting Module io.inverno.mod.http.base...
INFO Base Module io.inverno.mod.http.base started in 0ms
INFO Base Module io.inverno.mod.web.base started in 1ms
INFO Client Module io.inverno.mod.web.client started in 16ms
INFO App_web_client Module io.inverno.example.app_web_client started in 411ms
INFO Application Application io.inverno.example.app_web_client started in 483ms
INFO AbstractEndpoint HTTP/1.1 Client (nio) connected to https://timeapi.io:443
CurrentTime[year=2024, month=12, day=2, hour=1, minute=4, seconds=51, milliSeconds=493, dateTime=2024-12-02T01:04:51.4933778, date=12/02/2024, time=01:04, timeZone=America/Los_Angeles, dayOfWeek=Monday, dstActive=false]
INFO App_web_client Stopping Module io.inverno.example.app_web_client...
INFO Boot Stopping Module io.inverno.mod.boot...
INFO Boot Module io.inverno.mod.boot stopped in 0ms
INFO Http Stopping Module io.inverno.mod.discovery.http...
INFO Http Module io.inverno.mod.discovery.http stopped in 0ms
INFO K8s Stopping Module io.inverno.mod.discovery.http.k8s...
INFO K8s Module io.inverno.mod.discovery.http.k8s stopped in 0ms
INFO Meta Stopping Module io.inverno.mod.discovery.http.meta...
INFO Meta Module io.inverno.mod.discovery.http.meta stopped in 0ms
INFO Client Stopping Module io.inverno.mod.http.client...
INFO Base Stopping Module io.inverno.mod.http.base...
INFO Base Module io.inverno.mod.http.base stopped in 0ms
INFO Client Module io.inverno.mod.http.client stopped in 0ms
INFO Client Stopping Module io.inverno.mod.web.client...
INFO Base Stopping Module io.inverno.mod.web.base...
INFO Base Stopping Module io.inverno.mod.http.base...
INFO Base Module io.inverno.mod.http.base stopped in 0ms
INFO Base Module io.inverno.mod.web.base stopped in 0ms
INFO Client Module io.inverno.mod.web.client stopped in 0ms
INFO App_web_client Module io.inverno.example.app_web_client stopped in 7ms
Configuration
The Web client configuration is specified in the web-client module configuration WebClientConfiguration which includes, among other things, the http-client module configuration HttpClientConfiguration and the NetClientConfiguration for low level client network configuration which override the default configurations defined in the http-client and boot modules.
These configurations can be exposed by creating the following in the app_web_client:
package io.inverno.example.app_web_client;
import io.inverno.core.annotation.NestedBean;
import io.inverno.mod.boot.BootConfiguration;
import io.inverno.mod.configuration.Configuration;
import io.inverno.mod.http.client.HttpClientConfiguration;
import io.inverno.mod.web.client.WebClientConfiguration;
@Configuration
public interface App_web_clientConfiguration {
@NestedBean
WebClientConfiguration web_client();
}
Web client configuration allows to configure the internal discovery service and the base load balancing strategy in particular, it also contains an HTTP client configuration and a Net client configuration that supersedes the configurations provided in the HTTP client module.
When using the
WebClient, HTTP client and Net client configurations must be specified in theWebClientConfiguration, they are eventually used to create theHttpTrafficPolicyused to resolve services and which supersedes any HTTP client module configuration. As result, defining them explicitly in the module only affect theHttpClientwhen it is used directly to createEndpointinstances but will have no effect on the Web client HTTP configuration.
The boot configuration allows to configure low level net client configuration, the HTTP client configuration allows to configure the default HTTP client configuration and the
package io.inverno.example.app_web_client;
import io.inverno.core.annotation.Bean;
import io.inverno.core.v1.Application;
import io.inverno.mod.configuration.ConfigurationSource;
import io.inverno.mod.configuration.source.BootstrapConfigurationSource;
import io.inverno.mod.discovery.http.HttpTrafficPolicy;
import java.io.IOException;
import java.util.function.Supplier;
public class Main {
@Bean
public interface ServiceConfigurationSource extends Supplier<ConfigurationSource> {}
public static void main(String[] args) throws IOException {
App_web_client webClientApp = Application.run(new App_web_client.Builder(new BootstrapConfigurationSource(Main.class.getModule(), args))
.setApp_web_clientConfiguration(App_web_clientConfigurationLoader.load(configuration -> configuration
.web_client(web_client -> web_client
.discovery_service_ttl(20000)
.load_balancing_strategy(HttpTrafficPolicy.LoadBalancingStrategy.ROUND_ROBIN)
.http_client(http_client -> http_client.pool_max_size(3))
.net_client(BootNetClientConfigurationLoader.load(net_client -> net_client.connect_timeout(30000)))
)
))
);
...
}
}
Please refer to the API documentation to have an exhaustive description of the different configuration properties.
You can also refer to the configuration module documentation to get more details on how configuration works and more especially how you can from here define the server configuration in command line arguments, property files...
Initializing the Web client
The web-client module does not expose the WebClient bean directly, instead it exposes a WebClient.Boot bean with the sole purpose of initializing the root WebClient bean with an exchange context factory used to create the application context. The Web client is context aware, a strongly typed ExchangeContext is attached to the exchange and propagated during processing, it is typically initialized with the WebExchange when initiating a request and then used and/or enriched within interceptors. The exchange context type is unique and global within an application and more precisely within the scope of a web-client module instance which is usually instantiated within the application module composing the module.
In order to set up the WebClient bean in a module, we need then to consider two use cases: the case of a module composing and then starting the web-client module which requires the exchange context factory to initialize and expose the root WebClient, and then the case of a component module which simply uses the WebClient without starting the web-client module and then defines a WebClient socket with some specific context type.
In the first case, a wrapper bean is needed to create the root WebClient bean from the WebClient.Boot bean and the exchange context factory. The following example shows how to create the root WebClient from the boot Web client:
Note that the root
WebClientcan be created only once by invoking thewebClient()on theWebClient.Bootinstance, any subsequent call to that method will result in anIllegalStateException.
In the second case, the module can simply define a regular WebClient module socket specifying the context type required by the interceptors and services in the module.
The Inverno Web compiler plugin is taking care of generating these beans. The global exchange context type is computed by aggregating all types declared in WebClient sockets within the module including bean sockets or module sockets used to inject the Web client or in WebRouteInterceptor.Configurer beans used to configure Web client route interceptors.
Let's consider an application defining two services: FrontOfficeService used to query front office services and BackOfficeService service to query back office services. Each of these services requires a specific context: FrontOfficeContext and BackOfficeContext.
The front office context can be defined as follows:
package io.inverno.example.app_web_client;
import io.inverno.mod.http.base.ExchangeContext;
public interface FrontOfficeContext extends ExchangeContext {
void setMarket(String market);
String getMarket();
}
As for the front office service, it requires a WebClient with a FrontOfficeContext which MUST be defined using an upper bound wildcard. The injected instance is intercepted in the constructor to set the context in all requests issued within the service.
package io.inverno.example.app_web_client;
import io.inverno.core.annotation.Bean;
import io.inverno.mod.http.base.Method;
import io.inverno.mod.web.client.WebClient;
import io.inverno.mod.web.client.WebExchange;
import java.net.URI;
import reactor.core.publisher.Mono;
@Bean
public class FrontOfficeService {
private final WebClient<? extends FrontOfficeContext> webClient;
public FrontOfficeService(WebClient<? extends FrontOfficeContext> webClient) {
this.webClient = webClient.intercept()
.interceptor(exchange -> {
exchange.request().headers(headers -> headers.set("fe-market", exchange.context().getMarket()));
return Mono.just(exchange);
});
}
public Mono<Void> doSomeStuff() {
return this.webClient
.exchange(Method.POST, URI.create("conf://frontOffice/"))
.doOnNext(exchange -> exchange.context().setMarket(market))
.flatMap(WebExchange::response)
.then();
}
}
The back office context and service can be created in a similar way:
package io.inverno.example.app_web_client;
public interface BackOfficeContext {
void setRiskPolicy(String policy);
String getRiskPolicy();
}
package io.inverno.example.app_web_client;
import io.inverno.core.annotation.Bean;
import io.inverno.mod.http.base.Method;
import io.inverno.mod.web.client.WebClient;
import io.inverno.mod.web.client.WebExchange;
import java.net.URI;
import reactor.core.publisher.Mono;
@Bean
public class BackOfficeService {
private final WebClient<? extends BackOfficeContext> webClient;
public BackOfficeService(WebClient<? extends BackOfficeContext> webClient) {
this.webClient = webClient.intercept()
.interceptor(exchange -> {
exchange.request().headers(headers -> headers.set("be-risk-policy", exchange.context().getRiskPolicy()));
return Mono.just(exchange);
});
}
public Mono<Void> doSomeStuff() {
return this.webClient
.exchange(Method.POST, URI.create("conf://backOffice/"))
.doOnNext(exchange -> exchange.context().setRiskPolicy("some-hardcoded-sample-policy"))
.flatMap(WebExchange::response)
.then();
}
}
The Inverno compiler plugin basically generates class <MODULE_CLASS>_WebClient containing the aggregated Context type extending all required types which MUST then all be defined as interfaces extending ExchangeContext. For the first case, when the root WebClient is initialized, a concrete ContextImpl implementation is also generated to be able to provide the context factory to the boot Web client:
- Getter and setter methods (i.e.
T get*()andvoid set*(T value)methods) are implemented in order be able to set and get data on the context. - Other methods with no default implementation gets a blank implementation (i.e. no-op).
When compiling above module, the Inverno Web compiler plugin generates App_web_client_WebClient private wrapper bean which:
- defines the
App_web_client_WebClient.Contextinterface aggregating module's exchange context types - defines the
App_web_client_WebClient.ContextImplclass implementing the context interface - initializes the root
WebClientusing the aggregated context implementation and the Web route interceptor configurers defined in the module
package io.inverno.example.app_web_client;
import io.inverno.core.annotation.Bean;
import io.inverno.core.annotation.Init;
import io.inverno.core.annotation.Wrapper;
import io.inverno.mod.http.base.ExchangeContext;
import io.inverno.mod.web.client.WebClient;
import io.inverno.mod.web.client.WebRouteInterceptor;
import java.lang.String;
import java.util.List;
import java.util.function.Supplier;
import javax.annotation.processing.Generated;
@Wrapper @Bean( name = "webClient", visibility = Bean.Visibility.PRIVATE )
@Generated(value="io.inverno.mod.web.compiler.internal.client.WebClientCompilerPlugin", date = "2024-12-02T15:53:08.284683043+01:00[Europe/Paris]")
public final class App_web_client_WebClient implements Supplier<WebClient<App_web_client_WebClient.Context>> {
private final WebClient.Boot webClientBoot;
private WebClient<App_web_client_WebClient.Context> webClient;
private List<WebRouteInterceptor.Configurer<? super App_web_client_WebClient.Context>> interceptorsConfigurers;
public App_web_client_WebClient(WebClient.Boot webClientBoot) {
this.webClientBoot = webClientBoot;
}
@Init
public void init() {
this.webClient = this.webClientBoot.webClient(App_web_client_WebClient.ContextImpl::new);
this.webClient = this.webClient
.configureInterceptors(this.interceptorsConfigurers);
}
@Override
public WebClient<App_web_client_WebClient.Context> get() {
return this.webClient;
}
public void setInterceptorsConfigurers(List<WebRouteInterceptor.Configurer<? super App_web_client_WebClient.Context>> interceptorsConfigurers) {
this.interceptorsConfigurers = interceptorsConfigurers;
}
public interface Context extends BackOfficeContext, FrontOfficeContext, ExchangeContext {}
private static class ContextImpl implements App_web_client_WebClient.Context {
private String riskPolicy;
private String market;
@Override
public void setRiskPolicy(String riskPolicy) {
this.riskPolicy = riskPolicy;
}
@Override
public String getMarket() {
return this.market;
}
@Override
public void setMarket(String market) {
this.market = market;
}
@Override
public String getRiskPolicy() {
return this.riskPolicy;
}
}
}
The plugin only generates a wrapper bean containing the global exchange context implementation when a module composes and starts the web-client module. Now let's imagine that the BackOfficeService is moved to module back_office declared with @Module(excludes = "io.inverno.mod.web.client") and composed in the application module. When compiling that module, the plugin then generates a mutator socket used to inject the WebClient dependency with the proper context type:
package io.inverno.example.back_office;
import io.inverno.core.annotation.Bean;
import io.inverno.core.annotation.Mutator;
import io.inverno.mod.http.base.ExchangeContext;
import io.inverno.mod.web.client.WebClient;
import io.inverno.mod.web.client.WebRouteInterceptor;
import java.util.List;
import java.util.function.Function;
import javax.annotation.processing.Generated;
@Mutator(required = true) @Bean( name = "webClient" )
@Generated(value="io.inverno.mod.web.compiler.internal.client.WebClientCompilerPlugin", date = "2024-12-02T16:01:45.356889748+01:00[Europe/Paris]")
public final class Back_Office_WebClient implements Function<WebClient<? extends Back_Office_WebClient.Context>, WebClient<Back_Office_WebClient.Context>> {
private List<WebRouteInterceptor.Configurer<? super Back_Office_WebClient.Context>> interceptorsConfigurers;
@Override
@SuppressWarnings("unchecked")
public WebClient<Back_Office_WebClient.Context> apply(WebClient<? extends Back_Office_WebClient.Context> webClient) {
return ((WebClient<Back_Office_WebClient.Context>)webClient)
.configureInterceptors(this.interceptorsConfigurers);
}
public void setInterceptorsConfigurers(List<WebRouteInterceptor.Configurer<? super Back_Office_WebClient.Context>> interceptorsConfigurers) {
this.interceptorsConfigurers = interceptorsConfigurers;
}
public interface Context extends BackOfficeContext, ExchangeContext {}
}
A simple socket with the aggregated context type would have been enough to declare the
WebClientdependency. However, the mutator socket allows to intercept the injected instance before it is made available for dependency injection within the module, it is then possible to configure common interceptors. Please refer to the Configuring interceptors section to learn how interceptors are defined in a Web client application.
When composing that module in the app_web_client module, the Web compiler plugin will aggregate Back_Office_WebClient.Context into the global App_web_client.Context making it possible to inject the resulting WebClient bean into the back_office module requiring WebClient<? extends Back_Office_WebClient.Context>. It is important to notice that WebClient instances are always provided with a context type extending the required type and because of type erasure upper bound wildcards MUST always be used when defining WebClient socket.
Using such generated context guarantees that the context eventually created by the WebClient complies with what is expected within the module and component modules. This allows to safely compose multiple Web client modules in an application, developed by separate teams and defining different context types.
This doesn't come without limitations. For instance, contexts must be defined as interfaces since multiple inheritance is not supported in Java. If you try to use a class, a compilation error will be raised.
Another limitation comes from the fact that it might be difficult to define a Web client or an interceptor that uses many context types, programmatically the only way to achieve this is to create an intermediary type that extends the required context types. Although this is acceptable, it is not ideal semantically speaking. Hopefully this issue can be mitigated when defining Web client routes in a declarative way, a Declarative Web client allows to specify context type using intersection types on the route method (e.g. <T extends FrontOfficeContext & BackOfficeContext>).
Finally, the Inverno Web compiler plugin only generates concrete implementations for getter and setter methods which might seem simplistic but actual logic can still be provided using default implementations in the context interface. For example, considering a simplistic security context used to set a bearer token in an interceptor, a method to encode the token in base64 can be exposed as follows:
package io.inverno.example.app_web_client;
import io.inverno.mod.http.base.ExchangeContext;
import java.nio.charset.StandardCharsets;
import java.util.Base64;
public interface SecurityContext extends ExchangeContext {
void setToken(String token);
String getToken();
default String tokenInBase64() {
return Base64.getUrlEncoder().encodeToString(this.getToken().getBytes(StandardCharsets.UTF_8));
}
}
Particular care must be taken when declaring context types with generics (e.g. Context<A>), we must always make sure that for a given erased type (e.g. Context) there is one type that is assignable to all others which will then be retained during the context type generation. This basically follows Java language specification which prevents from implementing the same interface twice with different arguments as a result the generated context can only implement one which must obviously be assignable to all others. A compilation error shall be reported if inconsistent exchange context types have been defined.
In order to avoid any misuse and realize the benefits of the context generation, it is important to understand the purpose of the exchange context and why we choose to have it strongly typed.
The exchange context is mainly used to propagate and expose contextual information during the processing of an exchange in interceptors or during the creation of the exchange, it is not necessarily meant to expose any logic.
A strongly typed context has many advantages over an untyped map:
- static checking can be performed by the compiler,
- a handler or an interceptor have guarantees over the information exposed in the context (
ClassCastExceptionare basically impossible),- as we just saw it is also possible to expose some logic using default interface methods,
- actual services can be exposed right away in the context without having to use error-prone string keys or explicit cast.
The generation of the context by the Inverno Web compiler plugin is here to reduce the complexity induced by strong typing as long as above rules are respected.
Configuring interceptors
The Web client API allows to define interceptors globally with specific sets of rules exchanges must match for the corresponding interceptors to be executed. They can then all be defined on the WebClient bean when setting up the instance, resulting in all matching exchanges initiated within the module to be intercepted.
As we just saw, the Inverno Web compiler plugin is generating beans for initializing the WebClient in a module whether the web-client module is composed and started or not. The generated bean defines a socket for injecting the list of WebRouteInterceptor.Configurer beans defined in the module. They are applied when initializing the Web client to create a WebClient.Intercepted instance eventually provided in the module.
For instance, the following configurer can be created to intercept exchanges targeting a specific service in order to set a corresponding bearer token for authentication:
package io.inverno.example.app_web_client;
import io.inverno.core.annotation.Bean;
import io.inverno.mod.http.base.ExchangeContext;
import io.inverno.mod.http.base.header.Headers;
import io.inverno.mod.web.client.WebRouteInterceptor;
import reactor.core.publisher.Mono;
@Bean
public class SecurityWebRouteInterceptorConfigurer implements WebRouteInterceptor.Configurer<ExchangeContext> {
private static final String FRONT_OFFICE_API_KEY = "abcdef123456";
private static final String BACK_OFFICE_API_KEY = "ghijkl78910";
@Override
public WebRouteInterceptor<ExchangeContext> configure(WebRouteInterceptor<ExchangeContext> interceptors) {
return interceptors
.intercept()
.uri(uri -> uri.scheme("conf").host("frontOffice").path("/**"))
.interceptor(exchange -> {
exchange.request().headers(headers -> headers.set(Headers.NAME_AUTHORIZATION, "Bearer " + FRONT_OFFICE_API_KEY));
return Mono.just(exchange);
})
.intercept()
.uri(uri -> uri.scheme("conf").host("backOffice").path("/**"))
.interceptor(exchange -> {
exchange.request().headers(headers -> headers.set(Headers.NAME_AUTHORIZATION, "Bearer " + BACK_OFFICE_API_KEY));
return Mono.just(exchange);
});
}
}
After compiling the module, any request sent to conf://frontOffice or conf://backOffice is now intercepted and the corresponding API key set in the authorization header.
In a multi-module application, interceptors defined in a composite module also apply to exchanges created in its component modules. Since interceptors are defined in a chain of intercepted Web clients which are initialized once in the generated Web client initialization bean, interceptors defined in a module are scoped to that module and its component modules. Considering a component module, its interceptors are not applied, not even evaluated, on exchanges created in the parent composite module or sibling component modules.
Service discovery
The web-client module integrates a CachingDiscoveryService whose role is to resolve services from the request URI when processing an exchange. This service is composing the list of HttpDiscoveryService injected in the module which basically determines the kind of URIs and therefore services that can be resolved and requested by the Web client. For instance, in order to be able to request a conf:// URIs, the configuration HTTP meta discovery service provided by the discovery-http-meta module and which supports conf:// scheme must be injected in the module. It is then possible to control and extend how services are resolved by the Web client while abstracting service discovery and therefore also HTTP connectivity. In the end, the Web client allows to request any HTTP service endpoint seamlessly resolved and cached, without having to manipulate HTTP connections either. When the WebClient fails to resolve a service, a ServiceNotFoundException is thrown.
To better understand what is done behind the scene, let's consider service conf://frontOffice configured as follows in a configuration.cprops file:
io.inverno.mod.discovery.http.meta.service.frontOffice = "http://localhost:8080"
Here is how to send a request to the conf://frontOffice service using the WebClient:
Mono<String> responseBody = webClient.exchange(URI.create("conf://frontOffice/path/to/resource"))
.flatMap(WebExchange::response)
.flatMapMany(response -> response.body().string().stream())
.collect(Collectors.joining());
Using the configuration meta HttpDiscoveryService as follows, service is resolved and a connection created on every request since the discovery service is not caching services:
And here is how the same request would be sent using the HttpClient configuration meta HttpDiscoveryService:
URI requestURI = URI.create("conf://frontOffice/path/to/resource");
Mono<String> responseBody = discoveryService.resolve(ServiceID.of(requestURI))
.flatMap(service -> httpClient.exchange(ServiceID.getRequestTarget(requestURI))
.flatMap(exchange -> service.getInstance(exchange)
.map(serviceInstance -> serviceInstance.bind(exchange))
)
.flatMap(Exchange::response)
)
.flatMapMany(response -> response.body().string().stream())
.collect(Collectors.joining());
Please refer to service discovery modules documentation for a detailed description of service discovery.
Now using the HttpClient only, an endpoint and therefore a connection is created on every request and the service inet socket address is also hardcoded. When the service is deployed on multiple nodes, connections and load balancing must then be handled manually.
Finally, here is how the same request would be sent using the HttpClient only:
Mono<String> responseBody = httpClient
.endpoint("localhost", 8080).build()
.exchange("/path/to/resource")
.flatMap(Exchange::response)
.flatMapMany(response -> response.body().string().stream())
.collect(Collectors.joining());
The Web client makes things simpler and more flexible by taking care of service discovery, HTTP connections and caching. Cached services are also regularly refreshed to prevent stale states, the frequency at which they are refreshed and which defaults to 30000 milliseconds, can be controlled by configuration by setting discovery_service_ttl Web client configuration property:
App_web_client webClientApp = Application.run(new App_web_client.Builder(new BootstrapConfigurationSource(Main.class.getModule(), args))
.setApp_web_clientConfiguration(App_web_clientConfigurationLoader.load(configuration -> configuration
.web_client(web_client -> web_client
.discovery_service_ttl(20000)
)
))
);
Fail on error status
The Web client is configured to raise exception by default when receiving a response with status 4xx or 5xx. The default error response mapper simply convert the error response status to the corresponding HttpException using HttpException.fromStatus() method.
String responseBody = webClient.exchange(URI.create("http://service/not_found"))
.flatMap(WebExchange::response)
.flatMapMany(response -> response.body().string().stream())
.collect(Collectors.joining())
.block(); // throws NotFoundException
Custom error response mapper can be specified on the exchange in an interceptor as follows:
WebClient.Intercepted<? extends ExchangeContext> interceptedWebClient = webClient
.intercept()
.interceptor(exchange -> {
exchange.failOnErrorStatus(response -> Mono.error(new CustomException()));
return Mono.just(exchange);
});
String responseBody = interceptedWebClient
.exchange(URI.create("http://service/error"))
.flatMap(WebExchange::response)
.flatMapMany(response -> response.body().string().stream())
.collect(Collectors.joining())
.block(); // throws CustomException on error responses
If you prefer to handle the error response explicitly, the error mapping can also be disabled on the exchange:
String responseBody = webClient.exchange(URI.create("http://service/error"))
.doOnNext(exchange -> exchange.failOnErrorStatus(false)) // do not automatically fail on 4xx or 5xx
.flatMap(WebExchange::response)
.flatMapMany(response -> {
switch(response.headers().getStatus().getCategory()) {
case CLIENT_ERROR:
case SERVER_ERROR: {
throw new CustomException();
}
default: return response.body().string().stream();
}
})
.collect(Collectors.joining())
.block(); // throws CustomException on error responses
Follow redirect
The Web client does not automatically follow redirect responses (i.e. 3xx response status), but it is actually quite easy to implement as follows:
Mono<String> responseBody = webClient.exchange(URI.create("http://service/path/to/resource"))
.flatMap(WebExchange::response)
.flatMap(response -> {
if(response.headers().getStatus().getCategory() == Status.Category.REDIRECTION) {
return response.headers().get(Headers.NAME_LOCATION)
.map(location -> webClient.exchange(URI.create(location)).flatMap(WebExchange::response))
.orElseThrow(() -> new IllegalStateException("Missing location header in redirect"));
}
return Mono.just(response);
})
.flatMapMany(response -> response.body().string().stream())
.collect(Collectors.joining());
Above example is a simple
GETrequest, things can get more complex consideringPOSTrequest with a body or when headers must be copied, updated or replaced from the original request which is why there is no built-in support to follow redirect responses. Besides service discovery is probably more suited for changing service locations in a microservices application, an HTTP meta service especially support advanced routing of requests as well as path rewriting.
Retry on error
Retrying a request after receiving an error response can easily be implemented using the reactor API as follows:
Mono<String> responseBody = webClient.exchange(URI.create("http://service/path/to/resource"))
.flatMap(WebExchange::response)
.retry(2) // retries 2 times when receiving errors
.flatMapMany(response -> response.body().string().stream())
.collect(Collectors.joining());
Using a fixed delay between attempts:
Mono<String> responseBody = webClient.exchange(URI.create("http://service/path/to/resource"))
.flatMap(WebExchange::response)
.retryWhen(Retry.fixedDelay(10, Duration.ofMillis(500))) // retries 2 times with a fixed delay of 500ms between each attempt
.flatMapMany(response -> response.body().string().stream())
.collect(Collectors.joining());
Using an exponential backoff strategy:
Mono<String> responseBody = webClient.exchange(URI.create("http://service/path/to/resource"))
.flatMap(WebExchange::response)
.retryWhen(Retry.backoff(10, Duration.ofMillis(100))) // retries 10 times using an exponential backoff strategy with a minimum duration of 100ms
.flatMapMany(response -> response.body().string().stream())
.collect(Collectors.joining());
Declarative Web Client
The Web client API provides a programmatic way of initiating and sending HTTP requests, but it also comes with a set of annotations for defining Web client routes in a declarative way for consuming resources exposed by a single service.
A Web client is a simple interface annotated with @WebClient and defining methods annotated with @WebRoute or @WebSocketRoute which describe how to request HTTP or WebSocket resources. These interfaces are scanned at compile time by the Inverno Web compiler plugin in order to generate concrete beans using the WebClient bean to create the actual requests for the declared Web route methods.
Implementations are nested in the module's
WebClientinitializing bean class also generated by the Inverno Web compiler.
For instance, in order to create a client for consuming a book service exposing basic CRUD operations, we have to define a Book model in a dedicated *.dto package:
package io.inverno.example.app_web_client.dto;
public class Book {
private String isbn;
private String title;
private String author;
private int pages;
// Constructor, getters, setters, hashcode, equals...
}
Now we can define the BookClient interface as follows:
package io.inverno.example.app_web_client;
import io.inverno.example.app_web_client.dto.Book;
import io.inverno.mod.base.resource.MediaTypes;
import io.inverno.mod.http.base.BadRequestException;
import io.inverno.mod.http.base.Method;
import io.inverno.mod.http.base.NotFoundException;
import io.inverno.mod.web.base.annotation.Body;
import io.inverno.mod.web.base.annotation.PathParam;
import io.inverno.mod.web.client.annotation.WebClient;
import io.inverno.mod.web.client.annotation.WebRoute;
import reactor.core.publisher.Flux;
import reactor.core.publisher.Mono;
@WebClient( uri = "conf://bookService/book" ) // 1
public interface BookClient {
@WebRoute(method = Method.POST, produces = MediaTypes.APPLICATION_JSON) // 2
Mono<Void> create(@Body Book book) throws BadRequestException; // 3
@WebRoute(path = "/{isbn}", method = Method.PUT, produces = MediaTypes.APPLICATION_JSON)
Mono<Void> update(@PathParam String isbn, @Body Book book) throws NotFoundException;
@WebRoute(method = Method.GET, consumes = MediaTypes.APPLICATION_JSON)
Flux<Book> list();
@WebRoute(path = "/{isbn}", method = Method.GET, consumes = MediaTypes.APPLICATION_JSON)
Mono<Book> get(@PathParam String isbn);
@WebRoute(path = "/{isbn}", method = Method.DELETE)
Mono<Void> delete(@PathParam String isbn);
}
- A Web client must be an interface, the actual implementation is generated by the Web compiler plugin resulting in a bean being provided in the module. It must be annotated with
@WebClientannotation. The mandatoryuriparameter specifies the base URI which must specify the service ID and the root service path and therefore must be absolute (i.e. it must have a scheme). The other annotation parameters,nameandvisibility, allows to specify the name and the visibility of the generated bean in the module. - The
@WebRouteannotation on a method indicates which service resource is targeted by the method and basically how the Web compiler plugin should create the corresponding exchange. It basically specifies the resource path relative to the base URI, the method, the consumed media types, the produced media type and the accepted language tags. - Request Parameters and body are specified as method parameters annotated with
@CookieParam,@FormParam,@HeaderParam,@PathParam,@QueryParamand@Bodyannotations. The return type represents the response body necessarily declared in a reactive type (i.e.Mono<T>,Flux<T>orPublisher<T>).
A WebExchange.Configurer can also be declared as method parameter to be able to customize the WebExchange and the exchange context in particular when invoking the method. The return type must be reactive, the actual request being always sent when the return publisher is subscribed. The return type usually represents the response body, but it is also possible to return a WebExchange or WebResponse publisher for specific use cases requiring complete control over the exchange or response.
The package containing the Book DTO must be exported to com.fasterxml.jackson.databind module in the app_web_client module descriptor in order for the ObjectMapper to be allowed to instantiate objects and populate them from parsed JSON trees using reflection API.
module io.inverno.example.app_web_client {
exports io.inverno.example.app_web_client.dto to com.fasterxml.jackson.databind;
}
Using a dedicated package for DTOs allows to limit and control the access to the module classes, if you're not familiar with the Java modular system and used to Java 8<, you might find this a bit distressing but if you want to better structure and secure your applications, this is the way.
The conf://bookService HTTP meta service must be configured in configuration.cprops for the Web client to be able to resolve the book service:
io.inverno.mod.discovery.http.meta.service.bookService = "http://127.0.0.1:8080"
The book service basically consumes the book resource exposed in the Web server example application.
After compiling the module, a BookClient bean should have been generated and can now be used to request book resources.
package io.inverno.example.app_web_client;
import io.inverno.core.annotation.Bean;
import io.inverno.core.v1.Application;
import io.inverno.example.app_web_client.dto.Book;
import io.inverno.mod.configuration.ConfigurationSource;
import io.inverno.mod.configuration.source.BootstrapConfigurationSource;
import java.io.IOException;
import java.util.function.Supplier;
public class Main {
@Bean
public interface ServiceConfigurationSource extends Supplier<ConfigurationSource> {}
public static void main(String[] args) throws IOException {
App_web_client webClientApp = Application.run(new App_web_client.Builder(new BootstrapConfigurationSource(Main.class.getModule(), args)));
try {
webClientApp.bookClient().create(new Book("978-0132143011", "Distributed Systems: Concepts and Design", "George Coulouris, Jean Dollimore, Tim Kindberg, Gordon Blair", 1080)).block();
System.out.println(webClientApp.bookClient().get("978-0132143011").block());
webClientApp.bookClient().delete("978-0132143011").block();
System.out.println(webClientApp.bookClient().list().collectList().block().size() + " books in store");
}
finally {
webClientApp.stop();
}
}
}
Running above application should output:
...
INFO Application Application io.inverno.example.app_web_client started in 686ms
INFO AbstractEndpoint HTTP/1.1 Client (nio) connected to http://127.0.0.1:8080
Book{isbn='978-0132143011', title='Distributed Systems: Concepts and Design', author='George Coulouris, Jean Dollimore, Tim Kindberg, Gordon Blair', pages=1080}
0 books in store
...
Notice that only one connection has been created to make four requests in a row which demonstrates that the resolved service is cached and that connections are pooled.
Web client can be defined using a hierarchy of interfaces with support for generics as long as the leaves, annotated with the @WebClient are not generic types. This allows to factorize the definition of resources. For instance, a generic CRUDClient interface can be created in order to define common CRUD operations, the BookClient can then simply extends that interface as follows:
package io.inverno.example.app_web_client;
import io.inverno.mod.base.resource.MediaTypes;
import io.inverno.mod.http.base.BadRequestException;
import io.inverno.mod.http.base.Method;
import io.inverno.mod.http.base.NotFoundException;
import io.inverno.mod.web.base.annotation.Body;
import io.inverno.mod.web.base.annotation.PathParam;
import io.inverno.mod.web.client.annotation.WebRoute;
import reactor.core.publisher.Flux;
import reactor.core.publisher.Mono;
public interface CRUDClient<T> {
@WebRoute(method = Method.POST, produces = MediaTypes.APPLICATION_JSON)
Mono<Void> create(@Body T resource) throws BadRequestException;
@WebRoute(path = "/{id}", method = Method.PUT, produces = MediaTypes.APPLICATION_JSON)
Mono<Void> update(@PathParam String id, @Body T resource) throws NotFoundException;
@WebRoute(method = Method.GET, consumes = MediaTypes.APPLICATION_JSON)
Flux<T> list();
@WebRoute(path = "/{id}", method = Method.GET, consumes = MediaTypes.APPLICATION_JSON)
Mono<T> get(@PathParam String id);
@WebRoute(path = "/{id}", method = Method.DELETE)
Mono<Void> delete(@PathParam String id);
}
package io.inverno.example.app_web_client;
import io.inverno.example.app_web_client.dto.Book;
import io.inverno.mod.web.client.annotation.WebClient;
@WebClient( uri = "conf://bookService/book" )
public interface BookClient extends CRUDClient<Book> {
}
Web client route
A Web client route basically describes the exchange to create in order to request a particular REST endpoint and what to do with the response. This is essentially characterized by:
- An input, the HTTP request characterized by the following components: path, method, query parameters, headers, cookies, path parameters, request body.
- A regular output which is a successful HTTP response (2xx or 3xx), basically a response body and more precisely: status, headers and body.
- A set of error outputs, unsuccessful HTTP responses (4xx or 5xx) basically resulting in an
HttpExceptionto be thrown but more precisely: status, headers and body.
Web client routes are defined as methods in a Web client which match this definition: the input is defined in method parameters, the output is defined by the return type of the method and finally the exceptions thrown by the method define the error outputs.
It then remains to bind the Web route semantic to the method, this is done using various annotations on the method and its parameters.
The request is sent when the response publisher returned in the Web client route method is subscribed.
Request attributes
Basic request attributes are specified in a single @WebRoute annotation on a Web client method. It allows to define the path to the resource relative to the base URI specified in the @WebClient annotation, the request method, the request content type, the accepted media ranges and the accepted language tags.
For instance, the following example shows how to declare a POST request to http://service/api/v1/resource endpoint with an application/json body and accepting application/json content type and en-US language in response:
package io.inverno.example.app_web_client;
import io.inverno.mod.base.resource.MediaTypes;
import io.inverno.mod.http.base.Method;
import io.inverno.mod.web.base.annotation.Body;
import io.inverno.mod.web.client.annotation.WebClient;
import io.inverno.mod.web.client.annotation.WebRoute;
import reactor.core.publisher.Mono;
@WebClient( uri = "http://service/api/v1" )
public interface ApiClientV1 {
@WebRoute( path = "/resource", method = Method.POST, produces = MediaTypes.APPLICATION_JSON, consumes = MediaTypes.APPLICATION_JSON, language = "en-US" )
Mono<Void> createResource(@Body ResourceV1 resource);
}
The Web compiler plugin more or less translates above @WebRoute annotation into the following:
webClient.exchange(Method.POST, URI.create("http://service/api/v1/resource"))
.doOnNext(exchange -> exchange.request()
.headers(headers -> headers
.contentType("application/json")
.set(Headers.NAME_ACCEPT, "application/json")
.set(Headers.NAME_ACCEPT_LANGUAGE, "en-US")
)
body().<ResourceV1>encoder(ResourceV1.class).value(resource)
)
...
Parameter bindings
Web client route method parameters are bound to the various elements of the request using @*Param annotations defined in the Web client API.
This parameters can be of any type, as long as the parameter converter injected into the web-client module can convert it, otherwise a ConverterException is thrown. The default parameter converter provided in the boot module is able to convert primitive and common types including arrays and collections. Please refer to the HTTP client documentation to learn how to extend the parameter converter to convert custom types.
In the following example, the value or values of query parameter isbns is encoded to an array of strings:
@WebRoute( path = "/book/byIsbn", consumes = MediaTypes.APPLICATION_JSON )
Flux<Book> getBooksByIsbn(@QueryParam String[] isbns);
The isbns query parameter will be added to target when sending the request: /book/byIsbn?isbns=978-0132143011,978-0132143012,978-0132143013.
Method overloading should be used to define optional parameters. In the following example, query parameter limit is optional, it is possible to invoke getBooks() method with or without it:
// /book
@WebRoute( path = "/book", consumes = MediaTypes.APPLICATION_JSON )
Flux<Book> getBooks();
// /book?limit=123
@WebRoute( path = "/book", consumes = MediaTypes.APPLICATION_JSON )
Flux<Book> getBooks(@QueryParam int limit);
Query parameter
Query parameters are declared using the @QueryParam annotation as follows:
@WebRoute( path = { "/book/byIsbn" } )
Flux<T> getBooksByIsbn(@QueryParam String[] isbns);
The name of the method parameter defines the name of the query parameter to set in the request query component.
Path parameter
Path parameters are declared using the @PathParam annotation as follows:
@WebRoute( path = "/{id}" )
Mono<T> get(@PathParam String id);
Note that the name of the method parameter must match the name of the path parameter defined in the path attribute of the @WebRoute annotation.
Cookie parameter
It is possible to bind cookie values as well using the @cookieParam annotation as follows:
@WebRoute( path = "/" )
Mono<T> get(@CookieParam String session);
The name of the method parameter defines the name of the cookie to set in the request cookie header.
Header parameter
Header fields can also be bound using the @HeaderParam annotation as follows:
@WebRoute( path = "/" )
Flux<T> list(@HeaderParam Format format);
In previous example, the Format type is an enumeration indicating how book references must be returned (e.g. SHORT, FULL...), the name of the method parameter defines the name of the header to set in the request headers.
Form parameter
Form parameters are bound using the @FormParam annotation as follows:
@WebRoute(method = Method.POST, produces = MediaTypes.APPLICATION_X_WWW_FORM_URLENCODED)
Mono<Void> createAuthor(
@FormParam String forename,
@FormParam String surname,
@FormParam LocalDate birthdate,
@FormParam String nationality);
Form parameters are sent in a request body following application/x-www-form-urlencoded format as defined by living standard. The name of the method parameter defines the name of the form parameter in the request body.
Above example result in the following request body being sent:
forename=Leslie,middlename=B.,surname=Lamport,birthdate=19410207,nationality=US
Form parameters are encoded in the request body and as such, @FormParam annotation can't be used together with @Body or @PartParam when defining Web client route method parameters.
Part parameter
Part parameters in a multipart request are bound using the @PartParam annotation as follows:
@WebRoute( path = "/post_multipart", method = Method.POST, produces = MediaTypes.MULTIPART_FORM_DATA )
Mono<Void> post_multipart(@PartParam String part, @PartParam(filename = "resourceFile") Resource resource, @PartParam(contentType = MediaTypes.APPLICATION_JSON) Message message);
Part parameters are sent in a multipart/form-data encoded body as defined by RFC 7578. The name of the method parameter defines the name of the part in the request body. A part body is encoded using a media type converter just like a regular request body, the media type converter being selected based on media type specified in the contentType attribute. A Resource can also be specified in order to upload a file content, the part's filename defaults to the resource name, it can be overridden by specifying in the filename attribute.
Above example result in the following request body being sent:
--------------------------e9632fafa520176d
content-disposition: form-data;name="part"
Some part
--------------------------e9632fafa520176d
content-length: 20
content-type: text/plain
content-disposition: form-data;name="resource";filename="resourceFile"
This is an example!
--------------------------e9632fafa520176d
content-type: application/json
content-disposition: form-data;name="message"
{"message":"Hello world!"}
--------------------------e9632fafa520176d--
Part parameters are encoded in the request body and as such, @PartParam annotation can't be used together with @Body or @FormParam when defining Web client route method parameters.
Request body
The request body is bound to a route method parameter using the @Body annotation, it is automatically converted when sending the request based on the media type defined in the produce attribute of the @WebRoute annotation which is also eventually set in the content-type header of the request. The body method parameter can be of any type as long as there is a converter defined for the specified media type that can convert it.
In the following example, the request body is bound to parameter book of type Book, the book instance passed to the method is converted to application/json when sending the request:
@WebRoute( method = Method.POST, produces = MediaTypes.APPLICATION_JSON )
Mono<Void> create(@Body Book book) throws BadRequestException;
The request body can also be specified in a reactive way using a Mono<T>, a Flux<T> or more broadly a Publisher<T>, previous example can be made fully reactive as follows:
@WebRoute( method = Method.POST, produces = MediaTypes.APPLICATION_JSON )
Mono<Void> create(@Body Mono<Book> book) throws BadRequestException;
This basically allows to stream request data to the remote endpoint and send consistent objects as soon as they are ready to be sent resulting in reduced memory usage on the client and overall better response time because the server can also start processing data earlier.
@WebRoute( method = Method.POST, consumes = MediaTypes.APPLICATION_X_NDJSON )
Mono<Void> create(@Body Flux<Book> book) throws BadRequestException;
Using the
application/jsonmedia type converter, objects are sent a JSON array. Using theapplication/x-ndjsonmedia type converter, objects are separated by a new line character.
The @Body annotation conflicts with the @FormParam or @PartParam annotations which are all used to specify the request body, as a result they are mutually exclusive and only one can be specified in a Web client route method.
Response body
The response body is specified by the return type of the route method, it MUST be defined in a reactive way in a Mono<T>, a Flux<T> or more broadly a Publisher<T>, the request being sent when the publisher returned by the Web client route method is subscribed. The response body is automatically converted using the media type converter corresponding to the media type specified in the response content-type header.
@WebRoute( path = "/{isbn}", method = Method.GET, consumes = MediaTypes.APPLICATION_JSON )
Mono<Book> get(@PathParam String isbn);
A response can be processed as a stream when the media type converter supports it. For instance, the application/x-ndjson converter can emit converted objects each time a new line is encountered as defined by the ndjon format. This allows to process content as soon as possible without having to wait for the entire payload to be received resulting in reduced resource consumption.
@WebRoute( method = Method.GET, consumes = MediaTypes.APPLICATION_X_NDJSON )
Flux<Book> list();
The
application/jsonconverter can also be used for streaming elements received in a JSON array.
Exposing the Web exchange
Fully declarative Web clients should cover most usage but some specific use cases might still require to have full access to the exchange and or the response. One typical such use case is when there's a need to initialize the exchange context. This can obviously be achieved using the WebClient programmatically, but it can also be done in a declarative Web client.
The WebExchange can be exposed in a Web client route method in a WebExchange.Configurer method parameter:
@WebRoute( method = Method.POST, produces = MediaTypes.APPLICATION_JSON )
Mono<Void> create(@Body Book book, WebExchange.Configurer<ApiContext> exchange) throws BadRequestException;
It is then possible to customize it when invoking the method:
webClientApp.bookClient()
.create(new Book(), exchange -> {
exchange.request().headers(headers -> headers.set("some-header", "some value"));
exchange.context().setApiKey("123456789");
})
...
Another way to expose the WebExchange is to return it in the Web client route method.
@WebRoute( method = Method.POST, produces = MediaTypes.APPLICATION_JSON )
Mono<WebExchange<? extends ApiContext>> create(@Body Book book) throws BadRequestException;
The resulting method implementation simply initializes the exchange and returns it, the response publisher must then be explicitly subscribed to send the request.
webClientApp.bookClient()
.create(new Book()))
.flatMap(exchange -> {
exchange.request().headers(headers -> headers.set("some-header", "some value"));
exchange.context().setApiKey("123456789");
return exchange.response();
})
...
Context types declared in Web client route methods are aggregated by the Inverno Web compiler plugin in a unique exchange context type for the module but unlike WebRouteInterceptor.Configurer, it is possible to specify intersection types using a type variable when multiple context type are required.
@WebRoute( method = Method.POST, produces = MediaTypes.APPLICATION_JSON )
<T extends TracingContext & SecurityContext> Mono<Void> create(@Body Book book, WebExchange.Configurer<T> exchange) throws BadRequestException;
or
@WebRoute( method = Method.POST, produces = MediaTypes.APPLICATION_JSON )
<T extends TracingContext & SecurityContext> Mono<WebExchange<T>> create(@Body Book book) throws BadRequestException;
Exposing the Web response
A Web client route method can return the WebResponse instead of the response body type to give access to the full response. This is particularly useful when there is a need to access the actual response status or headers which are otherwise ignored.
In the following example, the request is sent when the returned WebResponse publisher is subscribed:
@WebRoute( method = Method.POST, produces = MediaTypes.APPLICATION_JSON )
Mono<WebResponse> createOrUpdate(@Body Book book) throws NotFoundException;
It is then possible to do something useful with the response status and headers:
String result = webClientApp.apiClientV1().createOrUpdate(new Book(...))
.map(response -> {
if(response.headers().getStatus() == Status.CREATED) {
return "A book was created at " + response.headers().get("date").orElse(ZonedDateTime.now().toString());
}
else {
return "A book was updated at " + response.headers().get("date").orElse(ZonedDateTime.now().toString());
}
})
.block();
WebSocket client route
A WebSocket client route is declared using the @WebSocketRoute annotation with some differences in semantic and bindings compared to a Web client route. A WebSocket exchange is essentially defined by an inbound stream of messages and an outbound stream of messages.
WebSocket client routes are defined as methods in a Web Client with the following rules:
- The WebSocket
BaseWeb2SocketExchange.Inboundmay be exposed in the method's return type asMono<BaseWeb2SocketExchange.Inbound>. - The WebSocket inbound may also be specified as method's return type as a
Mono<T>, aFlux<T>or more broadly as aPublisher<T>. - The WebSocket
BaseWeb2SocketExchange.Outboundmay be exposed in a method parameter using aConsumer<BaseWeb2SocketExchange.Outbound>. - The WebSocket outbound may also be specified as method parameter as
Mono<T>, aFlux<T>or more broadly as aPublisher<T>which closes the WebSocket on terminate by default. - The
Web2SocketExchangemay be exposed in a method parameter using aWeb2SocketExchange.Configurer. - The
Web2SocketExchangemay also be exposed in the method's return type asMono<Web2SocketExchange<T extends ExchangeContext>>. - The
WebExchangemay be exposed in a method parameter using aWebExchange.Configurerjust like for regular Web client routes. - Any of
@PathParam,@QueryParam,@HeaderParamor@CookieParammay be specified as method parameter just like for regular Web client routes.
The WebSocket connection is opened when the inbound publisher returned by the WebSocket client route method is subscribed.
WebSocket request attributes
A WebSocket is opened by sending an initial HTTP request to upgrade the protocol. The upgrading request basic attributes are specified in a single @WebSocketRoute annotation on a Web client method. It allows to define the path to the WebSocket endpoint relative to the base URI specified in the @WebClient annotation, the WebSocket subprotocol, the WebSocket message kind (TEXT or BINARY) and the accepted language tags.
A basic WebSocket client route connecting to ws://service/api/v1/chat, consuming and producing JSON text messages can be declared as follows:
package io.inverno.example.app_web_client;
import io.inverno.mod.base.resource.MediaTypes;
import io.inverno.mod.http.base.Method;
import io.inverno.mod.web.base.annotation.Body;
import io.inverno.mod.web.client.annotation.WebClient;
import io.inverno.mod.web.client.annotation.WebRoute;
import reactor.core.publisher.Mono;
@WebClient( uri = "ws://service/api/v1" )
public interface WebSocketClient {
@WebSocketRoute( path = "/chat", subprotocol = "json", messageType = WebSocketMessage.Kind.TEXT )
Flux<Message> chat(Flux<Message> outbound);
}
The Web compiler plugin more or less translates above @WebSocketRoute annotation into the following:
webClient.exchange(Method.GET, URI.create("ws://service/api/v1/chat"))
.flatMap(exchange -> exchange.webSocket("json"))
.doOnNext(wsExchange -> wsExchange.outbound().encodeTextMessages(outbound, Message.class))
...
The upgrading request can also be configured using regular Web client route parameter bindings such as @PathParam, @QueryParam, @HeaderParam or @CookieParam.
@WebSocketRoute( path = "/chat/{room}", subprotocol = "json")
Flux<Message> chatRoom(@PathParam String room, @QueryParam String nickname, Flux<Message> outbound);
The upgrading Web exchange can also be exposed using a WebExchange.Configurer just like for a regular Web Client route:
@WebSocketRoute( path = "/chat", subprotocol = "json")
Flux<Message> chat(Flux<Message> outbound, WebExchange.Configurer<ApiContext> exchange);
WebSocket outbound
The WebSocket outbound can be specified as a method parameter as a Mono<T>, a Flux<T> or more broadly as a Publisher<T> where <T> can be basically a ByteBuf, a String or any types that can be converted using a media type converter matching the subprotocol.
For instance, a raw message outbound publisher can be declared as follows:
@WebSocketRoute( path = "/raw-messages", messageType = WebSocketMessage.Kind.BINARY)
Flux<ByteBuf> rawMessages(Flux<ByteBuf> outbound);
The individual frames composing WebSocket outbound messages can also be sent as follows:
@WebSocketRoute( path = "/raw-messages", messageType = WebSocketMessage.Kind.BINARY)
Flux<ByteBuf> rawMessageFrames(Flux<Flux<ByteBuf>> outbound);
When a subprotocol is provided, messages are automatically encoded (and decoded) using a converter matching the subprotocol:
@WebSocketRoute( path = "/chat", subprotocol = "json")
Flux<Message> chat(Flux<Message> outbound);
Note that the subprotocol is normally negotiated with the server during the opening handshake, if the server does not support the requested subprotocol, no subprotocol is included in the handshake response but that doesn't prevent the WebSocket to be opened, it is then up to the WebSocket client to decide whether the connection must be closed which is the HTTP client normal behaviour.
The BaseWeb2SocketExchange.Outbound can also be exposed directly in a method parameter using a Consumer<BaseWeb2SocketExchange.Outbound> as follows:
@WebSocketRoute( path = "/raw", subprotocol = "json")
Flux<Message> chat2(Consumer<BaseWeb2SocketExchange.Outbound> outbound);
It is then possible to explicitly set the outbound:
webClientApp.apiClientV1().chat2(outbound -> outbound
.closeOnComplete(false)
.encodeTextMessages(Flux.just("Message 1", "Message 2", "Message 3").map(Message::new), Message.class)
)
...
By default, the WebSocket is automatically closed when the outbound publisher terminates, this behaviour is controlled by the closeOnComplete attribute in the @WebSocketRoute annotation:
@WebSocketRoute(path = "/events", subprotocol = "json", closeOnComplete = false)
Flux<Event> events(Mono<LoginCredentials> outbound);
When set to false, the WebSocket must be eventually closed explicitly, this can be done by exposing the Web2SocketExchange and invoking the close() method, but it is also possible to do it by cancelling the subscription to the inbound publisher:
Disposable subscription = webClientApp.apiClientV1().events(Mono.just(new LoginCredentials("user", "password"))).subscribe(event -> {
// Do something useful with the events...
...
});
// Eventually close the WebSocket
subscription.dispose();
WebSocket inbound
The WebSocket inbound can be specified in the method's return type as a Mono<T>, a Flux<T> or more broadly as a Publisher<T> where <T> can be basically a ByteBuf, a String or any types that can be converted using a media type converter matching the negotiated subprotocol.
For instance, a String message inbound publisher can be declared as follows:
@WebSocketRoute( path = "/string-messages")
Flux<String> stringMessages(Flux<String> outbound);
The individual frames composing inbound WebSocket messages can also be received as follows:
@WebSocketRoute( path = "/string-messages")
Flux<Flux<String>> stringMessageFrames(Flux<String> outbound);
As for the outbound, inbound messages are automatically decoded using a converter matching the subprotocol:
@WebSocketRoute( path = "/chat", subprotocol = "json")
Flux<Message> chat(Flux<Message> outbound);
The BaseWeb2SocketExchange.Inbound can also be returned by the method as follows:
@WebSocketRoute( path = "/chat", subprotocol = "json")
Mono<BaseWeb2SocketExchange.Inbound> chat(Flux<Message> outbound);
This gives access to the WebSocket inbound, allowing to consume messages explicitly:
webClientApp.apiClientV1().chat3(Flux.just("Message 1", "Message 2", "Message 3").map(Message::new))
.flatMapMany(inbound -> inbound.decodeTextMessages(Message.class))
...
Exposing the WebSocket exchange
As for declarative Web client routes, most WebSocket client use case should be covered by fully declarative WebSocket client. Specific use cases can still be handled programmatically using the Web2SocketExchange which can be conveniently exposed in a WebSocket client route method in a Web2SocketExchange.configurer method parameter:
@WebSocketRoute( path = "/chat/{room}", subprotocol = "json")
Flux<Message> chat(Web2SocketExchange.Configurer<ApiContext> wsExchange);
This basically allows to initialize the exchange context or set the WebSocket outbound explicitly:
webClientApp.webSocketClient().chat(wsExchange -> {
wsExchange.context().setApiKey("123456789");
wsExchange.outbound().encodeTextMessages(Flux.just("Message 1", "Message 2", "Message 3").map(Message::new), Message.class);
});
Another way to expose the Web2SocketExchange is to return it in the WebSocket client route method:
@WebSocketRoute( path = "/chat", subprotocol = "json")
Mono<Web2SocketExchange<? extends ApiContext>> chat(Flux<Message> outbound);
The resulting method implementation then simply returns the exchange instead of the WebSocket inbound which must then be explicitly subscribed to open the WebSocket connection:
webClientApp.webSocketClient().chat4(Flux.just("Message 1", "Message 2", "Message 3").map(Message::new))
.flatMapMany(wsExchange -> {
wsExchange.context().setApiKey("123456789");
return wsExchange.inbound().decodeTextMessages(Message.class);
});
As for regular Web client route, it is possible to specify an exchange context type that will be aggregated by the Inverno Web compiler plugin in a unique exchange context type for the module. Defining a type variable on the route method allows to specify intersection types as well:
@WebSocketRoute( path = "/chat/{room}", subprotocol = "json")
<T extends TracingContext & SecurityContext> Flux<Message> chat(Web2SocketExchange.Configurer<T> wsExchange);
or
@WebSocketRoute( path = "/chat", subprotocol = "json")
<T extends TracingContext & SecurityContext> Mono<Web2SocketExchange<T>> chat(Flux<Message> outbound);
Web Server
The Inverno web-server module provides extended functionalities on top of the http-server module for developing high-end Web and RESTfull servers.
It especially provides:
- advanced HTTP request routing and interception
- content negotiation
- automatic message payload conversion
- path parameters
- static handler for serving static resources
- version agnostic WebJars support
- declarative Web/REST controller
- OpenAPI specifications generation using Web/REST controllers JavaDoc comments
- SwaggerUI integration
- an Inverno compiler plugin for generating modules Web servers for statically validating and registering routes
The web-server module composes the http-server module and therefore starts an HTTP server. Just like the http-server module, it requires a net service and a resource service as well as a list of media type converters for message payload conversion. Basic implementations of these services are provided by the boot module which provides application/json, application/x-ndjson and text/plain media type converters. Additional media type converters can also be provided by implementing the MediaTypeConverter interface.
In order to use the Inverno web-server module, we should declare the following dependencies in the module descriptor:
@io.inverno.core.annotation.Module
module io.inverno.example.app_web_server {
requires io.inverno.mod.boot;
requires io.inverno.mod.web.server;
}
We also need to declare these dependencies in the build descriptor:
Using Maven:
<project>
<dependencies>
<dependency>
<groupId>io.inverno.mod</groupId>
<artifactId>inverno-boot</artifactId>
</dependency>
<dependency>
<groupId>io.inverno.mod</groupId>
<artifactId>inverno-web-server</artifactId>
</dependency>
</dependencies>
</project>
Using Gradle:
compile 'io.inverno.mod:inverno-boot:1.13.0'
compile 'io.inverno.mod:inverno-web-server:1.13.0'
Web Routing API
The web-server module defines an API for intercepting and routing HTTP requests based on the details of the request (e.g. path, method, content type...).
Considering the http-server module semantics we can define:
- the router whose role is to route an exchange to a specific handler based on a set of rules applied to the exchange.
- the route which is defined in the router and specifies the rules an exchange must match to be routed to a particular handler.
- the route manager which is used to manage the routes in a router or, more explicitly, to list, create, enable, disable or remove route in a router.
- the route interceptor which specifies the rules a route must match to be intercepted by a specific exchange interceptor.
- the route interceptor manager which is used to configure the route interceptors in the Web server.
Internally the Web server uses the HTTP router API specified in the http-base module to implement the Web router and error Web router.
The WebServer is the entry point for configuring interceptors and routes, it implements the WebRouter, the ErrorWebRouter, the WebRouteInterceptor and the ErrorWebRouteInterceptor interfaces for configuring Web routes, error Web routes, Web interceptors and error Web interceptors respectively.
A WebServer instance is not directly exposed by the module which exposes a WebServer.Boot bean used to initialize the root WebServer with an ExchangeContext factory required by the http-server to create the ExchangeContext. In a module composing the web-server module, a wrapper bean shall be provided to expose the WebServer from the WebServer.Boot bean in order to be able to configure interceptors and routes otherwise a blank Web server is started responding with (404) errors on every request.
@Wrapper @Bean( name = "webServer", visibility = Bean.Visibility.PRIVATE )
public final class RootWebServer implements Supplier<WebServer<ApplicationExchangeContext>> {
private final WebServer.Boot webServerBoot;
private WebServer<Server2_WebServer.Context> webServer;
public RootWebServer(WebServer.Boot webServerBoot) {
this.webServerBoot = webServerBoot;
}
@Init
public void init() {
this.webServer = this.webServerBoot.webServer(() -> new ApplicationExchangeContext());
this.webServer
.configureInterceptors(...)
.configureErrorInterceptors(...)
.intercept(...)
.interceptError(...)
.configure(...)
.configureRoutes(...)
.configureErrorRoutes(...)
.route(...)
.webSocketRoute(...)
.routeError(...)
...
}
@Override
public WebServer<Server2_WebServer.Context> get() {
return this.webServer;
}
}
One could think that it would be easier to rather inject an
ExchangeContextfactory into the web-server module which could then directly expose the root Web server. Unfortunately a module bean can't be of a generic type. Relying on an intermediary wrapper bean is the simplest and probably the safest solution to that issue. Hopefully the Inverno Web compiler plugin automatically generates above bean aggregating all Web configurers and Web controllers exposed in the module so this shouldn't be a concern. Please refer to Web server section to better understand how the Web server is initialized and configured in a Web application.
A WebRoute or an ErrorWebRoute respectively specifies the criteria a WebExchange or an ErrorWebExchange must match to be handled by a particular exchange handler. These are configured fluently using a RouteManager or an ErrorRouteManager directly obtained from the WebServer.
The following code shows how to define a simple route to handle GET requests to /hello:
WebServer<ExchangeContext> webServer = ...
webServer
.route()
.path("/hello")
.method(Method.GET)
.handler(exchange -> exchange.response().body().string().value("Hello"));
Web interceptors or error Web interceptors are respectively configured fluently using a WebRouteInterceptorManager or an ErrorWebRouteInterceptorManager directly obtained from the WebServer.
The following code shows how to intercept all requests to /hello:
WebServer<ExchangeContext> webServer = ...
webServer
.intercept()
.path("/hello")
.handler(exchange -> {
LOGGER.info("Intercepting /hello");
return Mono.just(exchange);
});
Web exchange
The web-server module API extends the server exchange API defined in the http-server module. It defines the server WebExchange composed of a WebRequest/WebResponse pair in an HTTP communication between a client and a server. These interfaces respectively extends Exchange, Request and Response defined in the http-server module. A Web exchange handler (i.e. ExchangeHandler<ExchangeContext, WebExchange<ExchangeContext>>) is typically attached to one or more Web routes defined in the WebRouter.
The Web exchange provides additional functionalities on top of the exchange including support for path parameters, request/response body decoder/encoder based on the content type or WebSocket inbound/outbound data decoder/encoder based on the negotiated subprotocol.
Path parameters
Path parameters are exposed in the WebRequest, they are extracted from the requested path by the router when the handler is attached to a route matching a parameterized path defined as in a URI builder.
For instance, if the handler is attached to a route matching /book/{id}, the id path parameter can be retrieved as follows:
ExchangeHandler<ExchangeContext, WebExchange<ExchangeContext>> handler = exchange -> {
exchange.request().pathParameters().get("id")
.ifPresentOrElse(
id -> {
...
},
() -> exchange.response().headers(headers -> headers.status(Status.NOT_FOUND)).body().empty()
);
};
Request body decoder
The request body can be decoded based on the content type defined in the request headers.
ExchangeHandler<ExchangeContext, WebExchange<ExchangeContext>> handler = exchange -> {
Mono<Result> storeBook = exchange.request().body().get()
.decoder(Book.class)
.one()
.map(book -> storeBook(book));
exchange.response().body()
.string().stream(storeBook.map(result -> result.getMessage()));
};
When invoking the decoder() method, a media type converter corresponding to the request content type is selected to decode the payload. The content-type header MUST be specified in the request, otherwise (400) bad request error is returned indicating an empty media type. If there is no converter corresponding to the media type, a (415) unsupported media type error is returned indicating that no decoder was found matching the content type.
A decoder is obtained by specifying the type of the object to decode in the decoder() method, the type can be a Class<T> or a java.lang.reflect.Type which allows to decode parameterized types at runtime bypassing type erasure. Parameterized Types can be built at runtime using the reflection API.
As you can see in the above example the decoder is fully reactive, a request payload can be decoded in a single object by invoking method one() on the decoder which returns a Mono<T> publisher or in a stream of objects by invoking method many() on the decoder which returns a Flux<T> publisher.
Decoding multiple payload objects is indicated when a client streams content to the server. For instance, it can send a request with application/x-ndjson content type in order to send multiple messages in a single request. Since everything is reactive the server doesn't have to wait for the full request, and it can process a message as soon as it is received. What is remarkable is that the code is widely unchanged.
ExchangeHandler<ExchangeContext, WebExchange<ExchangeContext>> handler = exchange -> {
Flux<Result> storeBook = exchange.request().body().get()
.decoder(Book.class)
.many()
.map(book -> storeBook(book));
exchange.response().body()
.string().stream(storeBook.map(result -> result.getMessage()));
};
Conversion of a multipart form data request body is also supported, the payload of each part being decoded independently based on the content type of the part. For instance, we can upload multiple books in multiple files in a multipart/form-data request and decode them on the fly as follows:
ExchangeHandler<ExchangeContext, WebExchange<ExchangeContext>> handler = exchange -> {
exchange.response()
.body().string().stream(Flux.from(exchange.request().body().get().multipart().stream()) // 1
.flatMap(part -> part.decoder(Book.class).one()) // 2
.map(book -> storeBook(book)) // 3
.map(result -> result.getMessage()) // 4
);
};
In the previous example:
- A stream of files is received in a
multipart/form-datarequest (note that we assume all parts are file parts). - Each part is decoded to a
Bookobject, the media type must be specified in thecontent-typeheader field of the part. - The book object so obtained is processed.
- The result for each upload is returned to the client.
All this process is done in a reactive way, the first chunk of response can be sent before all parts have been processed.
Response body encoder
As for the request body, the response body can be encoded based on the content type defined in the response headers. Considering previous example we can do the following:
ExchangeHandler<ExchangeContext, WebExchange<ExchangeContext>> handler = exchange -> {
Mono<Result> storeBook = exchange.request().body().get()
.decoder(Book.class)
.one()
.map(book -> storeBook(book));
exchange.response()
.headers(headers -> headers.contentType(MediaTypes.APPLICATION_JSON))
.body()
.encoder(Result.class)
.one(storeBook);
};
When invoking the encoder() method, a media type converter corresponding to the response content type is selected to encode the payload. The content-type header MUST be specified in the response, otherwise a (500) internal server error is returned indicating an empty media type. If there is no converter corresponding to the media type, a (500) internal server error is returned indicating that no encoder was found matching the content type.
A single object is encoded by invoking method one() on the encoder or multiple objects can be encoded by invoking method many() on the encoder. Returning multiple objects in a stream is particularly suitable to implement progressive display in a Web application, for example to display search results as soon as some are available.
ExchangeHandler<ExchangeContext, WebExchange<ExchangeContext>> handler = exchange -> {
Flux<SearchResult> searchResults = ...;
exchange.response()
.headers(headers -> headers.contentType(MediaTypes.APPLICATION_X_NDJSON))
.body()
.encoder(SearchResult.class)
.many(searchResults);
};
Web route
A Web route specifies the routing rules and the Web exchange handler that shall be invoked to handle a matching exchange. It can combine the following routing rules which are matched in that order: the path, method and content type of the request, the media ranges and language ranges accepted by the client. For instance, a Web exchange is matched against the path routing rule first, then the method routing rule... Multiples routes can then match a given exchange but only one will be retained to actually process the exchange which is the one matching the highest routing rules.
If a route doesn't define a particular routing rule, the routing rule is simply ignored and matches all exchanges. For instance, if a route doesn't define any method routing rule, exchanges are matched regardless of the method.
The WebRouter interface, implemented by the WebServer, defines a fluent API for the definition of Web routes. The following is an example of the definition of a Web route which matches all exchanges, this is the simplest route that can be defined:
webServer
.route() // 1
.handler(exchange -> { // 2
exchange.response()
.headers(headers ->
headers.contentType(MediaTypes.TEXT_PLAIN)
)
.body()
.encoder()
.value("Hello, world!");
});
- A new
WebRouteManagerinstance is obtained to configure a Web route - We only define the handler of the route as a result any exchange might be routed to that particular route unless a more specific route matching the exchange exists.
An exchange handler can be attached to multiple routes at once by providing multiple routing rules to the route manager, the following example actually results in 8 individual routes being defined:
webServer
.route()
.path("/doc")
.path("/document")
.method(Method.GET)
.method(Method.POST)
.consume(MediaTypes.APPLICATION_JSON)
.consume(MediaTypes.APPLICATION_XML)
.handler(exchange -> {
...
});
The WebRouteManager can also be used to list all routes matching specific rules using the findRoutes() method. In the following example, all routes matching GET method are returned:
Set<WebRoute<ExchangeContext>> routes = webServer
.route()
.method(Method.GET)
.findRoutes();
It is also possible to enable, disable or remove a set of routes matching particular criteria in a similar way:
// Disables all GET routes
webServer
.route()
.method(Method.GET)
.disable();
// Enables all GET routes
webServer
.route()
.method(Method.GET)
.enable();
// remove all GET routes
webServer
.route()
.method(Method.GET)
.remove();
Individual routes can be enabled, disabled or removed as follows:
// Disables all GET routes producing 'application/json'
webServer
.route()
.method(Method.GET)
.findRoutes()
.stream()
.filter(route -> route.getProduce().equals(MediaTypes.APPLICATION_JSON))
.forEach(WebRoute::disable);
// Enables all GET routes producing 'application/json'
webServer
.route()
.method(Method.GET)
.findRoutes()
.stream()
.filter(route -> route.getProduce().equals(MediaTypes.APPLICATION_JSON))
.forEach(WebRoute::enable);
// Removes all GET routes producing 'application/json'
webServer
.route()
.method(Method.GET)
.findRoutes()
.stream()
.filter(route -> route.getProduce().equals(MediaTypes.APPLICATION_JSON))
.forEach(WebRoute::remove);
Routes can also be configured as blocks in reusable WebRouter.Configurer by invoking configureRoutes() methods:
WebRouter.Configurer<ExchangeContext> public_routes_configurer = router -> {
router
.route()
...
};
WebRouter.Configurer<ExchangeContext> private_routes_configurer = router -> {
router
.route()
...
};
webServer
.configureRoutes(public_routes_configurer)
.configureRoutes(private_routes_configurer)
.route()
...
Path routing rule
The path routing rule matches exchanges whose request targets a specific path or a path that matches against a particular pattern. The path or path pattern of a routing rule must be absolute (i.e. start with /).
We can for instance define a route to handle all requests to /bar/foo as follows:
webServer
.route()
.path("/foo/bar")
.handler(exchange -> {
...
});
The route in the preceding example specifies an exact match for the exchange request path, it is also possible to make the route match the path with or without a trailing slash as follows:
webServer
.route()
.path("/foo/bar", true)
.handler(exchange -> {
...
});
A path pattern following the parameterized or path pattern URIs notation can also be specified to create a routing rule matching multiple paths. This also allows to specify path parameters that can be retrieved from the WebExchange in an interceptor or the handler.
In the following example, the route will match all exchanges whose request path is /book/1, /book/abc... and store the extracted parameter value in path parameter named id:
webServer
.route()
.path("/book/{id}")
.handler(exchange -> {
exchange.request().pathParameters().get("id")...
});
A parameter is matched against a regular expression set to [^/]* by default which is why previous route does not match /book/a/b. Parameterized URIs allow to specify the pattern matched by a particular path parameter using {[<name>][:<pattern>]} notation, we can then put some constraints on path parameters value. For instance, we can make sure the id parameter is a number between 1 and 999:
webServer
.route()
.path("/book/{id:[1-9][0-9]{0,2}}")
.handler(exchange -> {
...
});
If we just want to match a particular path without extracting path parameters, we can omit the parameter name and simply write:
webServer
.route()
.path("/book/{}")
.handler(exchange -> {
...
});
Wildcards can also be used to match all paths:
webServer
.route()
.path("/book/**/*")
.handler(exchange -> {
...
});
Method routing rule
The method routing rule matches exchanges that have been sent with a particular HTTP method.
In order to handle all GET exchanges, we can do:
webServer
.route()
.method(Method.GET)
.handler(exchange -> {
...
});
Consume routing rule
The consume routing rule matches exchanges whose request body content type matches a particular media range as defined by RFC 7231 Section 5.3.2.
For instance, in order to match all exchanges with an application/json request payload, we can do:
webServer
.route()
.method(Method.POST)
.consume(MediaTypes.APPLICATION_JSON)
.handler(exchange -> {
...
});
We can also specify a media range to match, for example, all exchanges with a */json request payload:
webServer
.route()
.method(Method.POST)
.consume("*/json")
.handler(exchange -> {
...
});
The two previous routes are different and as a result they can be both defined, a content negotiation algorithm is used to determine which route should process a particular exchange as defined in RFC 7231 Section 5.3.
Routes are sorted by consumed media ranges as follows:
- quality value is compared first as defined by RFC7231 Section 5.3.1, the default quality value is 1.
- type and subtype wildcards are considered after:
a/b>a/*>*/b>*/* - parameters are considered last, the most precise media range which is the one with the most parameters with matching values gets the highest priority (e.g.
application/json;p1=a;p2=2>application/json;p1=b>application/json;p1)
The first route whose media range matches the request's content-type header field is selected.
If we consider previous routes, an exchange with an application/json request payload will be matched by the first route while an exchange with a text/json request will be matched by the second route.
A media range can also be parameterized which allows for interesting setup such as:
webServer
.route()
.path("/document")
.method(Method.POST)
.consume("application/json;version=1")
.handler(exchange -> {
...
})
.route()
.path("/document")
.method(Method.POST)
.consume("application/json;version=2")
.handler(exchange -> {
...
})
.route()
.path("/document")
.method(Method.POST)
.consume("application/json")
.handler(exchange -> {
...
});
In the above example, an exchange with a application/json;version=1 request payload is matched by the first route, application/json;version=2 request payload is matched by the second route and any other application/json request payload is matched by the third route.
If there is no route matching the request content type matched by previous routing rules, a (415) unsupported media type error is returned.
As described before, if no route is defined with a consume routing rule, exchanges are matched regardless of the request content type, content negotiation is then eventually delegated to the handler which must be able to process the payload whatever the content type.
Produce routing rule
The produce routing rule matches exchanges based on the acceptable media ranges supplied by the client in the accept header field of the request as defined by RFC 7231 Section 5.3.2.
An HTTP client (e.g. Web browser) typically sends an accept header to indicate the server which response media types are acceptable in the response. The best matching route is determined based on the media types produced by the routes matching previous routing rules.
We can for instance define the following routes:
webServer
.route()
.path("/doc")
.produce(MediaTypes.APPLICATION_JSON)
.handler(exchange -> {
...
})
.route()
.path("/doc")
.produce(MediaTypes.TEXT_XML)
.handler(exchange -> {
...
});
Now let's consider the following accept request header field:
accept: application/json, application/xml;q=0.9, */xml;q=0.8
This field basically tells the server that the client wants to receive first an application/json response payload, if not available an application/xml response payload and if not available any */xml response payload.
The content negotiation algorithm is similar as the one described in the consume routing rule, it is simply reversed in the sense that it is the acceptable media ranges defined in the accept header field that are sorted and the route producing the media type matching the media range with the highest priority is selected.
Considering previous routes, a request with previous accept header field is then matched by the first route.
A request with the following accept header field is matched by the second route:
accept: application/xml;q=0.9, */xml;q=0.8
The exchange is also matched by the second route with the following accept header field:
accept: application/json;q=0.5, text/xml;q=1.0
If there is no route producing a media type that matches any of the acceptable media ranges, then a (406) not acceptable error is returned.
As described before, if no route is defined with a produce routing rule, exchanges are matched regardless of the acceptable media ranges, content negotiation is then eventually delegated to the handler which becomes responsible to return an acceptable response to the client.
Language routing rule
The language routing rule matches exchanges based on the acceptable languages supplied by client in the accept-language header field of the request as defined by RFC 7231 Section 5.3.5.
An HTTP client (e.g. Web browser) typically sends a accept-language header to indicate the server which languages are acceptable for the response. The best matching route is determined based on the language tags produced by the routes matching previous routing rules.
We can define the following routes to return a particular resource in English or in French:
webServer
.route()
.path("/doc")
.language("en-US")
.handler(exchange -> {
...
})
.route()
.path("/doc")
.language("fr-FR")
.handler(exchange -> {
...
});
The content negotiation is similar to the one described in the produce routing rule but using language ranges and language types instead of media ranges and media types. Acceptable language ranges are sorted as follows:
- quality value is compared first as defined by RFC 7231 Section 5.3.1, the default quality value is 1.
- primary and secondary language tags and wildcards are considered after:
fr-FR>fr>*
The route whose produced language tag matches the language range with the highest priority is selected.
As for the produce routing rule, if there is no route defined with a language tag that matches any of the acceptable language ranges, then a (406) not acceptable error is returned. However, unlike the produce routing rule, a default route can be defined to handle such unmatched exchanges.
For instance, we can add the following default route to the router:
webServer
.route()
.path("/doc")
.handler(exchange -> {
...
});
A request with the following accept-language header field is then matched by the default route:
accept-language: it-IT
WebSocket exchange
A Web exchange can be upgraded to a Web WebSocket exchange. The Web2SocketExchange thus created extends WebSocketExchange and allows to respectively decode/encode WebSocket inbound and outbound messages based on the subprotocol negotiated during the opening handshake.
As for request and response payloads, a media type converter corresponding to the subprotocol is selected to decode/encode inbound and outbound messages. If there is no converter corresponding to the subprotocol, a WebSocketException is thrown resulting in a (500) internal server error returned to the client indicating that no converter was found matching the subprotocol.
The subprotocol must then correspond to a valid media type. Unlike request and response payloads which expect strict media type representation, compact application/ media type representation can be specified as subprotocol. In practice, it is possible to open a WebSocket connection with subprotocol json to select the application/json media type converter.
As defined by RFC 6455, a WebSocket subprotocol is not a media type and is registered separately. However, using media type is very handy in this case as it allows to reuse the data conversion facility. Using compact
application/media type representation mitigates this specification violation as it is then possible to specify a valid subprotocol while still being able to select a media type converter. Let's consider the registered subprotocolv2.bookings.example.net(taken from RFC 6455 Section 1.9), we can then create a media type converter forapplication/v2.bookings.example.netthat will be selected when receiving connection using that particular subprotocol.
The following example is a variant of the simple chat server which shows how JSON messages can be automatically decoded and encoded:
ExchangeHandler<ExchangeContext, WebExchange<ExchangeContext>> handler = exchange -> {
exchange.webSocket("json")
.orElseThrow(() -> new InternalServerErrorException("WebSocket not supported"))
.handler(webSocketExchange -> {
Flux.from(webSocketExchange.inbound().decodeTextMessages(Message.class)).subscribe(message -> this.chatSink.tryEmitNext(message));
webSocketExchange.outbound().encodeTextMessages(this.chatSink.asFlux());
})
.or(() -> exchange.response()
.body().string().value("Web socket handshake failed")
);
};
WebSocket route
The WebRouter interface also exposes webSocketRoute() which returns a WebSocketRouteManager for defining WebSocket routes. A WebSocket route specifies the routing rules and the WebSocket exchange handler that shall be invoked after upgrading a matching exchange to a WebSocket exchange. it can combine the following routing rules which are matched in that order: the path of the request, the language ranges accepted by the client and the supported subprotocol. Unlike a regular Web route, a WebSocket exchange does not support method, consume and produce routing rules, this difference can be explained by the fact that a WebSocket upgrade request is always a GET request and that consumed and produced media types have just no meaning in the context of a WebSocket.
When an exchange matches a WebSocket route, the Web router automatically handle the upgrade and set up the WebSocket exchange handler specified in the route. If the WebSocket upgrade is not supported, a WebSocketException is thrown resulting in a (500) internal server error returned to the client.
A WebSocket endpoint can then be easily defined as follows:
webServer
.webSocketRoute()
.path("/ws")
.subprotocol("json")
.handler(webSocketExchange -> {
webSocketExchange.outbound().messages(factory -> webSocketExchange.inbound().messages());
});
Just like Web routes WebSocket routes matching particular rules can be selected, enabled, disabled or removed:
// Disables all WebSocket routes supporting subprotocol 'json'
webServer
.webSocketRoute()
.subprotocol("json")
.findRoutes()
.stream()
.forEach(WebSocketRoute::disable);
// Enables all routes (including WebSocket routes) with path matching '/ws'
webServer
.route()
.path("/ws")
.enable();
Subprotocol routing rule
The subprotocol routing rule matches exchanges based on the supported subprotocols supplied by the client in the sec-websocket-version header field of the request as defined by RFC 6455.
An HTTP client (e.g. Web browser) wishing to open a WebSocket connection typically sends a sec-websocket-version header to indicate the server which subprotocols it supports by order of preference. The best matching route is determined based on the subprotocol supported by the routes matching previous routing rules.
We can then define the following WebSocket routes that handle different subprotocols:
webServer
.webSocketRoute()
.path("/ws")
.subprotocol("json")
.handler(webSocketExchange -> {
...
})
.webSocketRoute()
.path("/ws")
.subprotocol("xml")
.handler(webSocketExchange -> {
...
})
.webSocketRoute()
.path("/ws")
.handler(webSocketExchange -> {
...
});
Let's consider a request with the following sec-websocket-version header field:
sec-websocket-version: xml, json
This field basically tells the server that the client wants to open a WebSocket connection using the xml subprotocol and if not supported the json subprotocol. As a result the request is matched by the second route in above example.
If there is no route supporting any of the subprotocols provided by the client, an UnsupportedProtocolException is thrown resulting in a (500) internal server error returned to the client. The last route in above example is therefore not a default route, it is only matched when the client open a WebSocket connection with no subprotocol.
Error Web exchange
The web-server module API extends the server exchange API defined in the http-server module. It defines the server ErrorWebExchange composed of a WebRequest/WebResponse pair in an HTTP communication between a client and a server. These interfaces respectively extends the ErrorExchange, Request and Response interfaces defined in the http-server module. An error Web exchange handler (i.e. ExchangeHandler<ExchangeContext, ErrorWebExchange<ExchangeContext>>) is typically attached to one or more error Web routes defined in an ErrorWebRouter.
The Error Web exchange provides additional functionalities on top of the error exchange such response body encoding based on the content type.
As the WebExchange, the ErrorWebExchange exposes a WebResponse which supports automatic response payload encoding based on the content type specified in the response headers. The usage is exactly the same as for the Web server exchange response body encoder.
The following error Web route matches IllegalArgumentException errors for client accepting application/json media type in the response:
ExchangeHandler<ExchangeContext, ErrorWebExchange<ExchangeContext>> errorHandler = errorExchange -> {
errorExchange.response()
.headers(headers -> headers.status(Status.INTERNAL_SERVER_ERROR))
.body()
.encoder(Message.class)
.value(new Message(errorExchange.getError().getMessage()));
};
Error Web route
An error Web route specifies the routing rules and the error Web exchange handler that shall be invoked to handle a matching error exchange. Similar to a Web route, it can combine the following routing rules which are matched in that order: the type of error, the path and content type of the request of the request, the media ranges and language ranges accepted by the client.
The ErrorWebRouter interface, implemented by the WebServer, defines a fluent API for the definition of Error Web routes. The following is an example of the definition of an Error Web route which matches IllegalArgumentException errors for client accepting application/json media type:
webServer
.routeError()
.error(IllegalArgumentException.class)
.produce(MediaTypes.APPLICATION_JSON)
.handler(errorExchange ->
errorExchange.response()
.body()
.encoder(Message.class)
.value(new Message("IllegalArgumentException"))
);
As with a Web router, an ErrorWebRouteManager can also be used to list error Web routes matching specific rules that can then be enabled, disabled or removed individually. The following example disables all routes matching SomeCustomException error type:
webServer
.routeError()
.error(SomeCustomException.class)
.disable();
Error routes can also be configured as blocks in reusable ErrorWebRouter.Configurer by invoking configureErrorRoutes() methods:
ErrorWebRouter.Configurer<ExchangeContext> public_error_routes_configurer = router -> {
router
.route()
routeError
};
ErrorWebRouter.Configurer<ExchangeContext> private_error_routes_configurer = router -> {
router
.routeError()
...
};
webServer
.configureErrorRoutes(public_error_routes_configurer)
.configureErrorRoutes(private_error_routes_configurer)
.routeError()
...
Error type routing rule
The error type routing rule matches error exchanges whose error is of a particular type.
For instance, in order to handle all error exchanges whose error is an instance of SomeCustomException, we can do:
webServer
.routeError()
.error(SomeCustomException.class)
.handler(exchange -> {
...
});
Consume routing rule
The consume routing rule, when applied to an error route behaves exactly the same as for a Web route. It allows to define specific error handlers when the original request body content type matches a particular media range.
Produce routing rule
The produce routing rule, when applied to an error route behaves exactly the same as for a Web route. It allows to define error handlers that produce responses of different types based on the set of media range accepted by the client.
This is particularly useful to returned specific error responses to a particular client in a particular context. For instance, a backend application might want to receive errors in a parseable format like application/json whereas a Web browser might want to receive errors in a human-readable format like text/html.
Language routing rule
The language routing rule, when applied to an error route behaves exactly the same as for a Web route. It allows to define error handlers that produce responses with different languages based on the set of language range accepted by the client fall-backing to the default route when content negotiation did not give any match.
Web route interceptor
A Web route interceptor specifies the rules and the exchange interceptor that shall be applied to a matching route. It can combine the same rules as for the definition of a route: the path and method of the route, media range matching the content consumed by the route, media range and language range matching the media type and language produced by the route.
Multiple Web exchange interceptors (i.e. ExchangeInterceptor<ExchangeContext, WebExchange<ExchangeContext>>) can be applied to one or more Web routes.
The WebRouteInterceptor interface, implemented by the WebServer, defines a fluent API similar to the WebRouter for the definition of Web interceptors. The following is an example of the definition of a Web route interceptor that is applied to routes matching GET method and consuming application/json response:
webServer.
.intercept()
.method(Method.GET)
.consume(MediaTypes.APPLICATION_JSON)
.interceptor(exchange -> {
LOGGER.info("Intercepted!");
return Mono.just(exchange);
});
When defining an interceptor, an intercepted Web server is returned which contains that interceptor definition as well as all interceptors previously defined in the chain. In order to be intercepted, a route must be defined on an intercepted Web server.
In the following example, the first route defined on the original Web server won't be intercepted:
webServer
.route()
.path("/route1")
.handler(exchange -> exchange.response().body().string().value("I'm not intercepted"))
.intercept()
.interceptor(exchange -> { // returns an intercepted Web server
LOGGER.info("intercepted");
return Mono.just(exchange);
})
.route()
.path("/route2")
.handler(exchange -> exchange.response().body().string().value("I'm intercepted"))
Arranging interceptors in chains of Web servers allows to isolate interceptor and route definitions which is particularly appreciated in a multi-module application. For instance, global interceptors and routes can be defined in an application module and the resulting intercepted Web server injected into multiple submodules defining their own interceptors and routes in perfect isolation.
As for an exchange handler, an exchange interceptor can be applied to multiple routes at once by providing multiple rules to the route interceptor manager, the following example is used to apply a route interceptor to /doc and /document routes consuming application/json or application/xml payloads:
webServer
.intercept()
.path("/doc")
.path("/document")
.consume(MediaTypes.APPLICATION_JSON)
.consume(MediaTypes.APPLICATION_XML)
.interceptor(exchange -> {
...
});
Multiple interceptors can be applied to a route at once using the interceptors() methods. The following example is equivalent as applying interceptor1 then interceptor2 on all routes matching /some_path (i.e. interceptor2 is then invoked before interceptor1):
ExchangeInterceptor<ExchangeContext, WebExchange<ExchangeContext>> interceptor1 = ...;
ExchangeInterceptor<ExchangeContext, WebExchange<ExchangeContext>> interceptor2 = ...;
webServer
.intercept()
.path("/some_path")
.interceptors(List.of(interceptor1, interceptor2));
The list of exchange interceptors applied to a route can be obtained from a WebRoute or WebSocketRoute instance:
// Use a WebRouteManager to find a WebRoute
WebRoute<ExchangeContext> route = ...
List<? extends ExchangeInterceptor<ExchangeContext, WebExchange<ExchangeContext>> routeInterceptors = route.getInterceptors();
In a similar way, it is possible to explicitly set exchange interceptors on a specific WebRoute instance:
Set<WebRoute<ExchangeContext>> routes = router.getRoutes();
ExchangeInterceptor<ExchangeContext, WebExchange<ExchangeContext>> serverHeaderInterceptor = exchange -> {
exchange.response()
.headers(headers -> headers.set(Headers.NAME_SERVER, "Inverno Web Server");
return Mono.just(exchange);
};
ExchangeInterceptor<ExchangeContext, WebExchange<ExchangeContext>> securityInterceptor = exchange -> {...};
routes.stream().forEach(route -> route.setInterceptors(List.of(serverHeaderInterceptor, securityInterceptor));
Route interceptors can also be configured as blocks in reusable WebRouteInterceptor.Configurer by invoking configureInterceptors() methods:
WebRouteInterceptor.Configurer<ExchangeContext> public_interceptors_configurer = interceptors -> {
interceptors
.intercept()
...
};
WebRouteInterceptor.Configurer<ExchangeContext> private_interceptors_configurer = interceptors -> {
interceptors
.intercept()
...
};
webServer
.configureInterceptors(public_interceptors_configurer)
.configureInterceptors(private_interceptors_configurer)
.intercept()
...
The definition of an interceptor is very similar to the definition of a route, but there are some peculiarities. For instance, a route can only produce one particular type of content in one particular language that are matched by a route interceptor with matching media and language ranges.
For performance reasons, route interceptor's rules should not be evaluated each time an exchange is processed but once when a route is defined. Unfortunately, this is not always possible and sometimes some rules have to be evaluated when processing the exchange. This happens when the difference between the set of exchanges matched by a route and the set of exchanges matched by a route interceptor is not empty which basically means that the route matches more exchanges than the route interceptor.
In these situations, the actual exchange interceptor is wrapped in order to evaluate the problematic rule on each exchange. A typical example is when a route defines a path pattern (e.g. /path/*.jsp) matching the specific path of a route interceptor (e.g. /path/private.jsp), the exchange interceptor must only be invoked on an exchange that matches the route interceptor's path. This can also happen with method and consumes rules.
Path patterns are actually very tricky to match offline, the internal
Routeruses theURIPattern#includes()to determine whether a given URIs set is included into another, when this couldn't be determined with certainty, the exchange interceptor is wrapped. Please refer to the URIs documentation for more information.
Particular care must be taken when listing the exchange interceptor attached to a route as these are the actual interceptors and not the wrappers. If you set interceptors explicitly on a
WebRouteinstance, they will be invoked whenever the route is invoked.
When a route interceptor is defined with specific produce and language rules, it can only be applied on routes that actually specify matching produce and language rules. Since there is no way to determine which content type and language will be produced by an exchange handler, it is not possible to determine whether an exchange interceptor should be invoked prior to the exchange handler unless specified explicitly on the route. In such case, a warning is logged to indicate that the interceptor is ignored for the route due to missing produce or language rules on the route.
Error Web route interceptor
Error Web routes can be intercepted in a similar way as for Web route by combining the same rules as for the definition of an error Web route.
Multiple Error Web exchange interceptors (i.e. ExchangeInterceptor<ExchangeContext, ErrorWebExchange<ExchangeContext>>) can be applied to one or more error Web routes.
The ErrorWebRouteInterceptor interface, implemented by the WebServer, defines a fluent API similar to the ErrorWebRouter for the definition of Error Web interceptors. The following is an example of the definition of an error Web route interceptor for intercepting error Web exchange with SomeCustomException errors and /some_path path:
webServer
.interceptError()
.path("/some_path")
.error(SomeCustomException.class)
.interceptor(errorExchange -> ...)
.routeError()
.handler(errorExchange -> ...);
As for route interceptors, error interceptors are chained in a tree of Web servers which allows to define interceptors and routes in isolation. In order to be intercepted, an error Web route must be defined on an intercepted Web server.
In the following example, NotFoundException error won't be intercepted:
webServer
.routeError()
.error(NotFoundException.class)
.handler(exchange -> exchange.response().body().string().value("I'm not intercepted"))
.interceptError()
.interceptor(exchange -> { // returns an intercepted Web server
LOGGER.info("intercepted");
return Mono.just(exchange);
})
.routeError()
.error(BadRequestException.class)
.handler(exchange -> exchange.response().body().string().value("I'm intercepted"))
As for WebRoute, it is possible to list or explicitly set the error interceptors applied to an error route.
// Use an ErrorWebRouteManager to find an ErrorWebRoute
ErrorWebRoute<ExchangeContext> errorRoute = ...
List<ExchangeInterceptor<ExchangeContext, ErrorWebExchange<ExchangeContext>>> errorRouteInterceptors = new ArrayList<>(errorRoute.getInterceptors());
errorRouteInterceptors.add(errorExchange -> {
...
});
errorRoute.setInterceptors(errorRouteInterceptors);
The ErrorWebRouteInterceptor offers the same features as the WebRouteInterceptor and allows configuring error interceptors as blocks in reusable ErrorWebRouteInterceptor.Configurer by invoking configureErrorInterceptors() methods:
ErrorWebRouteInterceptor.Configurer<ExchangeContext> public_error_interceptors_configurer = interceptors -> {
interceptors
.interceptError()
...
};
ErrorWebRouteInterceptor.Configurer<ExchangeContext> private_error_interceptors_configurer = interceptors -> {
interceptors
.interceptError()
...
};
webServer
.configureErrorInterceptors(public_error_interceptors_configurer)
.configureErrorInterceptors(private_error_interceptors_configurer)
.interceptError()
...
It is important to remember that an interceptor only applies to matching routes defined in the intercepted Web server where it is defined, so basically routes defined after the interceptor. In the particular case of error Web routes, an error Web route interceptor defined on a Web server without any subsequent error Web route will never be invoked, that doesn't mean errors won't be handled as the HTTP server has a default error exchange handler but this can be easily misleading: since the error is handled, one can expect the error interceptor to be invoked but interceptors only applies to routes and the default error exchange handler is not a route.
In order to circumvent this issue, it is recommended to always define error Web routes right after error Web interceptors. For instance, [white labels error routes][#white-labels-error-routes] can be easily configured using the WhiteLabelErrorRoutesConfigurer. In the following example, the error interceptor is invoked since error routes are defined:
webServer
.interceptError()
.interceptor(exchange -> {
LOGGER.info("intercepted");
return Mono.just(exchange);
})
.configureErrorRoutes(new WhiteLabelErrorRoutesConfigurer<>())
...
This is less of an issue when considering Web route interceptors since requests targeting undefined route resulting in 404 errors are not expected to be intercepted anyway.
Web Server
The web-server module composes the http-server module and as a result requires a NetService and a ResourceService. A set of media type converters is also required for message payload conversion. All these services are provided by the boot module, so one way to create an application with a Web server is to create an Inverno module composing boot and web-server modules.
@io.inverno.core.annotation.Module
module io.inverno.example.app_web_server {
requires io.inverno.mod.boot;
requires io.inverno.mod.web.server;
}
The resulting app_web_server module, thus created, can then be started as an application as follows:
package io.inverno.example.app_web_server;
import io.inverno.core.v1.Application;
public class Main {
public static void main(String[] args) {
Application.with(new App_web_server.Builder()).run();
}
}
The above example starts a blank Web server using default configuration which is an HTTP/1.x server with a Web router as root handler and an error router as error handler.
2021-04-14 11:00:18,308 INFO [main] i.w.c.v.Application - Inverno is starting...
╔════════════════════════════════════════════════════════════════════════════════════════════╗
║ , ~~ , ║
║ , ' /\ ' , ║
║ , __ \/ __ , _ ║
║ , \_\_\/\/_/_/ , | | ___ _ _ ___ __ ___ ___ ║
║ , _\_\/_/_ , | | / _ \\ \ / // _ \ / _|/ _ \ / _ \ ║
║ , __\_/\_\__ , | || | | |\ \/ /| __/| | | | | | |_| | ║
║ , /_/ /\/\ \_\ , |_||_| |_| \__/ \___||_| |_| |_|\___/ ║
║ , /\ , ║
║ , \/ , -- 1.6.0 -- ║
║ ' -- ' ║
╠════════════════════════════════════════════════════════════════════════════════════════════╣
║ Java runtime : OpenJDK Runtime Environment ║
║ Java version : 16+36-2231 ║
║ Java home : /home/jkuhn/Devel/jdk/jdk-16 ║
║ ║
║ Application module : io.inverno.example.app_web_server ║
║ Application version : 1.0.0-SNAPSHOT ║
║ Application class : io.inverno.example.app_web_server.Main ║
║ ║
║ Modules : ║
║ ... ║
╚════════════════════════════════════════════════════════════════════════════════════════════╝
2021-04-14 11:00:18,313 INFO [main] i.w.e.a.App_web_server - Starting Module io.inverno.example.app_web_server...
2021-04-14 11:00:18,313 INFO [main] i.w.m.b.Boot - Starting Module io.inverno.mod.boot...
2021-04-14 11:00:18,494 INFO [main] i.w.m.b.Boot - Module io.inverno.mod.boot started in 181ms
2021-04-14 11:00:18,494 INFO [main] i.w.m.w.Web - Starting Module io.inverno.mod.web.server...
2021-04-14 11:00:18,495 INFO [main] i.w.m.h.s.Server - Starting Module io.inverno.mod.http.server...
2021-04-14 11:00:18,495 INFO [main] i.w.m.h.b.Base - Starting Module io.inverno.mod.http.base...
2021-04-14 11:00:18,499 INFO [main] i.w.m.h.b.Base - Module io.inverno.mod.http.base started in 4ms
2021-04-14 11:00:18,570 INFO [main] i.w.m.h.s.i.HttpServer - HTTP Server (nio) listening on http://0.0.0.0:8080
2021-04-14 11:00:18,570 INFO [main] i.w.m.h.s.Server - Module io.inverno.mod.http.server started in 75ms
2021-04-14 11:00:18,571 INFO [main] i.w.m.w.Web - Module io.inverno.mod.web.server started in 76ms
2021-04-14 11:00:18,571 INFO [main] i.w.e.a.App_web_server - Module io.inverno.example.app_web_server started in 259ms
By default, no routes are defined and if we hit the server, a (404) not found error shall be returned:
$ curl -i 'http://127.0.0.1:8080/'
HTTP/1.1 404 Not Found
content-length: 0
Configuration
The Web server configuration is done in the web-server module configuration WebServerConfiguration which includes the http-server module configuration HttpServerConfiguration. As for the http-server module, the net service configuration can also be considered to set low level network configuration in the boot module.
Let's create the following configuration in the app_web_server module:
package io.inverno.example.app_web_server;
import io.inverno.core.annotation.NestedBean;
import io.inverno.mod.boot.BootConfiguration;
import io.inverno.mod.configuration.Configuration;
import io.inverno.mod.web.server.WebServerConfiguration;
@Configuration
public interface App_web_serverConfiguration {
@NestedBean
BootConfiguration boot();
@NestedBean
WebServerConfiguration web();
}
The Web server can then be configured. For instance, we can enable HTTP/2 over cleartext, TLS, HTTP compression... as described in the http-server module documentation.
package io.inverno.example.app_web_server;
import io.inverno.core.v1.Application;
public class Main {
public static void main(String[] args) {
Application.with(new App_web_server.Builder()
.setApp_web_serverConfiguration(
App_web_serverConfigurationLoader.load(configuration -> configuration
.web(web -> web
.http_server(server -> server
.server_port(8081)
.h2_enabled(true)
.server_event_loop_group_size(4)
)
)
)
)
).run();
}
}
Please refer to the API documentation to have an exhaustive description of the different configuration properties.
You can also refer to the configuration module documentation to get more details on how configuration works and more especially how you can from here define the server configuration in command line arguments, property files...
Configuring interceptors and routes
The module internally exposes a ServerController bean as defined by the http-server module and wired to the HTTP server to override the default server controller. This bean routes exchanges to the right handlers based on the routes defined in the Web server. It actually relies on internal Router instances for errors and routes to resolve exchange handlers based on exchange details.
The Web routing API is used to define interceptors and routes on the root WebServer instance which is obtained from the WebServer.Boot bean exposed by the module. The Inverno Web compiler plugin is responsible for generating a root WebServer bean by aggregating all configurers and providing an aggregated ExchangeContext factory required to initialize the WebServer and eventually to create the context when receiving requests in the HTTP server.
Depending on whether the web-server module is included or excluded from the module, the Inverno Web compiler plugin generates different WebServer kind beans. When the web-server is included, a wrapper bean initializing the root WebServer from the WebServer.Boot bean, configuring it and exposing the resulting WebServer inside the module is created. Otherwise, a mutating socket bean is created to indicate that the component module requires a WebServer bean with a specific exchange context type (e.g. WebServer<? extends CustomExchangeContext>). As a reminder, a mutating socket bean is able to transform a bean injected into a module, in our case to configure the WebServer coming from the enclosing module.
This approach allows to compose multiple Web server modules configuring their own interceptors and routes in complete isolation.
Web configurers
In a complex application with many route definitions sometimes dispatched into multiple modules and using complex interceptor setup, having a single configuration might not always be ideal, and we should prefer defining multiple consistent configurers aggregated into one single WebServer initialization bean. Following Web routing API documentation, we know interceptors and routes can be configured using a combination of WebRouter.Configurer, ErrorWebRouter.Configurer, WebRouteInterceptor.Configurer, ErrorWebRouteInterceptor.Configurer or WebServer.Configurer beans. At compile time, the Inverno Web compiler plugin automatically generates a wrapper bean initializing the Web server with an aggregated exchange context and applying all these configurers. It is then easy to compose multiple configurers within a module which offers more flexibility, particularly in relation to the exchange context.
For instance, the Web router and the error Web router can be configured into separate configurer beans in the app_web_server module as follows:
package io.inverno.example.app_web_server;
import io.inverno.core.annotation.Bean;
import io.inverno.mod.base.resource.MediaTypes;
import io.inverno.mod.http.base.ExchangeContext;
import io.inverno.mod.web.server.WebRouter;
@Bean( visibility = Bean.Visibility.PRIVATE )
public class App_web_serverWebRouterConfigurer implements WebRouter.Configurer<ExchangeContext> {
@Override
public void configure(WebRouter<ExchangeContext> router) {
router
.route()
.path("/hello")
.produce(MediaTypes.TEXT_PLAIN)
.language("en-US")
.handler(exchange -> exchange
.response()
.body()
.encoder(String.class)
.value("Hello!")
)
.route()
.path("/hello")
.produce(MediaTypes.TEXT_PLAIN)
.language("fr-FR")
.handler(exchange -> exchange
.response()
.body()
.encoder(String.class)
.value("Bonjour!")
)
.route()
.path("/custom_exception")
.handler(exchange -> {
throw new SomeCustomException();
});
}
}
package io.inverno.example.app_web_server;
import io.inverno.core.annotation.Bean;
import io.inverno.mod.base.resource.MediaTypes;
import io.inverno.mod.http.base.ExchangeContext;
import io.inverno.mod.http.base.Status;
import io.inverno.mod.http.base.UnauthorizedException;
import io.inverno.mod.http.base.header.Headers;
import io.inverno.mod.web.server.ErrorWebRouter;
import reactor.core.publisher.Mono;
@Bean( visibility = Bean.Visibility.PRIVATE )
public class App_web_serverErrorWebRouterConfigurer implements ErrorWebRouter.Configurer<ExchangeContext> {
@Override
public void configure(ErrorWebRouter<ExchangeContext> errorRouter) {
errorRouter
.routeError()
.error(SomeCustomException.class)
.handler(errorExchange -> errorExchange
.response()
.headers(headers -> headers
.status(Status.BAD_REQUEST)
.contentType(MediaTypes.TEXT_PLAIN)
)
.body()
.encoder()
.value("A custom exception was raised")
);
}
}
After compilation, App_web_server_WebServer bean aggregating the two configurer beans should have been generated exposing the configured WebServer bean into the module.
Now we can test the application:
$ curl -i http://locahost:8080/
HTTP/1.1 404 Not Found
content-length: 0
$ curl -i http://locahost:8080/hello
HTTP/1.1 200 OK
content-type: text/plain
content-length: 6
Hello!
$ curl -i -H 'accept-language: fr' http://locahost:8080/hello
HTTP/1.1 200 OK
content-type: text/plain
content-length: 8
Bonjour!
$ curl -i -H 'accept: application/json' http://locahost:8080/hello
HTTP/1.1 406 Not Acceptable
content-type: application/json
content-length: 81
{"status":"406","path":"/hello","error":"Not Acceptable","accept":["text/plain"]}
$ curl -i http://locahost:8080/custom_exception
HTTP/1.1 400 Bad Request
content-type: text/plain
content-length: 29
A custom exception was raised
Since all configurers are defined as interfaces, you can easily centralize configuration by implementing one or more configurers. For instance, previous configurers could have been defined in one single bean implementing
WebRouter.Configurer<ExchangeContext>andErrorWebRouter.Configurer<ExchangeContext>. You might also consider defining aWebServer.Configurerwhich allows to configure the whole Web server.
When defining Web configurer beans, it is important to make them private inside the module in order to avoid side effects when composing the module as they may interfere with the generated Web server bean, which already aggregates module's Web configurer beans, resulting in routes being configured twice. Compilation warnings shall be raised when a Web configurer is defined as a public bean.
Web configurers are applied by the generated Web server bean in the following order starting by WebRouteInterceptor.Configurer and ErrorWebRouteInterceptor.Configurer beans, then WebServer.Configurer beans and finally WebRouter.Configurer and ErrorWebRouter.Configurer beans. This basically means that the interceptors defined in WebRouteInterceptor.Configurer beans in the module will be applied to all routes defined in the module including those provided in component modules. Although it is possible to define multiple WebRouteInterceptor.Configurer beans, it is recommended to have only one because the order in which they are injected in the generated Web server bean is not guaranteed which might be problematic under certain circumstances.
Note that injection order can be specified explicitly by declaring a
@Wireannotation on the module with the configurers in the desired order.
Exchange context
The exchange context is global to all routes and interceptors, and basically specific to any application as it directly depends on what is expected by the routes and interceptors. Considering a complex application, this can quickly become very tricky. A safe approach would be to define a single global context type for the whole application and use it in all routes and interceptors definitions. Unfortunately we might have to include routes provided by third party modules that can't possibly use a specific context type. Besides, we might not want to expose the whole context to every interceptor and every route. The exchange context is unique and therefore necessarily global, but ideally it should be possible to define different context types corresponding to the routes being defined. For instance, a secured route might require some kind of security context unlike a public route.
The Inverno Web compiler plugin generates this global context based on the interceptor and route configurers aggregated into the generated WebServer bean.
The fact that the root
WebServercan only be initialized once with a singleExchangeContextfactory guarantees that there will be only one context provider and therefore one global context type.
Let's consider the case of an application which defines interceptors and routes that can use different exchange context depending on their functional area. For instance, we can imagine an application exposing front office and back office services using FrontOfficeContext and BackOfficeContext respectively.
Front office routes are then defined to handle exchanges exposing the FrontOfficeContext and back office routes, that may be specified in a completely different module, are defined to handle exchanges exposing the BackOfficeContext.
Let's start by defining these contexts and see how the global context is generated by the Inverno Web compiler plugin.
Exchange contexts must be defined as interfaces extending ExchangeContext:
package io.inverno.example.app_web_server.test;
import io.inverno.mod.http.base.ExchangeContext;
public interface FrontOfficeContext extends ExchangeContext {
void setMarket(String market);
String getMarket();
}
package io.inverno.example.app_web_server.test;
import io.inverno.mod.http.base.ExchangeContext;
public interface BackOfficeContext extends ExchangeContext {
void setVar(double var);
double getVar();
}
Then we can define different beans to configure front office and back office routers:
package io.inverno.example.app_web_server;
import io.inverno.core.annotation.Bean;
import io.inverno.mod.base.resource.MediaTypes;
import io.inverno.mod.http.base.Method;
import io.inverno.mod.web.server.WebRouteInterceptor;
import io.inverno.mod.web.server.WebRouter;
import reactor.core.publisher.Mono;
@Bean( visibility = Bean.Visibility.PRIVATE )
public class FrontOfficeRouterConfigurer implements WebRouter.Configurer<FrontOfficeContext>, WebRouteInterceptor.Configurer<FrontOfficeContext> {
@Override
public void configure(WebRouter<FrontOfficeContext> router) {
router
.route()
.path("/frontOffice")
.method(Method.GET)
.handler(exchange -> {
exchange.response()
.headers(headers -> headers.contentType(MediaTypes.TEXT_PLAIN))
.body().string().value("I've done some stuff on market: " + exchange.context().getMarket());
});
}
@Override
public WebRouteInterceptor<FrontOfficeContext> configure(WebRouteInterceptor<FrontOfficeContext> interceptors) {
return interceptors
.intercept()
.path("/frontOffice/**")
.interceptor(exchange -> {
// Resolve the market from the request, session or else
exchange.context().setMarket("market");
return Mono.just(exchange);
});
}
}
package io.inverno.example.app_web_server;
import io.inverno.core.annotation.Bean;
import io.inverno.mod.base.resource.MediaTypes;
import io.inverno.mod.http.base.Method;
import io.inverno.mod.web.server.WebRouteInterceptor;
import io.inverno.mod.web.server.WebRouter;
import reactor.core.publisher.Mono;
@Bean( visibility = Bean.Visibility.PRIVATE )
public class BackOfficeRouterConfigurer implements WebRouter.Configurer<BackOfficeContext>, WebRouteInterceptor.Configurer<BackOfficeContext> {
@Override
public void configure(WebRouter<BackOfficeContext> router) {
router
.route()
.path("/backOffice")
.method(Method.GET)
.handler(exchange -> {
exchange.response()
.headers(headers -> headers.contentType(MediaTypes.TEXT_PLAIN))
.body().string().value("VaR is: " + exchange.context().getVar());
});
}
@Override
public WebRouteInterceptor<BackOfficeContext> configure(WebRouteInterceptor<BackOfficeContext> interceptors) {
return interceptors
.intercept()
.path("/backOffice/**")
.interceptor(exchange -> {
// Resolve the VaR from the request, session or else
exchange.context().setVar(1234.5678);
return Mono.just(exchange);
});
}
}
Now if we compile the module, the Inverno Web compiler plugin generates interface App_web_server_WebServer.Context inside the generated App_web_server_WebServer which extends all context types encountered while aggregating the configurer beans. When the web-server module is included, it will also provide a concrete implementation of the context to initialize the root WebServer:
- Getter and setter methods (i.e.
T get*()andvoid set*(T value)methods) are implemented in order be able to set and get data on the context. - Other methods with no default implementation gets a blank implementation (i.e. no-op).
If we open the generated App_web_server_WebServer we should see:
...
public interface Context extends BackOfficeContext, ExchangeContext, FrontOfficeContext {}
private static class ContextImpl implements App_web_server_WebServer.Context {
private String market;
private double var;
@Override
public String getMarket() {
return this.market;
}
@Override
public void setMarket(String market) {
this.market = market;
}
@Override
public double getVar() {
return this.var;
}
@Override
public void setVar(double var) {
this.var = var;
}
}
Using such generated context guarantees that the context eventually created by the ServerController complies with what is expected by route handlers and interceptors. This allows to safely compose multiple Web server modules in an application, developed by separate teams and using different context types.
This doesn't come without limitations. For instance, contexts must be defined as interfaces since multiple inheritance is not supported in Java. If you try to use a class, a compilation error will be raised.
Another limitation comes from the fact that it might be difficult to define a route that uses many context types, using configurers the only way to achieve this is to create an intermediary type that extends the required context types. Although this is acceptable, it is not ideal semantically speaking. Hopefully this issue can be mitigated, at least for route definition, when routes are defined in a declarative way, for instance in a Web controller which allows to specify context type using intersection types on the route method (e.g. <T extends FrontOfficeContext & BackOfficeContext>).
Finally, the Inverno Web compiler plugin only generates concrete implementations for getter and setter methods which might seem simplistic but actual logic can still be provided using default implementations in the context interface. For example, role based access control can be implemented in a security context as follows:
package io.inverno.example.app_web_server;
import io.inverno.mod.http.base.ExchangeContext;
import java.util.Set;
public interface SecurityContext extends ExchangeContext {
void setRoles(Set<String> roles);
Set<String> getRoles();
default boolean hasRole(String role) {
return this.getRoles().contains(role);
}
}
Exposing setRoles() methods to actual services which should only be concerned by controlling access might not be ideal. There are two concerns to consider here: first resolving the roles of the authenticated user and set them into the context which is the responsibility of a security interceptor and then controlling the access to a secured service or resource which is the responsibility of a service or another security interceptor. Since we can compose multiple configurers using multiple context types automatically aggregated into the WebServer bean we can easily solve that issue by splitting previous security context:
package io.inverno.example.app_web_server;
import io.inverno.mod.http.base.ExchangeContext;
import java.util.Set;
public interface SecurityContext extends ExchangeContext {
Set<String> getRoles();
default boolean hasRole(String role) {
return this.getRoles().contains(role);
}
}
package io.inverno.example.app_web_server;
import java.util.Set;
public interface ConfigurableSecurityContext extends SecurityContext {
void setRoles(Set<String> roles);
}
Particular care must be taken when declaring context types with generics (e.g. Context<A>), we must always make sure that for a given erased type (e.g. Context) there is one type that is assignable to all others which will then be retained during the context type generation. This basically follows Java language specification which prevents from implementing the same interface twice with different arguments as a result the generated context can only implement one which must obviously be assignable to all others. A compilation error shall be reported if inconsistent exchange context types have been defined.
In order to avoid any misuse and realize the benefits of the context generation, it is important to understand the purpose of the exchange context and why we choose to have it strongly typed.
The exchange context is mainly used to propagate contextual information across the routing chain composed by interceptors and the exchange handler, it is not necessarily meant to expose any logic.
Unlike many other frameworks which use untyped map, the exchange context is strongly typed which has many advantages:
- static checking can be performed by the compiler,
- a handler or an interceptor have guarantees over the information exposed in the context (
ClassCastExceptionare basically impossible),- as we just saw it is also possible to expose some logic using default interface methods,
- actual services can be exposed right away in the context without having to use error-prone string keys or explicit cast.
The generation of the context by the Inverno Web compiler plugin is here to reduce the complexity induced by strong typing as long as above rules are respected.
White labels error routes
By default, no error routes are defined in the Web server and the basic HTTP error handler provided by the HTTP server module is then used. The WhiteLabelErrorRoutesConfigurer can be used to configure advanced error handling with white label text, JSON and HTML handlers.
The configurer can be applied in an ErrorWebRouter.Configurer bean as follows:
package io.inverno.example.app_web_server;
import io.inverno.core.annotation.Bean;
import io.inverno.mod.http.base.ExchangeContext;
import io.inverno.mod.web.server.ErrorWebRouter;
import io.inverno.mod.web.server.WhiteLabelErrorRoutesConfigurer;
@Bean( visibility = Bean.Visibility.PRIVATE )
public class App_web_serverErrorWebRouterConfigurer implements ErrorWebRouter.Configurer<ExchangeContext> {
@Override
public void configure(ErrorWebRouter<ExchangeContext> errorRouter) {
errorRouter
.configureErrorRoutes(new WhiteLabelErrorRoutesConfigurer<>());
}
}
If you now try to send a JSON request to an unknown location, you should get the following result:
$ curl -i -H 'accept: application/json' http://locahost:8080
HTTP/1.1 404 Not Found
content-type: application/json
content-length: 47
{"status":"404","path":"/","error":"Not Found"}
If you now open the unknown location http://locahost:8080 in a Web browser, you should see the following (404) whitelabel error page:
Note that white label error pages display the error stacktrace which might be interesting on some testing environment but do not necessarily comply with the security policies expected on a production environment. The white label configurer is a convenient way to quickly provide error handling in a Web server, but you should prefer defining custom error routes that comply with your security policies.
Static handler
The StaticHandler is a built-in exchange handler that can be used to define routes for serving static resources resolved with the Resource API.
For instance, we can create a route to serve files stored in a web-root directory as follows:
webServer
.route()
.path("/static/{path:.*}") // 1
.handler(new StaticHandler<>(new FileResource("web-root/"))) // 2
- The path must be parameterized with a
pathparameter which can include/, for the static handler to be able to determine the relative path of the resource in theweb-rootdirectory - The base resource is defined directly as a
FileResource, although it is also possible to use aResourceServiceto be more flexible in terms of the kind of resource
The static handler relies on the resource abstraction to resolve resources, as a result, these can be located on the file system, on the class path, on the module path...
The static handler also looks for a welcome page when a directory resource is requested. For instance considering the following web-root directory:
web-root/
├── index.html
└── snowflake.svg
A request to http://127.0.0.1/static/ would return the index.html file.
100-continue interceptor
The ContinueInterceptor class which can be used to automatically handles 100-continue as defined by RFC 7231 Section 5.1.1.
router
.intercept()
.interceptor(new ContinueInterceptor())
.route()
...
Note that in order to comply with RFC 7231, an HTTP server must respond with a (100) status to a request with a 100-continue expectation. The
ContinueInterceptorallows to automatize this, otherwise it must be done explicitly:... if(exchange.request().headers().contains(Headers.NAME_EXPECT, Headers.VALUE_100_CONTINUE)) { exchange.response().sendContinue(); } ...
WebJars
The WebJarsRoutesConfigurer is a WebRouter.Configurer implementation used to configure routes to WebJars static resources available on the module path or class path. Paths to the resources are version agnostic: /webjars/{webjar_module}/{path:.*} where {webjar_module} corresponds to the modularized name of the WebJar minus org.webjars. For example the location of the Swagger UI WebJar would be /webjars/swagger.ui/.
The WebJarsRoutesConfigurer requires a ResourceService to resolve WebJars resources. WebJars routes can be configured as follows:
package io.inverno.example.app_web_server;
import io.inverno.core.annotation.Bean;
import io.inverno.mod.base.resource.ResourceService;
import io.inverno.mod.http.base.ExchangeContext;
import io.inverno.mod.web.server.WebJarsRoutesConfigurer;
import io.inverno.mod.web.server.WebRouter;
@Bean
public class App_web_serverWebRouterConfigurer implements WebRouter.Configurer<ExchangeContext> {
private final ResourceService resourceService;
public App_web_serverWebRouterConfigurer(ResourceService resourceService) {
this.resourceService = resourceService;
}
@Override
public void accept(WebRouter<ExchangeContext> router) {
router
.configureRoutes(new WebJarsRoutesConfigurer<>(this.resourceService))
...
}
}
Then we can declare WebJars dependencies such as the Swagger UI in the build descriptor:
<project>
<dependencies>
<dependency>
<groupId>org.webjars</groupId>
<artifactId>swagger-ui</artifactId>
</dependency>
</dependencies>
</project>
The Swagger UI should be accessible at http://locahost:8080/webjars/swagger.ui/.
Sadly WebJars are rarely modular JARs, they are not even named modules which causes several issues when dependencies are specified on the module path. That's why when an application is run or packaged using Inverno tools, such dependencies and WebJars in particular are modularized. A WebJar such as swagger-ui is modularized into org.webjars.swagger.ui module which explains why it is referred to by its module name: swagger.ui in the WebJars resource path (the org.webjars part is omitted since the context is known).
When running a fully modular Inverno application, modularized WebJars modules must be added explicitly to the JVM using the --add-modules option, otherwise they are not resolved when the JVM starts. For instance:
$ java --add-modules org.webjars.swagger.ui ...
Hopefully, the Inverno Maven plugin adds unnamed modules by default when running or packaging an application, so you shouldn't have to worry about it. The following command automatically adds the unnamed modules when running the JVM:
$ mvn inverno:run
This can be disabled in order to manually control which modules should be added:
$ mvn inverno:run -Dinverno.exec.addUnnamedModules=false -Dinverno.exec.vmOptions="--add-modules org.webjars.swagger.ui"
It might also be possible to define the dependency in the module descriptor, unfortunately since WebJars modules are unnamed, they are named after the name of the JAR file which is greatly unstable and can't be trusted, so previous approach is by far the safest. If you need to create a WebJar you should make it a named module with the
Automatic-Module-Nameattribute sets toorg.webjars.{webjar_module}in the manifest file and with resources located underMETA-INF/resources/webjars/{webjar_module}/{webjar_version}/.
Note that when the application is run with non-modular WebJars specified on the class path, they can be accessed without any particular configuration as part of the UNNAMED module using the same path notation.
OpenAPI specification
The OpenApiRoutesConfigurer is a WebRouter.Configurer implementation used to configure routes to OpenAPI specifications defined in /META-INF/inverno/web/openapi.yml resources in application modules.
OpenAPI routes can be configured on the Web router as follows:
package io.inverno.example.app_web_server;
import io.inverno.core.annotation.Bean;
import io.inverno.mod.base.resource.ResourceService;
import io.inverno.mod.http.base.ExchangeContext;
import io.inverno.mod.web.server.OpenApiRoutesConfigurer;
import io.inverno.mod.web.server.WebRouter;
@Bean
public class App_web_serverWebRouterConfigurer implements WebRouter.Configurer<ExchangeContext> {
private final ResourceService resourceService;
public App_web_serverWebRouterConfigurer(ResourceService resourceService) {
this.resourceService = resourceService;
}
@Override
public void accept(WebRouter<ExchangeContext> router) {
router
.configureRoutes(new OpenApiRoutesConfigurer<>(this.resourceService))
...
}
}
The configurer will scan for OpenAPI specifications files /META-INF/inverno/web/openapi.yml in the application modules and configure the following routes:
/open-apireturning the list of available OpenAPI specifications inapplication/json/open-api/{moduleName}returning the OpenAPI specifications defined for the specified module name or (404) not found error if there is no OpenAPI specification defined in the module or no module with that name.
By default, the configurer also configures these routes to display OpenAPI specifications in a Swagger UI when accessed from a Web browser (i.e. with accept: text/html) assuming the Swagger UI WebJar dependency is present:
<project>
<dependencies>
<dependency>
<groupId>org.webjars</groupId>
<artifactId>swagger-ui</artifactId>
</dependency>
</dependencies>
</project>
Swagger UI support can be disabled from the OpenApiRoutesConfigurer constructor:
router
.configureRoutes(new OpenApiRoutesConfigurer<>(this.resourceService, false))
...
OpenAPI specifications are usually automatically generated by the Web Inverno compiler plugin for routes defined in a Web controller, but you can provide manual or generated specifications using the tool of your choice, as long as it is not conflicting with the Web compiler plugin.
Web Controller
The Web routing API provides a programmatic way of defining the Web routes of a Web server, but it also comes with a set of annotations for defining Web routes in a more declarative way.
A Web controller is a regular module bean annotated with @WebController which defines methods annotated with @WebRoute or @WebSocketRoute describing Web routes or WebSocket routes. These beans are scanned at compile time by the Inverno Web compiler plugin in order to include corresponding programmatic Web server configuration in the generated WebServer bean.
For instance, in order to create a book resource with basic CRUD operations, we can start by defining a Book model in a dedicated *.dto package (we'll see later why this matters):
package io.inverno.example.app_web_server.dto;
public class Book {
private String isbn;
private String title;
private String author;
private int pages;
// Constructor, getters, setters, hashcode, equals...
}
Now we can define a BookResource Web controller as follows:
package io.inverno.example.app_web_server;
import io.inverno.mod.web.base.annotation.PathParam;
import io.inverno.mod.web.server.annotation.WebRoute;
import java.util.Set;
import io.inverno.core.annotation.Bean;
import io.inverno.example.app_web_server.dto.Book;
import io.inverno.mod.base.resource.MediaTypes;
import io.inverno.mod.http.base.Method;
import io.inverno.mod.web.base.annotation.Body;
import io.inverno.mod.web.server.annotation.WebController;
@Bean(visibility = Bean.Visibility.PRIVATE) // 1
@WebController(path = "/book") // 2
public class BookResource {
@WebRoute(method = Method.POST, consumes = MediaTypes.APPLICATION_JSON) // 3
public void create(@Body Book book) { // 4
...
}
@WebRoute(path = "/{isbn}", method = Method.PUT, consumes = MediaTypes.APPLICATION_JSON)
public void update(@PathParam String isbn, @Body Book book) {
...
}
@WebRoute(method = Method.GET, produces = MediaTypes.APPLICATION_JSON)
public Set<Book> list() {
...
}
@WebRoute(path = "/{isbn}", method = Method.GET, produces = MediaTypes.APPLICATION_JSON)
public Book get(@PathParam String isbn) {
...
}
@WebRoute(path = "/{isbn}", method = Method.DELETE)
public void delete(@PathParam String isbn) {
...
}
}
Implementations details have been omitted for clarity, here is what's important to notice:
- A Web controller must be a module bean because it will be wired into the generated
WebServerbean and used to invoke the right handler method attached to a Web route. Besides this is convenient for implementation as it allows a repository to be wired into theBookResourcebean for instance. - The
@WebControllerannotation tells the Web compiler plugin to process the bean as a Web controller. The controller root path can also be specified in this annotation, if not specified it defaults to/which is the root path of the Web server. - The
@WebRouteannotation on a method tells the Web compiler plugin to define a route whose handler should invoke that method. The set of routing rules (i.e. path, method, consume, produce, language) describing the route can all be specified in the annotation. - Request Parameters and body are specified as method parameters annotated with
@CookieParam,@FormParam,@HeaderParam,@PathParam,@QueryParamand@Bodyannotations.
Some other contextual objects like the underlying WebExchange or the exchange context can also be declared as parameters and used in the Web controller method.
Assuming we have provided proper implementations to create, update, list, get and delete a book in a data store, we can compile the module. The generated WebServer bean should configure the routes corresponding to the Web controller's annotated methods. The generated class uses the same APIs described before, it is perfectly readable and debuggable and above all it eliminates the overhead of resolving Web controllers or Web routes at runtime.
Now let's go back to the Book DTO, we said earlier that it must be created in a dedicated package, the reason is actually quite simple. Since above routes consume and produce application/json payloads, the application/json media type converter will be invoked to convert Book objects from/to JSON data. This converter uses an ObjectMapper object from module com.fasterxml.jackson.databind which uses reflection to instantiate objects and populate them from parsed JSON trees. Unfortunately or hopefully the Java modular system prevents unauthorized reflective access and as a result the ObjectMapper can't access the Book class unless we explicitly export the package containing DTOs to module com.fasterxml.jackson.databind in the module descriptor as follows:
module io.inverno.example.app_web_server {
exports io.inverno.example.app_web_server.dto to com.fasterxml.jackson.databind;
}
Using a dedicated package for DTOs allows then to limit and control the access to the module classes.
If you're not familiar with the Java modular system and used to Java 8<, you might find this a bit distressing but if you want to better structure and secure your applications, this is the way.
We can now run the application and test the book resource:
$ curl -i http://localhost:8080/book
HTTP/1.1 200 OK
content-type: application/json
content-length: 2
[]
$ curl -i -X POST -H 'content-type: application/json' -d '{"isbn":"978-0132143011","title":"Distributed Systems: Concepts and Design","author":"George Coulouris, Jean Dollimore, Tim Kindberg, Gordon Blair","pages":1080}' http://localhost:8080/book
HTTP/1.1 200 OK
content-length: 0
$ curl -i http://localhost:8080/book
HTTP/1.1 200 OK
content-type: application/json
content-length: 163
[{"isbn":"978-0132143011","title":"Distributed Systems: Concepts and Design","author":"George Coulouris, Jean Dollimore, Tim Kindberg, Gordon Blair","pages":1080}]
$ curl -i http://localhost:8080/book/978-0132143011
HTTP/1.1 200 OK
content-type: application/json
content-length: 161
{"isbn":"978-0132143011","title":"Distributed Systems: Concepts and Design","author":"George Coulouris, Jean Dollimore, Tim Kindberg, Gordon Blair","pages":1080}
It is possible to separate the API from the implementation by defining the Web controller and the Web routes in an interface implemented in a module bean. For instance:
package io.inverno.example.app_web_server;
import io.inverno.example.app_web_server.dto.Book;
import io.inverno.mod.base.resource.MediaTypes;
import io.inverno.mod.http.base.Method;
import io.inverno.mod.web.base.annotation.Body;
import io.inverno.mod.web.base.annotation.PathParam;
import io.inverno.mod.web.server.annotation.WebController;
import io.inverno.mod.web.server.annotation.WebRoute;
import java.util.Set;
@WebController(path = "/book")
public interface BookResource {
@WebRoute(method = Method.POST, consumes = MediaTypes.APPLICATION_JSON)
void create(@Body Book book);
@WebRoute(path = "/{isbn}", method = Method.PUT, consumes = MediaTypes.APPLICATION_JSON)
void update(@PathParam String isbn, @Body Book book);
@WebRoute(method = Method.GET, produces = MediaTypes.APPLICATION_JSON)
Set<Book> list();
@WebRoute(path = "/{isbn}", method = Method.GET, produces = MediaTypes.APPLICATION_JSON)
Book get(@PathParam String isbn);
@WebRoute(path = "/{isbn}", method = Method.DELETE)
void delete(@PathParam String isbn);
}
package io.inverno.example.app_web_server;
import io.inverno.core.annotation.Bean;
import io.inverno.example.app_web_server.dto.Book;
import io.inverno.mod.web.base.annotation.Body;
import io.inverno.mod.web.base.annotation.PathParam;
import java.util.Set;
@Bean(visibility = Bean.Visibility.PRIVATE)
public class BookResourceImpl implements BookResource {
@Override
public void create(@Body Book book) {
...
}
@Override
public void update(@PathParam String isbn, @Body Book book) {
...
}
@Override
public Set<Book> list() {
...
}
@Override
public Book get(@PathParam String isbn) {
...
}
@Override
public void delete(@PathParam String isbn) {
...
}
}
This provides better modularity and allows defining the API in a dedicated module which can later be used to implement various server and/or client implementations in different modules. Another advantage is that it allows to split a Web controller interface into multiple interfaces.
Generics are also supported, we can for instance create the following generic CRUD<T> interface:
package io.inverno.example.app_web_server;
import io.inverno.mod.base.resource.MediaTypes;
import io.inverno.mod.http.base.Method;
import io.inverno.mod.web.base.annotation.Body;
import io.inverno.mod.web.base.annotation.PathParam;
import io.inverno.mod.web.server.annotation.WebRoute;
import java.util.Set;
public interface CRUD<T> {
@WebRoute(method = Method.POST, consumes = MediaTypes.APPLICATION_JSON)
void create(@Body T resource);
@WebRoute(path = "/{id}", method = Method.PUT, consumes = MediaTypes.APPLICATION_JSON)
void update(@PathParam String id, @Body T resource);
@WebRoute(method = Method.GET, produces = MediaTypes.APPLICATION_JSON)
Set<T> list();
@WebRoute(path = "/{id}", method = Method.GET, produces = MediaTypes.APPLICATION_JSON)
T get(@PathParam String id);
@WebRoute(path = "/{id}", method = Method.DELETE)
void delete(@PathParam String id);
}
And then create multiple specific resources using that interface:
package io.inverno.example.app_web_server;
import io.inverno.example.app_web_server.dto.Book;
import io.inverno.mod.web.server.annotation.WebController;
@WebController(path = "/book")
public interface BookResource extends CRUD<Book> {
}
The book resource as we defined it doesn't seem very reactive, this statement is both true and untrue: the API and the Web server are fully reactive, as a result Web routes declared in the book resource Web controller are configured using a reactive API in the generated WebServer bean, nonetheless the methods in the Web controller are not reactive.
Luckily, we can easily transform previous interface and make it fully reactive:
package io.inverno.example.app_web_server;
import io.inverno.mod.base.resource.MediaTypes;
import io.inverno.mod.http.base.Method;
import io.inverno.mod.web.base.annotation.Body;
import io.inverno.mod.web.base.annotation.PathParam;
import io.inverno.mod.web.server.annotation.WebRoute;
import reactor.core.publisher.Flux;
import reactor.core.publisher.Mono;
public interface CRUD<T> {
@WebRoute(method = Method.POST, consumes = MediaTypes.APPLICATION_JSON)
Mono<Void> create(@Body Mono<T> resource);
@WebRoute(path = "/{id}", method = Method.PUT, consumes = MediaTypes.APPLICATION_JSON)
Mono<Void> update(@PathParam String id, @Body Mono<T> resource);
@WebRoute(method = Method.GET, produces = MediaTypes.APPLICATION_JSON)
Flux<T> list();
@WebRoute(path = "/{id}", method = Method.GET, produces = MediaTypes.APPLICATION_JSON)
Mono<T> get(@PathParam String id);
@WebRoute(path = "/{id}", method = Method.DELETE)
Mono<Void> delete(@PathParam String id);
}
There is one remaining thing to do to make the book resource a proper REST resource. When creating a book we must return a 201 Created HTTP code with a location header as defined by RFC7231 Section 7.1.2. This can be done by injecting the WebExchange directly in the create() method:
public interface CRUD<T> {
@WebRoute(method = Method.POST, consumes = MediaTypes.APPLICATION_JSON, produces = MediaTypes.APPLICATION_JSON)
Mono<Void> create(@Body Mono<T> resource, WebExchange<?> exchange);
...
}
We can then do the following in the book resource implementation to set the status and location header:
package io.inverno.example.app_web_server;
import io.inverno.core.annotation.Bean;
import io.inverno.example.app_web_server.dto.Book;
import io.inverno.mod.http.base.Status;
import io.inverno.mod.http.base.header.Headers;
import io.inverno.mod.web.server.WebExchange;
import reactor.core.publisher.Mono;
@Bean
public class BookResourceImpl implements BookResource {
@Override
public Mono<Void> create(Mono<Book> book, WebExchange<?> exchange) {
...
exchange.response().headers(headers -> headers
.status(Status.CREATED)
.add(Headers.NAME_LOCATION, exchange.request().getPathBuilder().segment(b.getIsbn()).buildPath())
);
...
}
...
}
Now if we run the application and create a book resource we should get the following:
$ curl -i -X POST -H 'content-type: application/json' -d '{"isbn":"978-0132143011","title":"Distributed Systems: Concepts and Design","author":"George Coulouris, Jean Dollimore, Tim Kindberg, Gordon Blair","pages":1080}' http://locahost:8080/book
HTTP/1.1 201 Created
content-type: application/json
location: /book/978-0132143012
content-length: 0
Declarative routes are configured last in the generated WebServer bean which means they override any route previously defined in a Web configurer but above all they are intercepted by the interceptors defined in WebRouteInterceptor.Configurer beans in the module.
Declarative Web route
So far, we have described a concrete Web controller use case which should already give a good idea on how to configure route in a declarative way. Now, let's examine in details how a Web route is declared in a Web controller.
A Web route or HTTP endpoint or REST endpoint... in short an HTTP request/response exchange is essentially defined by:
- An input, basically an HTTP request characterized by the following components: path, method, query parameters, headers, cookies, path parameters, request body.
- A normal output, basically a successful HTTP response and more precisely: a status (2xx or 3xx), headers and a response body.
- A set of error outputs, basically unsuccessful HTTP responses and more precisely: a status (4xx or 5xx), headers and a response body.
Web routes are defined as methods in a Web controller which match this definition: the Web route input is defined as method parameters, the Web route normal output is defined by the return type of the method and finally the exceptions thrown by the method define the Web route error outputs.
It then remains to bind the Web route semantic to the method, this is done using various annotations on the method and its parameters.
Routing rules
Routing rules, as defined in the Web routing API, are specified in a single @WebRoute annotation on a Web controller method. It allows to define paths, methods, consumed media ranges, produced media types and produced languages of the Web routes that route a matching request to the handler implemented by the method.
For instance, we can define multiple paths and/or multiple produced media types in order to expose a resource at different locations in various formats:
@WebRoute( path = { "/book/current", "/book/v1" }, produces = { MediaTypes.APPLICATION_JSON, MediaTypes.APPLICATION_XML } )
Flux<T> list();
The matchTrailingSlash parameter can be used to indicate that the defined paths should be matched taking the trailing slash into account or not.
Note that this exactly corresponds to the Web routing API.
Parameter bindings
As stated above, a @WebRoute annotated method must be bound to a Web exchange. In particular, method parameters are bound to the various elements of the request using @*Param annotations defined in the Web routing API.
Such parameters can be of any type, as long as the parameter converter plugged into the web-server module can convert it, otherwise a ConverterException is thrown. The default parameter converter provided in the boot module is able to convert primitive and common types including arrays and collections. Please refer to the HTTP server documentation to learn how to extend the parameter converter to convert custom types.
In the following example, the value or values of query parameter isbns is converted to an array of strings:
@WebRoute( path = { "/book/byIsbn" }, produces = { MediaTypes.APPLICATION_JSON } )
Flux<Book> getBooksByIsbn(@QueryParam String[] isbns);
If the above route is queried with /book/byIsbn?isbns=978-0132143011,978-0132143012,978-0132143013&isbns=978-0132143014 the isbns parameter is then: ["978-0132143011", "978-0132143012", "978-0132143013", "978-0132143014"].
A parameter defined like this is required by default and a MissingRequiredParameterException is thrown if one or more parameters are missing from the request, but it can be declared as optional by defining it as an Optional<T>:
In the following example, query parameter limit is optional and no exception will be thrown if it is missing from the request:
@WebRoute( path = { "/book" }, produces = { MediaTypes.APPLICATION_JSON } )
Flux<Book> getBooks(@QueryParam Optional<Integer> limit);
Query parameter
Query parameters are declared using the @QueryParam annotation as follows:
@WebRoute( path = { "/book/byIsbn" }, produces = { MediaTypes.APPLICATION_JSON } )
Flux<T> getBooksByIsbn(@QueryParam String[] isbns);
Note that the name of the method parameter actually defines the name of the query parameter.
This contrasts with other RESTful API, such as JAX-RS, which requires to specify the parameter name, again, in the annotation. Since the Inverno Web compiler plugin works at compile time, it has access to actual method parameter names defined in the source.
Path parameter
Path parameters are declared using the @PathParam annotation as follows:
@WebRoute(path = "/{id}", method = Method.GET, produces = MediaTypes.APPLICATION_JSON)
Mono<T> get(@PathParam String id);
Note that the name of the method parameter must match the name of the path parameter defined in path attribute of the @WebRoute annotation.
Cookie parameter
It is possible to bind cookie values as well using the @cookieParam annotation as follows:
@WebRoute(method = Method.POST, consumes = MediaTypes.APPLICATION_JSON)
Mono<Void> create(@CookieParam String book_store, @Body Mono<T> book, WebExchange exchange);
In previous example, the route must be queried with a book_store cookie which is not declared as optional:
$ curl -i -X POST -H 'cookie: book_store=store1' -H 'content-type: application/json' -d '...' http://locahost:8080/book
...
Header parameter
Header field can also be bound using the @HeaderParam annotation as follows:
@WebRoute(method = Method.GET, produces = MediaTypes.APPLICATION_JSON)
Flux<T> list(@HeaderParam Optional<Format> format);
In previous example, the Format type is an enumeration indicating how book references must be returned (e.g. SHORT, FULL...), a format header may or may not be added to the request since it is declared as optional:
$ curl -i -H 'format: SHORT' http://locahost:8080/book
...
Form parameter
Form parameters are bound using the @FormParam annotation as follows:
@WebRoute(method = Method.POST, consumes = MediaTypes.APPLICATION_X_WWW_FORM_URLENCODED)
Mono<Void> createAuthor(
@FormParam String forename,
@FormParam Optional<String> middlename,
@FormParam String surname,
@FormParam LocalDate birthdate,
@FormParam Optional<LocalDate> deathdate,
@FormParam String nationality);
Form parameters are sent in a request body following application/x-www-form-urlencoded format as defined by living standard. They can be sent using an HTML form submitted to the server resulting in the following request body:
forename=Leslie,middlename=B.,surname=Lamport,birthdate=19410207,nationality=US
Previous route can then be queried as follows:
$ curl -i -X POST -H 'content-type:application/x-www-form-urlencoded' -d 'forename=Leslie,middlename=B.,surname=Lamport,birthdate=19410207,nationality=US' http://locahost:8080/author
Form parameters results from the parsing of the request body and as such, @FormParam annotation can't be used together with @Body on route method parameters.
Request body
The request body is bound to a route method parameter using the @Body annotation, it is automatically converted based on the media type declared in the content-type header field of the request as described in the Web server exchange documentation. The body method parameter can then be of any type as long as a converter exists for the specified media type specified that can convert it.
In the following example, the request body is bound to parameter book of type Book, it is then converted from application/json into a Book instance:
@WebRoute(method = Method.POST, consumes = MediaTypes.APPLICATION_JSON)
void create(@Body Book book);
Unlike parameters, the request body can be specified in a reactive way, the previous example can then be rewritten using a Mono<T>, a Flux<T> or more broadly a Publisher<T> as body parameter type as follows:
@WebRoute(method = Method.POST, consumes = MediaTypes.APPLICATION_JSON)
Mono<Void> create(@Body Mono<Book> book);
A stream of objects can be processed when the media type converter supports it. For instance, the application/x-ndjson converter can emit converted objects each time a new line is encountered, this allows to process content without having to wait for the entire message resulting in better response time and reduced memory consumption.
@WebRoute(method = Method.POST, consumes = MediaTypes.APPLICATION_X_NDJSON)
Mono<Void> create(@Body Flux<Book> book);
The
application/jsonconverter also supports such streaming capability by emitting converted objects while parsing a JSON array.
The @Body annotation can not be used together with the @FormParam annotation on route method parameters because the request body can only be consumed once.
Multipart form data
Multipart form data request body can be bound by defining a body parameter of type Mono<WebPart> if one part is expected, Flux<WebPart> if multiple parts are expected or more broadly of type Publisher<WebPart>.
We can then rewrite the example described in Web server exchange documentation as follows:
@WebRoute( path = "/bulk", method = Method.POST, consumes = MediaTypes.MULTIPART_FORM_DATA)
Flux<Result> createBulk(@Body Flux<WebPart> parts) {
return parts
.flatMap(part -> part.decoder(Book.class).one())
.map(book -> storeBook(book));
}
It is not possible to bind particular parts to a route method parameter. This design choice has been motivated by performance and resource consumption considerations. Indeed, this would require to consume and store the entire request body in memory before invoking the method. As a result, multipart data must still be handled manually using and processed in sequence (i.e. a part must be fully consumed before we can consume the next one).
Response body
The response body is specified by the return type of the route method.
@WebRoute(path = "/{id}", method = Method.GET, produces = MediaTypes.APPLICATION_JSON)
Book get(@PathParam String id);
As for the request body, the response body can be reactive if specified as a Mono<T>, a Flux<T> or more broadly as a Publisher<T>:
@WebRoute(path = "/{id}", method = Method.GET, produces = MediaTypes.APPLICATION_JSON)
Mono<Book> get(@PathParam String id);
Depending on the media type converter, partial responses can be sent to the client as soon as they are complete. For instance a stream of responses can be sent to a client as follows:
@WebRoute(path = "/", method = Method.GET, produces = MediaTypes.APPLICATION_X_NDJSON)
Publisher<Book> list();
In the preceding example, as soon as a book is retrieved from a data store it can be sent to the client which can then process responses as soon as possible reducing the latency and resource consumption on both client and server. The response content type is application/x-ndjson, so each book is encoded in JSON before a newline delimiter to let the client detects partial responses as defined by the ndjson format.
Server-sent events
Server-sent events can be streamed in the response body when declared together with a server-sent event factory route method parameter. A server-sent event factory can be bound to a route method parameter using the @SseEventFactory annotation.
In the following example, we declare a basic server-sent events Web route producing events with a String message:
@WebRoute(path = "/event", method = Method.GET)
Publisher<WebResponseBody.SseEncoder.Event<String>> getBookEvents(@SseEventFactory WebResponseBody.SseEncoder.EventFactory<String> events);
Server-sent event return type can be any of Mono<WebResponseBody.SseEncoder.Event<T>> if only one event is expected, Flux<WebResponseBody.SseEncoder.Event<T>> if multiple events are expected or more broadly Publisher<WebResponseBody.SseEncoder.Event<T>>.
By default, the media type of a server-sent event message is text/plain but it can be encoded using a specific media type converter as well by specifying a media type in the @SseEventFactory annotation.
We can rewrite previous example with messages of a custom type serialized in JSON as follows:
@WebRoute(path = "/event", method = Method.GET)
public Publisher<WebResponseBody.SseEncoder.Event<BookEvent>> getBookEvents(@SseEventFactory(MediaTypes.APPLICATION_JSON) WebResponseBody.SseEncoder.EventFactory<BookEvent> events) {
return Flux.interval(Duration.ofSeconds(1))
.map(seq -> events.create(
event -> event
.id(Long.toString(seq))
.event("bookEvent")
.value(new BookEvent("some book event"))
)
);
}
Contextual parameters
A contextual parameter is directly related to the context into which an exchange is processed in the route method, it can be injected in the route method by specifying a method parameter of a supported contextual parameter type.
WebExchange
The underlying Web exchange can be injected by specifying a method parameter of a type assignable from WebExchange.
@WebRoute(method = Method.POST, consumes = MediaTypes.APPLICATION_JSON)
Mono<Void> create(@Body Mono<T> resource, WebExchange<?> exchange) throws BadRequestException;
The exchange gives full access to the underlying request and response. Although it allows to manipulate the request and response bodies, this might conflict with the generated Web route and as a result the exchange should only be used to access request parameters, headers, cookies... or specify a specific response status, response cookies or headers...
The Web exchange also gives access to the exchange context, if a route handler requires a particular context type, it can be specified as a type parameter as follows:
@WebRoute(method = Method.POST, consumes = MediaTypes.APPLICATION_JSON)
Mono<Void> create(@Body Mono<T> resource, WebExchange<SecurityContext> exchange) throws BadRequestException;
Context types declared in a declarative Web route are aggregated in the WebServer bean by the Inverno Web compiler plugin in the same way as for Web server configurers. However, declarative Web routes make it possible to use intersection types when multiple context types are expected using a type variable which brings more flexibility.
@WebRoute(method = Method.POST, consumes = MediaTypes.APPLICATION_JSON)
<E extends TracingContext & SecurityContext> Mono<Void> create(@Body Mono<T> resource, WebExchange<E> exchange) throws BadRequestException;
When declaring generic context types, we must make sure they are all consistent (i.e. there is one type that is assignable to all others). When declaring a route using generic context type, it is then good practice to use upper bound wildcards as follows:
@WebRoute(method = Method.POST, consumes = MediaTypes.APPLICATION_JSON)
Mono<Void> create(@Body Mono<T> resource, WebExchange<SecurityContext<? extends PersonIdentity, ? extends AccessController>> exchange) throws BadRequestException;
Previous code basically means that the route requires a SecurityContext with any PersonIdentity types and any AccessContoller types. This is quite different if we defined it as SecurityContext<PersonIdentity, AccessController>, in the first case we can assign SecurityContext<PersonIdentity, RoleBasedAccessController> whereas in the second case we can only assign SecurityContext<PersonIdentity, RoleBasedAccessController>. Using upper bound wildcards then provides greater flexibility and more integration options: routes basically don't have to be defined using the same context type definition.
Exchange context
The exchange context can also be injected directly by specifying a method parameter of a type assignable from ExchangeContext.
@WebRoute(path = "/{id}", method = Method.GET, produces = MediaTypes.APPLICATION_JSON)
Mono<T> get(@PathParam String id, WebContext webContext);
As for the Web exchange, it is possible to specify intersection types using a type variable:
@WebRoute(path = "/{id}", method = Method.GET, produces = MediaTypes.APPLICATION_JSON)
<E extends WebContext & InterceptorContext> Mono<T> get(@PathParam String id, E context);
As before, context types declared in a declarative Web route are aggregated in the WebServer bean by the Inverno Web compiler plugin.
Declarative WebSocket route
In a similar way to a Web route, a WebSocket route is declared using the @WebSocketRoute annotation with slightly different semantic and bindings. A WebSocket exchange is essentially defined by an inbound stream of messages and an outbound stream of messages.
WebSocket routes are defined as methods in a Web controller with the following rules:
- The WebSocket
BaseWeb2SocketExchange.Inboundmay be injected as method parameter. - The WebSocket inbound may be injected as method parameter as a
Mono<T>, aFlux<T>or more broadly as aPublisher<T>. When defined that way, theBaseWeb2SocketExchange.Inboundcan not be injected as method parameter. - The WebSocket
BaseWeb2SocketExchange.Outboundmay be injected as method parameter and if so the method must bevoid. - The WebSocket outbound may be specified as method's return type as a
Mono<T>, aFlux<T>or more broadly as aPublisher<T>which closes the WebSocket by default on terminate. When defined that way, theBaseWeb2SocketExchange.Outboundcan not be injected as method parameter. - The
Web2SocketExchangemay always be injected as method parameter. - The exchange context may be injected as method parameter just like for regular Web routes.
- Any of
@PathParam,@QueryParam,@HeaderParamor@CookieParammay be specified as method parameter just like for regular Web routes.
Routing rules
WebSocket routing rules, as defined in the Web routing API, are specified in a single @WebSocketRoute annotation on a Web controller method. It allows to define paths, produced languages, supported subprotocols and the message type consumed and produced by the WebSocket routes that route a matching request to the handler implemented by the method.
A basic WebSocket route consuming and producing JSON text messages can be declared as follows:
@WebSocketRoute( path = "/chat", subprotocol = { "json" } )
Flux<Message> chat(Flux<Message> inbound);
Note that this exactly corresponds to the Web routing API.
Contextual parameters
The Web2SocketExchange and the exchange context can be injected in the WebSocket route handler method just as for a regular Web route.
@WebSocketRoute( path = "/chat", subprotocol = { "json" } )
Flux<Message> chat(Flux<Message> inbound, Web2SocketExchange<? extends ExchangeContext> webSocketExchange);
@WebSocketRoute( path = "/chat", subprotocol = { "json" } )
<E extends SecurityContext & ChatContext> Flux<Message> chat(Flux<Message> inbound, E context);
WebSocket inbound
The WebSocket inbound can be specified as method parameter in two ways, either by injecting the BaseWeb2SocketExchange.Inbound or by injecting a Mono<T>, a Flux<T> or more broadly as a Publisher<T>.
When specified as BaseWeb2SocketExchange.Inbound parameter, inbound frames or messages can be consumed as defined in the Web Routing API documentation:
@WebSocketRoute( path = "/ws" )
public void webSocket(BaseWeb2SocketExchange.Inbound inbound) {
Flux.from(inbound.messages()).flatMap(WebSocketMessage::stringReduced).subscribe(LOGGER::info);
}
When specified as a Publisher<T> parameter, <T> can be basically a ByteBuf, a String or any types that can be converted using a media type converter matching the negotiated subprotocol.
For instance, raw inbound messages can be consumed as follows:
@WebSocketRoute( path = "/ws" )
public void webSocket(Flux<ByteBuf> inbound) {
inbound.subscribe(message -> {
try {
LOGGER.info(message.toString(Charsets.DEFAULT));
}
finally {
// ByteBuf must be released where they are consumed
message.release();
}
});
}
It is also possible to consume raw frame data composing inbound messages as follows:
@WebSocketRoute( path = "/ws" )
public void webSocket(Flux<Flux<ByteBuf>> inbound) {
inbound
.doOnNext(message -> LOGGER.info("Message start"))
.flatMap(message -> message.doOnComplete(() -> LOGGER.info("Message end")))
.subscribe(message -> {
try {
LOGGER.info(message.toString(Charsets.DEFAULT));
}
finally {
// ByteBuf must be released where they are consumed
message.release();
}
});
}
Finally, inbound messages can also be automatically decoded using a converter matching the subprotocol negotiated during the opening handshake:
@WebSocketRoute( path = "/ws", subprotocol = { "json" } )
public void webSocket(Flux<Message> inbound) {
inbound.subscribe(message -> {
LOGGER.info(message.getNickname() + ": " + message.getMessage());
});
}
WebSocket outbound
The WebSocket outbound can be specified in two ways, either as method parameter by injecting the BaseWeb2SocketExchange.Outbound or as method's return type as a Mono<T>, a Flux<T> or more broadly as a Publisher<T>.
When specified as BaseWeb2SocketExchange.Outbound, outbound frames or messages can be provided as defined in the Web Routing API documentation:
@WebSocketRoute( path = "/ws" )
public void webSocket(BaseWeb2SocketExchange.Outbound outbound) {
outbound.messages(factory -> Flux.interval(Duration.ofSeconds(1)).map(ign -> factory.text(ZonedDateTime.now().toString())));
}
When specified as method's return type as a Publisher<T>, <T> can be basically a ByteBuf, a String or any types that can be converted using a converter matching the negotiated subprotocol.
For instance, String outbound messages can be provided as follows:
@WebSocketRoute( path = "/ws" )
public Flux<String> webSocket() {
return Flux.just("message 1", "message 2", "message 3");
}
It is also possible to produce fragmented raw messages as follows:
@WebSocketRoute( path = "/ws" )
public Flux<Flux<ByteBuf>> webSocket() {
return Flux.just(
Flux.just(
Unpooled.copiedBuffer("message", Charsets.DEFAULT),
Unpooled.copiedBuffer(" 1", Charsets.DEFAULT)
),
Flux.just(
Unpooled.copiedBuffer("message ", Charsets.DEFAULT),
Unpooled.copiedBuffer(" 2", Charsets.DEFAULT)
),
Flux.just(
Unpooled.copiedBuffer("message ", Charsets.DEFAULT),
Unpooled.copiedBuffer(" 3", Charsets.DEFAULT)
)
);
}
Finally, outbound messages can be automatically encoded using a converter matching the subprotocol negotiated during the opening handshake:
@WebSocketRoute( path = "/ws", subprotocol = { "json" } )
public Flux<Message> webSocket() {
return Flux.just(
new Message("john", "message 1"),
new Message("bob", "message 2"),
new Message("alice", "message 3")
);
}
Putting it all together, the simple chat server can be simply implemented as follows:
package io.inverno.example.app_web_server_websocket; import io.inverno.core.annotation.Bean; import io.inverno.core.annotation.Destroy; import io.inverno.core.annotation.Init; import io.inverno.example.app_web_server_websocket.dto.Message; import io.inverno.mod.web.server.annotation.WebController; import io.inverno.mod.web.server.annotation.WebSocketRoute; import reactor.core.publisher.Flux; import reactor.core.publisher.Sinks; @Bean @WebController public class App_web_server_websocketWebController { private Sinks.Many<Message> chatSink; @Init public void init() { this.chatSink = Sinks.many().multicast().onBackpressureBuffer(16, false); } @Destroy public void destroy() { this.chatSink.tryEmitComplete(); } @WebSocketRoute(path = "/ws", subprotocol = "json") public Flux<Message> ws2(Flux<Message> inbound) { inbound.subscribe(message -> this.chatSink.tryEmitNext(message)); return this.chatSink.asFlux(); } }
By default, the WebSocket is closed when the outbound publisher terminates, this behaviour is controlled by the closeOnComplete attribute in the @WebSocketRoute annotation. When set to false, the WebSocket must be eventually closed explicitly:
@WebSocketRoute( path = "/events", subprotocol = { "json" }, closeOnComplete = false )
public Mono<LoginCredentials> events(Flux<Event> inbound, Web2SocketExchange wsExchange) {
inbound.subscribe(event -> {
// do something useful with the events...
...
// ... before closing the WebSocket eventually
wsExchange.close();
});
return Mono.just(new LoginCredentials("user", "password"));
}
Composite Web server module
In a Web module, which requires the web-server module, the Web Inverno compiler plugin generates a single WebServer bean aggregating all route definitions and context types specified in Web configurers or Web controllers beans in the module.
When the web-server module is included in the module, a wrapper bean initializing the root WebServer from the WebServer.Boot bean exposed by the web-server module is generated. When the web-server module is not included in the module (i.e. explicitly excluded in the @Module annotation), a mutating socket bean is created instead. In both cases, Web configurers and Web controllers will be aggregated and corresponding interceptors and routes configured in the WebServer. The resulting WebServer, which is an intercepted Web server when interceptors have been defined, is eventually exposed in the module.
Multiple Web component modules (i.e. defining Web configurer beans and Web controllers but not including the web-server module) can be composed in an enclosing Web server module (i.e. including the web-server module). The WebServer bean being injected top to bottom to component modules which can then all configure interceptors and routes in complete isolation. Interceptors defined in the Web server module are applied to the routes defined in component modules which can also define their own interceptors in complete isolation since interceptors are chained in a tree of Web servers.
Now unlike interceptors, a Web route is unique in the Web server, so it is possible for two component modules to define the same route definition leading to conflicts and unexpected behaviours, the latest definition being the one finally retained in the server.
A generated WebServer bean is always annotated with a @WebRoutes annotation specifying the Web routes it configures. For instance, the bean generated for the module defining the book Web controller should look like:
@WebRoutes({
@WebRoute(path = { "/book/{id}" }, method = { Method.GET }, produces = { "application/json" }),
@WebRoute(path = { "/book" }, method = { Method.POST }, consumes = { "application/json" }),
@WebRoute(path = { "/book/{id}" }, method = { Method.PUT }, consumes = { "application/json" }),
@WebRoute(path = { "/book" }, method = { Method.GET }, produces = { "application/json" }),
@WebRoute(path = { "/book/{id}" }, method = { Method.DELETE })
})
@Wrapper @Bean( name = "webServer", visibility = Bean.Visibility.PRIVATE )
@Generated(value="io.inverno.mod.web.compiler.internal.server.WebServerCompilerPlugin", date = "2024-08-05T14:56:23.929833171+02:00[Europe/Paris]")
public final class App_web_server_WebServer implements Supplier<WebServer<App_web_server_WebServer.Context>> {
...
}
This information is then used by the compiler plugin to statically check that there is no conflicting routes when generating the WebServer bean. It is a good practice to explicitly define the @WebRoutes annotation when defining routes programmatically in a Web configurer, otherwise the compiler can not determine conflict as it does not know the actual routes configured.
Now let's imagine we have created a modular Web application with a book module defining the book Web controller, an admin module defining some admin Web controllers and a top app module composing these modules together with the web-server module.
The module descriptors for each of these modules should look like:
@io.inverno.core.annotation.Module( excludes = { "io.inverno.mod.web.server" } )
module io.inverno.example.web_modular.admin {
requires io.inverno.core;
requires io.inverno.mod.web.server;
exports io.inverno.example.web_modular.admin to io.inverno.example.web_modular.app;
}
@io.inverno.core.annotation.Module( excludes = { "io.inverno.mod.web.server" } )
module io.inverno.example.web_modular.book {
requires io.inverno.core;
requires io.inverno.mod.web.server;
exports io.inverno.example.web_modular.book to io.inverno.example.web_modular.app;
exports io.inverno.example.web_modular.book.dto to com.fasterxml.jackson.databind;
}
@io.inverno.core.annotation.Module
module io.inverno.example.web_modular.app {
requires io.inverno.mod.boot;
requires io.inverno.mod.web.server;
requires io.inverno.example.web_modular.admin;
requires io.inverno.example.web_modular.book;
}
The first thing to notice is that the web-server module is excluded from admin and book modules since we don't want to start a Web server in these modules, we only need the Web routing API in order to define Web controllers and generate the WebServer beans as mutating socket beans. As a consequence, the boot module which provides converters and net service required to create and start the web-server module is also not required but the io.inverno.core module is still required. Finally, we must export packages containing the generated module classes to the app module in order to be able to define the global exchange context in the generated WebServer bean in the app module.
Modules should all compile just fine resulting in two WebServer mutating socket beans being generated in admin and book module and a WebServer wrapper bean being generated in the app module. Looking at the dependency injection graph, the WebServer bean exposed in the app module should be injected in the admin and book module.
The same principles applies if multiple modules like admin or book are cascaded into one another: a WebServer bean aggregating module's Web configurers and Web controllers at a given level is injected in the WebServer bean aggregating module's Web configurers and Web controllers in the next level and so on.
Automatic OpenAPI specifications
Besides facilitating the development of REST and Web resources in general, Web controllers also simplify documentation. The Web Inverno compiler plugin can be setup to generate Open API specifications from the Web controller classes defined in a module and their JavaDoc comments.
Writing JavaDoc comments is something natural when developing in the Java language, with this approach, a REST API can be documented just as you document a Java class or method, documentation is written once and can be used in both Java and other languages and technologies using the generated Open API specification.
In order to activate this feature the inverno.web.generateOpenApiDefinition annotation processor option must be enabled when compiling a Web server module. This can be done on the command line: java -Ainverno.web.generateOpenApiDefinition=true ... or in the Maven compiler plugin configuration in the build descriptor:
<project>
<build>
<pluginManagement>
<plugins>
<plugin>
<groupId>org.apache.maven.plugins</groupId>
<artifactId>maven-compiler-plugin</artifactId>
<configuration>
<compilerArgs combine.children="append">
<arg>-Ainverno.web.generateOpenApiDefinition=true</arg>
</compilerArgs>
</configuration>
</plugin>
</plugins>
</pluginManagement>
</build>
</project>
The compiler then generates an Open API specification in META-INF/inverno/web/openapi.yml for any module defining one or more Web controllers.
The previous book resource could then be documented as follows:
/**
* The book resource.
*/
@Bean
@WebController(path = "/book")
public class BookResource {
/**
* Creates a book resource.
*
* @param book a book
* @param exchange the Web exchange
*
* @return the book resource has been successfully created
* @throws BadRequestException A book with the same ISBN reference already exist
*/
@WebRoute(method = Method.POST, consumes = MediaTypes.APPLICATION_JSON)
public Mono<Void> create(@Body Mono<Book> book, WebExchange exchange) throws BadRequestException { ... }
/**
* Updates a book resource.
*
* @param isbn the reference of the book resource to update
* @param book the updated book resource
*
* @return the book resource has been successfully updated
* @throws NotFoundException if the specified reference does not exist
*/
@WebRoute(path = "/{isbn}", method = Method.PUT, consumes = MediaTypes.APPLICATION_JSON)
public Mono<Void> update(@PathParam String isbn, @Body Mono<Book> book) throws NotFoundException { ... }
/**
* Returns the list of book resources.
*
* @return a list of book resources
*/
@WebRoute(method = Method.GET, produces = MediaTypes.APPLICATION_JSON)
public Flux<Book> list();
/**
* Returns the book resource identified by the specified ISBN.
*
* @param isbn an ISBN
*
* @return the requested book resource
* @throws NotFoundException if the specified reference does not exist
*/
@WebRoute(path = "/{isbn}", method = Method.GET, produces = MediaTypes.APPLICATION_JSON)
public Mono<Book> get(@PathParam String isbn) throws NotFoundException { ... }
/**
* Deletes the book resource identified by the specified ISBN.
*
* @param isbn an ISBN
*
* @return the book resource has been successfully deleted
* @throws NotFoundException if the specified reference does not exist
*/
@WebRoute(path = "/{isbn}", method = Method.DELETE)
public Mono<Void> delete(@PathParam String isbn) { ... }
}
Note that just like the javadoc tool, the Web compiler plugin takes inheritance into account when resolving JavaDoc comments and as a result, it is possible to define JavaDoc comments in an interface and enrich or override them in the implementation classes.
By default, the normal HTTP status code responded by a route is assumed to be 200 but it is possible to specify a custom status code using the @inverno.web.status tag. For instance the book creation route which actually responds with a 201 status should be documented as follows:
public class BookResource {
/**
* Creates a book resource.
*
* @param book a book
* @param exchange the Web exchange
*
* @return {@inverno.web.status 201} the book resource has been successfully created
* @throws BadRequestException A book with the same ISBN reference already exist
*/
@WebRoute(method = Method.POST, consumes = MediaTypes.APPLICATION_JSON)
public Mono<Void> create(@Body Mono<Book> book, WebExchange exchange) throws BadRequestException { ... }
...
}
Multiple
@returnstatements can be specified if multiple response statuses are expected. However, this might raise issues during the generation of the JavaDoc, you can bypass this by disabling the linter with-Xdoclint:noneoption.
This tag can also be used to specify error status code in @throws statements, but this is usually not necessary since the Web compiler plugin automatically detects status code for regular HTTPException such as BadRequestException (400) or NotFoundException (404).
The Web compiler plugin generates, per module, one Open API specification and one WebServer bean aggregating all routes from all Web configurers and Web controllers. As a result the general API documentation corresponds to the general documentation of the module which is defined in the module descriptor JavaDoc comment.
For instance, we can describe the API exposed by the book module in the module descriptor including the API version which should normally match the module version:
/**
* This is a sample Book API which demonstrates Inverno Web server module capabilities.
*
* @author <a href="mailto:jeremy.kuhn@inverno.io">Jeremy Kuhn</a>
*
* @version 1.2.3
*/
@io.inverno.core.annotation.Module( excludes = { "io.inverno.mod.web.server" } )
module io.inverno.example.web_modular.book {
requires io.inverno.core;
requires io.inverno.mod.web.server;
exports io.inverno.example.web_modular.book to io.inverno.example.web_modular.app;
exports io.inverno.example.web_modular.book.dto to com.fasterxml.jackson.databind;
}
These specifications can also be exposed in the Web server using the OpenApiRoutesConfigurer as described in the Web server documentation.
If we build and run the modular book application and access http://locahost:8080/open-api in a Web browser we should see a Swagger UI loaded with the Open API specifications of the admin and book modules:
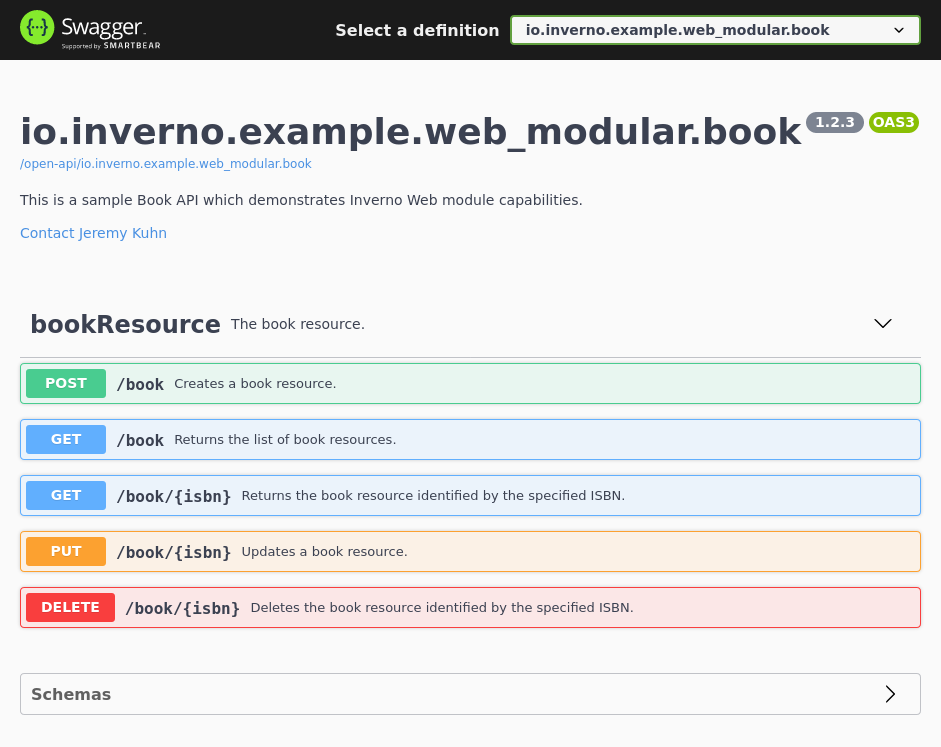
It is also possible to target a single specification by specifying the module name in the URI, for instance http://locahost:8080/open-api/io.inverno.example.web_modular.book:
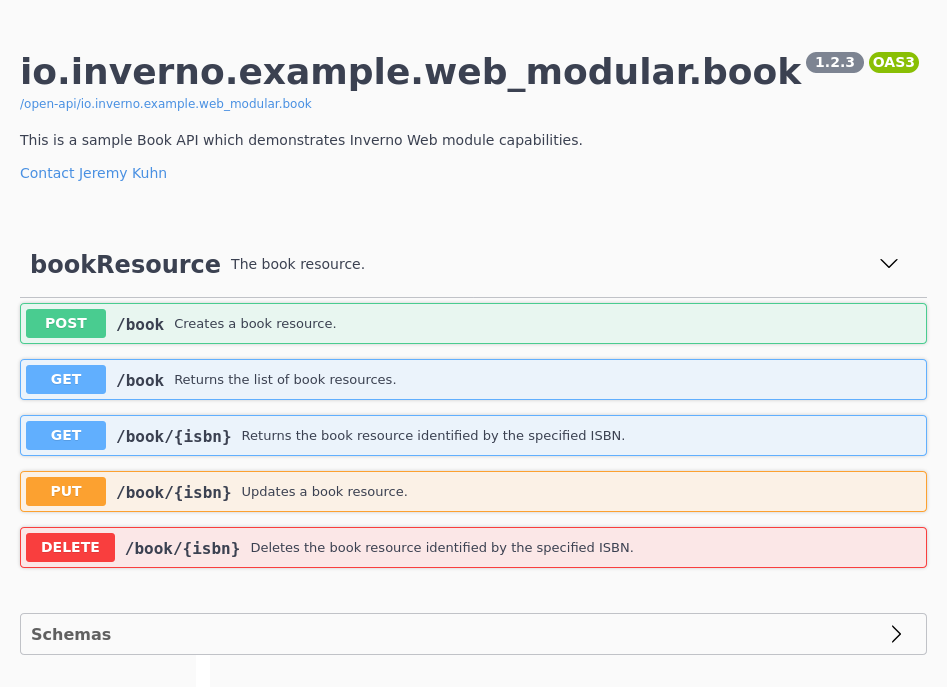
Finally, Open API specifications formatted in YAML can be retrieved as follows:
$ curl http://locahost:8080/open-api/io.inverno.example.web_modular.admin
openapi: 3.0.3
info:
title: 'io.inverno.example.web_modular.admin'
version: ''
...
Session
The Inverno session module defines an API for managing sessions in an application.
A session is used to persist information when a specific client access an application and make them available between requests. A session is ephemeral by design and is set to expire some time in the future either after a period of inactivity or at a fixed time. It is uniquely identified by a session id initially generated by the application for a particular client which must securely store it and provide it in each subsequent request in order for the application to resolve the session.
The session id is usually an opaque identifier generated in a way that ensures that there is a negligible probability that the same value will be accidentally assigned to a different session. But, it can also be used to convey stateless session data that will then be stored on the client side in addition to the stateful data stored on the application side in which case the session identifier is no longer opaque and must at least guarantees integrity and optionally confidentiality.
In order to use the Inverno session module, we need to declare a dependency in the module descriptor:
module io.inverno.example.app {
requires io.inverno.mod.session;
}
And also declare that dependency in the build descriptor:
Using Maven:
<project>
<dependencies>
<dependency>
<groupId>io.inverno.mod</groupId>
<artifactId>inverno-session</artifactId>
</dependency>
</dependencies>
</project>
Using Gradle:
compile 'io.inverno.mod:inverno-session:1.13.0'
Then multiple optional dependencies can be included depending on the needs:
- a dependency to the boot module which provides the
Reactorshould be added if in-memory session stores are to be used. - a dependency to the redis module and an implementation module should be added if Redis session stores are to be used.
- a dependency to the security-jose module if JWT sessions are to be used.
module io.inverno.example.app {
requires io.inverno.mod.boot;
requires io.inverno.mod.redis.lettuce;
requires io.inverno.mod.security.jose;
}
Using Maven:
<project>
<dependencies>
<dependency>
<groupId>io.inverno.mod</groupId>
<artifactId>inverno-boot</artifactId>
</dependency>
<dependency>
<groupId>io.inverno.mod</groupId>
<artifactId>inverno-redis-lettuce</artifactId>
</dependency>
<dependency>
<groupId>io.inverno.mod</groupId>
<artifactId>inverno-security-jose</artifactId>
</dependency>
</dependencies>
</project>
Using Gradle:
compile 'io.inverno.mod:inverno-boot:1.13.0'
compile 'io.inverno.mod:inverno-redis-lettuce:1.13.0'
compile 'io.inverno.mod:inverno-security-jose:1.13.0'
As stated before, the main purpose of sessions in an application is to be able to persist client specific data between requests. This can address several use cases such as authentication, shopping cart... Implementing sessions requires for the application to use a session store for creating and resolving sessions and for the client to provide the session id obtained from the initial request in each subsequent requests made to the application.
For instance, using an in-memory session store to store a counter, the application might look like:
package io.inverno.example.app_session;
import io.inverno.core.annotation.Bean;
import io.inverno.core.annotation.Wrapper;
import io.inverno.core.v1.Application;
import io.inverno.mod.base.concurrent.Reactor;
import io.inverno.mod.session.InMemoryBasicSessionStore;
import io.inverno.mod.session.Session;
import io.inverno.mod.session.SessionStore;
import java.util.concurrent.atomic.AtomicInteger;
import java.util.function.Supplier;
import reactor.core.publisher.Mono;
public class Main {
@Wrapper
@Bean( visibility = Bean.Visibility.PRIVATE )
public static class SessionStoreWrapper implements Supplier<SessionStore<AtomicInteger, Session<AtomicInteger>>> {
private final Reactor reactor;
public SessionStoreWrapper(Reactor reactor) {
this.reactor = reactor;
}
@Override
public SessionStore<AtomicInteger, Session<AtomicInteger>> get() {
return InMemoryBasicSessionStore.<AtomicInteger>builder(this.reactor).build();
}
}
@Bean
public static class SomeService {
private final SessionStore<AtomicInteger, Session<AtomicInteger>> sessionStore;
public SomeService(SessionStore<AtomicInteger, Session<AtomicInteger>> sessionStore) {
this.sessionStore = sessionStore;
}
public String openSession() {
return this.sessionStore
.create()
.map(Session::getId)
.block();
}
public int incrementCounter(String sessionId) throws IllegalStateException {
return this.sessionStore
.get(sessionId)
.switchIfEmpty(Mono.error(new IllegalStateException("Session does not exist or has expired")))
.flatMap(session -> session.getData(AtomicInteger::new)
.flatMap(counter -> {
int counterValue = counter.incrementAndGet();
return session.save().thenReturn(counterValue);
})
)
.block();
}
public void closeSession(String sessionId) {
this.sessionStore
.get(sessionId)
.flatMap(Session::invalidate)
.block();
}
}
public static void main(String[] args) {
App_session appSession = Application.run(new App_session.Builder());
try {
String sessionId = appSession.someService().openSession();
System.out.println(appSession.someService().incrementCounter(sessionId));
System.out.println(appSession.someService().incrementCounter(sessionId));
System.out.println(appSession.someService().incrementCounter(sessionId));
appSession.someService().closeSession(sessionId);
try {
appSession.someService().incrementCounter(sessionId);
}
catch(IllegalStateException e) {
System.err.println(e.getMessage());
}
}
finally {
appSession.stop();
}
}
}
We can run the application which should display 1, 2, 3, Session does not exist or has expired:
$ mvn inverno:run
...
2025-02-24 10:19:29,379 INFO [main] i.i.t.a.App_session - Starting Module io.inverno.test.app_session...
2025-02-24 10:19:29,379 INFO [main] i.i.m.b.Boot - Starting Module io.inverno.mod.boot...
2025-02-24 10:19:29,480 INFO [main] i.i.m.b.Boot - Module io.inverno.mod.boot started in 100ms
2025-02-24 10:19:29,480 INFO [main] i.i.t.a.App_session - Module io.inverno.test.app_session started in 104ms
2025-02-24 10:19:29,481 INFO [main] i.i.c.v.Application - Application io.inverno.test.app_session started in 119ms
1
2
3
Session does not exist or has expired
2025-02-24 10:19:29,511 INFO [main] i.i.t.a.App_session - Stopping Module io.inverno.test.app_session...
2025-02-24 10:19:29,512 INFO [main] i.i.m.b.Boot - Stopping Module io.inverno.mod.boot...
2025-02-24 10:19:29,513 INFO [main] i.i.m.b.Boot - Module io.inverno.mod.boot stopped in 0ms
2025-02-24 10:19:29,513 INFO [main] i.i.t.a.App_session - Module io.inverno.test.app_session stopped in 1ms
Above example gives an overview of the session lifecycle which is first created in SomeService#openSession(), resolved and saved after initializing and/or updating session data in SomeService#incrementCounter(String) and finally invalidated in SomeService#closeSession(String). Session data is strongly typed which allows to validate the code statically at compile time.
It is important to notice that the session must be saved in order for session data to be persisted. This actually depends on the session store implementation: although this is a must when using an external data store like Redis or a RDBMS for obvious reasons, an in-memory session store may be more permissive, for instance we could have initialized the session data once in
SomeService#openSession()to have them set in the actual stored session and then simply resolve and update them inSomeService#incrementCounter(String)because, once session data is initialized,Session#getData()will always return the same instance. In practice, you should always assume that session data and the session in general must be saved explicitly at the end of a request processing to keep session consistent.
Session store
The SessionStore manages sessions and their lifecycle in an application, it is used to create, resolve, save and invalidate sessions. In practice, it is meant to be used in intermediary services (e.g. exchange interceptors in a Web application) that implicitly create, resolve and provide the session to the actual application services.
The following example shows how a session store is used to create, resolve, save and remove a session:
SessionStore<Map<String, String>, Session<Map<String, String>>> sessionStore = ...
Session<Map<String, String>> newSession = sessionStore.create().block(); // 1
String sessionId = newSession.getId();
Session<Map<String, String>> resolvedSession = sessionStore // 2
.get(sessionId)
.switchIfEmpty(Mono.error(new IllegalStateException("Session does not exist or has expired"))) // 3
.block();
Map<String, String> sessionData = resolvedSession.getData(HashMap::new).block(); // 4
sessionData.put("someAttribute", "someValue"); // 5
sessionStore.save(resolvedSession).block(); // 6
sessionStore.remove(sessionId).block(); // 7
- A new session is created by generating a unique session id and storing the newly created session in a data store. From there the session store monitors the session which is set to expire either after a period of inactivity or at a specific time in the future.
- Resolve the existing session identified by the provided session id.
- A session might not exist for the specified session id either because the provided session id is invalid or because the session has expired.
- Session data are retrieved from the session, they can be initialized when missing by specifying a supplier.
- Session data can then be updated.
- The session must be stored for the data or any other modification to be persisted.
- Eventually the session is removed/invalidated.
The session and its data are independent in a sense that they can be resolved independently, the Session is relevant when there is a need to update metadata such as expiration settings, save (including data) or invalidate the session, but when data are only needed for read-only, they can be directly resolved:
Map<String, String> sessionData = sessionStore.getData(sessionId).block();
String someAttributeValue = sessionData.get("someAttribute");
This allows to optimize session access with some implementations, but it is important to remember that any update to the session data thus obtained might not be persisted and that the session last accessed time will not be updated as well.
A session identifier is a string generated in such a way that there is a negligible probability that the same value will be accidentally assigned to a different session. Session store implementations delegates the generation of session ids to a SessionIdGenerator. The API provides a simple implementation generating UUID optionally encoded in Base64:
SessionIdGenerator<Map<String, String>, Session<Map<String, String>>> base64UUIDSessionIdGenerator = SessionIdGenerator.uuid(); // encoded in Base64 by default
SessionIdGenerator<Map<String, String>, Session<Map<String, String>>> uuidSessionIdGenerator = SessionIdGenerator.uuid(false); // not encoded in Base64
A session identifier is usually opaque, but it can also be used to convey stateless session data that are then stored client side. This is the case for JWT session stores that uses JWTs as session identifiers.
The session API provides several SessionStore implementations for storing basic or JWT sessions in-memory or in a Redis data store: InMemoryBasicSessionStore, RedisBasicSessionStore, InMemoryJWTSessionStore and RedisJWTSessionStore.
In the case of basic session stores, sessions are stored exclusively in a data store on the application side. In the case of JWT session stores, sessions are stored in both the session id on the client side and in a data store on the application side.
Session
A Session is created or resolved from a SessionStore, unlike the SessionStore which is not meant to be manipulated directly in the application, the Session is directly exposed in the application. It gives access to session data and metadata such as the session id and expiration settings, it also exposes session lifecycle operations to refresh the session id and save or invalidate the session.
The session lifecycle is as follows:
- On creation an empty session is persisted in the session store. On resolution, a local session is loaded if the session has not expired.
- From there the session can be used and updated in the application.
- At the end of the processing of client request, the session must be saved to persist any updates made to the local session.
- Eventually the session expires or is invalidated and removed from the session store.
It is important to understand that when interacting with a session, changes are not persisted on the fly implicitly, the local session must be saved explicitly in order to persist any change in the session store. This also means that concurrent access to sessions is not supported and might lead to data being overwritten, but that is not the purpose of session anyway. Using an RDBMS or any data store supporting transactions is the recommended way to avoid conflicting updates in the presence of concurrent access.
It exposes two session identifiers: the original session id which is the one that was resolved with the session or null for a newly created session and the actual session id which only differs from the original one when refreshed by the session either explicitly by invoking Session#refreshId(true) or implicitly if needed when saving the session.
Considering a newly created session:
SessionStore<SessionData, Session<SessionData>> sessionStore = ...
Session<SessionData> session = sessionStore.create().block();
String originalSessionId = session.getOriginalId(); // null because this is a new session
String sessionId = session.getId(); // the session identifier
Considering an existing session:
SessionStore<SessionData, Session<SessionData>> sessionStore ...
Session<SessionData> session = sessionStore.get("123456").block();
String originalSessionId = session.getOriginalId(); // the original session id
String sessionId = session.getId(); // same as original session id since it was not refreshed
Considering an existing session for which the session id is explicitly refreshed:
SessionStore<SessionData, Session<SessionData>> sessionStore ...
Session<SessionData> session = sessionStore.get("123456").block();
session.refreshId(true).block();
String originalSessionId = session.getOriginalId(); // the original session id
String sessionId = session.getId(); // different from the original session id since it was refreshed
A session id is refreshed in order to limit replay attacks or when using some implementations that stores data inside the session id when they have been updated. The Session#refreshId(boolean) method allows to force session id refresh as in above example or to only do it when needed, typically in case data stored in the session id has been modified. Session#getOriginalId() and Session#getId() can be used to determine whether the session id was indeed refreshed.
A session is ephemeral by design and set to expire some time in the future either after a period of inactivity or at a specific time. These expiration settings are initialized by the session store when the session is created, they are exposed on the session instance which also allows to change them during the lifetime of the session.
In case the session is set to expire after a period of inactivity the maximum inactive interval should be set. The session expires when the last accessed time happened before the current time minus the interval, the actual expiration time is returned by Session#getExpirationTime() which is calculated from the last accessed time and the maximum inactive interval.
Session<SessionData> session = ...
long lastAccessedTime = session.getLastAccessedTime();
Long maxInactiveInterval = session.getMaxInactiveInterval(); // null when the session is set to expire at a specific time in the future
long expirationTime = session.getExpirationTime(); // lastAccessedTime + maxInactiveInterval
By default, a session store should set a new session to expire after Session#DEFAULT_MAX_INACTIVE_INTERVAL = 1800000L milliseconds (i.e. 30 minutes) of inactivity, but be aware that this is implementation specific. The maximum inactive interval can be changed on a particular session as follows:
session.setMaxInactiveInterval(300000L); // set session to expire after 5 minutes of inactivity
Above code overrides specific expiration time if any was set.
In case the session is set to expire at a specific time in the future, the maximum inactive interval is null.
Session<SessionData> session = ...
session.setExpirationTime(System.currentTimeMillis() + 600000L); // expires in 10 minutes
long expirationTime = session.getExpirationTime(); // the expiration time that was set
Long maxInactiveInterval = session.getMaxInactiveInterval(); // null since explicit expiration time has been set
As when setting the maximum inactive interval, setting an explicit expiration time overrides the maximum inactive interval which is then set to null.
The Session also gives access to the session data which is strongly typed and independent of the session, it is not automatically resolved along with the session and has to be resolved and set on the session:
Session<SessionData> session = ...
SessionData sessionData = session.getData(SessionData::new).block(); // create data when missing
String someData = sessionData.getSomeData(); // update data
sessionData.setSomeData("Updated data");
session.setData(sessionData); // set data explicitly
session.save().block(); // save the session
When a session is saved the session store must determine whether data should be saved, so basically whether they have been modified. The behaviour depends on the implementation, but in general it is fair to assume that data will be saved if they have been resolved and then explicitly set by invoking Session#setData(Object). The API provides the SessionDataSaveStrategy to influence this behaviour, it defines a single method SessionDataSaveStrategy#getAndSetSaveState(Object, boolean) which must determine when the provided session data has been modified and requires to be saved. The API provides two default implementations:
SessionDataSaveStrategy.onSetOnly()which indicates that session data shall only be saved whenSession#setData(Object)was invoked (i.e.getAndSetSaveStatealways returnsfalse).SessionDataSaveStrategy.onGet()which indicates that session data shall be saved whenever they have been resolved from the session usingSession#getData()(i.e.getAndSetSaveStatealways returnstrue).
The default behaviour for most session store implementations is to rely on SessionDataSaveStrategy#onGet() to make sure resolved session data are saved when Session#save() is invoked with the consequence that they are always saved even if they were not modified. This can be optimized by providing adhoc implementations for specific session data types that precisely detect modifications (this typically requires to be able to define some state in the session data which is set when data are modified).
It is not possible to rely on
Object#equals(Object)to detect changes in the session data because there is only one session data instance, there is no original instance to compare it to. It would have been possible to achieve this it by duplicating the session data instance, but this is not always possible and might have a significant impact on memory which is why theSessionDataSaveStrategywas introduced.
A session can be invalidated during the processing of a request by invoking Session#invalidate() as follows:
Session<SessionData> session = ...
session.invalidate().block();
After being invalidated a session is removed from the session store and can no longer be saved or used.
The session API differentiates two kinds of session:
- Basic session using opaque identifiers and storing session data in a data store on application side.
- JWT session using JWT identifiers and storing session data in both the session id kept on the client side and a data store on application side.
Basic session
A basic session uses an opaque session id only used to resolve the session from the session store on application side. The API provides two implementations: InMemoryBasicSessionStore and RedisBasicSessionStore. They both rely on basic SessionIdGenerator, typically the SessionIdGenerator.uuid(), although custom implementations can be specified as well.
In-memory Basic session store
The InMemoryBasicSessionStore implementation stores session in-memory in a concurrent map, it is suited for simple or test applications that do not require to have sessions shared across multiple nodes. It requires the Reactor to schedule the session clean task removing expired sessions.
Reactor reactor = ...
InMemoryBasicSessionStore<SessionData> sessionStore = InMemoryBasicSessionStore
.<SessionData>builder(reactor, SessionIdGenerator.uuid(true)) // generate Base64 encoded UUID as session id
.cleanPeriod(InMemoryBasicSessionStore.DEFAULT_CLEAN_PERIOD) // 5 minutes
.maxInactiveInterval(Session.DEFAULT_MAX_INACTIVE_INTERVAL) // 30 minutes
.expireAfterPeriod(Session.DEFAULT_MAX_INACTIVE_INTERVAL) // overrides max inactive interval which is set by default
.build();
Redis Basic session store
The RedisBasicSessionStore implementation stores sessions in a Redis data store, it is suited when there is a need to share sessions across multiple nodes. It requires a RedisClient for storing sessions in the Redis data store, an ObjectMapper and the session data type for deserializing/serializing session data from/to the Redis data store.
RedisClient<String, String> redisClient = ...
ObjectMapper mapper = ...
RedisBasicSessionStore<SessionData> sessionStore = RedisBasicSessionStore.<SessionData>builder(redisClient, mapper, SessionData.class, SessionIdGenerator.uuid())
.keyPrefix(RedisBasicSessionStore.DEFAULT_KEY_PREFIX)
.maxInactiveInterval(Session.DEFAULT_MAX_INACTIVE_INTERVAL) // 30 minutes
.expireAfterPeriod(Session.DEFAULT_MAX_INACTIVE_INTERVAL) // overrides max inactive interval which is set by default
.sessionDataSaveStrategy(SessionDataSaveStrategy.onSetOnly()) // only save data when setData() is explicitly invoked on the session
.build();
When not specified, the default SessionDataSaveStrategy is SessionDataSaveStrategy#onGet() which means session data are saved whenever they are resolved.
Session are automatically expired by Redis using PEXPIRE or PEXPIREAT set on the session Redis key.
Note that a two minutes buffer is used to make sure sessions can still be accessed at the limits.
JWT session
Unlike the basic session, which uses opaque session id, a JWT session uses a JWT as session id which allows to store part of the session data in the session id itself and keep it on the client side. The main session reference is still kept in a data store on the application side and used in the end to determine whether a session has expired or has been invalidated, protecting against replay attacks.
A JWT session defines two kinds of session data which are both strongly typed:
- regular stateful data stored application side in a data store, resolved and set using
JWTSession#getData()andJWTSession#setData(Object). - stateless data stored in the JWT session id stored client side, get and set using
JWTSession#getStatelessData()andJWTSession#setStatelessData(Object).
Since stateless data are stored in the session id, any change should trigger a refresh of the session id. As for regular session data, implementations can rely on SessionDataSaveStrategy to determine whether a refresh is required. Considering the side effects a refresh of the session id might induce the safest and default approach chosen in the session API implementations is to use the SessionDataSaveStrategy.onSetOnly() strategy which requires to explicitly invoke JWTSession#setStatelessData(Object) to trigger the session refresh on save.
JWT sessions enables interesting setups where session data can be stored entirely client side leaving only a reference on the application side optimizing resource usage on the server.
JWTSessionStore<Void, AuthenticationData> sessionStore = ...
JWTSession<Void, AuthenticationData> jwtSession = sessionStore.create().block();
jwtSession.setStatelessData(new AuthenticationData("jsmith"));
jwtSession.save().block(); // trigger refresh session id since stateless data has been set
jwtSession.getId(); // JWT containing authentication data
Note that such setup is particularly suited when session data barely change during the lifetime of the session which is typically the case of authentication data.
The API provides two implementations: InMemoryJWTSessionStore and RedisJWTSessionStore which rely on a JWTSessionIdGenerator to generate JWT session identifiers.
JWTSessionIdGenerator
A JWTSessionIdGenerator is used to generate JWT session identifiers containing session metadata, namely expiration settings, and stateless session data as JWT claims. The API allows to create two kinds of JWT session id generator: a JWS generator which guarantees integrity and a JWE generator which guarantees both integrity and confidentiality.
A JWS JWTSessionIdGenerator can be obtained as follows:
JWKService jwkService = ...
JWTService jwtService = ...
String keyId = UUID.randomUUID().toString();
jwkService.oct().generator()
.keyId(keyId)
.algorithm(OCTAlgorithm.HS256.getAlgorithm())
.generate()
.map(JWK::trust)
.flatMap(jwkService.store()::set)
.block();
JWTSessionIdGenerator<SessionData, StatelessSessionData> jwtsSessionIdGenerator = JWTSessionIdGenerator.jws(jwtService, headers -> headers
.keyId(keyId)
.algorithm(OCTAlgorithm.HS256.getAlgorithm())
);
A JWE JWTSessionIdGenerator can be obtained as follows:
JWKService jwkService = ...
JWTService jwtService = ...
String keyId = UUID.randomUUID().toString();
jwkService.ec().generator()
.keyId(keyId)
.algorithm(ECAlgorithm.ECDH_ES.getAlgorithm())
.curve(ECCurve.P_256.getCurve())
.generate()
.map(JWK::trust)
.flatMap(jwkService.store()::set)
.block();
JWTSessionIdGenerator<SessionData, StatelessSessionData> jwteSessionIdGenerator = JWTSessionIdGenerator.jwe(jwtService, header -> header
.keyId(keyId)
.algorithm(ECAlgorithm.ECDH_ES.getAlgorithm())
.encryptionAlgorithm(OCTAlgorithm.A256GCM.getAlgorithm())
);
In-memory JWT session store
The InMemoryJWTSessionStore stores stateful session data in-memory in a concurrent map, it is suited for simple or test applications that do not require to have sessions shared across multiple nodes. It requires a JWTSessionIdGenerator for generating JWT session ids, the Reactor to schedule the session clean task removing expired sessions, an ObjectMapper and the stateless session data type for deserializing stateless session data from the JWT claim.
Reactor reactor = ...
ObjectMapper mapper = ...
JWTSessionIdGenerator<SessionData, StatelessSessionData> jwtSessionIdGenerator = ...
InMemoryJWTSessionStore<SessionData, StatelessSessionData> jwtSessionStore = InMemoryJWTSessionStore.builder(
jwtSessionIdGenerator,
reactor,
mapper,
StatelessSessionData.class
)
.cleanPeriod(InMemoryBasicSessionStore.DEFAULT_CLEAN_PERIOD) // 5 minutes
.maxInactiveInterval(Session.DEFAULT_MAX_INACTIVE_INTERVAL) // 30 minutes
.expireAfterPeriod(Session.DEFAULT_MAX_INACTIVE_INTERVAL) // overrides max inactive interval which is set by default
.statelessSessionDataSaveStrategy(SessionDataSaveStrategy.onSetOnly()) // must be onSetOnly() by default
.build();
It uses a SessionDataSaveStrategy to determine whether the JWT session id must be refreshed, basically when stateless data has changed. This is set to SessionDataSaveStrategy.onSetOnly() by default to avoid undesirable side effects in some situations where session id refresh is triggered multiple times within the same transaction using SessionDataSaveStrategy.onGet() strategy.
SessionDataSaveStrategy.onSetOnly()is the safest approach, a custom strategy, taking the stateless session type specificities into account, can be provided to avoid having to invokeJWTSession#setStatelessData(Object)explicitly.
Redis JWT session store
The RedisJWTSessionStore stores stateful session data in a Redis data store, it is suited when there is a need to share sessions across multiple nodes. It requires a RedisClient for storing sessions in the Redis data store, an ObjectMapper and the stateful and stateless session data types for deserializing/serializing stateful session data from/to the Redis data store and deserializing stateless session data from the JWT claim.
RedisClient<String, String> redisClient = ...
ObjectMapper mapper = ...
JWTSessionIdGenerator<SessionData, StatelessSessionData> jwtSessionIdGenerator = ...
RedisJWTSessionStore<SessionData, StatelessSessionData> jwtSessionStore = RedisJWTSessionStore.builder(
jwtSessionIdGenerator,
redisClient,
mapper,
SessionData.class,
StatelessSessionData.class
)
.keyPrefix(RedisJWTSessionStore.DEFAULT_KEY_PREFIX)
.maxInactiveInterval(Session.DEFAULT_MAX_INACTIVE_INTERVAL) // 30 minutes
.expireAfterPeriod(Session.DEFAULT_MAX_INACTIVE_INTERVAL) // overrides max inactive interval which is set by default
.sessionDataSaveStrategy(SessionDataSaveStrategy.onSetOnly()) // only save stateful data when setData() is explicitly invoked on the session
.statelessSessionDataSaveStrategy(SessionDataSaveStrategy.onSetOnly()) // must be onSetOnly() by default
.build();
When not specified, the default SessionDataSaveStrategy for stateful session data is SessionDataSaveStrategy#onGet() which means stateful session data are saved whenever they are resolved and the default SessionDataSaveStrategy for stateless session data is SessionDataSaveStrategy#onSetOnly() to avoid undesirable side effects in some situations where session id refresh is triggered multiple times within the same transaction using SessionDataSaveStrategy.onGet() strategy.
Session are automatically expired by Redis using PEXPIRE or PEXPIREAT set on the session Redis key.
Note that a two minutes buffer is used to make sure sessions can still be accessed at the limit.
Session HTTP
The Inverno session-http module extends the session API and the HTTP server API respectively defined in the session module and the http-server module in order to provide session management in an HTTP server or a Web application. It basically provides a session exchange interceptor that resolves the user session from a request, exposes it in a session exchange context and eventually saves it and injects it in the response when needed: in case of a new session or when the session id was refreshed. The session context allows to interact with the session or create it when it is missing.
Usage is completely transparent and designed to facilitate the interaction with the session, however it is important to understand how sessions are managed within a session store, when they are persisted and when they expire, please refer to the session module documentation for a proper overview on session management.
In order to use the Inverno session-http module, we need to declare a dependency in the module descriptor:
module io.inverno.example.app_session_http {
requires io.inverno.mod.session.http;
}
And also declare that dependency in the build descriptor:
Using Maven:
<project>
<dependencies>
<dependency>
<groupId>io.inverno.mod</groupId>
<artifactId>inverno-session-http</artifactId>
</dependency>
</dependencies>
</project>
Using Gradle:
compile 'io.inverno.mod:inverno-session-http:1.13.0'
Basic HTTP session support using an in-memory session store, a simple Map as session data and a cookie to convey the session id can be added to a Web application as follows by configuring the session interceptor on the Web routes that use sessions:
package io.inverno.test.app_session_http;
import io.inverno.core.annotation.Bean;
import io.inverno.core.v1.Application;
import io.inverno.mod.base.concurrent.Reactor;
import io.inverno.mod.base.resource.MediaTypes;
import io.inverno.mod.http.base.Method;
import io.inverno.mod.session.BasicSessionStore;
import io.inverno.mod.session.InMemoryBasicSessionStore;
import io.inverno.mod.session.http.CookieSessionIdExtractor;
import io.inverno.mod.session.http.CookieSessionInjector;
import io.inverno.mod.session.http.SessionInterceptor;
import io.inverno.mod.session.http.context.BasicSessionContext;
import io.inverno.mod.web.base.annotation.Body;
import io.inverno.mod.web.base.annotation.PathParam;
import io.inverno.mod.web.server.WebServer;
import io.inverno.mod.web.server.annotation.WebController;
import io.inverno.mod.web.server.annotation.WebRoute;
import java.util.HashMap;
import java.util.Map;
import reactor.core.publisher.Mono;
@Bean( visibility = Bean.Visibility.PRIVATE )
@WebController
public class Main {
@Bean( visibility = Bean.Visibility.PRIVATE )
public static class WebServerConfigurer implements WebServer.Configurer<BasicSessionContext.Intercepted<Map<String, String>>> {
private final BasicSessionStore<Map<String, String>> sessionStore;
public WebServerConfigurer(Reactor reactor) {
this.sessionStore = InMemoryBasicSessionStore.<Map<String, String>>builder(reactor).build();
}
@Override
public WebServer<BasicSessionContext.Intercepted<Map<String, String>>> configure(WebServer<BasicSessionContext.Intercepted<Map<String, String>>> webServer) {
return webServer
.intercept()
.interceptor(SessionInterceptor.of(
new CookieSessionIdExtractor<>(),
this.sessionStore,
new CookieSessionInjector<>()
));
}
}
@WebRoute(path = "/session/{name}", method = Method.PUT, consumes = MediaTypes.TEXT_PLAIN)
public Mono<Void> setSessionAttribute(@PathParam String name, @Body String value, BasicSessionContext<Map<String, String>> sessionContext) {
return sessionContext.getSessionData(HashMap::new).doOnNext(data -> data.put(name, value)).then();
}
@WebRoute(path = "/session", method = Method.GET, produces = MediaTypes.APPLICATION_JSON)
public Mono<Map<String, String>> getSessionAttributes(BasicSessionContext<Map<String, String>> sessionContext) {
return sessionContext.getSessionData(HashMap::new);
}
@WebRoute(path = "/session/{name}", method = Method.GET, produces = MediaTypes.TEXT_PLAIN)
public Mono<String> getSessionAttribute(@PathParam String name, BasicSessionContext<Map<String, String>> sessionContext) {
return sessionContext.getSessionData(HashMap::new).map(data -> data.get(name));
}
public static void main(String[] args) {
App_web_session appSession = Application.run(new App_web_session.Builder());
}
}
We can run above application and try to set and get some session attributes:
$ mvn inverno:run
...
2025-02-25 10:59:34,151 INFO [main] i.i.t.a.App_web_session - Starting Module io.inverno.test.app_web_session...
2025-02-25 10:59:34,151 INFO [main] i.i.m.b.Boot - Starting Module io.inverno.mod.boot...
2025-02-25 10:59:34,279 INFO [main] i.i.m.b.Boot - Module io.inverno.mod.boot started in 127ms
2025-02-25 10:59:34,279 INFO [main] i.i.m.w.s.Server - Starting Module io.inverno.mod.web.server...
2025-02-25 10:59:34,279 INFO [main] i.i.m.h.s.Server - Starting Module io.inverno.mod.http.server...
2025-02-25 10:59:34,279 INFO [main] i.i.m.h.b.Base - Starting Module io.inverno.mod.http.base...
2025-02-25 10:59:34,281 INFO [main] i.i.m.h.b.Base - Module io.inverno.mod.http.base started in 2ms
2025-02-25 10:59:34,285 INFO [main] i.i.m.w.b.Base - Starting Module io.inverno.mod.web.base...
2025-02-25 10:59:34,285 INFO [main] i.i.m.h.b.Base - Starting Module io.inverno.mod.http.base...
2025-02-25 10:59:34,285 INFO [main] i.i.m.h.b.Base - Module io.inverno.mod.http.base started in 0ms
2025-02-25 10:59:34,286 INFO [main] i.i.m.w.b.Base - Module io.inverno.mod.web.base started in 0ms
2025-02-25 10:59:34,304 INFO [main] i.i.m.h.s.i.HttpServer - HTTP Server (nio) listening on http://0.0.0.0:8080
2025-02-25 10:59:34,304 INFO [main] i.i.m.h.s.Server - Module io.inverno.mod.http.server started in 25ms
2025-02-25 10:59:34,304 INFO [main] i.i.m.w.s.Server - Module io.inverno.mod.web.server started in 25ms
2025-02-25 10:59:34,335 INFO [main] i.i.t.a.App_web_session - Module io.inverno.test.app_web_session started in 187ms
2025-02-25 10:59:34,335 INFO [main] i.i.c.v.Application - Application io.inverno.test.app_web_session started in 214ms
Session attributes can be added by sending PUT requests to `http://localhost:8080/session/{attributeName}:
$ curl -i -X PUT -H 'content-type: text/plain' -d 'someValue' http://localhost:8080/session/someAttribute
HTTP/1.1 200 OK
set-cookie: SESSION-ID=ZDAxYzAxZDAtMDFiMi00MjA5LWJkYjUtMWJmNzkyM2Y2MTI0; Path=/; HttpOnly; SameSite=Lax
content-length: 0
Now in order to access the session and its attributes, subsequent requests must convey above session cookie:
$ curl -i -H 'cookie: SESSION-ID=ZDAxYzAxZDAtMDFiMi00MjA5LWJkYjUtMWJmNzkyM2Y2MTI0' http://localhost:8080/session
HTTP/1.1 200 OK
content-type: application/json
content-length: 29
{"someAttribute":"someValue"}
$ curl -i -H 'cookie: SESSION-ID=ZDAxYzAxZDAtMDFiMi00MjA5LWJkYjUtMWJmNzkyM2Y2MTI0' http://localhost:8080/session/someAttribute
HTTP/1.1 200 OK
content-type: text/plain
content-length: 9
someValue
The session will eventually expire after a period of inactivity (30 minutes by default when using the InMemoryBasicSessionStore), but we can also explicitly invalidate the session with the following Web route:
@WebRoute(path = "/session", method = Method.DELETE)
public Mono<Void> invalidateSession(WebExchange<? extends BasicSessionContext<Map<String, String>>> exchange) {
if(exchange.context().isSessionPresent()) {
exchange.response().body().before(exchange.context().getSession().flatMap(Session::invalidate));
}
return Mono.empty();
}
The client can then invalidate the session explicitly:
$ curl -i -X DELETE -H 'cookie: SESSION-ID=ZDAxYzAxZDAtMDFiMi00MjA5LWJkYjUtMWJmNzkyM2Y2MTI0' http://localhost:8080/session
HTTP/1.1 200 OK
set-cookie: SESSION-ID=; Max-Age=0; Path=/
content-length: 0
$ curl -i -H 'cookie: SESSION-ID=ZDAxYzAxZDAtMDFiMi00MjA5LWJkYjUtMWJmNzkyM2Y2MTI0' http://localhost:8080/session
HTTP/1.1 200 OK
content-type: application/json
set-cookie: SESSION-ID=ZTczZmIyODktYmQyYS00YjRiLTlhYzItYWQwOGRlYzJmMjMz; Path=/; HttpOnly; SameSite=Lax
content-length: 2
{}
The invalidated session is removed from the session store and a subsequent request conveying the invalidated session id leads to the creation of a new session.
You probably noticed that session invalidation was done in the
WebResponseBody#before(Mono)hook, this is actually mandatory to reflect the session invalidation in the response, namely to provide an emptyset-cookieheader. This cannot actually be done in the response body publisher because when it is subscribed the response headers have already been sent to the client, and it is then not possible to inject the session in the response headers. This is also true for any change that might affect the session id and requires to inject the session in the response like refreshing the session id or, when using JWT sessions, updating expiration settings or stateless session data.
Session interceptor
The SessionInterceptor must be set on the Web routes that use sessions. Its role is to provide a SessionContext to subsequent exchange interceptors and eventually the exchange handler and to save the session at the end of the processing of the exchange.
A SessionInterceptor instance is created by composing a SessionIdExtractor used to extract the session id from the request, a SessionStore used to manage and store sessions and a SessionInjector used to inject the session in the response.
It is important to understand what is actually done and especially when during the processing of the exchange to avoid any misuse.
- The session interceptor first tries to extract the session id from the request. If any was provided, it then tries to resolve the session from the session store.
- If a session exists, it is set in the session context otherwise the session creation
Monoreturned bySessionStore#create()is set instead. - The session interceptor then sets a
ResponseBody#before(Mono)hook on the exchange response body whose role is to inject the session, if any and if required, into the response. This is done before consuming the response body publisher in order to be able to set response headers. - A
ResponseBody#after(Mono)hook is finally set on the exchange response body in order to save the session at the end of the exchange processing which is after the response has been completely sent to the client.
This implies several things:
- a session will not be automatically saved in case of errors during the processing of the exchange, as a result it will have to be saved explicitly in an error exchange handler using
Session#save(). - a session is injected in the response before the response body publisher is subscribed, which means that any changes impacting the session id (e.g. creation of the session, refresh session id...) must happen in the exchange handler itself or in a
ResponseBody#before(Mono)hook.
As stated in the session module documentation, some session store implementations like in-memory session stores do expose the session data actually stored which can then be updated on-fly but this must be considered as an exception and an explicit call to
Session#save()is the only guarantee that the complete session will actually be persisted in the session store.
A SecurityInterceptor is created as follows:
SessionIdExtractor<SessionContext.Intercepted<SessionData, Session<SessionData>>, Exchange<SessionContext.Intercepted<SessionData, Session<SessionData>>>> sessionIdExtractor = ...
SessionStore<SessionData, Session<SessionData>> sessionStore = ...
SessionInjector<SessionData, Session<SessionData>, SessionContext.Intercepted<SessionData, Session<SessionData>>, Exchange<SessionContext.Intercepted<SessionData, Session<SessionData>>>> sessionInjector = ...
SessionInterceptor<SessionData, Session<SessionData>, SessionContext.Intercepted<SessionData, Session<SessionData>>, Exchange<SessionContext.Intercepted<SessionData, Session<SessionData>>>> sessionInterceptor = SessionInterceptor.of(sessionIdExtractor, sessionStore, sessionInjector);
Using generics here allows the compiler to properly check that provided components are consistent with each other. Nonetheless, the API provides BasicSessionContext and JWTSessionContext interfaces in order to simplify a bit above declarations when using basic session and JWT session respectively.
SessionIdExtractor<BasicSessionContext.Intercepted<SessionData>, Exchange<BasicSessionContext.Intercepted<SessionData>>> sessionIdExtractor = ...
BasicSessionStore<SessionData> sessionStore = ...
SessionInjector<SessionData, Session<SessionData>, BasicSessionContext.Intercepted<SessionData>, Exchange<BasicSessionContext.Intercepted<SessionData>>> sessionInjector = ...
SessionInterceptor<SessionData, Session<SessionData>, BasicSessionContext.Intercepted<SessionData>, Exchange<BasicSessionContext.Intercepted<SessionData>>> sessionInterceptor = SessionInterceptor.of(sessionIdExtractor, sessionStore, sessionInjector);
In practice, it is not needed to specify explicit type arguments. As you'll see in the next example, the compiler should be able to figure them out implicitly from the session store and the Web configurer declaration.
It has to be applied just like any other exchange interceptor to any Web routes using sessions. This can be done by defining a Web configurer implementing WebRouteInterceptor.Configurer or WebServer.Configurer. The following example shows how to enable session support for /session/** routes:
package io.inverno.test.app_session_http;
import io.inverno.core.annotation.Bean;
import io.inverno.mod.session.Session;
import io.inverno.mod.session.SessionStore;
import io.inverno.mod.session.http.CookieSessionIdExtractor;
import io.inverno.mod.session.http.CookieSessionInjector;
import io.inverno.mod.session.http.SessionInterceptor;
import io.inverno.mod.session.http.context.SessionContext;
import io.inverno.mod.web.server.WebRouteInterceptor;
import java.util.Map;
@Bean( visibility = Bean.Visibility.PRIVATE )
public class WebSessionConfigurer implements WebRouteInterceptor.Configurer<SessionContext.Intercepted<Map<String, String>, Session<Map<String, String>>>> {
private final SessionStore<Map<String, String>, Session<Map<String, String>>> sessionStore;
public WebSessionConfigurer(SessionStore<Map<String, String>, Session<Map<String, String>>> sessionStore) {
this.sessionStore = sessionStore;
}
@Override
public WebRouteInterceptor<SessionContext.Intercepted<Map<String, String>, Session<Map<String, String>>>> configure(WebRouteInterceptor<SessionContext.Intercepted<Map<String, String>, Session<Map<String, String>>>> interceptors) {
return interceptors
.intercept()
.path("/session/**")
.interceptor(SessionInterceptor.of(
new CookieSessionIdExtractor<>(),
this.sessionStore,
new CookieSessionInjector<>()
));
}
}
The session is extracted from the request and injected in the response in an HTTP cookie, but any SessionIdExtractor and SessionInjector implementations could have been used as well.
Above example shows a general setup using generic
SessionContext,SessionStoreandSessionbutBasicSessionContext,BasicSessionStore,JWTSessionContext,JWTSessionStoreor any otherSessionStoreimplementations could have been used.
Session id extractor
A session id extractor is used in a SessionInterceptor to extract the client session id from an HTTP request. The SessionIdExtractor interface is a functional interface defining method extract(Exchange). The following example shows a simple inline implementation that extracts a session id from a query parameter:
SessionIdExtractor<BasicSessionContext.Intercepted<SessionData>, Exchange<BasicSessionContext.Intercepted<SessionData>>> queryParameterSessionIdExtractor = exchange -> Mono.justOrEmpty(
exchange.request().queryParameters().get("session-id")
.map(Parameter::asString)
.orElse(null)
);
The API provides the CookieSessionIdExtractor that extracts the session id from a session cookie named SESSION-ID by default.
Multiple session id extractors can be chained in order to extract the session id from different locations within the request by order of preference. For instance, we can chain a CookieSessionIdExtractor to above extractor in order to extract the session id from a query parameter or a session cookie in that order.
SessionIdExtractor<BasicSessionContext.Intercepted<SessionData>, Exchange<BasicSessionContext.Intercepted<SessionData>>> composedSessionIdExtractor = queryParameterSessionIdExtractor.or(new CookieSessionIdExtractor<>());
Session injector
A session injector is used in a SessionInterceptor before sending the HTTP response headers to inject or remove the session in the HTTP response. The SessionInjector interface defines methods #inject(Exchange, Session) and #remove(Exchange) for which a default no-op implementation is provided. The following example shows a simple inline implementation that sets the session id in a response header:
SessionInjector<SessionData, Session<SessionData>, BasicSessionContext.Intercepted<SessionData>, Exchange<BasicSessionContext.Intercepted<SessionData>>> sessionInjector = (exchange, session) -> Mono.fromRunnable(() ->
exchange.response().headers(headers -> headers.set("session-id", session.getId()))
);
The API provides the CookieSessionInjector that injects the session id in a session cookie named SESSION-ID by default.
A no-op implementation is provided for
#remove(Exchange)method for convenience as it is not always easy nor possible to inform a client that a session has been invalidated like in above example. In any case if an invalid or expired session id is conveyed in a request no session will be resolved. It is however good practice to provide a proper implementation whenever possible which is the case for theCookieSessionInjector.
Multiple session injectors can be composed in order to inject the session at different locations in the response. For instance, we can chain a CookieSessionInjector to above injector in order to inject the session id in a response header and in a response cookie.
SessionInjector<SessionData, Session<SessionData>, BasicSessionContext.Intercepted<SessionData>, Exchange<BasicSessionContext.Intercepted<SessionData>>> composedSessionInjector = headerSessionInjector.compose(new CookieSessionInjector<>());
Session context
The SessionContext extends the ExchangeContext and provides access to the session during the processing an exchange. It basically exposes method getSession() which returns a Mono that emits the existing session resolved by the session interceptor or a new session if none were present. The session is therefore only created when needed. Furthermore, method isSessionPresent() allows to check whether the session interceptor was able to resolve the session which can be useful when the creation of a session is optional.
It also exposes convenient methods getSessionData() and getSessionData(Supplier) to access session data directly.
Please remember that depending on the session store and more precisely on the session data save strategy, session data updates might not be persisted unless
Session#setData()is invoked explicitly. See session module documentation to know more about this particular aspect.
The SessionContext.Intercepted extends the SessionContext by providing setSessionPresent(boolean) and setSession(Mono) which are used by the session interceptor to populate the session context. This mutable session context shall only be used when configuring session support in a Web configurer.
It is usually a good practice to use an upper bound wildcard when declaring the session context in an exchange inside a Web controller in order to avoid compilation errors.
@WebRoute(path = "/session", method = Method.DELETE)
public Mono<Void> invalidateSession(WebExchange<? extends SessionContext<Map<String, String>>, Session<Map<String, String>>> exchange) {
...
}
Basic session context
The BasicSessionContext interface extends the generic SessionContext interface in order to simplify setup when using basic sessions. Just like the BasicSessionStore, it basically fixes the Session type so that only the session data type needs to be specified.
Using basic sessions, previous session Web configurer could be rewritten as follows:
package io.inverno.test.app_session_http;
import io.inverno.core.annotation.Bean;
import io.inverno.mod.session.BasicSessionStore;
import io.inverno.mod.session.http.CookieSessionIdExtractor;
import io.inverno.mod.session.http.CookieSessionInjector;
import io.inverno.mod.session.http.SessionInterceptor;
import io.inverno.mod.session.http.context.BasicSessionContext;
import io.inverno.mod.web.server.WebRouteInterceptor;
import java.util.Map;
@Bean( visibility = Bean.Visibility.PRIVATE )
public class WebBasicSessionConfigurer implements WebRouteInterceptor.Configurer<BasicSessionContext.Intercepted<Map<String, String>>> {
private final BasicSessionStore<Map<String, String>> sessionStore;
public WebBasicSessionConfigurer(BasicSessionStore<Map<String, String>> sessionStore) {
this.sessionStore = sessionStore;
}
@Override
public WebRouteInterceptor<BasicSessionContext.Intercepted<Map<String, String>>> configure(WebRouteInterceptor<BasicSessionContext.Intercepted<Map<String, String>>> interceptors) {
return interceptors
.intercept()
.path("/session/**")
.interceptor(SessionInterceptor.of(
new CookieSessionIdExtractor<>(),
this.sessionStore,
new CookieSessionInjector<>()
));
}
}
In the particular case of basic sessions, this actually brings little change apart from less verbosity and the fact that
BasicSessionContextcan then be declared in Web controller (remember that there is only one exchange context type generated by the Inverno Web compiler and which extends all types declared in configurers and controllers). but in the end it is still a regularSessionobject that is exposed to the application. On the other hand, declaring aJWTSessionContextis much more interesting as it provides additional features like stateless session data.
JWT session context
The JWTSessionContext interface extends the generic SessionContext interface in order to simplify setup when using JWT sessions. It fixes the Session type to JWTSession so that only the stateful and stateless session data types have to be declared in type arguments and adds methods getStatelessSessionData() and getStatelessSessionData(Supplier) for accessing stateless session data stored in the JWT session id.
Using JWT sessions, a JWTSessionStore must be provided within the application and the session Web configurer should be rewritten as follows:
package io.inverno.test.app_session_http;
import io.inverno.core.annotation.Bean;
import io.inverno.mod.session.http.CookieSessionIdExtractor;
import io.inverno.mod.session.http.CookieSessionInjector;
import io.inverno.mod.session.http.SessionInterceptor;
import io.inverno.mod.session.http.context.jwt.JWTSessionContext;
import io.inverno.mod.session.jwt.JWTSessionStore;
import io.inverno.mod.web.server.WebRouteInterceptor;
import java.util.Map;
@Bean( visibility = Bean.Visibility.PRIVATE )
public class WebJWTSessionConfigurer implements WebRouteInterceptor.Configurer<JWTSessionContext.Intercepted<Void, Map<String, String>>> {
private final JWTSessionStore<Void, Map<String, String>> sessionStore;
public WebJWTSessionConfigurer(JWTSessionStore<Void, Map<String, String>> sessionStore) {
this.sessionStore = sessionStore;
}
@Override
public WebRouteInterceptor<JWTSessionContext.Intercepted<Void, Map<String, String>>> configure(WebRouteInterceptor<JWTSessionContext.Intercepted<Void, Map<String, String>>> interceptors) {
return interceptors
.intercept()
.path("/session/**")
.interceptor(SessionInterceptor.of(
new CookieSessionIdExtractor<>(),
this.sessionStore,
new CookieSessionInjector<>()
));
}
}
Note that in above example, the stateful session data type has been declared as
Voidwhich means that all session data will be stored in the stateless data in the JWT session id on the client side.
In a Web controller, it is then possible to get or set stateless session data using the JWTSessionContext:
@WebRoute(path = "/hello", method = Method.GET)
public Mono<String> hello(JWTSessionContext<Void, Map<String, String>> sessionContext) {
return sessionContext.getStatelessSessionData()
.mapNotNull(statelessData -> "Hello " + statelessData.get("user"))
.switchIfEmpty(Mono.error(new UnauthorizedException()));
}
Particular care must be taken when using JWT session, as any change to session metadata like expiration settings or stateless session data will result in a session id refresh which must always be performed before response headers are sent to the client, otherwise there is a real risk for the client to lose the session, the session being moved to a different id in the session store after writing the response headers making it impossible for the session interceptor to inject the new session id into the response.
When such situation is detected, the session interceptor should log the following error:
2025-02-25 16:30:41,059 ERROR [inverno-io-epoll-1-2] i.i.m.s.h.i.GenericSessionInterceptor - Session id has been refreshed after response
Expiration setting as well as Stateless data updates should then always be done in a ResponseBody#before(Mono) hook as follows:
@WebRoute(path = "/login", method = Method.GET)
public Mono<String> login(@HeaderParam String authorization, WebExchange<? extends JWTSessionContext<Void, Map<String, String>>> exchange) {
String username = ... // authenticate authorization header and extract the username
exchange.response().body().before(exchange.context()
.getStatelessSessionData(HashMap::new)
.doOnNext(statelessData -> statelessData.put("user", username))
.then()
);
return Mono.just("OK");
}
In practice, stateless data should only be used to store data that barely change during the lifetime of the session such as authentication data in order to limit session id refresh. Explicit session id refresh may still be necessary to prevent replay attacks in which case they must be performed in a ResponseBody#before(Mono) hook as in above example.
gRPC Base
The Inverno grpc-base module defines the foundational API for creating gRPC clients and servers. It also provides common gRPC services like the message compressor service.
In order to use the Inverno grpc-base module, we need to declare a dependency in the module descriptor:
module io.inverno.example.app {
requires io.inverno.mod.grpc.base;
}
And also declare that dependency in the build descriptor:
Using Maven:
<project>
<dependencies>
<dependency>
<groupId>io.inverno.mod</groupId>
<artifactId>inverno-grpc-base</artifactId>
</dependency>
</dependencies>
</project>
Using Gradle:
compile 'io.inverno.mod:inverno-grpc-base:1.13.0'
The grpc-base module is usually provided as a transitive dependency by other gRPC modules, the grpc-client and grpc-server modules in particular, so it might not be necessary to include it explicitly.
gRPC base API
The base gRPC base API defines common classes and interfaces for implementing gRPC clients and servers. This includes:
- common gRPC exchange API
- gRPC service name
- gRPC status enumerations
- gRPC exceptions
- gRPC message compressor API
- gRPC metadata
gRPC message compressor service
The gRPC message compressor service is used to resolve a message compressor matching gRPC message encoding as defined by the [gRPC protocol][grpc-protocol].
The GrpcMessageCompressor interface defines methods to compress and uncompress raw message data (i.e. ByteBuf), a gRPC message compressor can be resolved from the GrpcMessageCompressorService as follows:
Base grpcBase = ...
GrpcMessageCompressorService messageCompressorService = grpcBase.messageCompressorService();
// Returns the first matching message compressor from the list of encodings or an empty optional if there is no matching message compressor
Optional<GrpcMessageCompressor> messageCompressor = messageCompressorService.getMessageCompressor("gzip","deflate");
// Returns the list of supported message encodings
Set<String> supportedMessageEncodings = messageCompressorService.getMessageEncodings();
The module has four built-in message compressor implementations: identity, gzip, deflate and snappy. Additional custom compressors can be injected in the module to extend its capabilities.
For instance, we could create a BrotliGrpcMessageCompressor to compress/uncompress br encoded messages. It must be injected in the grpc-base module either explicitly when creating the module or through dependency injection.
NetService netService = ...
Base grpcBase = new Base.Builder(netService)
.setMessageCompressors(List.of(new BrotliGrpcMessageCompressor())
.build();
grpcBase.start();
// Returns brotli message compressor
Optional<GrpcMessageCompressor> messageCompressor = messageCompressorService.getMessageCompressor("br");
grpcBase.stop();
The grpc-base module is usually composed in other modules and as a result dependency injection should work just fine, so custom compressors simply need to be declared as beans in the enclosing module.
Configuration
The grpc-base module exposes the GrpcBaseConfiguration which allows to configure built-in message compressors. That configuration is typically conveyed by the grpc-client and grpc-server modules which compose the grpc-base module.
gRPC Client
The Inverno grpc-client module allows to create reactive gRPC clients as described by the gRPC over HTTP/2 protocol on top of the http-client module.
It provides an API to transform HTTP client exchanges into gRPC exchanges supporting the gRPC protocol. A gRPC exchange basically supports:
- the four kinds of gRPC service methods: unary, client streaming, server streaming and bidirectional streaming as defined by the gRPC core concepts.
- metadata and especially encoding/decoding of protocol buffer binary metadata
- message compression with built-in support for
gzip,deflateandsnappymessage encodings - cancellation
This module requires a net service which is usually provided by the boot module. The http-client module, although not required to bootstrap the module, is required to be able to create HTTP/2 clients. In order to use the Inverno grpc-client module and invoke a gRPC service method, we should then declare the following dependencies in the module descriptor:
@io.inverno.core.annotation.Module
module io.inverno.example.app_grpc_client {
requires io.inverno.mod.boot;
requires io.inverno.mod.http.client;
requires io.inverno.mod.grpc.client;
}
The grpc-base module which provides base gRPC API and services is composed as a transitive dependency in the grpc-client module and as a result it doesn't need to be specified here nor provided in an enclosing module.
We also need to declare these dependencies in the build descriptor:
Using Maven:
<project>
<dependencies>
<dependency>
<groupId>io.inverno.mod</groupId>
<artifactId>inverno-boot</artifactId>
</dependency>
<dependency>
<groupId>io.inverno.mod</groupId>
<artifactId>inverno-http-client</artifactId>
</dependency>
<dependency>
<groupId>io.inverno.mod</groupId>
<artifactId>inverno-grpc-client</artifactId>
</dependency>
</dependencies>
</project>
Using Gradle:
compile 'io.inverno.mod:inverno-boot:1.13.0'
compile 'io.inverno.mod:inverno-http-client:1.13.0'
compile 'io.inverno.mod:inverno-grpc-client:1.13.0'
A gRPC service is basically invoked by converting an HTTP/2 client exchange into a unary, client streaming, server streaming or bidirectional streaming gRPC exchange using the GrpcClient bean:
package io.inverno.example.app_grpc_client;
import examples.HelloReply;
import examples.HelloRequest;
import io.inverno.core.annotation.Bean;
import io.inverno.core.v1.Application;
import io.inverno.mod.grpc.base.GrpcServiceName;
import io.inverno.mod.grpc.client.GrpcClient;
import io.inverno.mod.grpc.client.GrpcExchange;
import io.inverno.mod.http.base.ExchangeContext;
import io.inverno.mod.http.base.HttpVersion;
import io.inverno.mod.http.client.Endpoint;
import io.inverno.mod.http.client.HttpClient;
import io.inverno.mod.http.client.HttpClientConfigurationLoader;
import java.util.Set;
public class Main {
@Bean
public static class Greeter {
private final Endpoint<ExchangeContext> endpoint;
private final GrpcClient grpcClient;
public Greeter(GrpcClient grpcClient, HttpClient httpClient) {
this.grpcClient = grpcClient;
this.endpoint = httpClient
.endpoint("localhost", 8080)
.configuration(HttpClientConfigurationLoader.load(configuration ->
configuration.http_protocol_versions(Set.of(HttpVersion.HTTP_2_0)) // enable direct HTTP/2
))
.build(); // Create the endpoint
}
public HelloReply sayHello(HelloRequest request) {
return this.endpoint
.exchange() // Create the HTTP client exchange
.<GrpcExchange.Unary<ExchangeContext, HelloRequest, HelloReply>>map(exchange -> this.grpcClient.unary( // Convert to a unary gRPC exchange
exchange,
GrpcServiceName.of("helloworld", "Greeter"), // service name
"SayHello", // method name
HelloRequest.getDefaultInstance(), // request message type
HelloReply.getDefaultInstance() // response message type
))
.flatMap(grpcExchange -> {
grpcExchange.request().value(request); // Set the request
return grpcExchange.response().flatMap(GrpcResponse.Unary::value); // Get the response
})
.block(); // Get a connection, send the request and receive the response
}
}
public static void main(String[] args) {
App_grpc_client app_grpc_client = Application.run(new App_grpc_client.Builder());
try {
HelloReply response = app_grpc_client.greeter().sayHello(HelloRequest.newBuilder()
.setName("Bob")
.build()
);
System.out.println("Received: " + response.getMessage());
}
finally {
app_grpc_client.stop();
}
}
}
In above example, module app_grpc_client creates the Greeter bean which uses the HttpClient to obtain an Endpoint to connect to localhost in plain HTTP/2. When invoking the sayHello() method, an HTTP client exchange is created, it is converted to a unary gRPC exchange which allows to set the request message and to return the response message. The request is sent when the response publisher is subscribed, the gRPC response message is eventually returned and displayed to the standard output and the module finally stopped.
Note that the gRPC protocol is built on top of HTTP/2 and as such the underlying connection should be an HTTP/2 connection, trying to convey gRPC messages over an HTTP/1.x connection, although possible in theory, is discouraged as it will break interoperability and might lead to unpredictable behaviours.
2024-04-05 15:02:41,083 INFO [main] i.i.c.v.Application - Inverno is starting...
╔════════════════════════════════════════════════════════════════════════════════════════════╗
║ , ~~ , ║
║ , ' /\ ' , ║
║ , __ \/ __ , _ ║
║ , \_\_\/\/_/_/ , | | ___ _ _ ___ __ ___ ___ ║
║ , _\_\/_/_ , | | / _ \\ \ / // _ \ / _|/ _ \ / _ \ ║
║ , __\_/\_\__ , | || | | |\ \/ /| __/| | | | | | |_| | ║
║ , /_/ /\/\ \_\ , |_||_| |_| \__/ \___||_| |_| |_|\___/ ║
║ , /\ , ║
║ , \/ , -- 1.6.0 -- ║
║ ' -- ' ║
╠════════════════════════════════════════════════════════════════════════════════════════════╣
║ Java runtime : OpenJDK Runtime Environment ║
║ Java version : 22+36-snap ║
║ Java home : /snap/openjdk/1735/jdk ║
║ ║
║ Application module : io.inverno.example.app_grpc_client ║
║ Application version : 1.0.0-SNAPSHOT ║
║ Application class : io.inverno.example.app_grpc_client.Main ║
║ ║
║ Modules : ║
║ ... ║
╚════════════════════════════════════════════════════════════════════════════════════════════╝
2024-04-05 15:02:41,095 INFO [main] i.i.e.a.App_grpc_client - Starting Module io.inverno.example.app_grpc_client...
2024-04-05 15:02:41,095 INFO [main] i.i.m.b.Boot - Starting Module io.inverno.mod.boot...
2024-04-05 15:02:41,323 INFO [main] i.i.m.b.Boot - Module io.inverno.mod.boot started in 227ms
2024-04-05 15:02:41,323 INFO [main] i.i.m.g.c.Client - Starting Module io.inverno.mod.grpc.client...
2024-04-05 15:02:41,324 INFO [main] i.i.m.g.b.Base - Starting Module io.inverno.mod.grpc.base...
2024-04-05 15:02:41,347 INFO [main] i.i.m.g.b.Base - Module io.inverno.mod.grpc.base started in 23ms
2024-04-05 15:02:41,349 INFO [main] i.i.m.g.c.Client - Module io.inverno.mod.grpc.client started in 25ms
2024-04-05 15:02:41,350 INFO [main] i.i.m.h.c.Client - Starting Module io.inverno.mod.http.client...
2024-04-05 15:02:41,350 INFO [main] i.i.m.h.b.Base - Starting Module io.inverno.mod.http.base...
2024-04-05 15:02:41,355 INFO [main] i.i.m.h.b.Base - Module io.inverno.mod.http.base started in 5ms
2024-04-05 15:02:41,362 INFO [main] i.i.m.h.c.Client - Module io.inverno.mod.http.client started in 11ms
2024-04-05 15:02:41,387 INFO [main] i.i.e.a.App_grpc_client - Module io.inverno.example.app_grpc_client started in 301ms
2024-04-05 15:02:41,388 INFO [main] i.i.c.v.Application - Application io.inverno.example.app_grpc_client started in 357ms
2024-04-05 15:02:41,588 INFO [inverno-io-epoll-1-1] i.i.m.h.c.i.AbstractEndpoint - HTTP/2.0 Client (epoll) connected to http://localhost:8080
Received: Hello Bob
2024-04-05 15:02:41,652 INFO [main] i.i.e.a.App_grpc_client - Stopping Module io.inverno.example.app_grpc_client...
2024-04-05 15:02:41,655 INFO [main] i.i.m.b.Boot - Stopping Module io.inverno.mod.boot...
2024-04-05 15:02:41,656 INFO [main] i.i.m.b.Boot - Module io.inverno.mod.boot stopped in 0ms
2024-04-05 15:02:41,656 INFO [main] i.i.m.g.c.Client - Stopping Module io.inverno.mod.grpc.client...
2024-04-05 15:02:41,656 INFO [main] i.i.m.g.b.Base - Stopping Module io.inverno.mod.grpc.base...
2024-04-05 15:02:41,657 INFO [main] i.i.m.g.b.Base - Module io.inverno.mod.grpc.base stopped in 0ms
2024-04-05 15:02:41,657 INFO [main] i.i.m.g.c.Client - Module io.inverno.mod.grpc.client stopped in 0ms
2024-04-05 15:02:41,657 INFO [main] i.i.m.h.c.Client - Stopping Module io.inverno.mod.http.client...
2024-04-05 15:02:41,657 INFO [main] i.i.m.h.b.Base - Stopping Module io.inverno.mod.http.base...
2024-04-05 15:02:41,657 INFO [main] i.i.m.h.b.Base - Module io.inverno.mod.http.base stopped in 0ms
2024-04-05 15:02:41,657 INFO [main] i.i.m.h.c.Client - Module io.inverno.mod.http.client stopped in 0ms
2024-04-05 15:02:41,657 INFO [main] i.i.e.a.App_grpc_client - Module io.inverno.example.app_grpc_client stopped in 5ms
Above example showed a programmatic way to invoke gRPC service methods, gRPC works with protocol buffer which allows to specify messages and services in an interface description language (proto 3). The protocol buffer compiler is used to generate Java classes from .proto files, it can be extended with the Inverno gRPC plugin in order to automatically generate Inverno client stubs at build time.
For instance, providing the following protocol buffer service definition:
service Greeter {
rpc SayHello (HelloRequest) returns (HelloReply) {}
}
The plugin generates class GreeterGrpcClient implementing boilerplate code and greatly simplifies above application. The generated class provide two base implementations for creating gRPC client bean. The GreeterGrpcClient.Http class is based on the HttpClient and uses a dedicated Endpoint (i.e. a dedicated connection pool) to connect to the server. The GreeterGrpcClient.Web is based on the WebClient which provides transparent service discovery and connection management. Depending on the needs of an application, one can create a bean implementing one, the other or both:
package io.inverno.example.app_grpc_client;
import examples.GreeterGrpcClient;
import examples.HelloReply;
import examples.HelloRequest;
import io.inverno.core.annotation.Bean;
import io.inverno.core.v1.Application;
import io.inverno.mod.discovery.ServiceID;
import io.inverno.mod.grpc.client.GrpcClient;
import io.inverno.mod.http.base.ExchangeContext;
import io.inverno.mod.http.client.HttpClient;
import io.inverno.mod.web.client.WebClient;
public class Main {
@Bean
public static class HttpGreeterGrpcClient extends GreeterGrpcClient.Http {
public HttpGreeterGrpcClient(HttpClient httpClient, GrpcClient grpcClient) {
super(httpClient, grpcClient);
}
}
@Bean
public static class WebGreeterGrpcClient extends GreeterGrpcClient.Web<ExchangeContext> {
public WebGreeterGrpcClient(WebClient<? extends ExchangeContext> webClient, GrpcClient grpcClient) {
super(ServiceID.of("http://127.0.0.1:8080"), webClient, grpcClient);
}
}
public static void main(String[] args) {
App_grpc_client app_grpc_client = Application.run(new App_grpc_client.Builder());
try {
// Using the HttpClient based implementation, the stub must be closed explicitly to close connections
try(GreeterGrpcClient.HttpClientStub<ExchangeContext> stub = app_grpc_client.httpGreeterGrpcClient().createStub("127.0.0.1", 8080)) {
HelloReply response = stub
.sayHello(HelloRequest.newBuilder()
.setName("Bob")
.build()
)
.block();
}
// Using the WebClient based implementation, connections are closed by the WebClient when the application module is stopped
HelloReply response = app_grpc_client.webGreeterGrpcClient()
.sayHello(HelloRequest.newBuilder()
.setName("Bob")
.build()
)
.block();
}
finally {
app_grpc_client.stop();
}
}
}
Note that the
WebClientbased implementation requires the web-client module which must then be declared as a module dependency.
Using the WebClient based implementation is recommended in most cases as it abstracts service discovery and connection management which greatly simplifies the code. It also allows to specify an exchange context type that is aggregated in the global exchange context type generated by the Inverno Web compiler plugin in Web client module, the context can then be customized when invoking a gRPC service method.
package io.inverno.example.app_grpc_client;
import examples.GreeterGrpcClient;
import examples.HelloReply;
import examples.HelloRequest;
import io.inverno.core.annotation.Bean;
import io.inverno.core.v1.Application;
import io.inverno.mod.discovery.ServiceID;
import io.inverno.mod.grpc.client.GrpcClient;
import io.inverno.mod.web.client.WebClient;
public class Main {
@Bean
public static class WebGreeterGrpcClient extends GreeterGrpcClient.Web<ApiContext> {
public WebGreeterGrpcClient(WebClient<? extends ApiContext> webClient, GrpcClient grpcClient) {
super(ServiceID.of("http://127.0.0.1:8080"), webClient, grpcClient);
}
}
public static void main(String[] args) {
App_grpc_client app_grpc_client = Application.run(new App_grpc_client.Builder());
try {
HelloReply response = app_grpc_client.webGreeterGrpcClient()
.sayHello(
HelloRequest.newBuilder()
.setName("Bob")
.build(),
context -> context.setApiKey("xxxxxxx")
)
.block();
}
finally {
app_grpc_client.stop();
}
}
}
The HttpClient based implementation must be favoured whenever there is a need to control the underlying HTTP connections explicitly. Please refer to the http-client and web-client modules documentation to get a complete overview of the HTTP client and the Web client and to the Inverno gRPC plugin documentation to get a detailed explanation on the generation of gRPC clients and servers.
When using the
HttpClientimplementation, the endpoint can be created implicitly inside theGreeterGrpcClientby providing a hostname and a port, as in above example. It is automatically closed at the end of the try-with-resources statement. But it is also possible to create the endpoint explicitly and pass it to the stub instead, in which case the code creating it is also responsible for closing it and as a result it will not be closed at the end of the try-with-resource statement. In any cases, theHttpClientbean must be configured to connect with HTTP/2.
Configuration
The grpc-client module operates on top of the http-client module, as a result network configuration and client specific configuration are inherited from the HTTP client configuration. The grpc-client specific configuration basically conveys the grpc-base module configuration which configures the built-in message compressors. A specific configuration can be created in the application module to easily override the default configurations:
package io.inverno.example.app_grpc_client;
import io.inverno.core.annotation.NestedBean;
import io.inverno.mod.configuration.Configuration;
import io.inverno.mod.grpc.client.GrpcClientConfiguration;
import io.inverno.mod.http.client.HttpClientConfiguration;
@Configuration
public interface App_grpc_clientConfiguration {
@NestedBean
GrpcClientConfiguration grpc_client();
@NestedBean
HttpClientConfiguration http_client();
}
This should be enough for exposing a configuration bean in the app_grpc_client module that let us set up the client:
package io.inverno.example.app_grpc_client;
import examples.HelloReply;
import examples.HelloRequest;
import io.inverno.core.annotation.Bean;
import io.inverno.core.v1.Application;
import io.inverno.mod.grpc.base.GrpcServiceName;
import io.inverno.mod.grpc.client.GrpcClient;
import io.inverno.mod.grpc.client.GrpcExchange;
import io.inverno.mod.http.base.ExchangeContext;
import io.inverno.mod.http.base.HttpVersion;
import io.inverno.mod.http.client.Endpoint;
import io.inverno.mod.http.client.HttpClient;
import io.inverno.mod.http.client.HttpClientConfigurationLoader;
import java.util.Set;
public class Main {
public static void main(String[] args) throws IOException {
App_grpc_client app = Application.run(new App_grpc_client.Builder()
.setApp_grpc_clientConfiguration(
App_grpc_clientConfigurationLoader.load(configuration -> configuration
.grpc_client(grpcClient -> grpcClient
.base(base -> base.compression_gzip_compressionLevel(6))
)
.http_client(httpClient -> httpClient
.http_protocol_versions(Set.of(HttpVersion.HTTP_2_0))
.request_timeout(600000l)
)
)
)
);
...
}
}
In above code, we have set:
- the gzip message compression level to 6
- the client to connect using HTTP/2 protocol only (required by gRPC protocol)
- the request timeout to 10 minutes
It is important to be aware that the HTTP client will terminate requests that exceeds the request timeout (i.e. take longer than the timeout to complete). Increasing the request timeout can then be required if you intend to invoke long-running gRPC services like server or bidirectional streaming service methods which might take longer than the default 60 seconds to complete. Implementing reconnection mechanism is also highly recommended for long polling use cases.
The support for native transport or TLS secured connection is provided by the HTTP client which must be configured accordingly. Although nothing prevents to send gRPC messages over an HTTP/1.x connection, this is discouraged and might as it will break interoperability and might result in unpredictable behaviours, particular care must be taken to ensure the client is properly configured to create HTTP/2 connections.
Please refer to the API documentation to have an exhaustive description of the different configuration properties.
You can also refer to the configuration module documentation to get more details on how configuration works and more especially how you can from here define the client configuration in command line arguments, property files...
gRPC exchange
The gRPC protocol specifies four kinds of service method that all fit into the exchange paradigm: unary RPC, client streaming RPC, server streaming RPC and bidirectional streaming RPC. The GrpcClient allows to convert an HTTP client exchange into a GrpcExchange specific to each kind of service method. Protocol buffer being used to encode and decode client and server messages, default message instances are required when creating a gRPC exchange.
A GrpcExchange exposes a context, the GrpcRequest and the GrpcResponse.
gRPC request
The gRPC client request exposes common request information and allows to specify the request metadata as well as request messages publisher. There are two kinds of gRPC requests: unary and streaming requests which are exposed depending on the kind exchange: unary and server streaming exchanges expose unary requests whereas client streaming and bidirectional streaming exchanges expose streaming requests.
The service name and the request method can be obtained as follows:
endpoint.exchange()
.map(exchange -> grpcClient...) // converts HTTP exchange to gRPC exchange
.flatMap(grpcExchange -> {
// <package>.<service>
GrpcServiceName serviceName = grpcExchange.request().getServiceName();
// <method>
String methodName = grpcExchange.request().getMethodName();
// <package>.<service>/<method>
String fullMethodName = grpcExchange.request().getFullMethodName();
return grpcExchange.response();
})
...
Standard or custom request metadata including protocol buffer binary data encoded in Base64 can be provided as follows:
endpoint.exchange()
.map(exchange -> grpcClient...) // converts HTTP exchange to gRPC exchange
.flatMap(grpcExchange -> {
grpcExchange.request()
.metadata(metadata -> metadata
.acceptMessageEncoding(List.of(GrpcHeaders.VALUE_GZIP, GrpcHeaders.VALUE_IDENTITY))
.messageEncoding(GrpcHeaders.VALUE_GZIP)
.timeout(Duration.ofSeconds(5))
.set("custom", "someValue")
.setBinary("customBinary", SomeMessage.newBuilder().setValue("abc").build()) // -bin suffix is automatically added
);
return grpcExchange.response();
})
When considering a unary or server streaming exchange, the request message can be set either synchronously or in a reactive way:
endpoint.exchange()
.map(exchange -> grpcClient...) // converts HTTP exchange to a unary or server streaming gRPC exchange
.flatMap(grpcExchange -> {
// set the request message
grpcExchange.request().value(SingleHelloRequest.newBuilder().setName("Bob").build());
// set the request message in a reactive way
grpcExchange.request().value(Mono.fromSupplier(() -> SingleHelloRequest.newBuilder().setName("Bob").build()));
return grpcExchange.response();
})
...
When considering a client streaming or bidirectional streaming exchange, the request messages publisher can be set as follows:
endpoint.exchange()
.map(exchange -> grpcClient...) // converts HTTP exchange to a client streaming or bidirectional streaming gRPC exchange
.flatMap(grpcExchange -> {
grpcExchange.request().stream(
Flux.just("Bob", "Bill", "Jane")
.map(name -> SingleHelloRequest.newBuilder().setName(name).build())
);
return grpcExchange.response();
})
...
gRPC response
The gRPC client response exposes the response metadata and trailers metadata as well as the response messages publisher. As for the request, there are two kinds of gRPC response: unary and streaming responses which are exposed depending on the kind exchange: unary and client streaming exchanges expose a unary responses whereas server streaming and bidirectional streaming exchanges expose streaming responses.
Standard or custom response metadata including protocol buffer binary data encoded in Base64 can be accessed as follows:
endpoint.exchange()
.map(exchange -> grpcClient...) // converts HTTP exchange to gRPC exchange
.flatMap(grpcExchange ->
// set the request
...
return grpcExchange.response();
})
.map(response -> {
GrpcInboundResponseMetadata metadata = grpcExchange.response().metadata();
List<String> acceptMessageEncodings = metadata.getAcceptMessageEncoding();
Optional<String> messageEncoding = metadata.getMessageEncoding();
Optional<String> customValue = metadata.get("custom");
Optional<SomeMessage> customBinaryValue = metadata.getBinary("customBinary", SomeMessage.getDefaultInstance()); // -bin suffix is automatically added
return response;
})
...
Response trailers metadata are available after the complete response have been received and exposes the final gRPC stratus and message:
endpoint.exchange()
.map(exchange -> grpcClient...) // converts HTTP exchange to a unary or client streaming gRPC exchange
.flatMap(grpcExchange ->
// set the request
...
return grpcExchange.response();
})
.flatMap(response -> {
return response.value()
.doOnTerminate(() -> System.out.println("gRPC status: " + response.trailersMetadata().getStatus()));
})
.block();
Note that before the response message publisher completes, there are no trailers and
nullshall be returned.
When considering a unary or a client streaming exchange, the response message is exposed as a single publisher:
Reply reply = endpoint.exchange()
.map(exchange -> grpcClient...) // converts HTTP exchange to a unary or client streaming gRPC exchange
.flatMap(grpcExchange -> {
// set the request
...
return grpcExchange.response();
})
.flatMap(response -> response.value()) // single response message
.block();
When considering a unary or a client streaming exchange, the response messages are exposed in a publisher:
List<Reply> replies = endpoint.exchange()
.map(exchange -> grpcClient...) // converts HTTP exchange to a server streaming or bidirectional streaming gRPC exchange
.flatMap(grpcExchange -> {
// set the request
...
return grpcExchange.response();
})
.flatMapMany(response -> response.stream()) // multiple response messages
.collect(Collectors.toList())
.block();
gRPC Exchange interceptor
A gRPC exchange is backed by an HTTP exchange which can be intercepted just like any HTTP exchange. There's no specific gRPC API for interceptor, it is assumed the HTTP client API is enough to cover all use cases.
gRPC Exchange context
The context is inherited from the HTTP client, it is used to convey contextual information such as security, tracing... throughout the processing of the exchange and especially within interceptors.
Unary gRPC exchange
A unary gRPC exchange corresponds to the request/response paradigm where a client sends exactly one message and receives exactly one message from the server.
The following example shows how to invoke a unary service method:
Endpoint<ExchangeContext> endpoint = ...
SingleHelloReply reply = endpoint.exchange()
.<GrpcExchange.Unary<ExchangeContext, SingleHelloRequest, SingleHelloReply>>map(exchange -> grpcClient.unary(
exchange,
GrpcServiceName.of("examples", "HelloService"),
"SayHello",
SingleHelloRequest.getDefaultInstance(),
SingleHelloReply.getDefaultInstance()
))
.flatMap(grpcExchange -> {
grpcExchange.request().value(SingleHelloRequest.newBuilder().setName("Bob").build());
return grpcExchange.response();
})
.flatMap(GrpcResponse.Unary::value)
.block();
The client sends one SingleHelloRequest message and the server sends one SingleHelloReply message in response.
Client streaming gRPC exchange
A client streaming gRPC exchange corresponds to the stream/response paradigm where a client sends a stream of messages and receives exactly one message from the server.
The following example shows how to invoke a client streaming service method:
Endpoint<ExchangeContext> endpoint = ...
GroupHelloReply reply = endpoint.exchange()
.<GrpcExchange.ClientStreaming<ExchangeContext, SingleHelloRequest, GroupHelloReply>>map(exchange -> grpcClient.clientStreaming(
exchange,
GrpcServiceName.of("examples", "HelloService"),
"SayHelloToEverybody",
SingleHelloRequest.getDefaultInstance(),
GroupHelloReply.getDefaultInstance()
))
.flatMap(grpcExchange -> {
grpcExchange.request().stream(Flux.just("Bob", "Bill", "Jane")
.map(name -> SingleHelloRequest.newBuilder().setName(name).build())
);
return grpcExchange.response();
})
.flatMap(GrpcResponse.Unary::value)
.block();
The client sends multiple SingleHelloRequest messages and the server sends one GroupHelloReply message in response.
In such use case, the server typically aggregates all requests and only sends the response after all of them has been received and processed. All requests can be aggregated before processing the response message or processed on the fly using a reduction operation.
Server streaming gRPC exchange
A server streaming gRPC exchange corresponds to the request/stream paradigm where a client sends exactly one message and receives a stream of messages from the server.
The following example shows how to invoke a server streaming service method:
Endpoint<ExchangeContext> endpoint = ...
List<SingleHelloReply> replies = endpoint.exchange()
.<GrpcExchange.ServerStreaming<ExchangeContext, GroupHelloRequest, SingleHelloReply>>map(exchange -> grpcClient.serverStreaming(
exchange,
GrpcServiceName.of("examples", "HelloService"),
"SayHelloToEveryoneInTheGroup",
GroupHelloRequest.getDefaultInstance(),
SingleHelloReply.getDefaultInstance()
))
.flatMap(grpcExchange -> {
grpcExchange.request().value(GroupHelloRequest.newBuilder().addAllNames(List.of("Bob", "Bill", "Jane")).build());
return grpcExchange.response();
})
.flatMapMany(GrpcResponse.Streaming::stream)
.collect(Collectors.toList())
.block();
The client sends one GroupHelloRequest message and the server sends multiple SingleHelloReply message in response.
In such use case, the server sends response messages that the client can either process as soon as they are available or aggregate to process them all at once at the end of the call.
Bidirectional streaming gRPC exchange
A bidirectional streaming gRPC exchange corresponds to the stream/stream paradigm where a client sends a stream of messages and receives a stream of messages from the server.
The following example shows how to invoke a bidirectional streaming service method:
Endpoint<ExchangeContext> endpoint = ...
List<SingleHelloReply> REPLIES = endpoint.exchange()
.<GrpcExchange.BidirectionalStreaming<ExchangeContext, SingleHelloRequest, SingleHelloReply>>map(exchange -> grpcClient.bidirectionalStreaming(
exchange,
GrpcServiceName.of("examples", "HelloService"),
"sayHelloToEveryone",
SingleHelloRequest.getDefaultInstance(),
SingleHelloReply.getDefaultInstance()
))
.flatMap(grpcExchange -> {
grpcExchange.request().stream(Flux.just("Bob", "Bill", "Jane")
.map(name -> SingleHelloRequest.newBuilder().setName(name).build())
);
return grpcExchange.response();
})
.flatMapMany(GrpcResponse.Streaming::stream)
.collect(Collectors.toList())
.block();
In above example, the client sends multiple SingleHelloRequest messages and the server sends multiple SingleHelloReply messages in response.
In such use case, both the server and the client can send messages when they are available. Messages sent by the server do not necessarily relates to messages sent by the client, the two streams are not necessarily correlated.
Cancellation
A client can decide to cancel a gRPC when it is no longer interested in the result of a gRPC call as defined by gRPC Cancellation.
endpoint.exchange()
.map(exchange -> grpcClient...) // converts HTTP exchange to a server streaming or bidirectional streaming gRPC exchange
.flatMapMany(grpcExchange -> {
// set the request
...
return grpcExchange.response()
.flatMapMany(response -> response.stream())
.doOnNext(message -> {
if(...) { // Check cancellation conditions then cancel
exchange.cancel();
}
});
})
.subscribe(...);
Cancelling the exchange basically cancels subscriptions to the request and response message publishers and sends a RST_STREAM frame to the server with code CANCEL (0x8). When receiving this signal, the server is expected to do the same and also propagate the cancellation to any outgoing gRPC calls.
A gRPC client exchange is also canceled when a GrpcException with a CANCELLED(1) status is thrown in the request or response streams. But a more elegant way to cancel a gRPC exchange is to simply cancel the response subscription:
Disposable disposable = endpoint.exchange()
.map(exchange -> grpcClient...) // converts HTTP exchange to a server streaming or bidirectional streaming gRPC exchange
.flatMapMany(grpcExchange -> {
// set the request
...
return grpcExchange.response();
})
.flatMapMany(GrpcResponse.Streaming::stream)
.subscribe(...);
disposable.cancel();
The reactive nature of the Inverno framework makes this quite natural, the exchange paradigm implemented in HTTP client and server already considers request and response as data streams that can be cancelled anytime. Considering a server making outgoing HTTP calls chained to an original request, those will be automatically canceled when the original request is canceled and this is especially the case for gRPC.
gRPC Server
The Inverno grpc-server module allows to create reactive gRPC servers as described by the gRPC over HTTP/2 protocol on top of the http-server module.
It provides an API to create HTTP exchange handlers supporting the gRPC protocol. A gRPC exchange basically supports:
- the four kinds of gRPC service methods: unary, client streaming, server streaming and bidirectional streaming as defined by the gRPC core concepts.
- metadata and especially encoding/decoding of Base64 protocol buffer binary metadata
- message compression with built-in support for
gzip,deflateandsnappymessage encodings - cancellation
This module requires a net service which is usually provided by the boot module. One of http-server module or the web-server module (which compose the http-server module), although not required to bootstrap the module, is required to be able to expose HTTP/2 endpoints. In order to use the Inverno grpc-server module and expose a gRPC service endpoint, we should then declare the following dependencies in the module descriptor:
@io.inverno.core.annotation.Module
module io.inverno.example.app_grpc_server {
requires io.inverno.mod.boot;
requires io.inverno.mod.web.server;
requires io.inverno.mod.grpc.server;
}
The grpc-base module which provides base gRPC API and services is composed as a transitive dependency in the grpc-server module and as a result it doesn't need to be specified here nor provided in an enclosing module.
We also need to declare these dependencies in the build descriptor:
Using Maven:
<project>
<dependencies>
<dependency>
<groupId>io.inverno.mod</groupId>
<artifactId>inverno-boot</artifactId>
</dependency>
<dependency>
<groupId>io.inverno.mod</groupId>
<artifactId>inverno-web-server</artifactId>
</dependency>
<dependency>
<groupId>io.inverno.mod</groupId>
<artifactId>inverno-grpc-server</artifactId>
</dependency>
</dependencies>
</project>
Using Gradle:
compile 'io.inverno.mod:inverno-boot:1.13.0'
compile 'io.inverno.mod:inverno-web-server:1.13.0'
compile 'io.inverno.mod:inverno-grpc-server:1.13.0'
A gRPC service is basically exposed by using the GrpcServer bean to convert a unary, client streaming, server streaming or bidirectional streaming gRPC exchange handler into an HTTP server exchange handler which can then be injected either in the HTTP server controller or more conveniently in a Web route:
package io.inverno.example.app_grpc_server;
import examples.HelloReply;
import examples.HelloRequest;
import io.inverno.core.annotation.Bean;
import io.inverno.mod.base.resource.MediaTypes;
import io.inverno.mod.grpc.base.GrpcServiceName;
import io.inverno.mod.grpc.server.GrpcExchange;
import io.inverno.mod.grpc.server.GrpcServer;
import io.inverno.mod.http.base.ExchangeContext;
import io.inverno.mod.http.base.Method;
import io.inverno.mod.web.server.WebRouter;
@Bean( visibility = Visibility.PRIVATE )
public class GreeterRouteConfigurer implements WebRouter.Configurer<ExchangeContext> {
private final GrpcServer grpcServer;
public GreeterRouteConfigurer(GrpcServer grpcServer) {
this.grpcServer = grpcServer;
}
@Override
public void configure(WebRouter<ExchangeContext> router) {
router
.route()
.path(GrpcServiceName.of("helloworld", "Greeter").methodPath("SayHello")) // /helloworld.Greeter/SayHello
.method(Method.POST)
.consume(MediaTypes.APPLICATION_GRPC)
.consume(MediaTypes.APPLICATION_GRPC_PROTO)
.handler(this.grpcServer.unary( // Create a unary exchange handler
HelloRequest.getDefaultInstance(),
HelloReply.getDefaultInstance(),
(GrpcExchange.Unary<ExchangeContext, HelloRequest, HelloReply> grpcExchange) -> { // Handle the gRPC exchange
grpcExchange.response().value(grpcExchange.request().value()
.map(helloRequest -> HelloReply.newBuilder()
.setMessage("Hello " + helloRequest.getName())
.build()
)
);
}
));
}
}
In above example, bean greeterRouteConfigurer is created in module app_grpc_client, the Web routes configurer is automatically registered to the Web server by the Inverno Web compiler to expose helloworld.Greeter/SayHello gRPC endpoint. When receiving a HelloRequest message the server simply responds with a corresponding HelloReply message.
Note that the gRPC protocol is built on top of HTTP/2 and as such the underlying connection should be an HTTP/2 connection, trying to convey gRPC messages over an HTTP/1.x connection, although possible in theory, is discouraged as it will break interoperability and might lead to unpredictable behaviours.
2024-04-08 11:52:41,131 INFO [main] i.i.c.v.Application - Inverno is starting...
╔════════════════════════════════════════════════════════════════════════════════════════════╗
║ , ~~ , ║
║ , ' /\ ' , ║
║ , __ \/ __ , _ ║
║ , \_\_\/\/_/_/ , | | ___ _ _ ___ __ ___ ___ ║
║ , _\_\/_/_ , | | / _ \\ \ / // _ \ / _|/ _ \ / _ \ ║
║ , __\_/\_\__ , | || | | |\ \/ /| __/| | | | | | |_| | ║
║ , /_/ /\/\ \_\ , |_||_| |_| \__/ \___||_| |_| |_|\___/ ║
║ , /\ , ║
║ , \/ , -- 1.6.0 -- ║
║ ' -- ' ║
╠════════════════════════════════════════════════════════════════════════════════════════════╣
║ Java runtime : OpenJDK Runtime Environment ║
║ Java version : 22+36-snap ║
║ Java home : /snap/openjdk/1735/jdk ║
║ ║
║ Application module : io.inverno.example.app_grpc_server ║
║ Application version : 1.0.0-SNAPSHOT ║
║ Application class : io.inverno.example.app_grpc_server.Main ║
║ ║
║ Modules : ║
║ ... ║
╚════════════════════════════════════════════════════════════════════════════════════════════╝
2024-04-08 11:52:41,141 INFO [main] i.i.e.a.App_grpc_server - Starting Module io.inverno.example.app_grpc_server...
2024-04-08 11:52:41,142 INFO [main] i.i.m.b.Boot - Starting Module io.inverno.mod.boot...
2024-04-08 11:52:41,357 INFO [main] i.i.m.b.Boot - Module io.inverno.mod.boot started in 215ms
2024-04-08 11:52:41,358 INFO [main] i.i.m.g.s.Server - Starting Module io.inverno.mod.grpc.server...
2024-04-08 11:52:41,358 INFO [main] i.i.m.g.b.Base - Starting Module io.inverno.mod.grpc.base...
2024-04-08 11:52:41,474 INFO [main] i.i.m.g.b.Base - Module io.inverno.mod.grpc.base started in 116ms
2024-04-08 11:52:41,477 INFO [main] i.i.m.g.s.Server - Module io.inverno.mod.grpc.server started in 119ms
2024-04-08 11:52:41,477 INFO [main] i.i.m.w.s.Server - Starting Module io.inverno.mod.web.server...
2024-04-08 11:52:41,477 INFO [main] i.i.m.h.s.Server - Starting Module io.inverno.mod.http.server...
2024-04-08 11:52:41,478 INFO [main] i.i.m.h.b.Base - Starting Module io.inverno.mod.http.base...
2024-04-08 11:52:41,483 INFO [main] i.i.m.h.b.Base - Module io.inverno.mod.http.base started in 5ms
2024-04-08 11:52:41,633 INFO [main] i.i.m.h.s.i.HttpServer - HTTP Server (epoll) listening on http://0.0.0.0:8080
2024-04-08 11:52:41,633 INFO [main] i.i.m.h.s.Server - Module io.inverno.mod.http.server started in 155ms
2024-04-08 11:52:41,633 INFO [main] i.i.m.w.s.Server - Module io.inverno.mod.web.server started in 156ms
2024-04-08 11:52:41,634 INFO [main] i.i.e.a.App_grpc_server - Module io.inverno.example.app_grpc_server started in 500ms
2024-04-08 11:52:41,634 INFO [main] i.i.c.v.Application - Application io.inverno.example.app_grpc_server started in 559ms
The Greeter service can be invoked using an Inverno gRPC client but since this service is gRPC official HelloWorld example, we can also use gRPC-java HelloWorld example:
$ $GRPC_JAVA_HOME/examples/build/install/examples/bin/hello-world-client Bob localhost:8080
avr. 08, 2024 11:58:42 AM io.grpc.examples.helloworld.HelloWorldClient greet
INFOS: Will try to greet Bob ...
avr. 08, 2024 11:58:42 AM io.grpc.examples.helloworld.HelloWorldClient greet
INFOS: Greeting: Hello Bob
$
Above example showed a programmatic way to expose gRPC service methods, gRPC works with protocol buffer which allows to specify messages and services in an interface description language (proto 3). The protocol buffer compiler is used to generate Java classes from .proto files, it can be extended with the Inverno gRPC plugin in order to automatically generate Inverno Web routes configurers for gRPC services at build time.
For instance, providing the following protocol buffer service definition:
service Greeter {
rpc SayHello (HelloRequest) returns (HelloReply) {}
}
The plugin generates abstract class GreeterGrpcRouteConfigurer implementing boilerplate code, we can then simply extend that class to implement the service logic:
package io.inverno.example.app_grpc_server;
import examples.GreeterGrpcRouteConfigurer;
import examples.HelloReply;
import examples.HelloRequest;
import io.inverno.core.annotation.Bean;
import io.inverno.core.annotation.Bean.Visibility;
import io.inverno.mod.grpc.server.GrpcServer;
import io.inverno.mod.http.base.ExchangeContext;
import reactor.core.publisher.Mono;
@Bean( visibility = Visibility.PRIVATE )
public class GreeterController extends GreeterGrpcRouteConfigurer<ExchangeContext> {
public GreeterController(GrpcServer grpcServer) {
super(grpcServer);
}
@Override
public Mono<HelloReply> sayHello(HelloRequest request) {
return Mono.just(HelloReply.newBuilder().setMessage("Hello " + request.getName()).build());
}
}
Above example simply handles HelloRequest message to produce corresponding HelloReply message, but it is also possible to access the GrpcExchange to access request metadata or set response metadata:
package io.inverno.example.app_grpc_server;
import examples.GreeterGrpcRouteConfigurer;
import examples.HelloReply;
import io.inverno.core.annotation.Bean;
import io.inverno.core.annotation.Bean.Visibility;
import io.inverno.mod.grpc.server.GrpcExchange;
import io.inverno.mod.grpc.server.GrpcServer;
import io.inverno.mod.http.base.ExchangeContext;
import java.util.Optional;
@Bean( visibility = Visibility.PRIVATE )
public class GreeterController extends GreeterGrpcRouteConfigurer<ExchangeContext> {
public GreeterController(GrpcServer grpcServer) {
super(grpcServer);
}
@Override
public void sayHello(GrpcExchange.Unary<ExchangeContext, examples.HelloRequest, examples.HelloReply> grpcExchange) {
Optional<String> requestMetadata = grpcExchange.request().metadata().get("SomeRequestMetadata");
grpcExchange.response()
.metadata(metadata -> metadata.set("SomeResponseMetadata", "someValue"))
.value(grpcExchange.request().value()
.map(helloRequest -> HelloReply.newBuilder().setMessage("Hello " + helloRequest.getName()).build())
);
}
}
Note that the
GreeterControllerclass must be created as a@Beanin order for the service routes to be registered the Web server.
Configuration
The grpc-server module operates on top of the http-server or web-server modules, as a result network configuration and server specific configuration are inherited from the HTTP server or [Web server][#web-server] configuration. The grpc-server specific configuration basically conveys the grpc-base module configuration which configures the built-in message compressors. A specific configuration can be created in the application module to easily override the default configurations:
package io.inverno.example.app_grpc_server;
import io.inverno.core.annotation.NestedBean;
import io.inverno.mod.configuration.Configuration;
import io.inverno.mod.grpc.server.GrpcServerConfiguration;
import io.inverno.mod.web.server.WebServerConfiguration;
@Configuration
public interface App_grpc_serverConfiguration {
@NestedBean
GrpcServerConfiguration grpc_server();
@NestedBean
WebServerConfiguration web_server();
}
The Web server can then be configured. For instance, we can enable direct HTTP/2 over cleartext which is required to expose gRPC endpoints, configure the server port or the built-in gRPC message compressors:
package io.inverno.example.app_grpc_server;
import io.inverno.core.v1.Application;
import io.inverno.mod.configuration.source.BootstrapConfigurationSource;
public class Main {
public static void main(String[] args) throws IOException {
Application.run(new App_grpc_server.Builder()
.setApp_grpc_serverConfiguration(App_grpc_serverConfigurationLoader.load(configuration -> configuration
.grpc_server(grpcServer -> grpcServer
.base(base -> base.compression_gzip_compressionLevel(6))
)
.web_server(webServer -> webServer
.http_server(httpServer -> httpServer
.server_port(8081)
.h2_enabled(true)
)
)
))
);
}
}
The support for native transport or TLS secured connection is provided by the HTTP server which must be configured accordingly. Although nothing prevents to send gRPC messages over an HTTP/1.x connection, this is discouraged as it will break interoperability and might result in unpredictable behaviours, particular care must be taken to ensure the server is properly configured to accept HTTP/2 connections.
Please refer to the API documentation to have an exhaustive description of the different configuration properties.
You can also refer to the configuration module documentation to get more details on how configuration works and more especially how you can from here define the server configuration in command line arguments, property files...
gRPC exchange
The gRPC protocol specifies four kinds of service method that all fit into the exchange paradigm: unary RPC, client streaming RPC, server streaming RPC and bidirectional streaming RPC. The GrpcServer allows to convert a gRPC exchange handler handling one of those into a regular HTTP exchange handler that can be used to handle exchanges in the HTTP server controller or in a Web route. Protocol buffer being used to encode and decode client and server messages, default message instances are required when creating a gRPC exchange handler.
A GrpcExchange exposes a context, the GrpcRequest and the GrpcResponse.
gRPC request
The gRPC server request exposes common request information, the request metadata as well as the request messages publisher. There are two kinds of gRPC requests: unary and streaming requests which are exposed depending on the kind of exchange: unary and server streaming exchanges expose unary requests whereas client streaming and bidirectional streaming exchanges expose streaming requests.
The service name and the request method can be obtained as follows:
(GrpcExchange.Unary<ExchangeContext, HelloRequest, HelloReply> grpcExchange) -> {
// <package>.<service>
GrpcServiceName serviceName = grpcExchange.request().getServiceName();
// <method>
String methodName = grpcExchange.request().getMethodName();
// <package>.<service>/<method>
String fullMethodName = grpcExchange.request().getFullMethodName();
...
}
Standard or custom request metadata including protocol buffer binary data encoded in Base64 can be accessed as follows:
(GrpcExchange.Unary<ExchangeContext, HelloRequest, HelloReply> grpcExchange) -> {
GrpcInboundRequestMetadata metadata = grpcExchange.request().metadata();
List<String> acceptMessageEncodings = metadata.getAcceptMessageEncoding();
Optional<String> messageEncoding = metadata.getMessageEncoding();
Optional<Duration> timeout = grpcExchange.request().metadata().getTimeout();
Optional<String> customValue = metadata.get("custom");
Optional<SomeMessage> customBinaryValue = metadata.getBinary("customBinary", SomeMessage.getDefaultInstance()); // -bin suffix is automatically added
...
}
When considering a unary or a server streaming exchange, the request message is exposed as a single publisher:
(GrpcExchange.Unary<ExchangeContext, HelloRequest, HelloReply> grpcExchange) -> {
Mono<HelloRequest> value = grpcExchange.request().value(); // single request message
...
}
(GrpcExchange.ServerStreaming<ExchangeContext, HelloRequest, HelloReply> grpcExchange) -> {
Mono<HelloRequest> value = grpcExchange.request().value(); // single request message
...
}
When considering a client streaming or a bidirectional streaming exchange, the request messages are exposed in a publisher:
(GrpcExchange.ClientStreaming<ExchangeContext, HelloRequest, HelloReply> grpcExchange) -> {
Publisher<HelloRequest> stream = grpcExchange.request().stream(); // multiple request message
...
}
(GrpcExchange.BidirectionalStreaming<ExchangeContext, HelloRequest, HelloReply> grpcExchange) -> {
Publisher<HelloRequest> stream = grpcExchange.request().stream(); // multiple request message
...
}
gRPC Exchange interceptor
A gRPC exchange is backed by an HTTP server exchange which can be intercepted just like any HTTP exchange. There's no specific gRPC API for interceptor, it is assumed the HTTP server or Web server API are enough to cover all use cases.
gRPC Exchange context
The context is inherited from the HTTP server or the Web server, it is used to convey contextual information such as security, tracing... throughout the processing of the exchange and especially within interceptors.
Unary gRPC exchange
A unary gRPC exchange corresponds to the request/response paradigm where a server receives exactly one message from the client and responds with exactly one message.
The following example shows how to expose a unary service method:
...
@Override
public final void configure(WebRouter<ExchangeContext> router) {
router
.route()
.path(SERVICE_NAME.methodPath("SayHello"))
.method(Method.POST)
.consume(MediaTypes.APPLICATION_GRPC)
.consume(MediaTypes.APPLICATION_GRPC_PROTO)
.handler(this.grpcServer.unary(
SingleHelloRequest.getDefaultInstance(),
SingleHelloReply.getDefaultInstance(),
(GrpcExchange.Unary<ExchangeContext, SingleHelloRequest, SingleHelloReply> grpcExchange) -> {
grpcExchange.response().value(grpcExchange.request().value()
.map(request -> SingleHelloReply.newBuilder().setMessage("Hello " + request.getName()).build())
);
}
));
}
...
The server receives one SingleHelloRequest message and sends one SingleHelloReply message in response.
Client streaming gRPC exchange
A client streaming gRPC exchange corresponds to the stream/response paradigm where a server receives a stream of messages from the client and responds with exactly one message.
The following example shows how to expose a client streaming service method:
...
@Override
public final void configure(WebRouter<ExchangeContext> router) {
router
.route()
.path(SERVICE_NAME.methodPath("SayHelloToEverybody"))
.method(Method.POST)
.consume(MediaTypes.APPLICATION_GRPC)
.consume(MediaTypes.APPLICATION_GRPC_PROTO)
.handler(this.grpcServer.clientStreaming(
SingleHelloRequest.getDefaultInstance(),
GroupHelloReply.getDefaultInstance(),
(GrpcExchange.ClientStreaming<ExchangeContext, SingleHelloRequest, GroupHelloReply> grpcExchange) -> {
grpcExchange.response().value(Flux.from(grpcExchange.request().stream())
.map(SingleHelloRequest::getName)
.collectList()
.map(names -> GroupHelloReply.newBuilder().setMessage("Hello ").addAllNames(names).build())
);
}
));
}
...
The client receives multiple SingleHelloRequest messages and sends one GroupHelloReply message in response.
In such use case, the server typically aggregates all requests and only sends the response after all of them has been received and processed. Requests can be aggregated before processing or processed on the fly using a reduction operation.
For instance, above example could be rewritten using a reduction operation like this:
...
@Override
public final void configure(WebRouter<ExchangeContext> router) {
router
.route()
.path(SERVICE_NAME.methodPath("SayHelloToEverybody"))
.method(Method.POST)
.consume(MediaTypes.APPLICATION_GRPC)
.consume(MediaTypes.APPLICATION_GRPC_PROTO)
.handler(this.grpcServer.clientStreaming(
SingleHelloRequest.getDefaultInstance(),
GroupHelloReply.getDefaultInstance(),
(GrpcExchange.ClientStreaming<ExchangeContext, SingleHelloRequest, GroupHelloReply> grpcExchange) -> {
grpcExchange.response().value(Flux.from(grpcExchange.request().stream())
.reduceWith(
() -> GroupHelloReply.newBuilder().setMessage("Hello "),
(reply, request) -> reply.addNames(request.getName())
)
.map(GroupHelloReply.Builder::build)
);
}
));
}
...
Server streaming gRPC exchange
A server streaming gRPC exchange corresponds to the request/stream paradigm where a server receives exactly one message and responds with a stream of messages.
The following example shows how to expose a server streaming service method:
...
@Override
public final void configure(WebRouter<ExchangeContext> router) {
router
.route()
.path(SERVICE_NAME.methodPath("SayHelloToEveryoneInTheGroup"))
.method(Method.POST)
.consume(MediaTypes.APPLICATION_GRPC)
.consume(MediaTypes.APPLICATION_GRPC_PROTO)
.handler(this.grpcServer.serverStreaming(
GroupHelloRequest.getDefaultInstance(),
SingleHelloReply.getDefaultInstance(),
(GrpcExchange.ServerStreaming<ExchangeContext, GroupHelloRequest, SingleHelloReply> grpcExchange) -> {
grpcExchange.response().stream(grpcExchange.request().value()
.flatMapMany(request -> Flux.fromIterable(request.getNamesList())
.map(name -> SingleHelloReply.newBuilder().setMessage("Hello " + name).build())
)
);
}
));
}
...
The server receives one GroupHelloRequest message and sends multiple SingleHelloReply message in response.
In such use case, the server sends response messages that the client can either process as soon as they are available or aggregate to process them all at once at the end of the call.
Bidirectional streaming gRPC exchange
A bidirectional streaming gRPC exchange corresponds to the stream/stream paradigm where a server receives a stream of messages and responds with a stream of messages.
The following example shows how to expose a bidirectional streaming service method:
...
@Override
public final void configure(WebRouter<ExchangeContext, ?> router) {
router
.route()
.path(SERVICE_NAME.methodPath("SayHelloToEveryoneInTheGroups"))
.method(Method.POST)
.consume(MediaTypes.APPLICATION_GRPC)
.consume(MediaTypes.APPLICATION_GRPC_PROTO)
.handler(this.grpcServer.bidirectionalStreaming(
GroupHelloRequest.getDefaultInstance(),
SingleHelloReply.getDefaultInstance(),
(GrpcExchange.BidirectionalStreaming<ExchangeContext, GroupHelloRequest, SingleHelloReply> grpcExchange) -> {
grpcExchange.response().stream(Flux.from(grpcExchange.request().stream())
.map(GroupHelloRequest::getNamesList)
.flatMap(Flux::fromIterable)
.map(name -> SingleHelloReply.newBuilder().setMessage("Hello " + name).build())
);
}
));
}
...
In above example, the server receives multiple GroupHelloRequest messages and sends multiple SingleHelloReply messages in response.
In such use case, both the server and the client can send messages when they are available. Messages sent by the server do not necessarily relates to messages sent by the client, the two streams are not necessarily correlated.
Cancellation
A server can decide to cancel a gRPC when it can no longer produce result to the client or if it estimates the client won't be interested anymore as defined by gRPC Cancellation. This is typically the case when it exceeds the timeout specified by the client in the gRPC request.
Considering a server streaming exchange, gRPC request timeout can be implemented as follows:
(GrpcExchange.ServerStreaming<A, GroupHelloRequest, SingleHelloReply> grpcExchange) -> {
Duration timeout = grpcExchange.request().metadata().getTimeout().orElse(Duration.ofSeconds(20)); // Get the grpc-timeout, defaults to 20 seconds when missing
grpcExchange.response().stream(Flux.interval(Duration.ofSeconds(1)) // A long-running stream that will eventually time out
.map(index -> SingleHelloReply.newBuilder().setMessage("Hello " + index).build())
.doOnCancel(() -> grpcExchange.cancel()) // Cancel the exchange on cancel subscription
.take(timeout) // Cancel subscription when the request timeout is exceeded
);
}
...
Cancelling the exchange basically cancels subscriptions to the request and response message publishers and sends a RST_STREAM frame to the client with code CANCEL (0x8).
A gRPC server exchange is also canceled when a GrpcException with a CANCELLED(1) status is thrown in the response stream.
gRPC error handler
The GrpcServer also provides an HTTP exchange error handler that can be injected in the HTTP server or Web server in order to map HTTP errors to gRPC status code.
In a gRPC exchange the expected HTTP code returned by a server should always be OK(200) even in case of errors which should then be reported in the grpc-status response trailer. The gRPC server exchange handler catches most of the errors that can be thrown when it is invoked by the server or when processing request and response messages publishers. However, it can't catch errors thrown outside the scope of the handler, like in interceptors for example. These errors are normally handled by the Web server error exchange handlers.
The gRPC error handler must be used to circumvent that issue, it can be injected in the HTTP server controller or in an error web route.
package io.inverno.example.app_grpc_server;
import io.inverno.core.annotation.Bean;
import io.inverno.core.annotation.Bean.Visibility;
import io.inverno.mod.base.resource.MediaTypes;
import io.inverno.mod.grpc.server.GrpcServer;
import io.inverno.mod.http.base.ExchangeContext;
import io.inverno.mod.web.server.ErrorWebRouter;
@Bean(visibility = Visibility.PRIVATE)
public class App_grpc_serverErrorWebRoutesConfigurer implements ErrorWebRouter.Configurer<ExchangeContext> {
private final GrpcServer grpcServer;
public App_grpc_serverErrorWebRoutesConfigurer(GrpcServer grpcServer) {
this.grpcServer = grpcServer;
}
@Override
public void configure(ErrorWebRouter<ExchangeContext> errorRouter) {
errorRouter
.routeError()
.consume(MediaTypes.APPLICATION_GRPC)
.consume(MediaTypes.APPLICATION_GRPC_JSON)
.consume(MediaTypes.APPLICATION_GRPC_PROTO)
.handler(this.grpcServer.errorHandler());
}
}
In case of errors, it basically makes sure the HTTP response status is OK(200), maps the HTTP error to a gRPC status code as define by HTTP to gRPC Status Code Mapping and sets in the response trailers.
Reactive Template
The Inverno irt module provides a template engine for efficient reactive data rendering.
Data are basically rendered by templates which are regrouped in template sets and applied based on the type of data to render. A template set is statically typed and generated by an Inverno compiler plugin which compiles .irt template set source files along with the Java sources of a module.
The template sets classes thus obtained support reactive rendering, data are rendered as a flow of events for efficient usage of resources. For instance, the complete set of data doesn't have to be available or loaded into memory, the rendering being reactive the output can be generated incrementally by processing each piece of data individually one after the other when they become available. Since the rendering process never blocks it is also possible to lazily load data when/if they need to be rendered.
The syntax of .irt template set is inspired from functional language such as XSLT and Erlang which are particularly suited for reactive rendering. Since a template is a generated Java class, the Java language is also widely used in a template source file, especially for the dynamic parts of a template.
In terms of raw performance, Inverno templates processing is faster than most Java template engines by an order of magnitude and with lower memory usage. The following benchmark project compares performances of various template engines rendering a list of stock items into an HTML document as a String.

Please keep in mind that outcomes might be different considering different scenarios, especially reactive rendering which might appear slower but addresses different concerns such as stream processing and optimized usage of resources.
In order to use the Inverno irt module, we need to declare a dependency in the module descriptor:
module io.inverno.example.app {
requires io.inverno.mod.irt;
}
And also declare that dependency in the build descriptor:
Using Maven:
<project>
<dependencies>
<dependency>
<groupId>io.inverno.mod</groupId>
<artifactId>inverno-irt</artifactId>
</dependency>
</dependencies>
</project>
Using Gradle:
compile 'io.inverno.mod:inverno-irt:1.13.0'
Dependencies to io.netty.common and io.netty.buffer are also required when using BYTEBUF or PUBLISHER_BYTEBUF modes which require Netty's ByteBuf. They are defined as optional in the irt module and won't be included by default. In order to use ByteBuf based generation modes, the following dependencies must be declared as well in the module descriptor:
module io.inverno.example.app {
requires io.netty.common;
requires transitive io.netty.buffer;
}
And the corresponding dependency to io.netty:netty-buffer must be declared in the build descriptor:
Using Maven:
<project>
<dependencies>
<dependency>
<groupId>io.netty</groupId>
<artifactId>netty-buffer</artifactId>
</dependency>
</dependencies>
</project>
Using Gradle:
compile 'io.netty:netty-buffer:4.1.79.Final'
Creates an .irt template
A template can be created along with other Java source files in the source directory of an Inverno module. At compile time, the Inverno reactive template compiler plugin will scan the module source folder for .irt files and compiles them to generate template set classes that can be used in your module to render data.
The following Simple.irt template set is a simple example containing one template that renders a Message object as String:
package io.inverno.example.app_irt.templates;
import io.inverno.example.app_irt.model.Message;
option modes = {"STRING"};
option charset = "utf-8";
(Message message) -> {The message is: {@message.message}}
package io.inverno.example.app_irt.model;
public class Message {
private final String message;
private final boolean important;
public Message(String message, boolean important) {
this.message = message;
this.important = important;
}
public String getMessage() {
return message;
}
public boolean isImportant() {
return important;
}
}
As for any Java source file, the preceding template source must be created in the same package as the one it declares in a module source folder. The name of the template corresponds to the name of the file.
After compiling the module, a new Java class Simple.java should have been created in the generated source folder in package io.inverno.example.app_irt.templates.
A Message object can then be rendered as follows:
CompletableFuture<String> rendered = Simple.string().render(new Message("Hello, world!"));
System.out.println(rendered.get()); // The message is: Hello, world!
.irt syntax
Package and imports
An .irt template always starts with the declaration of the Java package containing the template, followed by the list of imported Java types or static methods used within the template. This is exactly the same as any Java source file.
package io.inverno.example.app_irt.templates;
import io.inverno.example.app_irt.model.Message;
...
Includes
Then you can specify external template sets to include in the template set using the include keyword. This allows to include templates from an external template set in a template set using the same precedence. For instance, in the following example, template set io.inverno.example.app_irt.templates.Misc is included in the template set which means that its templates can be applied in the including template.
include io.inverno.example.app_irt.templates.Misc;
Note that this can lead to conflicts when two included templates defines a template using the same signature (same name and same input parameters), such conflict can be resolved by explicitly overriding the conflicting template in the including template set.
Options
Rendering options are specified after that using the option keyword. You can for instance declare the charset to use for rendering which defaults to utf-8 if not specified:
option charset = "utf-8";
or the template rendering modes supported by the generated template set. There are five template rendering modes, you can choose to specify one or more modes depending on your needs:
- STRING to expose methods to render data in a
String, this is the default behavior - BYTEBUF to expose methods to render data in a
ByteBuf - STREAM to expose methods to render data in an
OutputStream - PUBLISHER_STRING to expose methods to render data in a
Publisher<String> - PUBLISHER_BYTEBUF to expose methods to render data in a
Publisher<ByteBuf>
The last two modes are particularly suitable for reactive rendering.
option modes = {"STRING", "STREAM", "PUBLISHER_STRING"};
Templates
Templates are specified last. A template is a function that defines how a particular input must be rendered, a template can have a name in which case it is referred as a named template. In a template set, there can't be two templates with the same signature (i.e. defining the same input parameters) unless they have different names.
A template is declared as follows:
(Message message) -> {...}
A named template is declared as follows:
name(Message message) -> {...}
A template can be defined with zero or more parameters. No parameter templates can be useful to create static templates such as headers or footers, they are usually named:
header() -> {...}
The body of a template is a combination of static content and statements which define how the template input should be rendered. Template statements are specified within braces {...} which must be escaped within static content using \.
A template can also be specified without a body in order to create aliases or resolve conflicts.
For instance the following template defines alias apple for template fruit (assuming Apple is an instance of Fruit):
apple(Apple fruit) -> this::fruit
fruit(Fruit fruit) -> {...}
And the following template resolves a conflict induced by the inclusion of template set Include1 and Include2 which both defines template conflicting with the same input parameters:
...
include io.inverno.example.app_irt.templates.Include1;
include io.inverno.example.app_irt.templates.Include2;
...
conflicting(String input) -> Include1
Static content
Static contents are specified directly in the template body and are rendered as is:
(...) -> {
This is a static content, braces: \{ and \} must be escaped.
}
Comment
The syntax supports two kinds of comments which can be either outside or inside the body of a template.
Outside the body of a template, comments are regular Java comments:
/*
* This a comment to explain that the following import is commented
*/
// import java.util.List;
Inside the body of a template, comments are statements starting with {% and ending with }:
(Message message) -> {
Hello {% this is a comment} World.
}
Value of
A value can be rendered directly in a synchronous way within a statement starting with {@ and ending with } as follows:
(Message message) -> {
The message is: {@message.message}
}
In the preceding example, we used a syntactic sugar to navigate into the message object hierarchy and access the message properties, but it is also possible to evaluate a raw Java expression specified between ( and ) to get the same result:
(Message message) -> {
The message is: {@(message.getMessage())}
}
It is then possible to evaluate any Java expression:
(Message message) -> {
The message is: {@(5+8)}
}
Note that this may pose a security threat when the origin of a template set can't be trusted.
If
An if statement can be used to render different contents based on one or more conditions. An if statement starts with {@if and ends with }, it contains one or more branches separated by ; defining a condition and a corresponding body, a default branch with an empty condition can be specified last. Each condition is specified as a raw Java if expression between ( and ):
(Message message, String lang) -> {
{@if
(lang.equals("fr")) -> {
Le message est: {@message.message}
};
(lang.equals("de")) -> {
Die Nachricht ist: {@message.message}
};
() -> {
The message is: {@message.message}
}
}
}
Apply template
Templates can be applied on data using an apply template statement starting with { and ending with }. The template to apply is selected among the ones available in the template set based on the type of data to render following Java's rules for function overloading.
As for the value of statement, it is possible to use a syntactic sugar notation or a raw Java expression between ( and ) to select the data on which a template should be applied. A template set provides a default template for object which simply renders the toString() representation of the input. Considering previous examples, the content of a message object can then also be rendered as follows:
(Message message) -> {
The message is: {message.message}
}
Unlike the value of statement which renders data synchronously, applying a template can be an asynchronous operation depending on the type of data to render. Indeed, when the data to render is an array, an Iterable, a Stream or a Publisher, the template is applied on each element and in the case of a Publisher the operation is reactive, non-blocking and therefore asynchronous.
For instance, a list of messages can be rendered synchronously as follows:
(List<Message> messages) -> {
Messages are:
{messages}
}
(Message message) -> {{@message.message}
}
resulting in:
Messages are:
message 1
message 2
message 3
message 4
message 5
...
Now if we consider a Publisher, a message is rendered to the output when it is emitted by the publisher following reactive principles.
As you can see the apply template statement is extremely powerful, it is used to render data based on their types which facilitates composition, but it can also be used as a for loop statement to render a list of elements.
By default, an apply template statement will select the unnamed template within the template set matching the type of data to render, but it is also possible to select a named templates as follows:
(List<Message> messages) -> {
Messages are:
{messages;bullet}
}
(Message message) -> {{@message.message}
}
bullet(Message message) -> {* {@message.message}
}
resulting in:
Messages are:
* message 1
* message 2
* message 3
* message 4
* message 5
...
Extra parameters can also be passed to a template in which case we have to explicitly specify the inputs:
(List<Message> messages) -> {
Messages are:
{messages; message -> bullet(message, "-")}
}
bullet(Message message, String marker) -> {{@marker} {@message.message}
}
resulting in:
Messages are:
- message 1
- message 2
- message 3
- message 4
- message 5
...
It is also possible to specify guard expressions as raw Java expressions and choose to apply different templates based on certain conditions. For instance, let's say we want to render important messages in a specific way, we can do as follows:
(List<Message> messages) -> {
Messages are:
{messages;(message) -> important(message) when (message.isImportant());(message)}
}
(Message message) -> {{@message.message}
}
important(Message message) -> {**{@message.message}**
}
In the previous example, the important template is applied when a message is important and the unnamed template is applied otherwise. Assuming message 3 is important, this will result in:
Messages are:
- message 1
- message 2
- **message 3**
- message 4
- message 5
...
The index of an item in a list is made available when selecting the target template. For instance, a numbered list of messages can be rendered as follows:
(List<Message> messages) -> {
Messages are:
{messages;(index, message) -> (index, message)}
}
(long index, Message message) -> {{@index}. {@message.message}
}
resulting in:
Messages are:
0. message 1
1. message 2
2. message 3
3. message 4
4. message 5
...
A no-arg named template can be applied by omitting the data part in the statement:
(Message message) -> {
{;header}
The message is: {@message.message}
{;footer}
}
header() -> {==== HEADER ====
}
footer() -> {==== FOOTER ====
}
resulting in:
==== HEADER ====
The message is: {@message.message}
==== FOOTER ====
Pipes
A pipe can be used to transform data before they are rendered or before a template is applied, as a result they can be specified in value of and apply template statements. In practice, a pipe is a simple function that accepts a data and transform it into another data. Pipes can be chained to sequentially apply multiple transformations.
A pipe can be specified as a lambda expression and applied using a | in a value of or apply template statement as follows:
(Message message) -> {
The message is: {@message.message|((String content) -> content.toUpperCase())}
}
Lambdas are handy when there's a need for very specific pipes. However, the recommended way to create pipes is to define them in Java as static methods returning the Pipe implementation in order to keep the template readable. Above pipe can be defined in a Java class as follows:
package io.inverno.example.app_irt.pipes;
import io.inverno.mod.irt.Pipe;
public final class SamplePipes {
public static Pipe<String, String> uppercase() {
return String::toUpperCase;
}
}
We can then statically import that class in the template set and simplify above example:
import static io.inverno.example.app_irt.pipes.SamplePipes.*;
(Message message) -> {
The message is: {@message.message|uppercase}
}
Several built-in pipes are provided in the module in the Pipes, StreamPipes and PublisherPipes classes. The Pipes class provides pipes used to transform simple data object before rendering such as strings, dates and numbers. The StreamPipes and PublisherPipes provide pipes used to transformed streams and publishers typically in an apply template statement.
For instance the following example sort a list of items and map them to their datetime before applying templates:
import static io.inverno.mod.irt.Pipes.*;
import static io.inverno.mod.irt.PublisherPipes.*;
import java.time.format.DateTimeFormatter;
(Publisher<Item> items) -> {
{items|sort|map(Item::getDateTime)}
}
(ZonedDateTime datetime) -> {
{@datetime|dateTime(DateTimeFormatter.ISO_DATE_TIME)}
}
Modes
Template set classes are generated by the Inverno reactive template compiler plugin. Depending on the modes specified in the template set options, the resulting class will expose different render() methods with different outputs.
STRING
The STRING mode is the default resulting in the generation of render() methods that return a CompletableFuture<String> which completes once the input data has been fully rendered into the resulting String. For instance, assuming we have created a Simple.irt template set containing a template to render Message object, we can render a Message to a String as follows:
String result = Simple.string().render(new Message("some important message", true)).get();
The rendering process start as soon as the render() method is invoked, the get() operation on the resulting CompletableFuture waits until the message has been fully rendered. In this particular example, the whole process is synchronous since the input data is available from the start but keep in mind that this might not always be the case especially when Publisher objects are rendered in the process.
BYTEBUF
The BYTEBUF has a similar behavior except that data are rendered in a ByteBuf:
ByteBuf result = Simple.bytebuf().render(new Message("some important message", true)).get();
It is possible to provide the ByteBuf instance into which data should be rendered by defining a factory:
ByteBuf result = Simple.bytebuf(() -> Unpooled.unreleasableBuffer(Unpooled.buffer())).render(new Message("some important message", true)).get();
This can be useful to optimize memory as it allows to reuse ByteBuf instances or specify direct or pooled ByteBuf.
Note that the
BYTEBUFrequiresio.netty.commonandio.netty.buffermodules which must be declared explicitly in the module descriptor.
STREAM
The STREAM mode is used to render data in an OutputStream:
ByteArrayOutputStream result = Simple.stream(() -> new ByteArrayOutputStream()).render(new Message("some important message", true)).get();
PUBLISHER_*
Finally, the PUBLISHER_STRING and PUBLISHER_BYTEBUF modes are used to generate fully reactive rendering methods which return Publisher<String> and Publisher<ByteBuf> respectively. Unlike previous modes, the rendering process starts when a subscription is made on the returned Publisher which can emits partial rendering result whenever a partial data is rendered.
String result = Flux.from(Simple.publisherString().render(new Message("some important message", true))).collect(Collectors.joining()).block();
If you consider small data set and require very high performance, you should prefer non-reactive modes. If your concern is more about resources, considering a large amount of data that you do not want to load into memory at once or progressive rendering you should prefer reactive modes which might have a slight decrease in performance.
Note that the
BYTEBUFrequiresio.netty.commonandio.netty.buffermodules which must be declared explicitly in the module descriptor.
SQL Client
The Inverno SQL client module specifies a reactive API for executing SQL statement on a RDBMS.
This module only exposes the API and a proper implementation module must be considered to obtain SqlClient instances.
In order to use the Inverno SQL client module, we need to declare a dependency to the API and at least one implementation in the module descriptor:
@io.inverno.core.annotation.Module
module io.inverno.example.app {
requires io.inverno.mod.sql; // this is actually optional since implementations should already define a transitive dependency
requires io.inverno.mod.sql.vertx; // Vert.x implementation
}
And also declare these dependencies in the build descriptor:
Using Maven:
<project>
<dependencies>
<dependency>
<groupId>io.inverno.mod</groupId>
<artifactId>inverno-sql</artifactId>
</dependency>
<dependency>
<groupId>io.inverno.mod</groupId>
<artifactId>inverno-sql-vertx</artifactId>
</dependency>
</dependencies>
</project>
Using Gradle:
compile 'io.inverno.mod:inverno-sql:1.13.0'
compile 'io.inverno.mod:inverno-sql-vertx:1.13.0'
SQL client API
The Sql client API defines the SqlClient interface which provides reactive methods to execute SQL statements on a RDBMS.
Query and update
The SqlClient extends the SqlOperations interface which defines methods for common RDBMS operations such as query or update in addition to the more general statements and prepared statements.
We can query a database as follows:
SqlClient client = ...
Flux<Person> persons = Flux.from(
client.query("SELECT * FROM person")
)
.map(row -> new Person(row.getString("firstname"), row.getString("name"), row.getLocalDate("birthdate"))); // Map the resulting rows
persons.subscribe(...); // The query is executed on subscribe following reactive principles
Prepared queries are also supported:
Publisher<Row> results = client.query("SELECT * FROM person WHERE name = $1", "John");
A row mapping function can be specified directly in the query as well
Publisher<Person> results = client.query(
"SELECT * FROM person WHERE name = $1",
row -> new Person(row.getString("firstname"), row.getString("name"), row.getLocalDate("birthdate")),
"Smith"
);
A single result can also be queried as follows:
Mono<Person> person = client.queryForObject( // only consider the first row in the results
"SELECT * FROM person WHERE name = $1",
row -> new Person(row.getString("firstname"), row.getString("name"), row.getLocalDate("birthdate")),
"Smith"
);
The two previous examples are actually optimizations of the first one which enable implementations to optimize the query, resulting in faster execution.
The database can be updated as follows:
client.update(
"UPDATE person SET birthdate = $1 WHERE id = $2",
LocalDate.of(1970, 1, 1), 123
);
It can also be updated in a batch as follows:
client.batchUpdate(
"UPDATE person SET birthdate = $1 WHERE id = $2",
List.of(
new Object[]{ LocalDate.of(1970, 1, 1), 123 },
new Object[]{ LocalDate.of(1980, 1, 1), 456 },
new Object[]{ LocalDate.of(1990, 1, 1), 789 }
)
);
Note that all these operations use prepared statements which protect against SQL injection attacks.
Statements
The SqlClient also defines methods to create more general statements and prepared statements.
A static statement can be created and executed as follows:
SqlClient client = ...
Publisher<SqlResult> results = client.statement("SELECT * FROM person").execute();
// The statement is executed on subscribe following reactive principles
results.subscribe(...);
The execution of a statement returns SqlResult for each SQL operations in the statement in a publisher.
The SqlResult exposes row metadata and depending on the operation type either the number of rows affected by the operation (UPDATE or DELETE) or the resulting rows (SELECT).
Following preceding example:
Flux<Person> persons = Flux.from(client.statement("SELECT * FROM person").execute())
.single() // Make sure we have only one result
.flatMapMany(SqlResult::rows)
.map(row -> new Person(row.getString("firstname"), row.getString("name"), row.getLocalDate("birthdate")))
persons.subscribe(...);
Queries can also be fluently appended to a statement as follows:
Publisher<SqlResult> results = client
.statement("SELECT * FROM person")
.and("SELECT * FROM city")
.and("SELECT * FROM country")
.execute();
Unlike prepared statements, static statements are not pre-compiled and do not protect against SQL injection attacks which is why prepared statements should be preferred when there is a need for performance, dynamic or user provided queries.
A prepared statement can be created and executed as follows:
SqlClient client = ...
Publisher<SqlResult> results = client.preparedStatement("SELECT * FROM person WHERE name = $1")
.bind("Smith") // bind the query argument
.execute();
// The statement is executed on subscribe following reactive principles
results.subscribe(...);
As for a static statement, a prepared statement returns SqlResult for each SQL operations in the statement, however it is not possible to specify multiple operation in a prepared statement. But it is possible to transform it into a batch which will result in multiple operations and therefore multiple SqlResult.
In order to create a batch statement, we must bind multiple query arguments as follows:
Publisher<SqlResult> results = client.preparedStatement("SELECT * FROM person WHERE name = $1")
.bind("Smith") // first query
.and().bind("Cooper") // second query
.and().bind("Johnson") // third query
.execute();
// Returns 3 since we have created a batch statement with three queries
long resultCount = Flux.from(results).count().block();
Transactions
The API provides two ways to execute statement in a transaction which can be managed explicitly or implicitly.
We can choose to manage transaction explicitly by obtaining a TransactionalSqlOperations which exposes commit() and rollback() methods that we must invoke explicitly to close the transaction:
In the following example we perform a common SELECT/UPDATE operation within a transaction:
SqlClient client = ...
final float debit = 42.00f;
final int accountId = 1;
Mono<Integer> affectedRows = Mono.usingWhen(
client.transaction(),
tops -> tops
.queryForObject("SELECT balance FROM account WHERE id = $1", row -> row.getFloat(0), accountId)
.flatMap(balance -> ops
.update("UPDATE account SET balance = $1 WHERE id = $2", balance - debit, accountId)
.doOnNext(rowCount -> {
if(balance - debit < 0) {
throw new IllegalStateException();
}
})
)
,
tops -> { // Complete
// extra processing before commit
// ...
return tops.commit();
},
(tops, ex) -> { // Error
// extra processing before roll back
// ...
return tops.rollback();
},
tops -> { // Cancel
// extra processing before commit
// ...
return tops.rollback();
}
);
// On subscribe, a transaction is created, the closure method is invoked and the transaction is explicitly committed or rolled back when the publisher terminates.
affectedRows.subscribe(...);
The following example does the same but with implicit transaction management:
SqlClient client = ...
final float debit = 42.00f;
final int accountId = 1;
Publisher<Integer> affectedRows = client.transaction(ops -> ops
.queryForObject("SELECT balance FROM account WHERE id = $1", row -> row.getFloat(0), accountId)
.flatMap(balance -> ops
.update("UPDATE account SET balance = $1 WHERE id = $2", balance - debit, accountId)
.doOnNext(rowCount -> {
if(balance - debit < 0) {
throw new IllegalStateException();
}
})
)
);
// Same as before but the transaction is implicitly committed or rolled back
affectedRows.subscribe(...);
Note that transactions might not be supported by all implementations, for instance the Vert.x pooled client implementation does not support transactions and an
UnsupportedOperationExceptionwill be thrown if you try to create a transaction.
Connections
Some SqlClient implementations backed by a connection pool for instance can be used to execute multiple SQL statements on a single connection released once the resulting publisher terminates (either closed or returned to the pool).
For instance, we can execute multiple statements on a single connection as follows:
SqlClient client = ...
final int postId = 1;
client.connection(ops -> ops
.queryForObject("SELECT likes FROM posts WHERE id = $1", row -> row.getInteger(0), postId)
.flatMap(likes -> ops.update("UPDATE posts SET likes = $1 WHERE id = $2", likes + 1, postId))
);
Vert.x SQL Client implementation
The Inverno Vert.x SQL client module is an implementation of the SQL client API on top of the Vert.x Reactive SQL client.
It provides multiple SqlClient implementations that wrap Vert.x SQL pooled client, pool or connection and exposes a SqlCLient bean created from the module's configuration and backed by a Vert.x pool. It can be used to execute SQL statements in an application.
In order to use the Inverno Vert.x SQL client module, we need to declare a dependency in the module descriptor:
@io.inverno.core.annotation.Module
module io.inverno.example.app {
requires io.inverno.mod.sql.vertx;
}
And also declare this dependency as well as a dependency to the Vert.x implementation corresponding to the RDBMS we are targeting in the build descriptor:
Using Maven:
<project>
<dependencies>
<dependency>
<groupId>io.inverno.mod</groupId>
<artifactId>inverno-sql-vertx</artifactId>
</dependency>
<dependency>
<groupId>io.vertx</groupId>
<artifactId>vertx-pg-client</artifactId>
</dependency>
</dependencies>
</project>
Using Gradle:
compile 'io.inverno.mod:inverno-sql-vertx:1.13.0'
compile 'io.vertx:vertx-pg-client:4.1.2'
Configuration
The VertxSqlClientConfiguration is used to create and configure the SQL client bean exposed by the module.
Please refer to the API documentation to have an exhaustive description of the different configuration properties.
Sql Client bean
The module exposes a SqlClient bean which is backed by a Vert.x pool. It is created using the configuration and especially the db_uri property whose scheme indicates the RDBMS system and therefore the Vert.x pool implementation to use.
For instance, the following configuration can be used to connect to a PostgreSQL database:
db_uri="postgres://user:password@localhost:5432/sample_db"
If you want to connect to a particular RDBMS, don't forget to add a dependency to the corresponding Vert.x SQL client implementation. Vert.x currently supports DB2, MSSQL, MySQL, PostgreSQL and Oracle.
The connection pool can be configured as well:
pool_maxSize=20
Please refer to the Vert.x database documentation to get the options supported for each RDBMS implementations.
The Vert.x SQL client requires a Vertx instance which is provided in the Inverno application reactor when using a VertxReactor, otherwise a dedicated Vertx instance is created. In any case, this instance can be overridden by providing a custom one to the module.
Vert.x wrappers
Depending on our needs, we can also choose to create a custom SqlClient using one the Vert.x SQL client wrappers provided by the module.
The ConnectionSqlClient wraps a Vert.x SQL connection, you can use to transform a single connection obtained via a Vert.x connection factory into a reactive SqlClient.
The PooledClientSqlClient wraps a Vert.x pooled SQL client that supports pipelining of queries on a single configuration for optimized performances. This implementation doesn't support transactions.
SqlClient client = new PooledClientSqlClient(PgPool.client(...));
Finally, the PoolSqlClient wraps a Vert.x SQL pool. This is a common implementation supporting transactions and result streaming, it is used to create the module's SQL client bean.
SqlClient client = new PoolSqlClient(PgPool.pool(...));
Redis Client
The Inverno Redis client module specifies a reactive API for executing commands on a Redis data store.
This module only exposes the API and a proper implementation module must be considered to obtain RedisClient instances.
In order to use the Inverno Redis client module, we need to declare a dependency to the API and at least one implementation in the module descriptor:
@io.inverno.core.annotation.Module
module io.inverno.example.app {
requires io.inverno.mod.redis; // this is actually optional since implementations should already define a transitive dependency
requires io.inverno.mod.redis.lettuce; // Lettuce implementation
}
And also declare these dependencies in the build descriptor:
Using Maven:
<project>
<dependencies>
<dependency>
<groupId>io.inverno.mod</groupId>
<artifactId>inverno-redis</artifactId>
</dependency>
<dependency>
<groupId>io.inverno.mod</groupId>
<artifactId>inverno-redis-lettuce</artifactId>
</dependency>
</dependencies>
</project>
Using Gradle:
compile 'io.inverno.mod:inverno-redis:1.13.0'
compile 'io.inverno.mod:inverno-redis-vertx:1.13.0'
Redis Client API
The Redis client API defines the RedisClient and RedisTransactionalClient interfaces which provide reactive methods to create and execute Redis commands.
The RedisTransactionalClient interface extends the RedisClient interface with Redis transactional support (i.e. MULTI, DISCARD, EXEC...).
Redis Operations
The API exposes multiple *Operations interfaces which are all extended by the RedisCLient and which allows to fluently send commands to a Redis data store.
There are currently ten such interfaces that exposes the >200 commands supported in Redis:
RedisHashReactiveOperationsRedisKeyReactiveOperationsRedisScriptingReactiveOperationsRedisSortedSetReactiveOperationsRedisStringReactiveOperationsRedisGeoReactiveOperationsRedisHLLReactiveOperationsRedisListReactiveOperationsRedisSetReactiveOperationsRedisStreamReactiveOperations
The API is pretty straightforward and provides guidance on how to create and send commands to the Redis data store. For instance a simple string value can be queried as follows:
RedisClient<String, String> client = ...
Mono<String> getSomeKey = client.get("someKey");
// The command is sent on subscribe following reactive principles
getSomeKey.subscribe(...);
Complex commands are created using builders, for instance command ZRANGE mySortedSet 0 +inf BYSCORE REV LIMIT 0 1 WITHSCORES can be created and executed as follows:
RedisClient<String, String> client = ...
Flux<SortedSetScoredMember<String>> zrangeWithScores = client.zrangeWithScores()
.reverse()
.byScore()
.limit(0, 1)
.build("mySortedSet", Bound.inclusive(0), Bound.unbounded());
// The command is sent on subscribe following reactive principles
zrangeWithScores.subscribe(...);
Keys and Values codecs
The RedisClient supports encoding and decoding of Redis keys and values, as a result the RedisClient client is a generic type which allows to specify the types of key and values.
The actual encoding/decoding logic is implementation specific.
Connections
Commands can be executed directly on the client instance in which case a connection is obtained each time an operation method is invoked on the client and released once the resulting publisher terminates. This might not be an issue when a single command is issued or when using an implementation based on a single connection. However, if there is a need to execute multiple commands or when using an implementation backed by a connection pool, it is often better to execute multiple SQL statements on a single connection released once the resulting publisher terminates (the connection can be either closed or returned to the pool).
Multiple commands can be executed on a single connection as follows:
RedisClient<String, String> client = ...
Flux<String> results = Flux.from(client.connection(operations ->
Flux.concat(
operations.get("key1"),
operations.get("key2"),
operations.get("key3")
)
));
// Commands are sent on subscribe following reactive principles
results.subscribe(...);
Batch
Commands can also be executed in batch, delaying the network flush so that multiple commands are sent to the server in one shot. This can have a significant positive impact on performances as the client doesn't have to wait for a response to send the next command.
A batch of commands can be executed as follows:
RedisClient<String, String> client = ...
Flux<String> results = Flux.from(client.batch(operations ->
Flux.just(
operations.get("key1"),
operations.get("key2"),
operations.get("key3")
)
));
// Commands are sent on subscribe following reactive principles
results.subscribe(...);
Transactions
Redis supports transactions through MULTI, EXEC and DISCARD commands which is a bit different from traditional begin/commit/rollback we can find in RDBMS. Please have a look at Redis transactions documentation to have a proper understanding on how transactions work in Redis.
Commands can be executed within a transaction using a RedisTransactionalClient, a transaction can be managed implicitly or explicitly by obtaining a RedisTransactionalOperations and explicitly invoke exec() or rollback().
In the following example, two SET commands are executed within a transaction, when subscribing to the returned Mono<RedisTransactionResult>, the two set publishers are subscribed on and the transaction is executed implicitly and a RedisTransactionResult is eventually emitted and holds transaction results:
RedisClient<String, String> client = ...
Mono<RedisTransactionResult> transaction = client
.multi(operations ->
Flux.just(
operations.set("key_1", "value_1"),
operations.set("key_2", "value_2")
)
);
// Commands are sent on subscribe following reactive principles
RedisTransactionResult result = transaction.block();
if(!result.wasDiscarded()) {
Assertions.assertEquals("OK", result.get(0));
Assertions.assertEquals("OK", result.get(1));
}
else {
// Report error
}
If any error is raised during the processing, typically when the client subscribes to the returned command publishers, the transaction is discarded.
The same transaction can be explicitly managed as follows:
RedisClient<String, String> client = ...
Mono<RedisTransactionResult> transaction = client
.multi()
.flatMap(operations -> {
operations.set("key_1", "value_1").subscribe();
operations.set("key_2", "value_2").subscribe();
return operations.exec();
});
// Commands are sent on subscribe following reactive principles
RedisTransactionResult result = transaction.block();
In above example, it is important to subscribe to command publishers explicitly otherwise they won't be part of the transaction.
Redis uses optimistic locking using check-and-set through the WATCH command which is used to indicate which keys should be monitored for changes during a transaction. When creating a transaction, it is possible to specified watches that would discard the transaction if any change is detected.
For instance, the following transaction will be discarded if the value of key key_3 is changed after the transaction begin:
RedisClient<String, String> client = ...
Mono<RedisTransactionResult> transaction = client
.multi("key_3") // watch 'key_3'
// let's change the value of 'key_3' using another connection to get the transaction discarded
.doOnNext(ign -> client.set("key_3", "value_3").block())
.flatMap(operations -> {
operations.set("key_3", "value_3").subscribe();
return operations.exec();
});
RedisTransactionResult result = transaction.block();
// Transaction was discarded since 'key_3' changed before the transaction after the start of the transaction and before it ended
Assertions.assertTrue(result.wasDiscarded());
Lettuce Redis Client implementation
The Inverno Lettuce Redis client module is an implementation of the Redis client API on top of the Lettuce client.
It provides PoolRedisClient and PoolRedisClusterClient implementations that wrap a Lettuce AsyncPool used to acquire StatefulRedisConnection and StatefulRedisClusterConnection respectively. The PoolRedisClusterClient doesn't implement RedisTransactionalClient since transactions are not supported by Redis in a clustered environment.
The module also exposes a RedisClient<String, String> bean created from the module's configuration and backed by a Lettuce BoundedAsyncPool<StatefulRedisConnection<String, String>> instance.
SQL pooled client, pool or connection and exposes a RedisCLient bean created from the module's configuration and backed by a Vert.x pool. It can be used to execute SQL statements in an application.
In order to use the Inverno Lettuce Redis client module, we need to declare a dependency in the module descriptor:
@io.inverno.core.annotation.Module
module io.inverno.example.app {
requires io.inverno.mod.redis.lettuce;
}
And also declare these dependencies in the build descriptor:
Using Maven:
<project>
<dependencies>
<dependency>
<groupId>io.inverno.mod</groupId>
<artifactId>inverno-redis-lettuce</artifactId>
</dependency>
</dependencies>
</project>
Using Gradle:
compile 'io.inverno.mod:inverno-redis-lettuce:1.13.0'
Configuration
The LettuceRedisClientConfiguration is used to create and configure the Redis client bean exposed by the module.
Please refer to the [API documentation][inverno-javadoc] to have an exhaustive description of the different configuration properties.
Redis Client bean
The module exposes a RedisClient<String, String> bean which is backed by a Lettuce BoundedAsyncPool<StatefulRedisConnection<String, String>> instance. It is created using the configuration and especially the uri property which specified the Redis server to connect to which is redis://localhost:6379 by default
For instance, the following configuration can be used to connect to a remote Redis server:
uri="redis://remoteRedis"
The connection pool can be configured as well:
pool_max_active=8
pool_min_idle=0
pool_max_idle=8
Secured connection using TLS and/or authentication can also be configured as follows:
tls=true
username=user
password=password
By default, this Redis client relies on a dedicated event loop group, but it can also rely on Inverno's reactor when a Reactor instance is available. This is transparent when assembling an application with the boot module which exposes Inverno's reactor.
Lettuce wrappers
Depending on our needs, we can also choose to create a custom RedisClient using one the Lettuce Redis client wrappers provided by the module.
The PoolRedisClient implementation wraps a Lettuce AsyncPool<StatefulRedisConnection<K, V>>, it is then possible to create a RedisClient client instance using specific key/value codecs:
BoundedAsyncPool<StatefulRedisConnection<byte[], byte[]>> pool = AsyncConnectionPoolSupport.createBoundedObjectPool(
() -> this.client.connectAsync(ByteArrayCodec.INSTANCE, RedisURI.create("redis://localhost"),
BoundedPoolConfig.create()
);
RedisClient<byte[], byte[]> byteArrayClient = new PoolRedisClient<>(pool, byte[].class, byte[].class);
The PoolRedisClusterClient implementation should be used to connect to a Redis cluster, it wraps a Lettuce AsyncPool<StatefulRedisClusterConnection<K, V>>
LDAP
The Inverno LDAP client module specifies a basic reactive API for interacting with an LDAP or Active Directory server.
It also provides a default JDK based implementation of the LDAPClient exposed in the module.
This module requires an ExecutorService used to execute JDK blocking operations in separate thread. The boot module provides a global worker pool which is ideal in such situations, so in order to use the Inverno ldap module, we should declare the following dependencies in the module descriptor:
@io.inverno.core.annotation.Module
module io.inverno.example.app {
requires io.inverno.mod.boot;
requires io.inverno.mod.ldap;
}
And also declare these dependencies in the build descriptor:
Using Maven:
<project>
<dependencies>
<dependency>
<groupId>io.inverno.mod</groupId>
<artifactId>inverno-boot</artifactId>
</dependency>
<dependency>
<groupId>io.inverno.mod</groupId>
<artifactId>inverno-ldap</artifactId>
</dependency>
</dependencies>
</project>
Using Gradle:
compile 'io.inverno.mod:inverno-boot:1.13.0'
compile 'io.inverno.mod:inverno-ldap:1.13.0'
Configuration
The LDAPClientConfiguration is used to create and configure the JDK based LDAP client bean exposed by the module.
Please refer to the API documentation to have an exhaustive description of the different configuration properties.
LDAP Client API
The LDAP client API defines the LDAPClient interface which provides reactive methods to bind, search and get LDAP entries in an LDAP server.
LDAP Operations
The API exposes LDAPOperations interface which is extended by the LDAPCLient and which allows to fluently send commands to the LDAP server.
Bind
The bind() method exposed on the LDAPClient allows to authenticate a user and obtain an LDAPOperations instance bound to that user.
The following is a complete example where user jsmith is authenticated and multiple operations are executed on the bound LDAPOperations instance.
String uid = "jsmith";
String userDN = "cn=jsmith,ou=users,dc=inverno,dc=io";
User user = Mono.from(client.bind(
"cn={0},ou=users,dc=inverno,dc=io",
new Object[] {uid},
"password",
ops -> ops.search(userDN, new String[] {"uid"}, "(&(objectClass=inetOrgPerson)(uid={0}))", uid)
.flatMap(userEntry -> ops.search("dc=inverno,dc=io", new String[]{ "cn" }, "(&(objectClass=groupOfNames)(member={0}))", userEntry.getDN())
.map(groupEntry -> groupEntry.getAttribute("cn").map(LDAPAttribute::asString).get())
.collectList()
.map(groups -> new User(userEntry.getDN(), userEntry.getAttribute("uid").map(LDAPAttribute::asString).get(), groups)))
)
)
.block();
As stated before, the LDAPClient extends LDAPOperations and any operations can then be directly invoked on the client instance. Whether an LDAP client instance is authenticated or not on the LDAP server is implementation specific.
Get a single entry
A single entry identified by a specific DN can be retrieved as follows:
LDAPOperations operations = ...
LDAPEntry jsmithEntry = operations.get("cn=jsmith,ou=users,dc=inverno,dc=io").block();
The DN can also be specified as a templatized expression using {i} notation and a list or arguments:
LDAPOperations operations = ...
LDAPEntry jsmithEntry = operations.get("cn={0},ou=users,dc=inverno,dc=io", "jsmith").block();
It is also possible to specify which attributes must be retrieved:
LDAPOperations operations = ...
LDAPEntry jsmithEntry = operations.get("cn={0},ou=users,dc=inverno,dc=io", new String[] {"cn", "uid", "mail", "userPassword"}, "jsmith").block();
LDAP Attributes are exposed on the resulting LDAPEntry, raw attribute values can be obtained as follows:
// Gets the value of attribute 'mail' or null
// if multiple 'mail' attributes are defined, one of them is returned in a non-deterministic way
Object mail = jsmithEntry.get("mail").orElse(null);
// Gets all values for attribute 'mail' or an empty list
List<Object> allMail = jsmithEntry.getAll("mail");
// Get all attributes
List<Map.Entry<String, Object>> all = jsmithEntry.getAll();
It is also possible to get attributes as convertible LDAPAttribute as follows:
// Gets the value of attribute 'birthDate' as a local date or null
// if multiple 'birthDate' attributes are defined, one of them is returned in a non-deterministic way
LocalDate birthDate = jsmithEntry.getAttribute("birthDate").map(LDAPAttribute::asLocalDate).orElse(null);
// Gets all values for attribute 'address' as strings or an empty list
List<String> addresses = jsmithEntry.getAllAttribute("address").stream().map(LDAPAttribute::asString).collect(Collectors.toList());
// Get all attributes
List<LDAPAttribute> allAttribute = jsmithEntry.getAllAttribute();
Search
We can search for entries using a base context and a filter expression. In the following example we search for inetOrgPerson class entries with CN and UID attributes in the users organizational unit:
List<LDAPEntry> result = client.search("ou=users,dc=inverno,dc=io", new String[] {"cn", "uid"}, "(objectClass=inetOrgPerson)")
.collectList()
.block();
The filter can be templatized using the {i} notation. In the following we search for the groups user jsmith belongs to:
List<LDAPEntry> result = client.search("dc=inverno,dc=io", new String[]{ "cn" }, "(&(objectClass=groupOfNames)(member={0}))", "cn=jsmith,ou=users,dc=inverno,dc=io")
.collectList()
.block();
Complex queries can be created using a SearchBuilder which allows specifying a search scope among other things:
List<LDAPEntry> result = client.search()
.scope(LDAPOperations.SearchScope.WHOLE_SUBTREE)
.build("ou=users,dc=inverno,dc=io", new String[] {"cn", "uid"}, "(objectClass=inetOrgPerson)")
.collectList()
.block();
LDAP Client bean
The module exposes an LDAPClient bean implemented using JDK DirContext to access the LDAP server. The client is created using the module's configuration which specifies:
- the LDAP server URI (e.g.
ldap://remoteLDAP:1389) - the authentication choice (
simpleby default) - the referral policy (follow referrals by default)
- the admin user
DNwhich shall be used by default to connect to the server - the admin user credentials, typically a password
If no admin user DN and credentials are specified the client connects to the server anonymously unless operations are executed inside a bind() invocation.
For instance, the following configuration can be used to connect to a remote LDAP server using an admin DN:
uri="ldap://remoteLDAP:1389"
admin_dn="cn=admin,ou=users,dc=inverno,dc=io"
admin_credentials="admin_password"
Since the JDK directory service interface uses blocking operations, the client also requires an
ExecutorServiceto make it reactive by executing blocking operations in separate threads and make sure no blocking operation is ever run in a reactor I/O thread. The boot module typically provides a global worker pool that must be used in such situations, but it is also possible to use a specificExecutorServiceas well when this makes sense.
Security
The Inverno security module defines an API for securing access to protected services or resources in an application.
Securing an application is a complex topic which involves multiple concerns such as authentication, identification, access control, cryptography... Over the years, many techniques and specifications were created to address these concerns and protect against always more complex attacks. Defining a generic security API that is consistent with all these aspects is therefore a tedious task.
The Inverno security API has been designed to follow a clear security model with the aim of simplifying security setup inside an application by relying on simple concepts in order to keep things manageable and understandable.
The Inverno security model, which basically defines application security, is based on three main concepts:
- Authentication which relates to the authentication of a request made to the application.
- Identification which relates to the identification of the entity accessing the application.
- Access Control which relates to the control of access to protected services or resources in the application.
The authentication process is about authenticating credentials (e.g. user/password, token...) provided in a request in order to assess whether access to the application is granted to a requesting entity. It is very important to understand that authentication is not about authenticating the entity but really the credentials. The entity represents the originator of a request to the application, it can be external or internal, it can be an application, a device, a proxy or an actual person but as far as the application is concerned, access can only be granted when valid credentials have been authenticated which is more related to the request than the actual entity behind that request. When referring to the authenticated entity, we simply refer to that entity behind a request which provided credentials that has been authenticated during the authentication process.
This is actually an important point so let's take a concrete example to better understand what it means. Let's consider a prepaid card which allows for ten entries to a roller coaster, you can buy one and at the entrance pass it to your friends one after the other so you can all enjoy the ride. When passing the gates, it is the pass that is being authenticated not the person holding that pass.
The identification process is about identifying the authenticated entity accessing the application. This goes beyond authentication whose role is, and we insisted on that, to validate that provided credentials are valid and which does not necessarily give any information about who or what is actually accessing the application.
The access control process is about controlling whether an authenticated entity has the proper clearance (e.g. roles, permissions...) to access specific services or resources within the application.
From these definitions, it is important to notice that although authentication, identification and access control are all related to an entity accessing the application, they are not necessarily related to each others. For instance OAuth2 is a perfect example of authentication without identification. Then we can surely conceive multiple cases where we have authentication without access control, for example an opaque token can be authenticated which gives us no information about the roles or permissions of the authenticated entity. To sum up, a requesting entity can be authenticated, then maybe identified, and we may be able to control the access to protected services or resources based on other information (e.g. roles, permissions...)
Let's consider a more practical example to illustrate the theory. Let's assume our secured application is actually a secured facility:
- a person can only enter the facility if he authenticates at the entrance by showing proper credentials:
- it can be a blank badge that gives him access to the facility but does not strongly identify him.
- it can a badge with identification information which is actually useless to properly identify the person unless he can prove he is the actual owner of the badge (e.g. using biometric information).
- it can be some kind of ID registered in the facility security system like a driver's license or an ID card. From there he can receive a temporary badge to access the rest of the facility (e.g. a visitor badge). In this case we might have some identification information but not necessarily what is needed to fully use the services offered inside the facility. Let's say the facility is a bank and the person is here to make a withdrawal, once inside the bank the ID card authenticated at the entrance does not give any information about the person's bank account and whether he is actually the owner of that bank account. These might be considered as identification information which require additional identification process.
- it can be a registered fingerprint or any kind of biometric information which might also provide identification information assuming they are securely stored inside the facility security system.
- the person can then enter the facility and access areas or use services inside:
- there can be unsecured services, like a coffee machine in the lobby which anybody within the facility can use.
- there can be restricted areas or services that require proper clearance to access. The person must then re-authenticate using the same credentials he used to enter the facility or using temporary credentials received at the entrance (e.g. visitor badge). Access control must then be performed and requires to have the person's clearances securely stored in the facility security system or inside the temporary credentials in which case they should ideally be signed and encrypted to guarantee both integrity (we don't want to let him forge his own clearances) and privacy (we don't want to let him know how access control works in the system).
- there can be services that require further identification information which can be already available following the person's authentication or which require some additional verification. For instance, the facility can be a casino, anybody can access the restaurant area but the casino area is restricted to adults over 18.
- finally when leaving the facility, the person must return any temporary credentials he received (e.g. visitor badge in exchange for his ID card) or we can just let him go if those credentials have an expiration time and/or can be revoked anytime when we don't want him to use the facility anymore.
An Inverno application is secured by composing authentication with identity and access controller inside a Security Context that implements application security requirements.
The security module defines the core security API and several extensions modules provide specific security features:
- the security-http module provides exchange interceptors and handlers to secure Web applications.
- the security-jose module provides services to manipulate JSON Object Signing and Encryption token as specified by RFC 7515, RFC 7516, RFC 7517, RFC 7518 and RFC 7519.
- the security-ldap module provides authenticators and identity resolvers to authenticate and identify an entity against an LDAP server or an Active Directory server.
The complete security API including extension modules currently supports:
- User/password authentication against a user repository (in-memory, Redis...).
- Token based authentication.
- Strong user identification against a user repository (in-memory, Redis...).
- Secured password encoding using message digest, Argon2, Password-Based Key Derivation Function, BCrypt, SCrypt...
- Role-based access control.
- Permission-based access control.
- JSON Object Signing and Encryption (provided in the security-jose module).
- LDAP/Active Directory authentication and identification (provided in the security-ldap module).
- HTTP basic authentication scheme (provided in the security-http module).
- HTTP digest authentication scheme (provided in the security-http module).
- Form based authentication (provided in the security-http module).
- Cross-origin resource sharing support (CORS) (provided in the security-http module).
- Protection against Cross-site request forgery attack (CSRF) (provided in the security-http module).
In order to use the Inverno security module, we need to declare a dependency in the module descriptor:
module io.inverno.example.app {
requires io.inverno.mod.security;
}
And also declare that dependency in the build descriptor:
Using Maven:
<project>
<dependencies>
<dependency>
<groupId>io.inverno.mod</groupId>
<artifactId>inverno-security</artifactId>
</dependency>
</dependencies>
</project>
Using Gradle:
compile 'io.inverno.mod:inverno-security:1.13.0'
Before looking into details of the security API, let's see how to secure a simple standalone application composed of a single HelloService bean exposing sayHello() method. Initially the application might look like:
package io.inverno.example.app_hello_security;
import io.inverno.core.annotation.Bean;
@Bean
public class HelloService {
public void sayHello() {
StringBuilder message = new StringBuilder();
message.append("Hello world!");
System.out.println(message.toString());
}
}
package io.inverno.example.app_hello_security;
import io.inverno.core.v1.Application;
public class Main {
public static void main(String[] args) {
Application.run(new App_hello_security.Builder()).helloService().sayHello();
}
}
Running the application would return the following output:
$ mvn inverno:run
...
15:59:29.395 [main] INFO io.inverno.core.v1.Application - Inverno is starting...
╔════════════════════════════════════════════════════════════════════════════════════════════╗
║ , ~~ , ║
║ , ' /\ ' , ║
║ , __ \/ __ , _ ║
║ , \_\_\/\/_/_/ , | | ___ _ _ ___ __ ___ ___ ║
║ , _\_\/_/_ , | | / _ \\ \ / // _ \ / _|/ _ \ / _ \ ║
║ , __\_/\_\__ , | || | | |\ \/ /| __/| | | | | | |_| | ║
║ , /_/ /\/\ \_\ , |_||_| |_| \__/ \___||_| |_| |_|\___/ ║
║ , /\ , ║
║ , \/ , -- 1.6.0 -- ║
║ ' -- ' ║
╠════════════════════════════════════════════════════════════════════════════════════════════╣
║ Java runtime : OpenJDK Runtime Environment ║
║ Java version : 17.0.2+8-86 ║
║ Java home : /home/jkuhn/Devel/jdk/jdk-17.0.2 ║
║ ║
║ Application module : io.inverno.example.app_hello_security ║
║ Application class : io.inverno.example.app_hello_security.Main ║
║ ║
║ Modules : ║
║ ... ║
╚════════════════════════════════════════════════════════════════════════════════════════════╝
15:59:29.400 [main] INFO io.inverno.example.app_hello_security.App_hello_security - Starting Module io.inverno.example.app_hello_security...
15:59:29.402 [main] INFO io.inverno.example.app_hello_security.App_hello_security - Module io.inverno.example.app_hello_security started in 3ms
15:59:29.405 [main] INFO io.inverno.core.v1.Application - Application io.inverno.example.app_hello_security started in 23ms
Hello world!
15:59:29.411 [Thread-0] INFO io.inverno.example.app_hello_security.App_hello_security - Stopping Module io.inverno.example.app_hello_security...
We want to protect the whole application so basically exit the application if the user could not be authenticated using login/password credentials specified on the command line.
In order to authenticate a user against an in-memory repository, we must create a security manager as follows:
package io.inverno.example.app_hello_security;
import io.inverno.core.annotation.Bean;
import io.inverno.core.v1.Application;
import io.inverno.mod.security.SecurityManager;
import io.inverno.mod.security.accesscontrol.AccessController;
import io.inverno.mod.security.authentication.LoginCredentials;
import io.inverno.mod.security.authentication.LoginCredentialsMatcher;
import io.inverno.mod.security.authentication.password.RawPassword;
import io.inverno.mod.security.authentication.user.InMemoryUserRepository;
import io.inverno.mod.security.authentication.user.User;
import io.inverno.mod.security.authentication.user.UserAuthenticator;
import io.inverno.mod.security.context.SecurityContext;
import io.inverno.mod.security.identity.Identity;
import java.util.List;
import java.util.function.Supplier;
import org.apache.logging.log4j.LogManager;
import org.apache.logging.log4j.Logger;
public class Main {
private static final Logger LOGGER = LogManager.getLogger(Main.class);
public static void main(String[] args) {
if(args.length != 2) {
System.out.println("Usage: hello <user> <password>");
return;
}
// The security manager uses a user authenticator with an in-memory user repository and a Login credentials (i.e. login/password) matcher
SecurityManager<LoginCredentials, Identity, AccessController> securityManager = SecurityManager.of(
new UserAuthenticator<>(
InMemoryUserRepository
.of(List.of(
User.of("jsmith")
.password(new RawPassword("password"))
.build()
))
.build(),
new LoginCredentialsMatcher<>()
)
);
securityManager.authenticate(LoginCredentials.of(args[0], new RawPassword(args[1])))
.subscribe(securityContext -> {
if(securityContext.isAuthenticated()) {
LOGGER.info("User has been authenticated");
Application.run(new App_hello_security.Builder()).helloService().sayHello();
}
else {
securityContext.getAuthentication().getCause().ifPresentOrElse(
error -> LOGGER.error("Failed to authenticate user", error),
() -> LOGGER.error("Unauthorized anonymous access")
);
}
});
}
}
Now if we run the application with valid or invalid credentials we should get the following outputs:
$ mvn inverno:run -Dinverno.run.arguments="jsmith password"
16:08:24.078 [main] INFO io.inverno.example.app_hello_security.Main - User has been authenticated
16:08:24.090 [main] INFO io.inverno.core.v1.Application - Inverno is starting...
...
16:08:24.108 [main] INFO io.inverno.example.app_hello_security.App_hello_security - Starting Module io.inverno.example.app_hello_security...
16:08:24.111 [main] INFO io.inverno.example.app_hello_security.App_hello_security - Module io.inverno.example.app_hello_security started in 4ms
16:08:24.115 [main] INFO io.inverno.core.v1.Application - Application io.inverno.example.app_hello_security started in 21ms
Hello world!
16:08:24.116 [Thread-0] INFO io.inverno.example.app_hello_security.App_hello_security - Stopping Module io.inverno.example.app_hello_security...
$ mvn inverno:run -Dinverno.run.arguments="jsmith invalid"
...
16:08:49.442 [main] ERROR io.inverno.example.app_hello_security.Main - Failed to authenticate user
io.inverno.mod.security.authentication.InvalidCredentialsException: Invalid credentials
at io.inverno.mod.security.authentication.AbstractPrincipalAuthenticator.lambda$authenticate$1(AbstractPrincipalAuthenticator.java:74) ~[io.inverno.mod.security-1.5.0-SNAPSHOT.jar:?]
at reactor.core.publisher.MonoErrorSupplied.subscribe(MonoErrorSupplied.java:55) [reactor.core-3.4.14.jar:?]
at reactor.core.publisher.Mono.subscribe(Mono.java:4400) [reactor.core-3.4.14.jar:?]
at reactor.core.publisher.FluxSwitchIfEmpty$SwitchIfEmptySubscriber.onComplete(FluxSwitchIfEmpty.java:82) [reactor.core-3.4.14.jar:?]
at reactor.core.publisher.FluxMapFuseable$MapFuseableSubscriber.onComplete(FluxMapFuseable.java:150) [reactor.core-3.4.14.jar:?]
at reactor.core.publisher.FluxFilterFuseable$FilterFuseableSubscriber.onComplete(FluxFilterFuseable.java:171) [reactor.core-3.4.14.jar:?]
at reactor.core.publisher.Operators$MonoSubscriber.complete(Operators.java:1817) [reactor.core-3.4.14.jar:?]
at reactor.core.publisher.MonoSupplier.subscribe(MonoSupplier.java:62) [reactor.core-3.4.14.jar:?]
at reactor.core.publisher.Mono.subscribe(Mono.java:4400) [reactor.core-3.4.14.jar:?]
at reactor.core.publisher.Mono.subscribeWith(Mono.java:4515) [reactor.core-3.4.14.jar:?]
at reactor.core.publisher.Mono.subscribe(Mono.java:4371) [reactor.core-3.4.14.jar:?]
at reactor.core.publisher.Mono.subscribe(Mono.java:4307) [reactor.core-3.4.14.jar:?]
at reactor.core.publisher.Mono.subscribe(Mono.java:4279) [reactor.core-3.4.14.jar:?]
at io.inverno.example.app_hello_security.Main.main(Main.java:71) [classes/:?]
...
We can change the HelloService in order to display a personalized greeting message to the authenticated user. This requires to resolve the identity of the user and inject the security context into the HelloService.
The identity of the user can be stored in the user repository and resolved using a UserIdentityResolver in the security manager as follows:
package io.inverno.example.app_hello_security;
import io.inverno.core.annotation.Bean;
import io.inverno.core.v1.Application;
import io.inverno.mod.security.SecurityManager;
import io.inverno.mod.security.accesscontrol.AccessController;
import io.inverno.mod.security.authentication.LoginCredentials;
import io.inverno.mod.security.authentication.LoginCredentialsMatcher;
import io.inverno.mod.security.authentication.password.RawPassword;
import io.inverno.mod.security.authentication.user.InMemoryUserRepository;
import io.inverno.mod.security.authentication.user.User;
import io.inverno.mod.security.authentication.user.UserAuthenticator;
import io.inverno.mod.security.context.SecurityContext;
import io.inverno.mod.security.identity.PersonIdentity;
import io.inverno.mod.security.identity.UserIdentityResolver;
import java.util.List;
import java.util.function.Supplier;
import org.apache.logging.log4j.LogManager;
import org.apache.logging.log4j.Logger;
public class Main {
private static final Logger LOGGER = LogManager.getLogger(Main.class);
@Bean
public static interface App_hello_securitySecurityContext extends Supplier<SecurityContext<PersonIdentity, AccessController>> {}
public static void main(String[] args) {
...
// The security manager now uses a user identity resolver to resolve the identity of the authenticated user
SecurityManager<LoginCredentials, PersonIdentity, AccessController> securityManager = SecurityManager.of(
new UserAuthenticator<>(
InMemoryUserRepository
.of(List.of(
User.of("jsmith")
.password(new RawPassword("password"))
.identity(new PersonIdentity("jsmith", "John", "Smith", "jsmith@inverno.io"))
.build()
))
.build(),
new LoginCredentialsMatcher<>()
),
new UserIdentityResolver<>()
);
// The security context is now injected in the App_hello_security module
securityManager.authenticate(LoginCredentials.of(args[0], new RawPassword(args[1])))
.subscribe(securityContext -> {
if(securityContext.isAuthenticated()) {
LOGGER.info("User has been authenticated");
Application.run(new App_hello_security.Builder(securityContext)).helloService().sayHello();
}
else {
securityContext.getAuthentication().getCause().ifPresentOrElse(
error -> LOGGER.error("Failed to authenticate user", error),
() -> LOGGER.error("Unauthorized anonymous access")
);
}
});
}
}
In above code, we also declared a socket bean in order to inject the SecurityContext in the module and eventually in the HelloService bean:
package io.inverno.example.app_hello_security;
import io.inverno.core.annotation.Bean;
import io.inverno.mod.security.accesscontrol.AccessController;
import io.inverno.mod.security.context.SecurityContext;
import io.inverno.mod.security.identity.PersonIdentity;
@Bean
public class HelloService {
private final SecurityContext<PersonIdentity, AccessController> securityContext;
public HelloService(SecurityContext<PersonIdentity, AccessController> securityContext) {
this.securityContext = securityContext;
}
public void sayHello() {
StringBuilder message = new StringBuilder();
message.append("Hello ").append(this.securityContext.getIdentity().map(PersonIdentity::getFirstName).orElse("whoever you are")).append("!");
System.out.println(message.toString());
}
}
If we run the application, we should now get a personalized greeting message using the user identity:
$ mvn inverno:run -Dinverno.run.arguments="jsmith password"
...
Hello John!
A
PersonIdentityhas been attached to the user in the repository but the repository may also contain users with no defined identity which is whySecurityContext#identity()returns anOptional.
Now let's say we want some privileged users to be greeted with an extra polite message. We can assign roles to users in the repository and resolve a RoleBasedAccessContoller to check privileges in the HelloService:
package io.inverno.example.app_hello_security;
import io.inverno.core.annotation.Bean;
import io.inverno.core.v1.Application;
import io.inverno.mod.security.SecurityManager;
import io.inverno.mod.security.accesscontrol.GroupsRoleBasedAccessControllerResolver;
import io.inverno.mod.security.accesscontrol.RoleBasedAccessController;
import io.inverno.mod.security.authentication.LoginCredentials;
import io.inverno.mod.security.authentication.LoginCredentialsMatcher;
import io.inverno.mod.security.authentication.password.RawPassword;
import io.inverno.mod.security.authentication.user.InMemoryUserRepository;
import io.inverno.mod.security.authentication.user.User;
import io.inverno.mod.security.authentication.user.UserAuthenticator;
import io.inverno.mod.security.context.SecurityContext;
import io.inverno.mod.security.identity.PersonIdentity;
import io.inverno.mod.security.identity.UserIdentityResolver;
import java.util.List;
import java.util.function.Supplier;
import org.apache.logging.log4j.LogManager;
import org.apache.logging.log4j.Logger;
public class Main {
private static final Logger LOGGER = LogManager.getLogger(Main.class);
@Bean
public static interface App_hello_securitySecurityContext extends Supplier<SecurityContext<PersonIdentity, RoleBasedAccessController>> {}
public static void main(String[] args) {
...
// The security manager now uses a groups RBAC Resolver to resolve the RBAC access controller of the authenticated user
SecurityManager<LoginCredentials, PersonIdentity, RoleBasedAccessController> securityManager = SecurityManager.of(
new UserAuthenticator<>(
InMemoryUserRepository
.of(List.of(
User.of("jsmith")
.password(new RawPassword("password"))
.identity(new PersonIdentity("jsmith", "John", "Smith", "jsmith@inverno.io"))
.groups("vip")
.build(),
User.of("adoe")
.password(new RawPassword("password"))
.identity(new PersonIdentity("adoe", "Alice", "Doe", "adoe@inverno.io"))
.build()
))
.build(),
new LoginCredentialsMatcher<>()
),
new UserIdentityResolver<>(),
new GroupsRoleBasedAccessControllerResolver()
);
...
}
}
package io.inverno.example.app_hello_security;
import io.inverno.core.annotation.Bean;
import io.inverno.mod.security.accesscontrol.RoleBasedAccessController;
import io.inverno.mod.security.context.SecurityContext;
import io.inverno.mod.security.identity.PersonIdentity;
import reactor.core.publisher.Mono;
@Bean
public class HelloService {
private final SecurityContext<PersonIdentity, RoleBasedAccessController> securityContext;
public HelloService(SecurityContext<PersonIdentity, RoleBasedAccessController> securityContext) {
this.securityContext = securityContext;
}
public void sayHello() {
this.securityContext.getAccessController()
.map(rbac -> rbac.hasRole("vip"))
.orElse(Mono.just(false))
.subscribe(isVip -> {
StringBuilder message = new StringBuilder();
if(isVip) {
message.append("Hello my dear friend ").append(this.securityContext.getIdentity().map(PersonIdentity::getFirstName).orElse("whoever you are")).append("!");
}
else {
message.append("Hello ").append(this.securityContext.getIdentity().map(PersonIdentity::getFirstName).orElse("whoever you are")).append("!");
}
System.out.println(message.toString());
});
}
}
We can now run the application using jsmith and adoe credentials and see the results:
$ mvn clean inverno:run -Dinverno.run.arguments="jsmith password"
...
Hello my dear friend John!
$ mvn clean inverno:run -Dinverno.run.arguments="adoe password"
...
Hello Alice!
As for the identity, we can not assume that an access controller is present in the security context which only proves that an entity has been authenticated.
Security Manager
Now let's take a closer look at the API starting by the SecurityManager which is the main entry point to secure an application.
Note that when securing a Web application, the role of the
SecurityManageris actually handled by aSecurityInterceptorintercepting secured Web route and populating the exchange context with the security context to make it accessible to route handlers and interceptors. Please refer to the security-http module documentation for detailed information.
The security manager is used to authenticate credentials and create a security context exposing the actual authentication result and the authenticated entity's identity and access controller if any. A SecurityManager instance is created by composing an Authenticator with optional IdentityResolver and AccessControllerResolver which are respectively used to resolve the Identity and the AccessController of the authenticated entity based on the Authentication object resulting from the authentication of input Credentials by the Authenticator.
The SecurityManager interface bascially chains the authentication, the identity resolution and the access controller resolution in a single method authenticate() returning the resulting SecurityContext.
Authenticator<Credentials, Authentication> authenticator = ...
IdentityResolver<Authentication, Identity> identityResolver = ...
AccessControllerResolver<Authentication, AccessController> accessControllerResolver = ...
// Create a security manager with authentication only
SecurityManager<Credentials, Identity, AccessController> securityManager = SecurityManager.of(authenticator);
// Create a security manager with identity resolution
SecurityManager<Credentials, Identity, AccessController> securityManager = SecurityManager.of(authenticator, identityResolver);
// Create a security manager with access control resolution
SecurityManager<Credentials, Identity, AccessController> securityManager = SecurityManager.of(authenticator, accessControllerResolver);
// Create a security manager with both identification and access control resolution
SecurityManager<Credentials, Identity, AccessController> securityManager = SecurityManager.of(authenticator, identityResolver, accessControllerResolver);
Note how generics are used to specify what
Credentialscan be authenticated, whatAuthenticationobject are returned by the authenticator and used by identity and access controller resolvers to resolve specificIdentityandAccessControllerobjects. This basically allows the compiler to check that the security manager is created with consistentAuthenticator,IdentityResolverandAccessControllerResolver.
A security context can then be obtained by authenticating appropriate credentials as defined by the selected authenticator.
SecurityManager<LoginCredentials, PersonIdentity, RoleBasedAccessController> securityManager = ...
SecurityContext<PersonIdentity, RoleBasedAccessController> securityContext = securityManager.authenticate(LoginCredentials.of("user", new RawPassword("password"))).block();
A security manager shall always return a security context even in case of security errors. For instance, it returns:
- an anonymous security context when authenticating
nullcredentials. An anonymous security context only expose an unauthenticatedAuthenticationobject with no cause. - a denied security context when authentication or identity or access controller resolutions failed with error.
- a granted security context when authentication and identity and access controller resolutions were successful.
The following shows a proper way to handle a security context:
if(securityContext.isAuthenticated()) {
// Sucessful authentication
...
}
else if(securityContext.isAnonymous()) {
// Anonymous access
...
}
else {
// Failed authentication
...
}
Credentials
Credentials must be provided to the application to get access to protected services or resources inside the application. In practice, Credentials must be authenticated by the Authenticator of a SecurityManager which eventually creates the application's SecurityContext used across the application to determine whether the authenticated entity can invoke services or access resources.
There are many forms of credentials which depend on the actual authentication process. The most common is a username/password pair, but we can also think about tokens, an X.509 certificates... The security API exposes several basic type of credentials.
TokenCredentials
Token credentials are composed of a single token usually easy to authenticate, temporary, revocable or renewable. They are typically obtained by an entity following other stronger authentication processes using sensitive credentials (e.g. username/password with or without multi-factor authentication...) in order to avoid exposing these sensitive data or to use a cheaper authentication process each time the application is accessed by the authenticated entity.
The TokenCredentials class is a basic token credentials implementation exposing an opaque token.
PrincipalCredentials
Principal credentials represents generic credentials for a principal entity identified using a username. The PrincipalCredentials interface is actually a base type which is simply exposing the username, it does not presume of any particular authentication method (e.g. password, multi-factor, biometric...).
LoginCredentials
Login credentials are specific principal credentials with a password which is used to authenticate a principal entity identified by a username.
The LoginCredentials interface extends PrincipalCredentials and simply exposes a Password in addition to the username. Login credentials can be created with a username and a password as follows:
LoginCredentials loginCredentials = LoginCredentials.of("jsmith", new RawPassword("password"));
Login credentials provided by a user in a login form for instance usually contain a raw password in clear text. However, it is completely possible to define them using an encoded password and therefore secure the password all the way to the authenticator.
Password
Password can be used in an authentication based on a shared secret, namely the password. The API defines the Password interface which is used to represent a password and allows it to be stored in a secured encoded form, for instance in a user repository. It can also be used to match a password provided in a password based credentials, for instance when authenticating LoginCredentials against other password based credentials resolved from a secured repository.
The Password interface exposes an encoded password value, the actual Password.Encoder that was used to encode the password and matches() methods used to match a raw password or another Password instance.
A simple message digest password can be created from a raw password value as follows:
// password -> bta60AntIvI9YWRfsFFSRBocTW-4xSzmI...
MessageDigestPassword password = new MessageDigestPassword.Encoder().encode("password");
or from an encoded value as follows:
MessageDigestPassword password = new MessageDigestPassword("bta60AntIvI9YWRfsFFSRBocTW-4xSzmI...", new MessageDigestPassword.Encoder());
Using the password instance, it is then possible to match a provided raw password value:
if(password.matches("password")) {
// passwords match
...
}
In order to properly match passwords, it is important to use the same encoder as the one that was used to encode the password. Password encoders can be configured in various ways to reach a proper level of protection. As a result, when encoding password, it is important to always use constant encoder's settings to be able to recover the exact same password instance from a given encoded password. On way to do that is to hardcode these settings in the application, but then they shall never be changed or all passwords must be renewed. Another more reliable way would be to store encoder's settings next the encoded password. This can be done by serializing the password as JSON.
ObjectMapper mapper = new ObjectMapper();
MessageDigestPassword password = new MessageDigestPassword.Encoder("SHA-512", "secret".getBytes(), 16).encode("password");
// {"@c":".MessageDigestPassword","value":"R3IF7VY7Trxh4slRRVF4Yk0_JNIcaAtUZ...","encoder":{"@c":".MessageDigestPassword$Encoder","algorithm":"SHA-512","secret":"c2VjcmV0","saltLength":16}}
String serializedPassword = mapper.writeValueAsString(password);
// Returns a MessageDigestPassword instance
Password<?, ?> readPassword = mapper.readValue(jsonPassword, Password.class);
The API currently provides the following Password implementations:
Argon2Passwordwhich uses Argon2 key derivation function.BCryptPasswordwhich uses Bcrypt hashing function.MessageDigestPasswordwhich uses aMessageDigestwith salt.PBKDF2Passwordwhich uses Password-Based Key Derivation Function 2.SCryptPasswordwhich uses Scrypt hashing function.- The
RawPasswordimplementation does not encode passwords, it is typically used to represent in-memory and volatile passwords submitted to a running application for authentication. They are usually matched against stored and secured password credentials. ARawPasswordinstance can't be serialized as JSON as other password implementations, it shall not be stored or communicated under any circumstances.
Authenticator
In a security manager, an authenticator is responsible for authenticating Credentials and returning a resulting Authentication which represents a proof that credentials have been authenticated.
The Authenticator interface is a functional interface defining one authenticate() method. It is then easy to create inline authenticator implementations for testing purposes or else. A simplistic authenticator for authenticating login credentials (i.e. username/password) can be created as follows:
Authenticator<LoginCredentials, Authentication> authenticator = credentials -> Mono.fromSupplier(() -> {
if(credentials.getUsername().equals("user") && credentials.getPassword().equals("password")) {
return Authentication.authenticated();
}
return Authentication.denied();
});
An authenticator might not always be able to authenticate provided credentials, this basically means that the authenticator is unable to determine whether specified credentials are valid because it does not manage or understand them. For instance, we can imagine defining different authenticators targeting different user realms or authentication systems, credentials could only be authenticated by the authenticator targeting the same realm or authentication system.
In such situations, an authenticator can decide to return an empty Mono instead of returning a denied authentication or throwing an AuthenticationException which would terminate the authentication process. This would allow other authenticators to try to authenticate the credentials.
Multiple authenticators can be chained using the or() operator. In the following example, authenticator1 is implemented in such a way that it only tries to authenticate users it knows, returning an empty Mono for those it doesn't know in order to delegate authentication to authenticator2 which is terminal and always returns an Authentication instance:
Authenticator<LoginCredentials, Authentication> authenticator1 = credentials -> Mono.fromSupplier(() -> {
if(credentials.getUsername().equals("user1")) {
if(credentials.getPassword().matches("password")) {
return Authentication.granted();
}
// Claim the credentials and terminate the chain
return Authentication.denied();
}
// Delegate to next authenticator in the chain
return null;
});
Authenticator<LoginCredentials, Authentication> authenticator2 = credentials -> Mono.fromSupplier(() -> {
if (credentials.getUsername().equals("user2") && credentials.getPassword().matches("password")) {
return Authentication.granted();
}
return Authentication.denied();
});
Authenticator<LoginCredentials, Authentication> compositeAuthenticator = authenticator1.or(authenticator2);
// A granted authentication is returned by authenticator1
compositeAuthenticator.authenticate(LoginCredentials.of("user1", new RawPassword("password")));
// A denied authentication is returned by authenticator2 which claimed the credentials
compositeAuthenticator.authenticate(LoginCredentials.of("user1", new RawPassword("invalid")));
// A granted authentication is returned by authenticator2
compositeAuthenticator.authenticate(LoginCredentials.of("user2", new RawPassword("password")));
// A denied authentication is returned by authenticator2 which is terminal
compositeAuthenticator.authenticate(LoginCredentials.of("user2", new RawPassword("invalid")));
// A denied authentication is returned by authenticator2 which is terminal
compositeAuthenticator.authenticate(LoginCredentials.of("unknown", new RawPassword("password")));
This approach might be very useful when there is a need to authenticate credentials against multiple authentication systems. However, you must be aware that some authenticator might not be chainable since, as
authenticator2they can be implemented to claim all credentials preventing further authenticator to be invoked. Let's consider aLoginCredentialsauthenticator, it could rightfully consider that any username/password pair that it is unable to validate should be denied.
It is also possible to transform the resulting authentication which can be useful to adapt it for further processing (e.g. identity resolver, access controller resolver, login forms...). In the following example, we transform the authentication returned by a login credentials authenticator into a TokenAuthentication:
Authenticator<LoginCredentials, Authentication> authenticator = ...
authenticator.map(authentication -> {
final String token = UUID.randomUUID().toString();
return new TokenAuthentication() {
@Override
public String getToken() {
return token;
}
@Override
public boolean isAuthenticated() {
return authentication.isAuthenticated();
}
@Override
public Optional<SecurityException> getCause() {
return authentication.getCause();
}
};
});
A proper authentication implementation shall always return an authentication whether authentication succeeds or fails. However, there might be use cases where we simply want to fail and propagate the authentication error. This can be desirable when handling denied authentications is not required and must be delegated to a higher level typically the security manager.
Considering previous example, we can make sure only authenticated authentication will be transformed by using the failOnDenied() operator which can be invoked to avoid having to handle denied authentications when transforming the authentication output:
Authenticator<LoginCredentials, Authentication> authenticator = ...
authenticator
// Fail when a denied authentication is returned and propagate the underlying SecurityException
.failOnDenied()
// Only transform successful authentication
.map(authentication -> {
final String token = UUID.randomUUID().toString();
return new TokenAuthentication() {
@Override
public String getToken() {
return token;
}
@Override
public boolean isAuthenticated() {
return authentication.isAuthenticated();
}
@Override
public Optional<SecurityException> getCause() {
return authentication.getCause();
}
};
});
It is also possible to fail on both denied or anonymous authentications using the failOnDeniedAndAnonymous() operator.
The API was designed to provide the most flexibility to the application which can decide how denied or anonymous authentications should be handled, unauthenticated authentications actually exist to still be able to create a security context and do things inside the application from an unauthenticated authentication. You should however take particular care when transforming authentication instances using
map()orflatMap()operators, remember that an authentication represents proof that credentials were authenticated and as a result always make sure the authentication state is taken into account all the way. In previous example, we could have quite easily ignored the authentication in the mapper and always returned an authenticated authentication. UsingfailOnDenied()orfailOnDeniedAndAnonymous()can prevent you form doing such mistakes.
The API provides several base implementations that facilitate the authentication setup in an application.
Please refer to security-jose and security-ldap modules documentations for JOSE tokens authenticators (i.e. JWS, JWE, JWT), LDAP and Active Directory authenticators.
PrincipalAuthenticator
The principal authenticator is a generic authenticator for PrincipalCredential which returns PrincipalAuthentication. Authentication is done by matching provided credentials against trusted credentials using a CredentialsMatcher. Trusted credentials are resolved by username using a CredentialsResolver. A PrincipalAuthenticator is then created with a CredentialsResolver and a CredentialsMatcher as follows:
// Resolves trusted credentials by username (e.g. from a trusted store...)
CredentialsResolver<LoginCredentials> credentialsResolver = ...
// Matches provided credentials against trusted credentials
CredentialsMatcher<LoginCredentials, LoginCredentials> credentialsMatcher = ...
PrincipalAuthenticator<LoginCredentials, LoginCredentials> authenticator = new PrincipalAuthenticator<>(credentialsResolver, credentialsMatcher);
authenticator.authenticate(LoginCredentials.of("user", new RawPassword("password")));
A principal authenticator is terminal by default and terminates the authentication by returning a denied authentication on AuthenticationException due to unresolvable credentials (CredentialsNotFoundException) or unmatched credentials (InvalidCredentialsException). A principal authenticator can be made non-terminal in order to chain other authenticators:
PrincipalAuthenticator<LoginCredentials, LoginCredentials> authenticator = new PrincipalAuthenticator<>(credentialsResolver, credentialsMatcher);
LoginCredentials invalidCredentials = LoginCredentials.of("user", new RawPassword("invalid"));
// Returns a denied authentication
PrincipalAuthentication authentication = authenticator.authenticate(invalidCredentials).block();
// Returns null
PrincipalAuthentication authentication = authenticator.authenticate(invalidCredentials).block();
UserAuthenticator
The user authenticator extends the principal authenticator, it is used to authenticate actual users. As for the PrincipalAuthenticator, the UserAuthenticator authenticates PrincipalCredentials, but it matches them against trusted User credentials instead of generic credentials. A user is a specific kind of credentials to represent actual users with Identity and groups. The resulting authentication is a UserAuthentication which exposes the Identity and the set of groups of the authenticated entity. A user is typically used to represent credentials for a physical person accessing the application.
Since the User interface exposes both identity and groups, the UserAuthenticator can actually authenticate and resolve data required to resolve the user's Identity and AccessController at once. In a security manager, it can be associated with a UserIdentityResolver which extracts the identity from the authentication and a GroupsRoleBasedAccessControllerResolver which uses the groups from the authentication as roles to create a RoleBasedAccessController.
// Resolves system users by username (e.g. from a user repository...)
CredentialsResolver<User<PersonIdentity>> credentialsResolver = ...
// Matches provided credentials against trusted users which are also LoginCredentials
CredentialsMatcher<LoginCredentials, LoginCredentials> credentialsMatcher = ...
UserAuthenticator<LoginCredentials, PersonIdentity, User<PersonIdentity>> authenticator = new UserAuthenticator<>(credentialsResolver, credentialsMatcher);
UserAuthentication<PersonIdentity> authentication = authenticator.authenticate(LoginCredentials.of("user", new RawPassword("password"))).block();
// first name, last name, email...
PersonIdentity identity = authentication.getIdentity();
// user belongs to groups sales, admin...
Set<String> groups = authentication.getGroups();
As for the principal authenticator, a user authenticator is terminal by default but can be made non-terminal by setting the terminal flag to false.
Credentials resolver
A credentials resolver is usually used within Authenticator implementations for resolving trusted credentials based on some id provided with the credentials in order to match them against trusted credentials. Both PrincipalAuthenticator and UserAuthenticator uses this technique to authenticate LoginCredentials identified by the username.
The CredentialsResolver interface is a functional interface defining one resolveCredentials() method. A simplistic implementation can then be created as follows:
CredentialsResolver<LoginCredentials> credentialsResolver = username -> Mono.fromSupplier(() -> {
switch(username) {
case "user1": return LoginCredentials.of("user1", new BCryptPassword.Encoder().encode("password1"));
case "user2": return LoginCredentials.of("user2", new BCryptPassword.Encoder().encode("password2"));
default: return null;
}
});
// Returns user1's trusted credentials
LoginCredentials user1Credentials = credentialsResolver.resolveCredentials("user1").block();
// Returns null
LoginCredentials user3Credentials = credentialsResolver.resolveCredentials("user3").block();
The API provides several implementations that facilitate the authentication setup in an application.
InMemoryLoginCredentialsResolver
An in-memory login credentials resolver can be used to create dynamic and volatile LoginCredentials resolvers which are particularly suited for testing and prototyping. The InMemoryLoginCredentialsResolver basically looks for LoginCredentials stored in a ConcurrentHashMap and allows to add or remove credentials as needed.
InMemoryLoginCredentialsResolver inMemoryLoginCredentialsResolver = new InMemoryLoginCredentialsResolver(List.of(LoginCredentials.of("user1", new RawPassword("password"))));
inMemoryLoginCredentialsResolver.put("user2", new RawPassword("password"));
inMemoryLoginCredentialsResolver.remove("user1");
UserRepository
A user repository is a user credentials resolver that provides CRUD operations to a data store in order to securely store and manage application users.
UserRepository<PersonIdentity, User<PersonIdentity>> userRepository = null;
// Create a user with identity and groups
userRepository.createUser(new User<>("jsmith", new PersonIdentity("jsmith", "John", "Smith", "jsmith@inverno.io"), new RawPassword("password"), "group1", "group2"));
// Update user email
userRepository.getUser("jsmith")
.doOnNext(user -> user.getIdentity().setEmail("jsmith1@inverno.io"))
.map(userRepository::updateUser)
.block();
// Password change requires current credentials
userRepository.changePassword(LoginCredentials.of("jsmith", new RawPassword("password")), "newPassword");
// Delete user
userRepository.deleteUser("jsmith").block();
A proper UserRepository implementation shall rely on a PasswordPolicy and a PasswordEncoder to respectively control the level of protection offered by passwords and securely store them in the datastore.
The PasswordPolicy interface defines the verify() method which evaluates the strength of a password in a login credentials against some rules. A PasswordPolicy.PasswordStrength provides qualitative and quantitative marks used to evaluate the password strength, it is returned when the password follows the policy and included in a PasswordPolicyException thrown when the password does not follow the policy.
The SimplePasswordPolicy is a simple implementation that allows to control password's minimum and maximum length:
PasswordPolicy<LoginCredentials, SimplePasswordPolicy.SimplePasswordStrength> passwordPolicy = new SimplePasswordPolicy<>(4, 8);
// Throws a PasswordPolicyException since 'newPassword' is too long (> 8)
SimplePasswordPolicy.SimplePasswordStrength passwordStrength = passwordPolicy.verify(LoginCredentials.of("jsmith", new RawPassword("password")), "newPassword");
// Returns the strength of the password
SimplePasswordPolicy.SimplePasswordStrength passwordStrength = passwordPolicy.verify(LoginCredentials.of("jsmith", new RawPassword("password")), "newPassword");
// WEAK, MEDIUM, STRONG...
passwordStrength.getQualifier();
// 10, 42, 100... The higher, the better
passwordStrength.getScore();
Please consider NIST Digital Identity Guidelines Section 5.1.1.2 if you need to create more elaborate implementations.
The PasswordEncoder was covered previously in this documentation, it is used to evenly encode passwords before they are stored in the repository.
The API currently provides two UserRepository implementations:
- the
InMemoryUserRepositorywhich stores users in aConcurrentHashMap. - the
RedisUserRepositorywhich stores users in a Redis datastore.
By default, they both use a default SimplePasswordPolicy as password policy and a PBKDF2Password.Encoder as password encoder. Custom password policy and encoder can be specified as follows:
// Required to access Redis datastore
RedisClient<String, String> redisClient = null;
// Required to serialize/deserialize users to/from JSON strings
ObjectMapper mapper = null;
// Use BCrypt hashing function and enforce passwords between 10 and 20 characters
UserRepository<PersonIdentity, User<PersonIdentity>> redisUserRepository = new RedisUserRepository<>(redisClient, mapper, new BCryptPassword.Encoder(8, 32), new SimplePasswordPolicy<>(10,20) );
A
UserRepositorycan be typically exposed in a REST interface consumed by an admin UI in order to manage application's users.
Credentials matcher
A credentials matcher is usually used in conjunction with a credentials resolver within Authenticator implementations to match credentials against trusted credentials resolved using the credentials resolver. Both PrincipalAuthenticator and UserAuthenticator uses this technique to authenticate LoginCredentials identified by the username.
The CredentialsMatcher interface is a functional interface defining one matches() method which must be reflexive, symmetric and transitive. A simplistic implementation can then be created as follows:
CredentialsMatcher<LoginCredentials, LoginCredentials> credentialsMatcher = (credentials, trustedCredentials) -> {
return credentials.getPassword().matches(trustedCredentials.getPassword());
};
LoginCredentialsMatcher
The API provides LoginCredentialsMatcher implementation which basically check that usernames are equal and that passwords are matching.
// Match user provided login credentials against trusted user credentials
CredentialsMatcher<LoginCredentials, User<PersonIdentity>> credentialsMatcher = new LoginCredentialsMatcher();
Identity resolver
In a security manager, an identity resolver is responsible for resolving the Identity of an authenticated entity based on the Authentication returned by an Authenticator.
The IdentityResolver interface is a functional interface defining one resolveIdentity() method which makes it easy to create inline implementations:
IdentityResolver<PrincipalAuthentication, PersonIdentity> identityResolver = authentication -> {
// The authentication is a proof of authentication, we can assume valid credentials have been provided
String authenticatedUsername = authentication.getUsername();
// Retrieve user identity from a reactive data source using the authenticated username
Mono<PersonIdentity> identity = ...
return identity;
};
A security manager may or may not use an identity manager depending on what is needed by the application. Identity resolution is also not exclusive to the identity resolver, there might be cases where identity information can actually be resolved during the authentication process, these information can then be exposed in a specific authentication and used in an identity resolver to create the actual identity exposed in the security context.
We can also think of various use cases where the identity can not or should not be resolved during the authentication process. For instance, in token based authentication, a token can be authenticated using cryptographic techniques (e.g. signature) without requiring to communicate with an external system which might have provided identity information, identity can then be resolved next by the identity resolver if the application needs it. Again, it is important to understand that authentication and identity are not necessarily correlated, the
LDAPIdentityResolverprovided in the security-ldap module is a good example that can be used after another authenticator than theLDAPAuthenticator.
UserIdentityResolver
The UserAuthenticator is a good example of identity information resolved during authentication. The identity is resolved with trusted credentials used for authentication in order to save resources. However, a security manager still requires an identity resolver in order to expose the identity in the security context. In this particular case, the UserIdentityResolver can be used to simply extract the identity from the UserAuthentication and returns it to the security manager.
// Simply returns the identity resolved during authentication
IdentityResolver<UserAuthentication<PersonIdentity>, PersonIdentity> identityResolver = new UserIdentityResolver<UserAuthentication<PersonIdentity>, PersonIdentity>();
AccessController resolver
In a security manager, an access controller resolver is responsible for resolving the authorizations granted to the authenticated entity based on the Authentication returned by an Authenticator in order to control its access to protected services and resources using an AccessController.
The AccessControllerResolver interface is a functional interface defining method resolveAccessController(), a simple inline implementation can be created as follows:
AccessControllerResolver<PrincipalAuthentication, RoleBasedAccessController> accessControllerResolver = authentication -> {
// The authentication is a proof of authentication, we can assume valid credentials have been provided
String authenticatedUsername = authentication.getUsername();
// Retrieve the role of the authenticated entity from a reactive data source using the authenticated username
Mono<Set<String>> roles = ...
return roles.map(RoleBasedAccessController::of);
};
As for the identity resolver, a security manager may or may not use an access controller resolver depending on application's needs. As for identity resolution, access control information (e.g. roles, permissions...) can be resolved during authentication. For instance, the UserAuthenticator resolves user's groups along with trusted credentials used for authentication. These information can then be passed in the authentication and used within the access controller resolver to create the AccessController used to control the access to protected service and resources for the authenticated entity.
GroupsRoleBasedAccessControllerResolver
The GroupsRoleBasedAccessControllerResolver uses the set of groups exposed in a GroupAwareAuthentication (e.g. UserAuthentication) to create a role-based access controller.
AccessControllerResolver<GroupAwareAuthentication, RoleBasedAccessController> accessControllerResolver = new GroupsRoleBasedAccessControllerResolver();
ConfigurationSourcePermissionBasedAccessControllerResolver
The ConfigurationSourcePermissionBasedAccessControllerResolver creates a permission-based access controller for the authenticated entity identified by a username. The resulting access controller is backed by a configuration source which defines permissions by username.
// The configuration source defining permissions by user
ConfigurationSource configurationSource = null;
ConfigurationSourcePermissionBasedAccessControllerResolver accessControllerResolver = new ConfigurationSourcePermissionBasedAccessControllerResolver(configurationSource);
Security Context
The security context is the central component used to secure an application. It is obtained from a security manager after credentials authentication. It is composed of the following subcomponents:
- an
Authenticationwhich results from the authentication of credentials and proves that there was an authentication. - an
Identitywhich provides information about the identity of the authenticated entity. - an
AccessControllerwhich provides services to determine whether the authenticated entity has the right to access protected services or resources within the application.
These basically correspond to the three main concepts composing the Inverno security model as described in the introduction of the security module.
A SecurityContext instance should be distributed in the application anywhere there is a need to protect services and resources (i.e. authentication and access control) or a need for information about the authenticated entity (i.e. identification). It is usually obtained from a security manager, but it is also possible to create a security context from previous components as follows:
Authentication authentication = Authentication.granted();
PersonIdentity identity = new PersonIdentity("jsmith", "John", "Smith", "jsmith@inverno.io");
RoleBasedAccessController accessController = RoleBasedAccessController.of("reader", "writer");
SecurityContext<PersonIdentity, RoleBasedAccessController> securityContext = SecurityContext.of(authentication, identity, accessController);
This construct can be useful for testing, but it is important to remember that the API specifies that an authentication must represent the proof that credentials were authenticated which basically guarantees that the security context can be trusted. As a result, the security manager should always be preferred to create the security context.
Authentication
An authentication results from an authentication process and represents the proof that credentials were authenticated, typically by an authenticator. In other words, it guarantees that the entity accessing the application has provided credentials and that they have been authenticated successfully or not.
An Authentication is always present in a security context but this does not mean credential have been successfully authenticated, it simply means that there was an authentication. It can then take three forms:
- anonymous which corresponds to an authentication which is not authenticated with no cause of error and indicates that authentication was bypassed and application is accessed anonymously.
- denied which corresponds to an authentication which is not authenticated with a cause of error (e.g. invalid credentials...) and indicates a failed authentication.
- granted which corresponds to an authenticated authentication and indicates a successful authentication.
From there, it is up to the application to authorize anonymous access and decide what to do in case of denied access. The following example shows how to fully handle authentication in a security context:
SecurityContext<PersonIdentity, RoleBasedAccessController> securityContext = ...
if(securityContext.getAuthentication().isAuthenticated()) {
// Application is accessed by an authenticated entity:
// - use access controller to secure services and resources
// - use identity to get information about the authenticated entity
...
}
else if(securityContext.getAuthentication().isAnonymous()) {
// Application is accessed anonymously: we can grant partial access or deny access
...
}
else {
// Authentication failed: we should deny access and report the error
LOGGER.error(securityContext.getAuthentication().getCause().get());
...
}
By extension, a security context can be anonymous, denied or granted as described in the security manager. A denied or anonymous security context always returns empty identity and access controller. Previous code can then be rewritten as follows:
SecurityContext<PersonIdentity, RoleBasedAccessController> securityContext = ...
if(securityContext.isAuthenticated()) {
// Application is accessed by an authenticated entity:
// - use access controller to secure services and resources
// - use identity to get information about the authenticated entity
...
}
else if(securityContext.isAnonymous()) {
// Application is accessed anonymously: we can grant partial access or deny access
...
}
else {
// Authentication failed: we should deny access and report the error
LOGGER.error(securityContext.getAuthentication().getCause().get());
...
}
You might have noticed that, unlike identity and access controller types, the authentication type is not defined as formal parameter in the
SecurityContextinterface. The authentication type is important in the security manager which uses specific identity and access controller resolvers for which the actual authentication type is important. However, it is no longer useful in the security context which only needs to determine whether authentication is anonymous, denied or granted.
Identity
The identity exposes information that identifies that authenticated entity, it is resolved by the security manager using an identity resolver.
A security context may or may not expose an identity depending on several elements such as whether identity is required by the application or whether an identity can be resolved based on the credentials provided to the security manager. In any case, the application must be prepared to handle security context with no identity.
SecurityContext<PersonIdentity, RoleBasedAccessController> securityContext = ...
securityContext.getIdentity().ifPresentOrElse(
identity -> {
// Send an e-mail to the authenticated user
String email = identity.getEmail();
...
},
() -> {
LOGGER.warn("Unable to send email: missing identity");
...
}
);
Access Controller
The access controller provides services used to determine whether access to protected service or resource should be granted to the authenticated entity, it is resolved by the security manager using an access controller resolver.
As for the identity, the application should not assume that a security context exposes an access controller for an authenticated entity, and it must be prepared to deal with a missing access controller.
SecurityContext<PersonIdentity, RoleBasedAccessController> securityContext = ...
Mono<String> protectedReactiveService = securityContext.getAccessController()
.map(accessController2 -> accessController2
.hasRole("reader")
.map(hasRole -> {
if(!hasRole) {
throw new ForbiddenException();
}
// User is authorized: do something useful
return "User is a reader";
})
)
.orElseThrow(() -> new InternalServerErrorException("Missing access controller"));
The API provides AccessController implementations to get role-based access control or permission-based access control.
RoleBasedAccessController
A role-based access controller defines services used to determine whether an authenticated entity has a particular set of roles. Role-based access control is used to protect access to services or resources based on the roles that were assigned to the authenticated user.
A RoleBasedAccessController is ideally obtained from an authentication by a security manager using a specific access controller resolver, but a simple instance can also be created from a collection of roles as follows:
RoleBasedAccessController accessController = RoleBasedAccessController.of("reader", "writer");
This construct can be useful for AccessControllerResolver implementations and testing purposes.
The RoleBasedAccessController interface basically defines three methods: hasRole() used to determine whether the authenticated entity has a specific role, hasAnyRole() used to determine whether the authenticated entity has any of the roles in a set of roles and hasAllRole() used to determine whether the authenticated entity has all the roles in a set of roles.
SecurityContext<PersonIdentity, RoleBasedAccessController> securityContext = ...
securityContext.getAccessController()
.ifPresent(accessController2 -> {
// Returns true if the authenticated user has role 'reader'
Mono<Boolean> canRead = accessController2.hasRole("reader");
// Returns true if the authenticated user has any of the roles: 'writer', 'admin'
Mono<Boolean> canWrite = accessController2.hasAnyRole("writer", "admin");
// Returns true if the authenticated user has all roles: 'reader', 'writer'
Mono<Boolean> canReadAndWrite = accessController2.hasAllRoles("reader", "writer");
});
These methods are reactive to support implementations using non-blocking operations.
PermissionBasedAccessController
A permission-based access controller defines services used to determine whether an authenticated has the required permissions to access a protected service or resource. Access to services or resources is then controlled based on the permissions granted to the authenticated user for a particular context. Permissions are evaluated in a context defined by a set of parameters, such permissions are referred as parameterized permissions.
The PermissionBasedAccessController interface basically defines three kind of methods: hasPermission() used to determine whether the authenticated user has a particular permission in a particular context, hasAnyPermission() used to determine whether the authenticated entity has any of the permissions in a set of permissions in a particular context and hasAllPermissions() used to determine whether the authenticated entity has all the permissions in a set of permissions in a particular context.
SecurityContext<PersonIdentity, PermissionBasedAccessController> securityContext = null;
securityContext.getAccessController()
.ifPresent(accessController -> {
// Returns true if the authenticated user has permission read
Mono<Boolean> canRead = accessController.hasPermission("read");
// Returns true if the authenticated user has permission read on 'contract' documents
Mono<Boolean> canReadContracts = accessController.hasPermission("read", PermissionBasedAccessController.Parameter.of("documentType", "contract"));
// Returns true if the authenticated user has permission 'manage' or 'admin'
Mono<Boolean> canManagePrinter = accessController.hasAnyPermission(Set.of("manage", "admin"));
// Returns true if the authenticated user has permission can manage printer 'lp1200'
Mono<Boolean> canManagePrinterLP1200 = accessController.hasAnyPermission(Set.of("manage", "admin"), PermissionBasedAccessController.Parameter.of("printer", "lp1200"));
// Returns true if the authenticated user can book and modify 'AF' flights from 'Orly' airport
Mono<Boolean> canBookAndModify = accessController.hasAllPermissions(Set.of("book", "modify"), PermissionBasedAccessController.Parameter.of("company", "AF"), PermissionBasedAccessController.Parameter.of("origin", "ORY"));
});
Parameterized permissions are very powerful and offer the most flexibility to control access to protected services and resources by taking the operational context into account. They are very similar to parameterized configuration properties as described in the configuration module. It is then no surprise than the API provides the ConfigurationSourcePermissionBasedAccessController implementation which is backed by a ConfigurationSource to resolve permissions as configuration properties defined as follows:
- the property name can be either a username or a role name prefixed with a role prefix to differentiate them from users (defaults is
ROLE_) - the property parameters are the permissions parameters defining the context into which permissions are defined
- the property value is a comma separated list of permissions defined using the following rules:
permissionto indicates a granted permission!permissionto indicates that a permission must not be granted*to indicate that all permissions are granted
The configuration source can be configured to use various defaulting strategies depending on the needs, it is however common to use a DefaultingStrategy.wildcard() strategy as it is more adapt than the DefaultingStrategy.lookup() strategy in that particular context.
Considering the following permissions defined in a CPropsFileConfigurationSource:
[ domain = "printer" ] {
# jsmith has role 'user' and therefore permission to query to any printer in the printer domain
ROLE_user="query"
ROLE_admin="*"
}
[ domain = "printer", printer = "lp1200" ] {
# jsmith has permission to query and print to printer lp1200
jsmith="query,print"
}
[ printer="epsoncolor" ] {
# jsmith has permission to manage printer epsoncolor across all domains
# when querying with (domain=printer,printer=epsoncolor) the permission is actually 'query' because domain parameter has the highest priority
jsmith="manage"
ROLE_user="query,print"
}
[ domain = "printer", printer = "XP-4100" ] {
# jsmith has all permission on printer XP-4100
jsmith="*"
}
[ domain = "printer", printer = "HL-L6400DW" ] {
ROLE_user="query,print"
}
[ domain = "printer", printer = "C400V_DN" ] {
jsmith="*,!manage"
}
We can then control permissions for user jsmith as follows:
CPropsFileConfigurationSource src = new CPropsFileConfigurationSource(new ClasspathResource(URI.create("classpath:/permissions.cprops")))
.withDefaultingStrategy(DefaultingStrategy.wildcard());
PermissionBasedAccessController pbac = new ConfigurationSourcePermissionBasedAccessController(src, "jsmith", Set.of("user"));
// true: 'jsmith' has role 'user' for which permission query is granted in domain 'printer'
pbac.hasPermission("query", "domain", "printer").block();
// true: 'jsmith' has role 'user' for which permission query is granted in domain 'printer'
pbac.hasPermission("query", "domain", "printer", "printer", "TM-C3500").block();
// false: 'jsmith' only have permission query in domain 'printer'
pbac.hasPermission("query").block();
// true: 'jsmith' has all permissions on printer 'XP-4100' in domain 'printer'
pbac.hasPermission("manage", "domain", "printer", "printer", "XP-4100").block();
// true: 'jsmith' has all permissions but 'manage' permission on printer 'C400V-DN' in domain 'printer'
pbac.hasPermission("print", "domain", "printer", "printer", "C400V-DN").block();
// false: 'jsmith' has all permissions but 'manage' permission on printer 'C400V-DN' in domain 'printer'
pbac.hasPermission("manage", "domain", "printer", "printer", "C400V-DN").block();
It is important to remember that when using a defaulting strategy, the order into which parameters are specified in the query can impact results. For instance, the wildcard strategy gives priority to the permission defined with the most parameters and in case of conflict to parameters defined from left to right in the query.
With great power comes great responsibility. As you can imagine, this particular permission-based access controller implementation is quite complex and requires rigor to be used properly. The more parameters are considered, the more difficult it is to define permissions. This might also have an impact on performances, especially when a defaulting strategy is used (wildcard defaulting may require
2^nqueries on the configuration source wherenis the number of parameter). As a guideline, you should try to consider limited number of parameters (ideally two and not more than three) and consider caching permissions.
As of now, the impact on performances that might be introduced by the
ConfigurationSourcePermissionBasedAccessControlleris still unclear due to limited real-life feedbacks which is why no big decision was taken yet to provide caching solutions. Possible solutions include using multiple dedicated Redis replicas when using aRedisConfigurationSourceor caching the complete list of permissions by user in an in-memory configuration source.
Security HTTP
The Inverno security-http module extends the security API and the HTTP server API respectively defined in the security module and the http-server module in order to secure access to an HTTP server or a Web application.
It defines a complete API for authenticating HTTP requests and exposing the resulting security context in the exchange context which can then be used in exchange interceptors and handlers to secure the application.
Base implementations for various HTTP and Web security standards are also provided. The module currently supports the following features:
- HTTP basic authentication scheme.
- HTTP digest authentication scheme.
- Form based authentication.
- Token based authentication.
- Cross-origin resource sharing support (CORS).
- Protection against Cross-site request forgery attack (CSRF).
In order to use the Inverno security-http module, we need to declare a dependency in the module descriptor:
module io.inverno.example.app_security_http {
requires io.inverno.mod.security.http;
}
And also declare that dependency in the build descriptor:
Using Maven:
<project>
<dependencies>
<dependency>
<groupId>io.inverno.mod</groupId>
<artifactId>inverno-security-http</artifactId>
</dependency>
</dependencies>
</project>
Using Gradle:
compile 'io.inverno.mod:inverno-security-http:1.13.0'
A dependency to the session-http module should be added if session based authentication is to be supported:
module io.inverno.example.app_security_http {
requires io.inverno.mod.session.http;
}
Using Maven:
<project>
<dependencies>
<dependency>
<groupId>io.inverno.mod</groupId>
<artifactId>inverno-session-http</artifactId>
</dependency>
</dependencies>
</project>
Using Gradle:
compile 'io.inverno.mod:inverno-session-http:1.13.0'
Let's quickly see how to secure a simple Web application exposing a single hello world service using basic authentication. The application might initially look like:
package io.inverno.example.app_security_http;
import io.inverno.core.annotation.Bean;
import io.inverno.core.v1.Application;
import io.inverno.mod.http.base.Method;
import io.inverno.mod.web.server.annotation.WebController;
import io.inverno.mod.web.server.annotation.WebRoute;
@Bean
@WebController
public class Main {
public static void main(String[] args) {
Application.run(new App_security_http.Builder());
}
@WebRoute( path = "/hello", method = Method.GET)
public String hello() {
return "Hello world!";
}
}
We can run the application which should respond with Hello world! when requesting http://localhost:8080/hello:
$ mvn inverno:run
...
10:19:32.797 [main] INFO io.inverno.core.v1.Application - Inverno is starting...
╔════════════════════════════════════════════════════════════════════════════════════════════╗
║ , ~~ , ║
║ , ' /\ ' , ║
║ , __ \/ __ , _ ║
║ , \_\_\/\/_/_/ , | | ___ _ _ ___ __ ___ ___ ║
║ , _\_\/_/_ , | | / _ \\ \ / // _ \ / _|/ _ \ / _ \ ║
║ , __\_/\_\__ , | || | | |\ \/ /| __/| | | | | | |_| | ║
║ , /_/ /\/\ \_\ , |_||_| |_| \__/ \___||_| |_| |_|\___/ ║
║ , /\ , ║
║ , \/ , -- 1.6.0 -- ║
║ ' -- ' ║
╠════════════════════════════════════════════════════════════════════════════════════════════╣
║ Java runtime : OpenJDK Runtime Environment ║
║ Java version : 18+36-2087 ║
║ Java home : /home/jkuhn/Devel/jdk/jdk-18 ║
║ ║
║ Application module : io.inverno.example.app_security_http ║
║ Application class : io.inverno.example.app_security_http.Main ║
║ ║
║ Modules : ║
║ ... ║
╚════════════════════════════════════════════════════════════════════════════════════════════╝
10:19:32.801 [main] INFO io.inverno.example.app_security_http.App_security_http - Starting Module io.inverno.example.app_security_http...
10:19:32.801 [main] INFO io.inverno.mod.boot.Boot - Starting Module io.inverno.mod.boot...
10:19:33.002 [main] INFO io.inverno.mod.boot.Boot - Module io.inverno.mod.boot started in 200ms
10:19:33.002 [main] INFO io.inverno.mod.web.server.Web - Starting Module io.inverno.mod.web.server...
10:19:33.002 [main] INFO io.inverno.mod.http.server.Server - Starting Module io.inverno.mod.http.server...
10:19:33.002 [main] INFO io.inverno.mod.http.base.Base - Starting Module io.inverno.mod.http.base...
10:19:33.009 [main] INFO io.inverno.mod.http.base.Base - Module io.inverno.mod.http.base started in 6ms
10:19:33.110 [main] INFO io.inverno.mod.http.server.internal.HttpServer - HTTP Server (nio) listening on http://0.0.0.0:8080
10:19:33.111 [main] INFO io.inverno.mod.http.server.Server - Module io.inverno.mod.http.server started in 109ms
10:19:33.111 [main] INFO io.inverno.mod.web.server.Web - Module io.inverno.mod.web.server started in 109ms
10:19:33.112 [main] INFO io.inverno.example.App_security_http - Module io.inverno.example.app_security_http started in 312ms
10:19:33.115 [main] INFO io.inverno.core.v1.Application - Application io.inverno.example.app_security_http started in 375ms
$ curl -i http://localhost:8080/hello
HTTP/1.1 200 OK
content-length: 12
Hello world!
From there, let's say we want to protect the access to all routes requiring HTTP basic authentication. In order to do this we must authenticate basic credentials provided within requests and reject requests (401) on denied authentication in which case a basic authentication challenge must also be sent to the client.
A Web configurer must be created to define a security interceptor that will authenticate requests and use a BasicAuthenticationErrorInterceptor to intercept unauthorized (401) errors and return the basic authentication challenge to the client.
package io.inverno.example.app_security_http;
import io.inverno.core.annotation.Bean;
import io.inverno.mod.http.base.ExchangeContext;
import io.inverno.mod.http.base.UnauthorizedException;
import io.inverno.mod.security.accesscontrol.AccessController;
import io.inverno.mod.security.authentication.LoginCredentialsMatcher;
import io.inverno.mod.security.authentication.password.RawPassword;
import io.inverno.mod.security.authentication.user.InMemoryUserRepository;
import io.inverno.mod.security.authentication.user.User;
import io.inverno.mod.security.authentication.user.UserAuthenticator;
import io.inverno.mod.security.http.AccessControlInterceptor;
import io.inverno.mod.security.http.SecurityInterceptor;
import io.inverno.mod.security.http.basic.BasicAuthenticationErrorInterceptor;
import io.inverno.mod.security.http.basic.BasicCredentialsExtractor;
import io.inverno.mod.security.http.context.SecurityContext;
import io.inverno.mod.security.identity.Identity;
import io.inverno.mod.web.server.ErrorWebRouteInterceptor;
import io.inverno.mod.web.server.WebRouteInterceptor;
import io.inverno.mod.web.server.WhiteLabelErrorRoutesConfigurer;
import java.util.List;
@Bean( visibility = Bean.Visibility.PRIVATE )
public class SecurityConfigurer implements WebRouteInterceptor.Configurer<SecurityContext.Intercepted<Identity, AccessController>>, ErrorWebRouteInterceptor.Configurer<ExchangeContext> {
@Override
public WebRouteInterceptor<SecurityContext.Intercepted<Identity, AccessController>> configure(WebRouteInterceptor<SecurityContext.Intercepted<Identity, AccessController>> interceptors) {
return interceptors
.intercept()
.interceptors(List.of(SecurityInterceptor.of( // 1
new BasicCredentialsExtractor<>(), // 2
new UserAuthenticator<>( // 3
InMemoryUserRepository.of(List.of(
User.of("jsmith")
.password(new RawPassword("password"))
.build()
))
.build(),
new LoginCredentialsMatcher<>()
)
),
AccessControlInterceptor.authenticated() // 4
));
}
@Override
public ErrorWebRouteInterceptor<ExchangeContext> configure(ErrorWebRouteInterceptor<ExchangeContext> errorInterceptors) {
return errorInterceptors
.interceptError()
.error(UnauthorizedException.class)
.interceptor(new BasicAuthenticationErrorInterceptor<>("inverno-basic")) // 5
.configureErrorRoutes(new WhiteLabelErrorRoutesConfigurer<>());
}
}
The Web configurer implements WebRouteInterceptor.Configurer and ErrorWebRouteInterceptor.Configurer in order to configure route and error route interceptors to apply to all routes. It declares the SecurityContext.Intercepted exchange context type which is required by the SecurityInterceptor to set the security context. Interceptors are defined to intercept all routes.
In above code, there are several things that deserve further explanation:
- The
SecurityInterceptoris the Web counterpart of theSecurityManager, it is used to authenticate credentials provided in HTTP requests and create the security context which is then exposed in the exchange context and accessible to exchange interceptors and handlers. - In addition to the authenticator and optional identity and access controller resolvers, it requires a credentials extractor used to extract
Credentialsfrom the request. TheBasicCredentialsExtractorbasically extractsLoginCredentials(username/password) from theauthorizationHTTP header of the request. - The security interceptor can then use any authenticator that is able to authenticate login credentials such as the
UserAuthenticator. - An access control interceptor is added next in order to limit the access to authenticated users. Just like the security manager, the security interceptor authenticates credentials and creates the security context. But that does not mean authentication was successful, the resulting security context can be anonymous, denied or authenticated.
- The
BasicAuthenticationErrorInterceptorintercepts unauthorized (401) errors and set the basic authentication scheme challenge in thewww-authenticateHTTP header of the response with theinverno-basicrealm.
We should now receive an unauthorized (401) error with a basic authentication challenge when requesting http://localhost:8080/hello (or any other endpoint) without credentials:
$ curl -i http://127.0.0.1:8080/hello
HTTP/1.1 401 Unauthorized
www-authenticate: basic realm="inverno-basic"
content-length: 0
In order to access the service, we must provide valid credentials in the authorization HTTP header. Basic authentication scheme specifies that credentials are obtained by encoding in base64 the concatenation of the username, a single colon and the password. In our example credentials for user jsmith are then anNtaXRoOnBhc3N3b3Jk:
$ curl -i -H 'authorization: basic anNtaXRoOnBhc3N3b3Jk' http://127.0.0.1:8080/hello
HTTP/1.1 200 OK
content-length: 12
Hello world!
We can change the /hello route handler to respond with a personalized message. This requires to resolve the identity of the user and use it in the handler.
A user repository allows to define users with identity such as PersonIdentity, the Web configurer can then be changed to expose PersonIdentity and use a UserIdentityResolver in the security interceptor to resolve the user identity and make it available in the security context:
package io.inverno.example.app_security_http;
...
import io.inverno.mod.security.identity.PersonIdentity;
import io.inverno.mod.security.identity.UserIdentityResolver;
@Bean( visibility = Bean.Visibility.PRIVATE )
public class SecurityConfigurer implements WebRouteInterceptor.Configurer<SecurityContext.Intercepted<PersonIdentity, AccessController>>, ErrorWebRouteInterceptor.Configurer<ExchangeContext> {
@Override
public WebRouteInterceptor<SecurityContext.Intercepted<PersonIdentity, AccessController>> configure(WebRouteInterceptor<SecurityContext.Intercepted<PersonIdentity, AccessController>> interceptors) {
return interceptors
.intercept()
.interceptors(List.of(SecurityInterceptor.of(
new BasicCredentialsExtractor<>(),
new UserAuthenticator<>(
InMemoryUserRepository.of(List.of(
User.of("jsmith")
.password(new RawPassword("password"))
.identity(new PersonIdentity("jsmith", "John", "Smith", "jsmith@inverno.io")) // Define user identity
.build()
))
.build(),
new LoginCredentialsMatcher<>()
),
new UserIdentityResolver<>() // Resolve user identity from UserAuthentication
),
AccessControlInterceptor.authenticated()
));
}
...
}
The PersonIdentity type is now declared in the SecurityContext.Intercepted exchange context type and the identity is resolved from user's identity.
We can now inject the exchange security context in the route handler and get the identity to provide the personalized message:
package io.inverno.example.app_security_http;
...
import io.inverno.mod.security.accesscontrol.AccessController;
import io.inverno.mod.security.http.context.SecurityContext;
import io.inverno.mod.security.identity.PersonIdentity;
@Bean
@WebController
public class Main {
...
@WebRoute( path = "/hello", method = Method.GET)
public String hello(SecurityContext<? extends PersonIdentity, ? extends AccessController> securityContext) {
return "Hello " + securityContext.getIdentity().map(PersonIdentity::getFirstName).orElse("whoever you are") + "!";
}
}
Here we injected
io.inverno.mod.security.http.context.SecurityContextwhich extends bothio.inverno.mod.security.context.SecurityContextandExchangeContext. This interface is not mutable and exposes the exact same components as the regular security context, it should be used in application's route interceptors and handlers. On the other hand, theSecurityContext.Interceptedis mutable and should only be used by security related interceptors and theSecurityInterceptorin particular.
User jsmith should now receive a personalized message when requesting http://localhost:8080/hello:
$ curl -i -H 'authorization: basic anNtaXRoOnBhc3N3b3Jk' http://127.0.0.1:8080/hello
HTTP/1.1 200 OK
content-length: 11
Hello John!
Let's create another endpoint for VIP users with vip role responding with an extra polite message:
package io.inverno.example.app_security_http;
...
import io.inverno.mod.http.base.ForbiddenException;
import io.inverno.mod.security.accesscontrol.RoleBasedAccessController;
import reactor.core.publisher.Mono;
@Bean
@WebController
public class Main {
...
@WebRoute( path = "/vip/hello", method = Method.GET)
public Mono<String> hello_vip(SecurityContext<? extends PersonIdentity, ? extends RoleBasedAccessController> securityContext) {
return securityContext.getAccessController()
.orElseThrow(ForbiddenException::new)
.hasRole("vip")
.map(isVip -> {
if(!isVip) {
throw new ForbiddenException();
}
return "Hello my dear friend " + securityContext.getIdentity().map(PersonIdentity::getFirstName).orElse("whoever you are") + "!";
});
}
...
}
You may have noticed that we did not have to change the
/helloroute definition which can still declareSecurityContext<? extends PersonIdentity, ? extends AccessController>since it is assignable from the actual context typeSecurityContext<PersonIdentity, RoleBasedAccessController>declared in the security configurer. Note that a compilation error would have been raised to report inconsistent exchange context types if we had not used upper bound wildcards.
In the Web configurer, VIP users can be placed into the vip group and a RoleBasedAccessContoller can be resolved using a GroupsRoleBasedAccessControllerResolver:
package io.inverno.example.app_security_http;
...
import io.inverno.mod.http.base.ForbiddenException;
import io.inverno.mod.security.accesscontrol.GroupsRoleBasedAccessControllerResolver;
import io.inverno.mod.security.accesscontrol.RoleBasedAccessController;
@Bean( visibility = Bean.Visibility.PRIVATE )
public class SecurityConfigurer implements WebRouteInterceptor.Configurer<SecurityContext.Intercepted<PersonIdentity, RoleBasedAccessController>>, ErrorWebRouteInterceptor.Configurer<ExchangeContext> {
@Override
public WebRouteInterceptor<SecurityContext.Intercepted<PersonIdentity, RoleBasedAccessController>> configure(WebRouteInterceptor<SecurityContext.Intercepted<PersonIdentity, RoleBasedAccessController>> interceptors) {
return interceptors
.intercept()
.interceptors(List.of(SecurityInterceptor.of(
new BasicCredentialsExtractor<>(),
new UserAuthenticator<>(
InMemoryUserRepository.of(List.of(
User.of("jsmith")
.password(new RawPassword("password"))
.identity(new PersonIdentity("jsmith", "John", "Smith", "jsmith@inverno.io"))
.groups("vip")
.build(),
User.of("adoe")
.password(new RawPassword("password"))
.identity(new PersonIdentity("adoe", "Alice", "Doe", "adoe@inverno.io"))
.build()
))
.build(),
new LoginCredentialsMatcher<>()
),
new UserIdentityResolver<>(),
new GroupsRoleBasedAccessControllerResolver()
),
AccessControlInterceptor.authenticated()
));
}
...
}
The RoleBasedAccessController type is now declared in the SecurityContext.Intercepted exchange context type, we also added another normal user and a role-based access controller based on users' groups is now resolved.
Accessing route /hello and /vip/hello with different users should provide the following results:
$ curl -i -H 'authorization: basic anNtaXRoOnBhc3N3b3Jk' http://127.0.0.1:8080/hello
HTTP/1.1 200 OK
content-length: 11
Hello John!
$ curl -i -H 'authorization: basic anNtaXRoOnBhc3N3b3Jk' http://127.0.0.1:8080/vip/hello
HTTP/1.1 200 OK
content-length: 26
Hello my dear friend John!
$ curl -i -H 'authorization: basic YWRvZTpwYXNzd29yZA==' http://127.0.0.1:8080/hello
HTTP/1.1 200 OK
content-length: 12
Hello Alice!
$ curl -i -H 'authorization: basic YWRvZTpwYXNzd29yZA==' http://127.0.0.1:8080/vip/hello
HTTP/1.1 403 Forbidden
content-length: 0
Here we have decided to control access inside the /vip/hello route handler, but we could have also globally restricted access to /vip/** routes to VIP users using an AccessControlInterceptor in the security configurer:
package io.inverno.example.app_security_http;
...
@Bean( visibility = Bean.Visibility.PRIVATE )
public class SecurityConfigurer implements WebRouteInterceptor.Configurer<SecurityContext.Intercepted<PersonIdentity, RoleBasedAccessController>>, ErrorWebRouteInterceptor.Configurer<ExchangeContext> {
@Override
public WebRouteInterceptor<SecurityContext.Intercepted<PersonIdentity, RoleBasedAccessController>> configure(WebRouteInterceptor<SecurityContext.Intercepted<PersonIdentity, RoleBasedAccessController>> interceptors) {
return interceptors
...
.intercept()
.path("/vip/**")
.interceptor(AccessControlInterceptor.verify(securityContext -> securityContext.getAccessController()
.orElseThrow(ForbiddenException::new)
.hasRole("vip")
));
}
...
}
The /vip/hello route handler can then be simplified while still being only accessible by VIP users:
package io.inverno.example.app_security_http;
...
@Bean
@WebController
public class Main {
...
@WebRoute( path = "/vip/hello", method = Method.GET)
public String hello_vip(SecurityContext<? extends PersonIdentity, ? extends RoleBasedAccessController> securityContext) {
return "Hello my dear friend " + securityContext.getIdentity().map(PersonIdentity::getFirstName).orElse("whoever you are") + "!";
}
}
If you followed the security module documentation, and you should have, you might have noticed how the
SecurityInterceptoris similar to theSecurityManager, they basically have the same role which is to authenticate a request and provide a security context which, although we had to create an exchange security context, is still the central component used to secure the application. As a result, securing a Web application is no different from securing a regular application, and it should therefore be easy to create secured components and libraries that can be integrated in both.
Security Interceptor
The SecurityInterceptor is the main entry point for securing an HTTP server or a Web application, it is the counterpart of the SecurityManager for regular applications. Its role is to extract Credentials from HTTP requests and just like the SecurityManager, to authenticate them and possibly resolve an Identity and/or an AccessController. It then sets the resulting security context in the exchange. Exchange interceptors and handlers can then access the security context anytime for securing services and resources.
A SecurityInterceptor instance is created by composing a CredentialsExtractor used to extract Credentials from the request in addition to the Authenticator and optional IdentityResolver and AccessControllerResolver. It should be used to intercept request targeting services or resources that must be secured or require identity information.
Although it is completely possible to use it on the global exchange handler in the HTTP server controller, we will focus on securing Web routes in a Web server in the rest of this documentation as it covers more interesting use cases.
As for the SecurityManager, the SecurityInterceptor basically chains the extraction of credentials, the authentication, the identity resolution and the access controller resolution and sets the resulting SecurityContext in the exchange context declared as a SecurityContext.Intercepted.
A SecurityInterceptor is created as follows:
CredentialsExtractor<Credentials, SecurityContext.Intercepted<Identity, AccessController>, Exchange<SecurityContext.Intercepted<Identity, AccessController>>> credentialsExtractor = ...
Authenticator<Credentials, Authentication> authenticator = ...
IdentityResolver<Authentication, Identity> identityResolver = ...
AccessControllerResolver<Authentication, AccessController> accessControllerResolver = ...
SecurityInterceptor<Credentials, Identity, AccessController, SecurityContext.Intercepted<Identity, AccessController>, Exchange<SecurityContext.Intercepted<Identity, AccessController>>> securityInterceptor = SecurityInterceptor.of(credentialsExtractor, authenticator, identityResolver, accessControllerResolver);
It can be applied to Web routes just like any other exchange interceptor by defining a Web configurer implementing WebRouteInterceptor.Configurer or WebServer.Configurer. The following example shows how to secure access by applying the security interceptor to all /vip/** routes:
package io.inverno.example.app_security_http;
import io.inverno.core.annotation.Bean;
import io.inverno.mod.security.accesscontrol.AccessController;
import io.inverno.mod.security.accesscontrol.AccessControllerResolver;
import io.inverno.mod.security.authentication.Authentication;
import io.inverno.mod.security.authentication.Authenticator;
import io.inverno.mod.security.authentication.Credentials;
import io.inverno.mod.security.http.CredentialsExtractor;
import io.inverno.mod.security.http.SecurityInterceptor;
import io.inverno.mod.security.http.context.SecurityContext;
import io.inverno.mod.security.identity.Identity;
import io.inverno.mod.security.identity.IdentityResolver;
import io.inverno.mod.web.server.WebRouteInterceptor;
@Bean( visibility = Bean.Visibility.PRIVATE )
public class SecurityConfigurer implements WebRouteInterceptor.Configurer<SecurityContext.Intercepted<Identity, AccessController>> {
@Override
public WebRouteInterceptor<SecurityContext.Intercepted<Identity, AccessController>> configure(WebRouteInterceptor<SecurityContext.Intercepted<Identity, AccessController>> interceptors) {
CredentialsExtractor<Credentials, SecurityContext.Intercepted<Identity, AccessController>, WebExchange<SecurityContext.Intercepted<Identity, AccessController>>> credentialsExtractor = ...
Authenticator<Credentials, Authentication> authenticator = ...
IdentityResolver<Authentication, Identity> identityResolver = ...
AccessControllerResolver<Authentication, AccessController> accessControllerResolver = ...
return interceptors
.intercept()
.path("/vip/**")
.interceptor(SecurityInterceptor.of(credentialsExtractor, authenticator, identityResolver, accessControllerResolver));
}
}
By combining various implementations of CredentialsExtractor, Authenticator, IdentityResolver and AccessControllerResolver, it is possible to implements any kind of HTTP authentication methods (e.g. basic, digest, token...). It is still good to remember that the role of the security interceptor is to authenticate credentials and create a resulting security context which can be anonymous, denied or authenticated, actual access control must be done in subsequent interceptors or within the route handler.
Since the security interceptor is a regular exchange interceptor, it is possible to define various instances applied to different routes. We can for instance imagine using different security interceptors implementing different authentication methods or targeting different user repositories based on the path, the language... basically any routing criteria exposed by the
WebRouteManager.
CredentialsExtractor
A credentials extractor is used in a security interceptor to extract Credentials from an HTTP request. The CredentialsExtractor interface is a functional interface defining method extract(). The following example shows a simple inline implementation that extract LoginCredentials from HTTP headers returning no credentials if either username or password is missing:
CredentialsExtractor<LoginCredentials, ExchangeContext, Exchange<ExchangeContext>> credentialsExtractor = exchange -> {
return Mono.fromSupplier(() -> exchange.request().headers().get("username")
.flatMap(username -> exchange.request().headers().get("password")
.map(RawPassword::new)
.map(password -> LoginCredentials.of(username, password))
)
.orElse(null)
);
};
When no credentials are returned, the security interceptor creates an anonymous security context.
Multiple credentials extractors can be chained in order to extract credentials from different locations within the request by order of preference. For instance, we can create a credentials extractor to extract TokenCredentials from an HTTP header, a cookie, or a query parameter in that order.
CredentialsExtractor<TokenCredentials, ExchangeContext, Exchange<ExchangeContext>> headerTokenCredentialsExtractor = exchange -> {
return Mono.fromSupplier(() -> exchange.request().headers().get("token").map(TokenCredentials::new).orElse(null));
};
CredentialsExtractor<TokenCredentials, ExchangeContext, Exchange<ExchangeContext>> cookieTokenCredentialsExtractor = exchange -> {
return Mono.fromSupplier(() -> exchange.request().headers().cookies().get("token").map(cookie -> new TokenCredentials(cookie.asString())).orElse(null));
};
CredentialsExtractor<TokenCredentials, ExchangeContext, Exchange<ExchangeContext>> queryTokenCredentialsExtractor = exchange -> {
return Mono.fromSupplier(() -> exchange.request().queryParameters().get("token").map(parameter -> new TokenCredentials(parameter.asString())).orElse(null));
};
CredentialsExtractor<TokenCredentials, ExchangeContext, Exchange<ExchangeContext>> credentialsExtractor = headerTokenCredentialsExtractor
.or(cookieTokenCredentialsExtractor)
.or(queryTokenCredentialsExtractor);
SecurityContext vs HTTP SecurityContext vs HTTP SecurityContext.Intercepted
The security-http module provides io.inverno.mod.security.http.context.SecurityContext which extends both ExchangeContext and io.inverno.mod.security.context.SecurityContext defined in the security module. Although the security context semantic remains unchanged, this was necessary to be able to expose it as an exchange context. The io.inverno.mod.security.http.context.SecurityContext can be seen as a security exchange context, it must be used to secure HTTP endpoints as it can be accessed from the Exchange and injected in Web route handlers.
It also provides the io.inverno.mod.security.http.context.SecurityContext.Intercepted which extends io.inverno.mod.security.http.context.SecurityContext and exposes a single setSecurityContext() method. This is a mutable version of the io.inverno.mod.security.http.context.SecurityContext which enables security related interceptors or handlers, such as the SecurityInterceptor, to set the io.inverno.mod.security.context.SecurityContext in the security exchange context.
In the end, every
ExchangeContexttypes should be implemented in the generated globalExchangeContexttype which will basically implements bothio.inverno.mod.security.http.context.SecurityContextandio.inverno.mod.security.http.context.SecurityContext.Intercepted. However, making sureio.inverno.mod.security.http.context.SecurityContextis used in applicative interceptors and handlers and only allow theio.inverno.mod.security.http.context.SecurityContext.Interceptedin specific trusted security interceptors and handlers is a good way to control and protect the security context against untrustworthy modifications.
Access Control Interceptor
As we just saw, the role of the security interceptor is to authenticate credentials and provides a security context, but it does not actually control access. The security context can be anonymous, denied or authenticated, actual access control must then be done in a subsequent interceptors and/or directly in the route handler. An AccessControlInterceptor can be applied on secured routes to control access globally.
In the following example, AccessControlInterceptor.authenticated() is used to create an interceptor that restricts access to authenticated users.
package io.inverno.example.app_security_http;
import io.inverno.core.annotation.Bean;
import io.inverno.mod.security.accesscontrol.AccessController;
import io.inverno.mod.security.accesscontrol.AccessControllerResolver;
import io.inverno.mod.security.authentication.Authentication;
import io.inverno.mod.security.authentication.Authenticator;
import io.inverno.mod.security.authentication.Credentials;
import io.inverno.mod.security.http.AccessControlInterceptor;
import io.inverno.mod.security.http.CredentialsExtractor;
import io.inverno.mod.security.http.SecurityInterceptor;
import io.inverno.mod.security.http.context.SecurityContext;
import io.inverno.mod.security.identity.Identity;
import io.inverno.mod.security.identity.IdentityResolver;
import io.inverno.mod.web.server.WebRouteInterceptor;
import java.util.List;
@Bean( visibility = Bean.Visibility.PRIVATE )
public class SecurityConfigurer implements WebRouteInterceptor.Configurer<SecurityContext.Intercepted<Identity, AccessController>> {
@Override
public WebRouteInterceptor<SecurityContext.Intercepted<Identity, AccessController>> configure(WebRouteInterceptor<SecurityContext.Intercepted<Identity, AccessController>> interceptors) {
CredentialsExtractor<Credentials, SecurityContext.Intercepted<Identity, AccessController>, WebExchange<SecurityContext.Intercepted<Identity, AccessController>>> credentialsExtractor = ...
Authenticator<Credentials, Authentication> authenticator = ...
IdentityResolver<Authentication, Identity> identityResolver = ...
AccessControllerResolver<Authentication, AccessController> accessControllerResolver = ...
return interceptors
.intercept()
.path("/vip/**")
.interceptors(List.of(
SecurityInterceptor.of(credentialsExtractor, authenticator, identityResolver, accessControllerResolver),
AccessControlInterceptor.authenticated()
));
}
}
We can use AccessControlInterceptor.anonymous() to restrict access to anonymous users, or we can also provide custom access control using AccessControlInterceptor.verify() as follows:
package io.inverno.example.app_security_http;
...
import io.inverno.mod.http.base.ForbiddenException;
import io.inverno.mod.security.accesscontrol.RoleBasedAccessController;
@Bean( visibility = Bean.Visibility.PRIVATE )
public class SecurityConfigurer implements WebRouteInterceptor.Configurer<SecurityContext.Intercepted<Identity, RoleBasedAccessController>> {
@Override
public WebRouteInterceptor<SecurityContext.Intercepted<Identity, RoleBasedAccessController>> configure(WebRouteInterceptor<SecurityContext.Intercepted<Identity, RoleBasedAccessController>> interceptors) {
CredentialsExtractor<Credentials, SecurityContext.Intercepted<Identity, AccessController>, WebExchange<SecurityContext.Intercepted<Identity, AccessController>>> credentialsExtractor = ...
Authenticator<Credentials, Authentication> authenticator = ...
IdentityResolver<Authentication, Identity> identityResolver = ...
AccessControllerResolver<Authentication, RoleBasedAccessController> accessControllerResolver = ...
return interceptors
.intercept()
.path("/vip/**")
.interceptors(List.of(
SecurityInterceptor.of(credentialsExtractor, authenticator, identityResolver, accessControllerResolver),
AccessControlInterceptor.verify(securityContext -> securityContext.getAccessController()
.orElseThrow(ForbiddenException::new)
.hasRole("vip")
)
));
}
}
HTTP authentication
By combining CredentialsExtractor with Authenticator, it is possible to implement various HTTP authentication methods. The security HTTP API provides credentials extractors as well as exchange interceptors and handlers that facilitate the configuration of standard HTTP authentication methods in Web applications.
HTTP Basic authentication
The basic HTTP authentication scheme is, as its name suggests, a basic authentication method on top of HTTP in which credentials are provided in the authorization HTTP header in the form basic Base64(username ":" password). Basic authentication can be requested to the client (e.g. a Web browser) by specifying a www-authenticate HTTP header in an unauthorized (401) response sent when a protected resource is requested without credentials or with invalid credentials.
A security context implementing HTTP basic authentication is obtained by combining the BasicCredentialsExtractor which extracts LoginCredentials with a compatible Authenticator implementation. The following example uses a basic PrincipalAuthenticator with an in-memory login credentials resolver in order to secure /basic/** routes:
package io.inverno.example.app_security_http;
import io.inverno.core.annotation.Bean;
import io.inverno.mod.security.accesscontrol.AccessController;
import io.inverno.mod.security.authentication.InMemoryLoginCredentialsResolver;
import io.inverno.mod.security.authentication.LoginCredentials;
import io.inverno.mod.security.authentication.LoginCredentialsMatcher;
import io.inverno.mod.security.authentication.PrincipalAuthenticator;
import io.inverno.mod.security.authentication.password.MessageDigestPassword;
import io.inverno.mod.security.http.SecurityInterceptor;
import io.inverno.mod.security.http.basic.BasicCredentialsExtractor;
import io.inverno.mod.security.http.context.SecurityContext;
import io.inverno.mod.security.identity.Identity;
import io.inverno.mod.web.server.WebRouteInterceptor;
import java.util.List;
@Bean( visibility = Bean.Visibility.PRIVATE )
public class SecurityConfigurer implements WebRouteInterceptor.Configurer<SecurityContext.Intercepted<Identity, AccessController>> {
@Override
public WebRouteInterceptor<SecurityContext.Intercepted<Identity, AccessController>> configure(WebRouteInterceptor<SecurityContext.Intercepted<Identity, AccessController>> interceptors) {
return interceptors
.intercept()
.path("/basic/**")
.interceptor(SecurityInterceptor.of(
new BasicCredentialsExtractor<>(),
new PrincipalAuthenticator<>(
new InMemoryLoginCredentialsResolver(List.of(
LoginCredentials.of("john", new MessageDigestPassword.Encoder().encode("password")),
LoginCredentials.of("alice", new MessageDigestPassword.Encoder().encode("password")),
LoginCredentials.of("bob", new MessageDigestPassword.Encoder().encode("password"))
)),
new LoginCredentialsMatcher<LoginCredentials, LoginCredentials>()
)
));
}
}
In order to fully implement HTTP basic authentication scheme as defined by RFC 7617, we also need to send a basic authentication challenge on unauthorized (401) errors. This can be done by intercepting UnauthorizedException on secured routes using a BasicAuthenticationErrorInterceptor:
package io.inverno.example.app_security_http;
...
import io.inverno.mod.http.base.ExchangeContext;
import io.inverno.mod.http.base.UnauthorizedException;
import io.inverno.mod.security.http.basic.BasicAuthenticationErrorInterceptor;
import io.inverno.mod.web.server.ErrorWebRouteInterceptor;
import io.inverno.mod.web.server.WhiteLabelErrorRoutesConfigurer;
@Bean( visibility = Bean.Visibility.PRIVATE )
public class SecurityConfigurer implements WebRouteInterceptor.Configurer<SecurityContext.Intercepted<Identity, AccessController>>, ErrorWebRouteInterceptor.Configurer<ExchangeContext> {
...
@Override
public ErrorWebRouteInterceptor<ExchangeContext> configure(ErrorWebRouteInterceptor<ExchangeContext> errorInterceptors) {
return errorInterceptors
.interceptError()
.error(UnauthorizedException.class)
.path("/basic/**")
.interceptor(new BasicAuthenticationErrorInterceptor<>("inverno-basic"))
.configureErrorRoutes(new WhiteLabelErrorRoutesConfigurer<>());
}
}
Using above configuration, unauthorized (401) error response corresponding to unauthenticated access will be augmented with a www-authenticate HTTP header requesting for basic authentication in the inverno-basic realm. In practice, this results in a login prompt being displayed in a Web browser.
The following shows an unauthorized (401) HTTP response with a basic authentication challenge generated by the BasicAuthenticationErrorInterceptor:
$ curl -i http://127.0.0.1:8080/basic/hello
HTTP/1.1 401 Unauthorized
www-authenticate: basic realm="inverno-basic"
content-length: 0
Sending a basic authentication challenge to the client has actually nothing to do with authentication, it simply gives indication to the client on what credentials are expected by the server to access a protected resource. If you don't need to strictly abide to the specification or if your HTTP resources will only be consumed by backend applications you might choose not to use the
BasicAuthenticationErrorInterceptor.
HTTP Digest authentication
The HTTP digest access authentication is a more secured HTTP authentication method in which login credentials (username/password) are sent digested by the client using a nonce previously sent by the server in a www-authenticate HTTP header. As for basic authentication, digest credentials are provided in the authorization HTTP header. The nonce is built using a secret, the current timestamp and a validity period which allows to expire digest credentials.
A security context implementing HTTP digest authentication is obtained by combining the DigestCredentialsExtractor which extracts DigestCredentials with a compatible Authenticator implementation. The DigestCredentialsMatcher can be used within a PrincipalAuthenticator or a UserAuthenticator to match digest credentials against trusted login credentials (digest credentials basically represent digested login credentials). The following example uses a UserAuthenticator with an in-memory user repository and a DigestCredentialsMatcher in order to secure /digest/** routes:
package io.inverno.example.app_security_http;
import io.inverno.core.annotation.Bean;
import io.inverno.mod.security.accesscontrol.AccessController;
import io.inverno.mod.security.authentication.password.RawPassword;
import io.inverno.mod.security.authentication.user.InMemoryUserRepository;
import io.inverno.mod.security.authentication.user.User;
import io.inverno.mod.security.authentication.user.UserAuthenticator;
import io.inverno.mod.security.http.SecurityInterceptor;
import io.inverno.mod.security.http.context.SecurityContext;
import io.inverno.mod.security.http.digest.DigestCredentialsExtractor;
import io.inverno.mod.security.http.digest.DigestCredentialsMatcher;
import io.inverno.mod.security.identity.Identity;
import io.inverno.mod.web.server.WebRouteInterceptor;
import java.util.List;
@Bean( visibility = Bean.Visibility.PRIVATE )
public class SecurityConfigurer implements WebRouteInterceptor.Configurer<SecurityContext.Intercepted<Identity, AccessController>> {
@Override
public WebRouteInterceptor<SecurityContext.Intercepted<Identity, AccessController>> configure(WebRouteInterceptor<SecurityContext.Intercepted<Identity, AccessController>> interceptors) {
return interceptors
.intercept()
.path("/digest/**")
.interceptor(SecurityInterceptor.of(
new DigestCredentialsExtractor<>(),
new UserAuthenticator<>(
InMemoryUserRepository
.of(List.of(
User.of("jsmith").password(new RawPassword("password")).build(),
User.of("adoe").password(new RawPassword("password")).build()
))
.build(),
new DigestCredentialsMatcher<>("secret")
)
));
}
}
As previously mentioned, digest credentials expire at a fixed datetime specified in the nonce, this is checked in the DigestCredentialsMatcher which fails authentication with a ExpiredNonceException when this happens.
The HTTP digest access authentication is based on a challenge-response mechanism as a result a digest authentication challenge must be generated server-side on an unauthorized access or expired nonce errors and sent to the client prior to authentication. This is done using a DigestAuthenticationErrorInterceptor on secured routes to intercept UnauthorizedException errors:
package io.inverno.example.app_security_http;
...
import io.inverno.mod.http.base.ExchangeContext;
import io.inverno.mod.http.base.UnauthorizedException;
import io.inverno.mod.security.http.digest.DigestAuthenticationErrorInterceptor;
import io.inverno.mod.web.server.ErrorWebRouteInterceptor;
import io.inverno.mod.web.server.WhiteLabelErrorRoutesConfigurer;
@Bean( visibility = Bean.Visibility.PRIVATE )
public class SecurityConfigurer implements WebRouteInterceptor.Configurer<SecurityContext.Intercepted<Identity, AccessController>>, ErrorWebRouteInterceptor.Configurer<ExchangeContext> {
...
@Override
public ErrorWebRouteInterceptor<ExchangeContext> configure(ErrorWebRouteInterceptor<ExchangeContext> errorInterceptors) {
return errorInterceptors
.interceptError()
.error(UnauthorizedException.class)
.path("/digest/**")
.interceptor(new DigestAuthenticationErrorInterceptor<>("inverno-digest", "secret"))
.configureErrorRoutes(new WhiteLabelErrorRoutesConfigurer<>());
}
}
Using above configuration, an unauthorized (401) error response corresponding to unauthenticated access will be augmented with a www-authenticate HTTP header containing the digest authentication challenge requesting for digest credentials in the inverno-digest realm. The interceptor basically generates a nonce using the specified secret, the nonce validity period (defaults to 300 seconds) and the message digest algorithm (defaults to MD5). In practice, this results in a login prompt being displayed in a Web browser.
The following shows an unauthorized (401) HTTP response with a digest authentication challenge generated by the DigestAuthenticationErrorInterceptor:
$ curl -i http://localhost:8080/digest/hello
HTTP/1.1 401 Unauthorized
www-authenticate: digest realm="inverno-digest",qop="auth",nonce="ODg2OTk2MzI3NjcwMzAwOjAyZmIxNWY0ZTAyMTA0NzMzMzdjYmU4YmY4NWRhOGI4",algorithm=MD5
content-length: 0
Token based authentication
Token based authentication is a simple authentication method based on the authentication of a token which was usually previously issued to the client by the server.
A token must be ideally difficult to forge and easy to validate which is why cryptographic methods are often used to generate secured token but solution based on random numbers stored in a trusted data store (like a session store) can also be considered.
A security context implementing token based authentication can be obtained by combining a TokenCredentials extractor with a compatible Authenticator implementation. The following example uses a CookieTokenCredentialsExtractor to extract TokenCredentials from a specific cookie and a simplistic highly unsecure authenticator which validates tokens against a hardcoded list of authorized tokens:
package io.inverno.example.app_security_http;
import io.inverno.core.annotation.Bean;
import io.inverno.mod.security.accesscontrol.AccessController;
import io.inverno.mod.security.authentication.Authentication;
import io.inverno.mod.security.http.SecurityInterceptor;
import io.inverno.mod.security.http.context.SecurityContext;
import io.inverno.mod.security.http.token.CookieTokenCredentialsExtractor;
import io.inverno.mod.security.identity.Identity;
import io.inverno.mod.web.server.WebRouteInterceptor;
import java.util.Set;
import reactor.core.publisher.Mono;
@Bean( visibility = Bean.Visibility.PRIVATE )
public class SecurityConfigurer implements WebRouteInterceptor.Configurer<SecurityContext.Intercepted<Identity, AccessController>> {
@Override
public WebRouteInterceptor<SecurityContext.Intercepted<Identity, AccessController>> configure(WebRouteInterceptor<SecurityContext.Intercepted<Identity, AccessController>> interceptors) {
return interceptors
.intercept()
.path("/token/**")
.interceptor(SecurityInterceptor.of(
new CookieTokenCredentialsExtractor<>(),
credentials -> Mono.fromSupplier(() -> {
if(Set.of("token1", "token2", "token3").contains(credentials.getToken())) {
return Authentication.granted();
}
return Authentication.denied();
})
));
}
}
As already mentioned, a proper token must be ideally hard to forge and using cryptographic solution such as JWS, JWE or JWT are highly recommended.
Form based login
Form based login is meant to be used to log physical users in an application using a login page in a Web browser. This is slightly more complex than a basic authentication as it usually involves the use of multiple authentication methods.
The login flow is started when a user tries to access a protected resource (1) in a Web browser without credentials or with invalid credentials, an unauthorized (401) is then raised and the user is redirected to the login page prompting for credentials (2), usually a username/password pair. The user then fills the input fields and submits the form (3) to the login action whose role is to authenticate the credentials and generate temporary credentials, usually token credentials, sent back to the client, usually in a cookie, in a found (302) response (4). The client is then redirected to the page initially requested which is now accessed with valid token credentials (5). The user can then access the protected page (6).
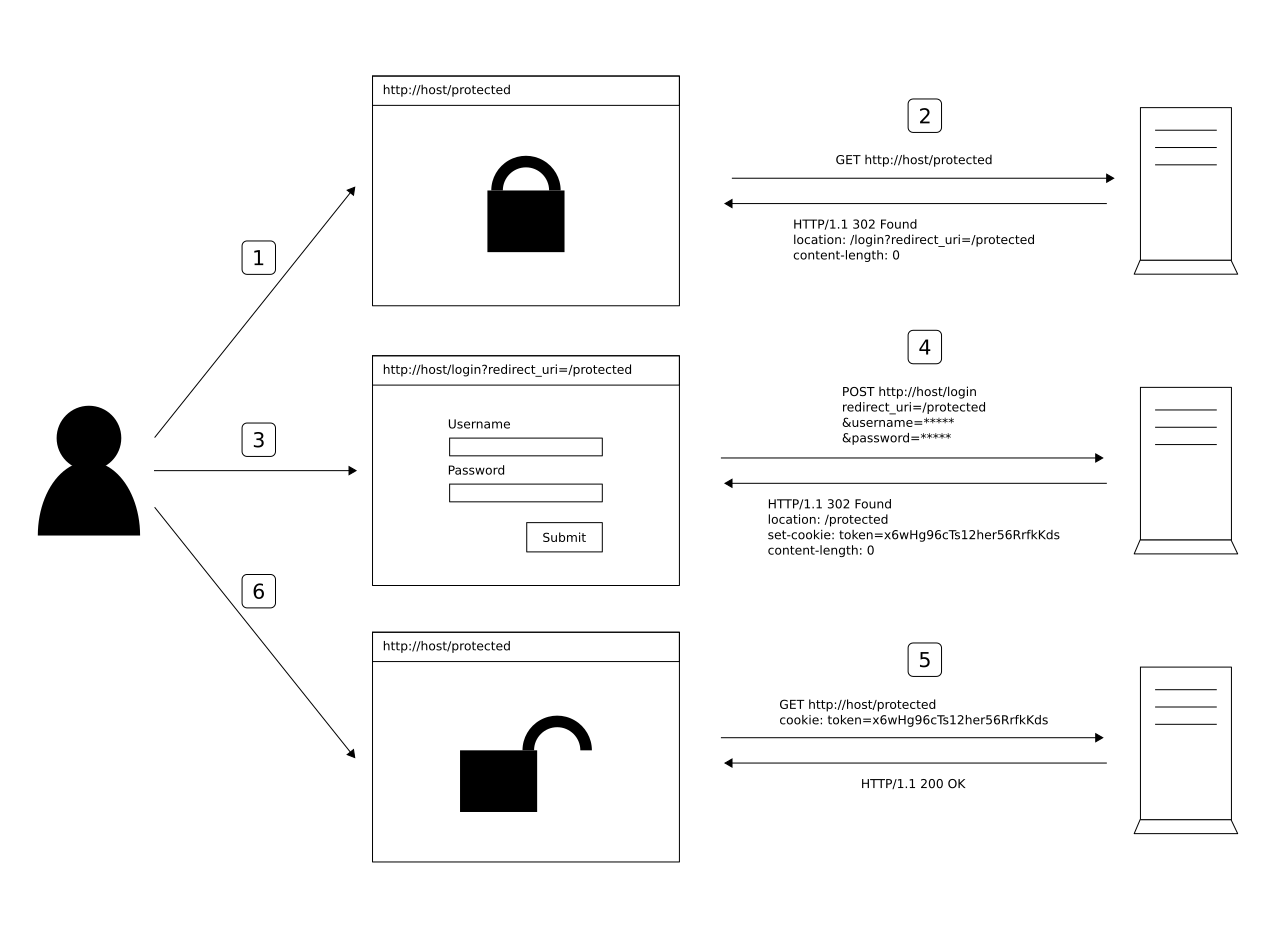
Form based login then requires two authentication methods: one to authenticate credentials provided by the user to a login action which should generate the actual credentials that are authenticated by the second method to grant access to protected resources.
Let's start by configuring Web routes to the login page and the login action.
The API provides the FormLoginPageHandler which renders a white label login page containing the login form using an Inverno reactive template. The actual login action URI can be configured when creating the handler (defaults to /login). The login form sends three parameters: username, password and redirect_uri.
package io.inverno.example.app_security_http;
import io.inverno.core.annotation.Bean;
import io.inverno.mod.base.resource.MediaTypes;
import io.inverno.mod.http.base.Method;
import io.inverno.mod.security.accesscontrol.AccessController;
import io.inverno.mod.security.http.context.SecurityContext;
import io.inverno.mod.security.http.form.FormLoginPageHandler;
import io.inverno.mod.security.identity.Identity;
import io.inverno.mod.web.server.WebRouter;
@Bean( visibility = Bean.Visibility.PRIVATE )
public class SecurityConfigurer implements WebRouter.Configurer<SecurityContext<Identity, AccessController>> {
@Override
public void configure(WebRouter<SecurityContext<Identity, AccessController>> router) {
router
.route()
.method(Method.GET)
.path("/login")
.produce(MediaTypes.TEXT_HTML)
.handler(new FormLoginPageHandler<>("/login"));
}
}
The login page is not different from a standard route and a custom login page can be easily used instead of the white label login page.
The LoginActionHandler is a route handler that must be targeted by the login form to authenticate the user credentials. It relies on a CredentialsExtractor to extract credentials from the login request and a compatible Authenticator to authenticate them. Finally, it uses a LoginSuccessHandler and a LoginFailureHandler to determine what to do in case of successful or failed authentication. If no LoginSuccessHandler is defined, a blank response is returned on successful authentication. If no LoginFailureHandler is defined, an unauthorized (401) error is returned on failed authentication.
In the following example, we decided to generate a JWS on successful authentication which requires to inject a JWKService to generate a JSON Web Key and a JWSService to create JWS tokens.
Please refer to the security-jose module documentation to learn how to create and validate JWS, JWE or JWT.
package io.inverno.example.app_security_http;
...
import io.inverno.mod.security.authentication.InMemoryLoginCredentialsResolver;
import io.inverno.mod.security.authentication.LoginCredentials;
import io.inverno.mod.security.authentication.LoginCredentialsMatcher;
import io.inverno.mod.security.authentication.PrincipalAuthentication;
import io.inverno.mod.security.authentication.PrincipalAuthenticator;
import io.inverno.mod.security.authentication.password.MessageDigestPassword;
import io.inverno.mod.security.http.form.FormCredentialsExtractor;
import io.inverno.mod.security.http.form.RedirectLoginFailureHandler;
import io.inverno.mod.security.http.form.RedirectLoginSuccessHandler;
import io.inverno.mod.security.http.login.LoginActionHandler;
import io.inverno.mod.security.http.login.LoginSuccessHandler;
import io.inverno.mod.security.http.token.CookieTokenLoginSuccessHandler;
import io.inverno.mod.security.jose.jwa.OCTAlgorithm;
import io.inverno.mod.security.jose.jwk.JWKService;
import io.inverno.mod.security.jose.jwk.oct.OCTJWK;
import io.inverno.mod.security.jose.jws.JWSAuthentication;
import io.inverno.mod.security.jose.jws.JWSService;
import java.util.List;
import reactor.core.publisher.Mono;
@Bean( visibility = Bean.Visibility.PRIVATE )
public class SecurityConfigurer implements WebRouter.Configurer<SecurityContext<Identity, AccessController>> {
private final Mono<? extends OCTJWK> jwsKey;
private final JWSService jwsService;
public SecurityConfigurer(JWKService jwkService, JWSService jwsService) {
this.jwsKey = jwkService.oct().generator()
.algorithm(OCTAlgorithm.HS256.getAlgorithm())
.generate()
.cache();
this.jwsService = jwsService;
}
@Override
public void configure(WebRouter<SecurityContext<Identity, AccessController>> router) {
router
.route()
.method(Method.GET)
.path("/login")
.produce(MediaTypes.TEXT_HTML)
.handler(new FormLoginPageHandler<>("/login"))
.route()
.method(Method.POST)
.path("/login")
.handler(new LoginActionHandler<>( // 1
new FormCredentialsExtractor<>(), // 2
new PrincipalAuthenticator<>( // 3
new InMemoryLoginCredentialsResolver(List.of(
LoginCredentials.of("john", new MessageDigestPassword.Encoder().encode("password")),
LoginCredentials.of("alice", new MessageDigestPassword.Encoder().encode("password")),
LoginCredentials.of("bob", new MessageDigestPassword.Encoder().encode("password"))
)),
new LoginCredentialsMatcher<>()
)
.failOnDenied() // 4
.flatMap(authentication -> this.jwsService.builder(PrincipalAuthentication.class, this.jwsKey) // 5
.header(header -> header
.algorithm(OCTAlgorithm.HS256.getAlgorithm())
)
.payload(authentication)
.build(MediaTypes.APPLICATION_JSON)
.map(JWSAuthentication::new)
),
LoginSuccessHandler.of(
new CookieTokenLoginSuccessHandler<>("/form"), // 6
new RedirectLoginSuccessHandler<>() // 7
),
new RedirectLoginFailureHandler<>("/login") // 8
));
}
}
- The
LoginActionHandleris used to handlePOSTrequest submitted in the login form. - The
FormCredentialsExtractoris used to extract user credentials submitted in the login form asLoginCredentials, the actual username and password form parameter names can be set in the credentials extractor (defaults tousernameandpassword). - A simple
PrincipalAuthenticatoris then used to authenticate the credentials. - The authentication shall fail if the principal authenticator returns a denied authentication.
- The resulting
PrincipalAuthenticationis then wrapped into aJWSAuthentication. We don't have to check whether the authentication is authenticated before creating the JWS token since we usedfailOnDenied(). - The
CookieTokenLoginSuccessHandleris used to set the compact representation of the JWS token in a response cookie. The cookie name and the cookie path can be set when creating the login success handler (defaults toAUTH-TOKENand/). - The
RedirectLoginSuccessHandleris then chained to redirect the user to the page initially requested. - The
RedirectLoginFailureHandleris used to redirect the user to the login page in case of failed authentication, the actual authentication error is specified in a query parameter (defaults toerror) so it can be displayed in the login form.
The login page and the login action handler are all set, we can now move on and configure a token based authentication to secure /form/** routes and restrict access to authenticated users. Since the login action handler sets a JWS token in a cookie we need to use a CookieTokenCredentialsExtractor to extract the TokenCredentials and a JWSAuthenticator to validate the JWS. The JWS actually wraps the original PrincipalAuthentication we can then unwrap it in order to restore the original authentication.
package io.inverno.example.app_security_http;
...
import io.inverno.mod.security.http.AccessControlInterceptor;
import io.inverno.mod.security.http.SecurityInterceptor;
import io.inverno.mod.security.http.context.SecurityContext;
import io.inverno.mod.security.http.token.CookieTokenCredentialsExtractor;
import io.inverno.mod.security.jose.jws.JWSAuthenticator;
import io.inverno.mod.web.server.WebRouteInterceptor;
@Bean( visibility = Bean.Visibility.PRIVATE )
public class SecurityConfigurer implements WebRouter.Configurer<SecurityContext<Identity, AccessController>>, WebRouteInterceptor.Configurer<SecurityContext.Intercepted<Identity, AccessController>> {
...
@Override
public WebRouteInterceptor<SecurityContext.Intercepted<Identity, AccessController>> configure(WebRouteInterceptor<SecurityContext.Intercepted<Identity, AccessController>> interceptors) {
return interceptors
.intercept()
.path("/form/**")
.interceptors(List.of(
SecurityInterceptor.of(
new CookieTokenCredentialsExtractor<>(),
new JWSAuthenticator<>(this.jwsService, PrincipalAuthentication.class, this.jwsKey)
.failOnDenied()
.map(jwsAuthentication -> jwsAuthentication.getJws().getPayload())
),
AccessControlInterceptor.authenticated()
));
}
}
In above code, the JWS authenticator uses the JWS service to parse and validate the JWS token. A denied JWSAuthentication with an InvalidCredentialsException cause is returned on invalid tokens.
Using a JWS token allows to restore the original authentication which can be very useful for resolving identity and/or access controller using regular authentication types (e.g.
PrincipalAuthentication,UserAuthentication...).
Accessing a protected resource with no token or an invalid token results in an UnauthorizedException error since the access is restricted to authenticated users. the client should then be redirected to the login page. This can be done applying the FormAuthenticationErrorInterceptor on UnauthorizedException errors on /form/** routes.
package io.inverno.example.app_security_http;
...
import io.inverno.mod.http.base.ExchangeContext;
import io.inverno.mod.http.base.UnauthorizedException;
import io.inverno.mod.security.http.form.FormAuthenticationErrorInterceptor;
import io.inverno.mod.web.server.ErrorWebRouteInterceptor;
import io.inverno.mod.web.server.WhiteLabelErrorRoutesConfigurer;
@Bean( visibility = Bean.Visibility.PRIVATE )
public class SecurityConfigurer implements WebRouter.Configurer<SecurityContext<Identity, AccessController>>, WebRouteInterceptor.Configurer<SecurityContext.Intercepted<Identity, AccessController>>, ErrorWebRouteInterceptor.Configurer<ExchangeContext> {
...
@Override
public ErrorWebRouteInterceptor<ExchangeContext> configure(ErrorWebRouteInterceptor<ExchangeContext> errorInterceptors) {
return errorInterceptors
.interceptError()
.error(UnauthorizedException.class)
.path("/form/**")
.interceptor(new FormAuthenticationErrorInterceptor<>("/login"))
.configureErrorRoutes(new WhiteLabelErrorRoutesConfigurer<>());
}
}
Finally, a /logout route can also be defined using a LogoutActionHandler which uses an AuthenticationReleaser to release the security context and a LogoutSuccessHandler to handle successful logout and respond to the client. In the following example, a CookieTokenLogoutSuccessHandler is used to delete the token cookie and a RedirectLogoutSuccessHandler is used to redirect the user after a successful logout to the root of the server (/).
package io.inverno.example.app_security_http;
...
import io.inverno.mod.security.http.form.RedirectLogoutSuccessHandler;
import io.inverno.mod.security.http.login.LogoutActionHandler;
import io.inverno.mod.security.http.login.LogoutSuccessHandler;
import io.inverno.mod.security.http.token.CookieTokenLogoutSuccessHandler;
@Bean( visibility = Bean.Visibility.PRIVATE )
public class SecurityConfigurer implements WebRouter.Configurer<SecurityContext<Identity, AccessController>>, WebRouteInterceptor.Configurer<SecurityContext.Intercepted<Identity, AccessController>>, ErrorWebRouteInterceptor.Configurer<ExchangeContext> {
...
@Override
public void configure(WebRouter<SecurityContext<Identity, AccessController>> router) {
router
...
.route()
.method(Method.GET)
.path("/logout")
.handler(new LogoutActionHandler<>(
authentication -> Mono.empty(),
LogoutSuccessHandler.of(
new CookieTokenLogoutSuccessHandler<>("/form"),
new RedirectLogoutSuccessHandler<>()
)
));
}
...
}
Here is the complete code of the SecurityConfigurer used to configure form login flow:
package io.inverno.example.app_security_http;
import io.inverno.core.annotation.Bean;
import io.inverno.mod.base.resource.MediaTypes;
import io.inverno.mod.http.base.ExchangeContext;
import io.inverno.mod.http.base.Method;
import io.inverno.mod.http.base.UnauthorizedException;
import io.inverno.mod.security.accesscontrol.AccessController;
import io.inverno.mod.security.authentication.InMemoryLoginCredentialsResolver;
import io.inverno.mod.security.authentication.LoginCredentials;
import io.inverno.mod.security.authentication.LoginCredentialsMatcher;
import io.inverno.mod.security.authentication.PrincipalAuthentication;
import io.inverno.mod.security.authentication.PrincipalAuthenticator;
import io.inverno.mod.security.authentication.password.MessageDigestPassword;
import io.inverno.mod.security.http.AccessControlInterceptor;
import io.inverno.mod.security.http.SecurityInterceptor;
import io.inverno.mod.security.http.context.SecurityContext;
import io.inverno.mod.security.http.form.FormAuthenticationErrorInterceptor;
import io.inverno.mod.security.http.form.FormCredentialsExtractor;
import io.inverno.mod.security.http.form.FormLoginPageHandler;
import io.inverno.mod.security.http.form.RedirectLoginFailureHandler;
import io.inverno.mod.security.http.form.RedirectLoginSuccessHandler;
import io.inverno.mod.security.http.form.RedirectLogoutSuccessHandler;
import io.inverno.mod.security.http.login.LoginActionHandler;
import io.inverno.mod.security.http.login.LoginSuccessHandler;
import io.inverno.mod.security.http.login.LogoutActionHandler;
import io.inverno.mod.security.http.login.LogoutSuccessHandler;
import io.inverno.mod.security.http.token.CookieTokenCredentialsExtractor;
import io.inverno.mod.security.http.token.CookieTokenLoginSuccessHandler;
import io.inverno.mod.security.http.token.CookieTokenLogoutSuccessHandler;
import io.inverno.mod.security.identity.Identity;
import io.inverno.mod.security.jose.jwa.OCTAlgorithm;
import io.inverno.mod.security.jose.jwk.JWKService;
import io.inverno.mod.security.jose.jwk.oct.OCTJWK;
import io.inverno.mod.security.jose.jws.JWSAuthentication;
import io.inverno.mod.security.jose.jws.JWSAuthenticator;
import io.inverno.mod.security.jose.jws.JWSService;
import io.inverno.mod.web.server.ErrorWebRouteInterceptor;
import io.inverno.mod.web.server.WebRouteInterceptor;
import io.inverno.mod.web.server.WebRouter;
import io.inverno.mod.web.server.WhiteLabelErrorRoutesConfigurer;
import java.util.List;
import reactor.core.publisher.Mono;
@Bean( visibility = Bean.Visibility.PRIVATE )
public class SecurityConfigurer implements WebRouter.Configurer<SecurityContext<Identity, AccessController>>, WebRouteInterceptor.Configurer<SecurityContext.Intercepted<Identity, AccessController>>, ErrorWebRouteInterceptor.Configurer<ExchangeContext> {
private final Mono<? extends OCTJWK> jwsKey;
private final JWSService jwsService;
public SecurityConfigurer(JWKService jwkService, JWSService jwsService) {
this.jwsKey = jwkService.oct().generator()
.algorithm(OCTAlgorithm.HS256.getAlgorithm())
.generate()
.cache();
this.jwsService = jwsService;
}
@Override
public void configure(WebRouter<SecurityContext<Identity, AccessController>> router) {
router
.route()
.method(Method.GET)
.path("/login")
.produce(MediaTypes.TEXT_HTML)
.handler(new FormLoginPageHandler<>("/login"))
.route()
.method(Method.POST)
.path("/login")
.handler(new LoginActionHandler<>(
new FormCredentialsExtractor<>(),
new PrincipalAuthenticator<>(
new InMemoryLoginCredentialsResolver(List.of(
LoginCredentials.of("john", new MessageDigestPassword.Encoder().encode("password")),
LoginCredentials.of("alice", new MessageDigestPassword.Encoder().encode("password")),
LoginCredentials.of("bob", new MessageDigestPassword.Encoder().encode("password"))
)),
new LoginCredentialsMatcher<>()
)
.failOnDenied()
.flatMap(authentication -> this.jwsService.builder(PrincipalAuthentication.class, this.jwsKey)
.header(header -> header
.algorithm(OCTAlgorithm.HS256.getAlgorithm())
)
.payload(authentication)
.build(MediaTypes.APPLICATION_JSON)
.map(JWSAuthentication::new)
),
LoginSuccessHandler.of(
new CookieTokenLoginSuccessHandler<>("/form"),
new RedirectLoginSuccessHandler<>()
),
new RedirectLoginFailureHandler<>("/login")
))
.route()
.method(Method.GET)
.path("/logout")
.handler(new LogoutActionHandler<>(
authentication -> Mono.empty(),
LogoutSuccessHandler.of(
new CookieTokenLogoutSuccessHandler<>("/form"),
new RedirectLogoutSuccessHandler<>()
)
));
}
@Override
public WebRouteInterceptor<SecurityContext.Intercepted<Identity, AccessController>> configure(WebRouteInterceptor<SecurityContext.Intercepted<Identity, AccessController>> interceptors) {
return interceptors
.intercept()
.path("/form/**")
.interceptors(List.of(
SecurityInterceptor.of(
new CookieTokenCredentialsExtractor<>(),
new JWSAuthenticator<>(this.jwsService, PrincipalAuthentication.class, this.jwsKey)
.failOnDenied()
.map(jwsAuthentication -> jwsAuthentication.getJws().getPayload())
),
AccessControlInterceptor.authenticated()
));
}
@Override
public ErrorWebRouteInterceptor<ExchangeContext> configure(ErrorWebRouteInterceptor<ExchangeContext> errorInterceptors) {
return errorInterceptors
.interceptError()
.error(UnauthorizedException.class)
.path("/form/**")
.interceptor(new FormAuthenticationErrorInterceptor<>("/login"))
.configureErrorRoutes(new WhiteLabelErrorRoutesConfigurer<>());
}
}
After defining routes /form/hello and /, we can run the application and test the login flow by accessing http://localhost:8080/form/hello which should redirect the Web browser to the white label login page:
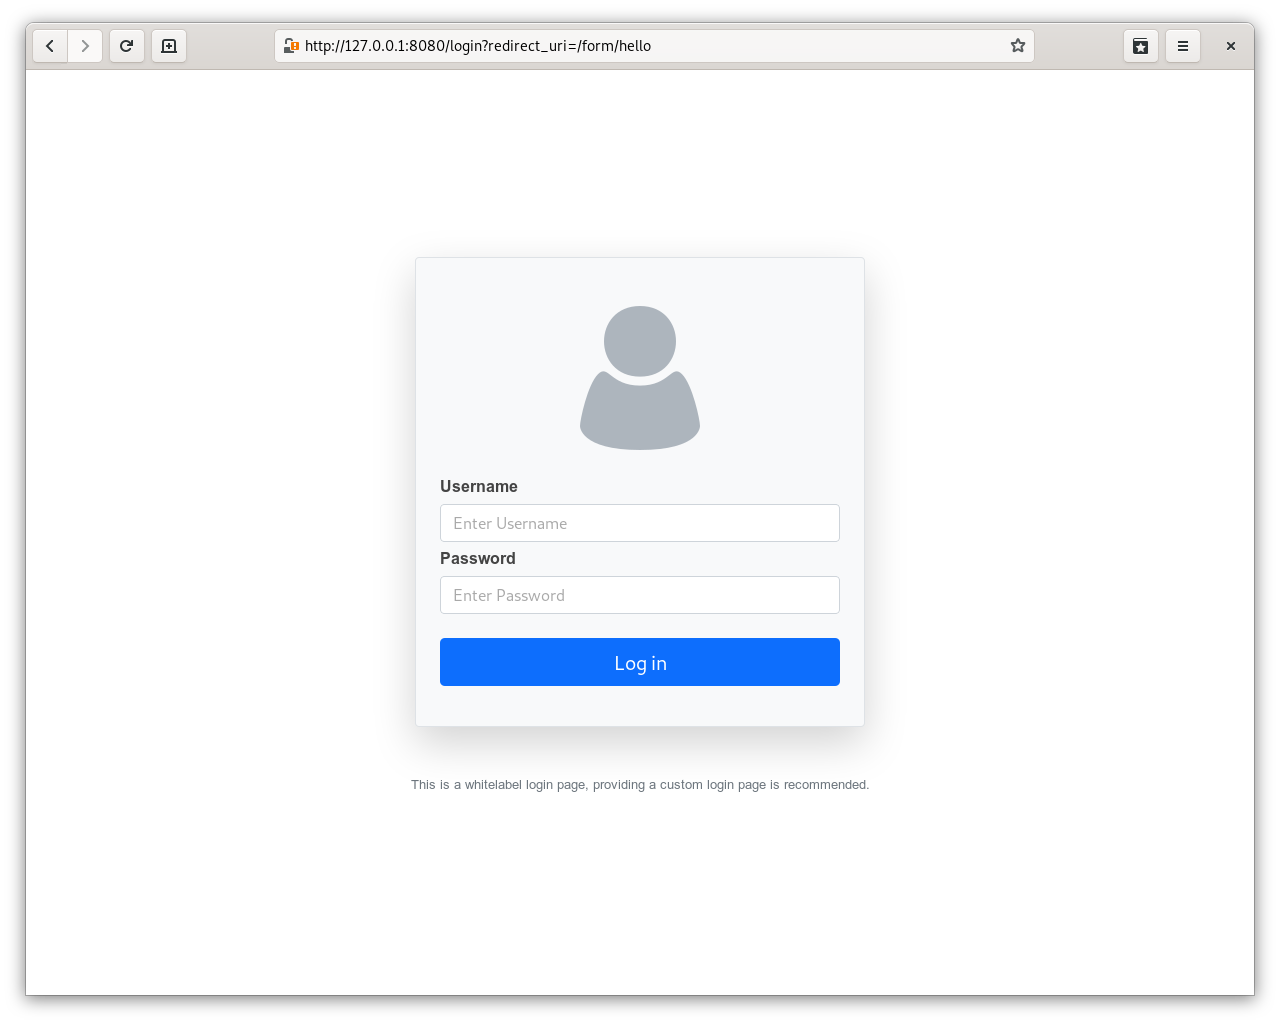
After filling valid login credentials in the login form, we should be redirected to the protected resource which is now accessible.

We described a basic form login flow, but it can be extended to match more complex or specific security requirements.
For instance, two-factors authentication could be implemented quite easily by providing a custom login form that would include a second authentication factor in addition to the login credentials and a specific login credentials authenticator that would check that factor as well, it is even possible to use the standard
UserAuthenticatorand just chain another authenticator to validate the second factor.
Session based authentication
A successful login authentication can also be stored in a session. The security-http provides LoginSuccessHandler and CredentialsExtractor implementations for respectively storing and resolving an Authentication resulting from a successful login in a session.
Please refer to the session and session-http modules documentations for a deeper insight on session management.
The BasicSessionLoginSuccessHandler can be used to store the authentication in a basic session store on backend side. SessionCredentials containing the authentication can then be resolved from the session using BasicSessionCredentialsExtractors and authenticated using SessionAuthenticator in order to restore the initial security context.
package io.inverno.example.app_security_http;
import io.inverno.core.annotation.Bean;
import io.inverno.mod.base.resource.MediaTypes;
import io.inverno.mod.http.base.Method;
import io.inverno.mod.http.base.UnauthorizedException;
import io.inverno.mod.security.accesscontrol.RoleBasedAccessController;
import io.inverno.mod.security.authentication.InMemoryLoginCredentialsResolver;
import io.inverno.mod.security.authentication.LoginCredentials;
import io.inverno.mod.security.authentication.LoginCredentialsMatcher;
import io.inverno.mod.security.authentication.PrincipalAuthentication;
import io.inverno.mod.security.authentication.PrincipalAuthenticator;
import io.inverno.mod.security.authentication.password.MessageDigestPassword;
import io.inverno.mod.security.http.AccessControlInterceptor;
import io.inverno.mod.security.http.SecurityInterceptor;
import io.inverno.mod.security.http.form.FormAuthenticationErrorInterceptor;
import io.inverno.mod.security.http.form.FormCredentialsExtractor;
import io.inverno.mod.security.http.form.FormLoginPageHandler;
import io.inverno.mod.security.http.form.RedirectLoginFailureHandler;
import io.inverno.mod.security.http.form.RedirectLoginSuccessHandler;
import io.inverno.mod.security.http.form.RedirectLogoutSuccessHandler;
import io.inverno.mod.security.http.login.LoginActionHandler;
import io.inverno.mod.security.http.login.LoginSuccessHandler;
import io.inverno.mod.security.http.login.LogoutActionHandler;
import io.inverno.mod.security.http.login.LogoutSuccessHandler;
import io.inverno.mod.security.http.session.BasicAuthSessionData;
import io.inverno.mod.security.http.session.BasicSessionCredentialsExtractor;
import io.inverno.mod.security.http.session.BasicSessionLoginSuccessHandler;
import io.inverno.mod.security.http.session.BasicSessionSecurityContext;
import io.inverno.mod.security.http.session.SessionAuthenticator;
import io.inverno.mod.security.http.session.SessionLogoutSuccessHandler;
import io.inverno.mod.security.identity.Identity;
import io.inverno.mod.session.Session;
import io.inverno.mod.session.SessionStore;
import io.inverno.mod.session.http.CookieSessionIdExtractor;
import io.inverno.mod.session.http.CookieSessionInjector;
import io.inverno.mod.session.http.SessionInterceptor;
import io.inverno.mod.web.server.WebServer;
import io.inverno.mod.web.server.WhiteLabelErrorRoutesConfigurer;
import java.util.List;
import reactor.core.publisher.Mono;
@Bean( visibility = Bean.Visibility.PRIVATE )
public class SecurityConfigurer implements WebServer.Configurer<BasicSessionSecurityContext.Intercepted<PrincipalAuthentication, Identity, RoleBasedAccessController, BasicAuthSessionData<PrincipalAuthentication>>> {
private final SessionStore<BasicAuthSessionData<PrincipalAuthentication>, Session<BasicAuthSessionData<PrincipalAuthentication>>> sessionStore;
public SecurityConfigurer(SessionStore<BasicAuthSessionData<PrincipalAuthentication>, Session<BasicAuthSessionData<PrincipalAuthentication>>> sessionStore) {
this.sessionStore = sessionStore;
}
@Override
public WebServer<BasicSessionSecurityContext.Intercepted<PrincipalAuthentication, Identity, RoleBasedAccessController, BasicAuthSessionData<PrincipalAuthentication>>> configure(WebServer<BasicSessionSecurityContext.Intercepted<PrincipalAuthentication, Identity, RoleBasedAccessController, BasicAuthSessionData<PrincipalAuthentication>>> webServer) {
return webServer
.interceptError()
.error(UnauthorizedException.class)
.interceptor(new FormAuthenticationErrorInterceptor<>())
.configureErrorRoutes(new WhiteLabelErrorRoutesConfigurer<>())
.intercept() // 1
.interceptor(SessionInterceptor.of(
new CookieSessionIdExtractor(),
this.sessionStore,
new CookieSessionInjector<>()
))
.route()
.method(Method.GET)
.path("/login")
.produce(MediaTypes.TEXT_HTML)
.handler(new FormLoginPageHandler<>())
.route()
.method(Method.POST)
.path("/login")
.handler(new LoginActionHandler<>(
new FormCredentialsExtractor<>(),
new PrincipalAuthenticator<>(
new InMemoryLoginCredentialsResolver(List.of(
LoginCredentials.of("john", new MessageDigestPassword.Encoder().encode("password")),
LoginCredentials.of("alice", new MessageDigestPassword.Encoder().encode("password")),
LoginCredentials.of("bob", new MessageDigestPassword.Encoder().encode("password"))
)),
new LoginCredentialsMatcher<>()
)
.failOnDenied(),
LoginSuccessHandler.of(
new BasicSessionLoginSuccessHandler<>(BasicAuthSessionData::new), // 2
new RedirectLoginSuccessHandler<>()
),
new RedirectLoginFailureHandler<>()
))
.intercept()
.interceptors(List.of(
SecurityInterceptor.of(
new BasicSessionCredentialsExtractor<>(), // 3
new SessionAuthenticator<>() // 4
),
AccessControlInterceptor.authenticated()
))
.route()
.method(Method.GET)
.path("/logout")
.handler(new LogoutActionHandler<>(
authentication -> Mono.empty(),
LogoutSuccessHandler.of(
new SessionLogoutSuccessHandler<>(), // 5
new RedirectLogoutSuccessHandler<>()
)
));
}
}
- The session interceptor must be set up first to make sure the session context is initialized before the security interceptor. The opaque session id is stored and passed in the session cookie.
- On successful login, the resulting
PrincipalAuthenticationis stored inBasicAuthSessionDatawhich is created on the fly. - Subsequent authenticated requests are expected to provide the session id, the security interceptor resolve the
SessionCredentialscontaining the authentication from the session context. - Session credentials are then passed to the session authenticator which basically returns the resolved authentication. The security interceptor then initialized the security context and authenticate the request.
- On a successful logout action the session is invalidated which revokes the authentication.
In order to set up basic session authentication, the session data type must implement AuthSessionData which basically defines getAuthentication() and setAuthentication() methods used in above flow to set and get the authentication. The BasicAuthSessionData is a simple implementation that can be used when session is only used to store the authentication.
In more complex applications which use stateful data stored in the session, you might not want to leak the authentication in the application. A simple solution to that problem is to define two session data types in the application:
AppSessionDatawhich defines the application session data andAppAuthSessionDatawhich extendsAppSessionDataand implementsAuthSessionDataso that we can useAppAuthSessionDatato configure session authentication while being able to refer toAppSessionDatain the rest of the application. For instance, a Web route accessing the session through the session context can then be declared as follows:@WebRoute( path = "session-data", method = Method.GET, produces = MediaTypes.TEXT_PLAIN ) public Mono<String> getSomeSessionData(SessionContext<? extends AppSessionData, ? extends Session<? extends AppSessionData>> sessionContext) { return sessionContext.getSessionData() .map(AppSessionData::getSomeData); }
In previous example, the authentication is stateful and stored server side, it must be fetched on every request from the session store. This can become problematic in some use cases, besides authentication data are mostly static and doesn't change during the lifetime of the session. Hopefully, the session module supports JWT sessions which allows to store stateless in the JWT used as session id.
Please refer to the security-jose module documentation and JWT specification to better understand what is a JWT and how it can be used to securely convey sensitive data.
The configuration is similar to the basic session, with the difference that a JWTSessionLoginSuccessHandler is used to store the authentication in the stateless session data which are eventually stored in the frontend, typically in the JWT stored in the session cookie. The JWTSessionCredentialsExtractor resolves SessionCredentials containing the authentication from the stateless session data.
package io.inverno.example.app_security_http;
import io.inverno.core.annotation.Bean;
import io.inverno.mod.base.resource.MediaTypes;
import io.inverno.mod.http.base.Method;
import io.inverno.mod.http.base.UnauthorizedException;
import io.inverno.mod.security.accesscontrol.AccessController;
import io.inverno.mod.security.authentication.InMemoryLoginCredentialsResolver;
import io.inverno.mod.security.authentication.LoginCredentials;
import io.inverno.mod.security.authentication.LoginCredentialsMatcher;
import io.inverno.mod.security.authentication.PrincipalAuthentication;
import io.inverno.mod.security.authentication.PrincipalAuthenticator;
import io.inverno.mod.security.authentication.password.MessageDigestPassword;
import io.inverno.mod.security.http.AccessControlInterceptor;
import io.inverno.mod.security.http.SecurityInterceptor;
import io.inverno.mod.security.http.form.FormAuthenticationErrorInterceptor;
import io.inverno.mod.security.http.form.FormCredentialsExtractor;
import io.inverno.mod.security.http.form.FormLoginPageHandler;
import io.inverno.mod.security.http.form.RedirectLoginFailureHandler;
import io.inverno.mod.security.http.form.RedirectLoginSuccessHandler;
import io.inverno.mod.security.http.form.RedirectLogoutSuccessHandler;
import io.inverno.mod.security.http.login.LoginActionHandler;
import io.inverno.mod.security.http.login.LoginSuccessHandler;
import io.inverno.mod.security.http.login.LogoutActionHandler;
import io.inverno.mod.security.http.login.LogoutSuccessHandler;
import io.inverno.mod.security.http.session.SessionAuthenticator;
import io.inverno.mod.security.http.session.SessionLogoutSuccessHandler;
import io.inverno.mod.security.http.session.jwt.JWTSessionCredentialsExtractor;
import io.inverno.mod.security.http.session.jwt.JWTSessionLoginSuccessHandler;
import io.inverno.mod.security.http.session.jwt.JWTSessionSecurityContext;
import io.inverno.mod.security.identity.Identity;
import io.inverno.mod.session.http.CookieSessionIdExtractor;
import io.inverno.mod.session.http.CookieSessionInjector;
import io.inverno.mod.session.http.SessionInterceptor;
import io.inverno.mod.session.jwt.JWTSessionStore;
import io.inverno.mod.web.server.WebServer;
import io.inverno.mod.web.server.WhiteLabelErrorRoutesConfigurer;
import java.util.List;
import reactor.core.publisher.Mono;
@Bean( visibility = Bean.Visibility.PRIVATE )
public class SecurityConfigurer implements WebServer.Configurer<JWTSessionSecurityContext.Intercepted<PrincipalAuthentication, Identity, AccessController, Void>> {
private final JWTSessionStore<Void, PrincipalAuthentication> sessionStore;
public SecurityConfigurer(JWTSessionStore<Void, PrincipalAuthentication> sessionStore) {
this.sessionStore = sessionStore;
}
@Override
public WebServer<JWTSessionSecurityContext.Intercepted<PrincipalAuthentication, Identity, AccessController, Void>> configure(WebServer<JWTSessionSecurityContext.Intercepted<PrincipalAuthentication, Identity, AccessController, Void>> webServer) {
return webServer
.interceptError()
.error(UnauthorizedException.class)
.interceptor(new FormAuthenticationErrorInterceptor<>())
.configureErrorRoutes(new WhiteLabelErrorRoutesConfigurer<>())
.intercept()
.interceptor(SessionInterceptor.of(
new CookieSessionIdExtractor(),
this.sessionStore,
new CookieSessionInjector<>()
))
.route()
.method(Method.GET)
.path("/login")
.produce(MediaTypes.TEXT_HTML)
.handler(new FormLoginPageHandler<>())
.route()
.method(Method.POST)
.path("/login")
.handler(new LoginActionHandler<>(
new FormCredentialsExtractor<>(),
new PrincipalAuthenticator<>(
new InMemoryLoginCredentialsResolver(List.of(
LoginCredentials.of("john", new MessageDigestPassword.Encoder().encode("password")),
LoginCredentials.of("alice", new MessageDigestPassword.Encoder().encode("password")),
LoginCredentials.of("bob", new MessageDigestPassword.Encoder().encode("password"))
)),
new LoginCredentialsMatcher<>()
)
.failOnDenied(),
LoginSuccessHandler.of(
new JWTSessionLoginSuccessHandler<>(), // 1
new RedirectLoginSuccessHandler<>()
),
new RedirectLoginFailureHandler<>()
))
.intercept()
.interceptors(List.of(
SecurityInterceptor.of(
new JWTSessionCredentialsExtractor<>(), // 2
new SessionAuthenticator<>()
),
AccessControlInterceptor.authenticated()
))
.route()
.method(Method.GET)
.path("/logout")
.handler(new LogoutActionHandler<>(
authentication -> Mono.empty(),
LogoutSuccessHandler.of(
new SessionLogoutSuccessHandler<>(),
new RedirectLogoutSuccessHandler<>()
)
));
}
}
- Set the authentication in the stateless session data. It is eventually included in the JWT representing the session id stored and passed in the session cookie.
SessionCredentialsare resolved from the stateless session data which contain the authentication.
In above example, the stateful session data type is Void which basically indicates that the application doesn't need stateful session data The session store usage is therefore minimal, it is only used to track the session and verify for instance that the JWT session id provided in a request has not been revoked. Authentication is stored in the JWT session id which is either a JWS or JWE depending on the JWTSessionIdGenerator used in the JWTSessionStore.
The following is an example of JWT session id containing a simple PrincipalAuthentication resulting from a successful login in above example:
eyJhbGciOiJIUzI1NiIsImtpZCI6IjU1MWM4NGMxLWM5OTgtNGRkMC05MjEyLTE4MTJlMDIwNjQ0YiJ9.eyJpYXQiOjE3Mzk0MzY5NDgsImp0aSI6Ijc1Y2ZlNWFmLWNhZmMtNGE1MC05NzliLWFlOWVhNzY4YjAzYyIsImh0dHBzOi8vaW52ZXJuby5pby9zZXNzaW9uL2RhdGEiOnsidXNlcm5hbWUiOiJqb2huIiwiYXV0aGVudGljYXRlZCI6dHJ1ZSwiYW5vbnltb3VzIjpmYWxzZX0sImh0dHBzOi8vaW52ZXJuby5pby9zZXNzaW9uL21heF9pbmFjdGl2ZV9pbnRlcnZhbCI6MTgwMDAwMH0.OEbTIQNXak-M6gi3nFkf2QGUFcxmJXaxwKYZRGSOi8w
{
"iat": 1739436948,
"jti": "75cfe5af-cafc-4a50-979b-ae9ea768b03c",
"https://inverno.io/session/data": {
"username": "john",
"authenticated": true,
"anonymous": false
},
"https://inverno.io/session/max_inactive_interval": 1800000
}
Note that this session id is a JWS, but a JWE session id generator can also be defined in the JWT session store to produce JWE session ids which guarantees both integrity and confidentiality. Please refer to the session module documentation for more information.
Cross-origin resource sharing (CORS)
Cross-origin resource sharing is a mechanism that allows for cross-domain requests where a resource is requested in a Web browser from a page in another domain. Cross-domain requests are usually forbidden by Web browsers following the same-origin policy, CORS defines a protocol that allows the Web browser to communicate with the server and determine whether a cross-origin request can be authorized.
The CORSInterceptor can be used to configure the CORS policy, it can be applied to routes that might be accessed from different domain than the server or globally to apply the policy to all routes.
Assuming the HTTP server runs locally on port 8080, the following example shows how to authorize all requests from http://127.0.0.1:9090:
package io.inverno.example.app_security_http;
import io.inverno.core.annotation.Bean;
import io.inverno.mod.security.accesscontrol.AccessController;
import io.inverno.mod.security.http.context.SecurityContext;
import io.inverno.mod.security.http.cors.CORSInterceptor;
import io.inverno.mod.security.identity.Identity;
import io.inverno.mod.web.server.WebRouteInterceptor;
@Bean( visibility = Bean.Visibility.PRIVATE )
public class SecurityConfigurer implements WebRouteInterceptor.Configurer<SecurityContext.Intercepted<Identity, AccessController>> {
@Override
public WebRouteInterceptor<SecurityContext.Intercepted<Identity, AccessController>> configure(WebRouteInterceptor<SecurityContext.Intercepted<Identity, AccessController>> interceptors) {
return interceptors
.intercept()
.interceptor(CORSInterceptor.builder("http://127.0.0.1:9090").build());
}
}
The CORSInterceptor fully supports the CORS protocol, it allows to define allowed origins (static or using a pattern), methods, headers with max age allowing credentials or private network. Please refer to the HTTP CORS protocol specification for further details in order to create more complex configuration
Cross-site request forgery protection (CSRF)
Cross-site request forgery attack consists for an attacker to make the Web browser of a victim perform unwanted action on a trusted Website when the user is authenticated. This is made possible by the use of cookies holding authentication credentials and which are automatically included in the requests by the Web browser. As far as the server is concerned, it can not make the difference between a legitimate and a malicious request as long as it contains valid credentials.
The CSRFDoubleSubmitCookieInterceptor can be used to protect against CSRF attacks, it implements the double submit cookie method advised by OWASP.
The following example shows how to configure the Web server in order to prevent CSRF attacks:
package io.inverno.example.app_security_http;
import io.inverno.core.annotation.Bean;
import io.inverno.mod.security.accesscontrol.AccessController;
import io.inverno.mod.security.http.context.SecurityContext;
import io.inverno.mod.security.http.csrf.CSRFDoubleSubmitCookieInterceptor;
import io.inverno.mod.security.identity.Identity;
import io.inverno.mod.web.server.WebRouteInterceptor;
@Bean( visibility = Bean.Visibility.PRIVATE )
public class SecurityConfigurer implements WebRouteInterceptor.Configurer<SecurityContext.Intercepted<Identity, AccessController>> {
@Override
public WebRouteInterceptor<SecurityContext.Intercepted<Identity, AccessController>> configure(WebRouteInterceptor<SecurityContext.Intercepted<Identity, AccessController>> interceptors) {
return interceptors
.intercept()
.interceptor(CSRFDoubleSubmitCookieInterceptor.builder().httpOnly(false).build());
}
}
The name of the reference cookie token is set to XSRF-TOKEN, on a POST, PUT, PATCH or DELETE request, the interceptor tries to compare its value to a header (X-CSRF-TOKEN by default) or, if missing, to a query parameter (_csrf_token by default). If the two values are matching, which basically means the client was able to read the cookie, the request can be safely authorized otherwise a forbidden (403) error shall be return to the client.
When using the
CSRFDoubleSubmitCookieInterceptorwith a Web application developed with Angular or other any other framework that support double submit cookie, thehttpOnlyflag of the reference cookie must be set tofalse.
Security LDAP
The Inverno security-ldap module provides authenticators used to authenticate login credentials against LDAP or Active Directory servers.
It also provides an identity resolver for resolving user identity from the LDAP attributes of a user entry.
The LDAP client provided in module ldap is therefore required, in order to use the security-ldap module we need then to declare the following dependencies in the module descriptor:
module io.inverno.example.app {
requires io.inverno.mod.ldap;
requires io.inverno.mod.security.ldap;
}
And also declare these dependencies in the build descriptor:
Using Maven:
<project>
<dependencies>
<dependency>
<groupId>io.inverno.mod</groupId>
<artifactId>inverno-ldap</artifactId>
</dependency>
<dependency>
<groupId>io.inverno.mod</groupId>
<artifactId>inverno-security-ldap</artifactId>
</dependency>
</dependencies>
</project>
Using Gradle:
compile 'io.inverno.mod:inverno-security-http:1.13.0'
compile 'io.inverno.mod:inverno-security-ldap:1.13.0'
The following example shows how to configure a security manager to authenticate login credentials against an LDAP server, resolving the authenticated user's identity from the LDAP server and a role-based access controller from user's groups.
// Provided by the ldap module
LDAPClient ldapClient = null;
SecurityManager<LoginCredentials, LDAPIdentity, RoleBasedAccessController> securityManager = SecurityManager.of(
new LDAPAuthenticator(ldapClient, "dc=inverno,dc=io"),
new LDAPIdentityResolver(ldapClient),
new GroupsRoleBasedAccessControllerResolver()
);
LDAP authenticator
The LDAPAuthenticator can authenticate LoginCredentials (username/password) against a standard LDAP server.
When the password specified in the credentials is a RawPassword, authentication is made by a binding operation to the LDAP server. If the password is an encoded password, authentication is made by comparing the encoded value to the password attribute (userPassword by default) of the LDAP user entry.
The user DN is obtained using username template (defaults to cn={0},ou=users) formatted with the username specified in the credentials. User groups are resolved by searching for groups using a search filter set to (&(objectClass=groupOfNames)(member={0})) by default.
An LDAPAuthenticator is created using an LDAPClient and a base DN which identifies the organization where to look for entries. The following example shows how to create an LDAPAuthenticator to authenticate users in the dc=inverno,dc=io organization:
// Provided by the ldap module
LDAPClient ldapClient = ...
LDAPAuthenticator ldapAuthenticator = new LDAPAuthenticator(ldapClient, "dc=inverno,dc=io");
LDAPAuthentication authentication = ldapAuthenticator.authenticate(LoginCredentials.of("jsmith", new RawPassword("password"))).block();
The LDAPAuthentication returned by the LDAPAuthenticator is a specific principal authentication that exposes the user's DN, it also extends GroupAwareAuthentication since LDAP users can be an organized in groups (i.e. groupOfNames class). This information is resolved when authenticating credentials in the LDAP authenticator. A GroupsRoleBasedAccessControllerResolver can then be used in a security manager or security interceptor to resolve a role-based access controller using users groups as roles.
Active Directory authenticator
The ActiveDirectoryAuthenticator is a similar implementation used to authenticate LoginCredentials against an Active Directory server and returning LDAPAuthentication.
Although Active Directory can be accessed using LDAP, the internal semantic is quite different from standard LDAP server like OpenLDAP which is why we needed a specific implementation.
Unlike the LDAPAuthenticator, authentication using password comparison is not supported, and therefore it can only authenticate credentials specified with raw passwords using a bind operation. User groups are resolved from the memberOf attribute of the user entry which is resolved using a search user filter set to (&(objectClass=user)(userPrincipalName={0})) by default.
An ActiveDirectoryAuthenticator is created using an LDAPClient and a domain. The following example shows how to create an ActiveDirectoryAuthenticator to authenticate users in inverno.io domain:
// Provided by the ldap module
LDAPClient ldapClient = ...
ActiveDirectoryAuthenticator adAuthenticator = new ActiveDirectoryAuthenticator(ldapClient, "inverno.io");
LDAPAuthentication authentication = adAuthenticator.authenticate(LoginCredentials.of("jsmith", new RawPassword("password"))).block();
LDAP identity
An LDAP server is basically a directory service which can provide any kind of information about a user such as email addresses, postal addresses, phone numbers... The LDAPIdentity exposes standard LDAP attributes of person, organizationalPerson and inetOrgPerson classes as defined by RFC 2256 and RFC 2798.
The LDAP identity is resolved in a security manager or a security interceptor from an LDAPAuthentication using an LDAPIdentityResolver which basically look up the LDAP user entry with specific attributes in the LDAP server using the user DN and a search user filter set to (&(objectClass=inetOrgPerson)(uid={0})) by default.
An LDAPIdentityResolver is created using an LDAPClient. The following example shows how to create a simple LDAPIdentityResolver for resolving common identity attributes:
// Provided by the ldap module
LDAPClient ldapClient = ...
LDAPIdentityResolver ldapIdentityResolver = new LDAPIdentityResolver();
It is possible to specify which attributes must be queried as follows:
// Provided by the ldap module
LDAPClient ldapClient = ...
LDAPIdentityResolver ldapIdentityResolver = new LDAPIdentityResolver(ldapClient, "uid", "mail", "mobile");
JSON Object Signing and Encryption
The Inverno security-jose module is a complete implementation of JSON Object Signing and Encryption RFC specifications.
It allows to create, load or manipulate JSON Web Keys used to sign and verify JWS tokens or encrypt and decrypt JWE tokens. It also allows to manipulate so-called JSON Web Tokens (JWT) which are basically a set of claims wrapped inside a JWS or JWE token.
JWS and JWE tokens are using cryptographic signature and encryption algorithms which offer both payload integrity and/or privacy. The fact that they can be easily validated makes them an ideal choice for token credentials which do not necessarily require external systems for authentication.
Here is the complete list of RFCs implemented in the security-jose module:
- RFC 7515 JSON Web Signature (JWS)
- RFC 7516 JSON Web Encryption (JWE)
- RFC 7517 JSON Web Key (JWK)
- RFC 7518 JSON Web Algorithms (JWA)
- RFC 7519 JSON Web Token (JWT)
- RFC 7638 JSON Web Key (JWK) Thumbprint
- RFC 7797 JSON Web Signature (JWS) Unencoded Payload Option
- RFC 8037 CFRG Elliptic Curve Diffie-Hellman (ECDH) and Signatures in JSON Object Signing and Encryption (JOSE)
- RFC 8812 CBOR Object Signing and Encryption (COSE) and JSON Object Signing and Encryption (JOSE) Registrations for Web Authentication (WebAuthn) Algorithms
The Inverno security-jose module requires media type converters to be able to convert JWS and JWE payloads (e.g. object to JSON...), media type converters are usually provided in the boot module, as a result in order to use the module, we need to declare the following dependencies in the module descriptor:
@io.inverno.core.annotation.Module
module io.inverno.example.app {
requires io.inverno.mod.boot;
requires io.inverno.mod.security.jose;
}
And also declare these dependencies in the build descriptor:
Using Maven:
<project>
<dependencies>
<dependency>
<groupId>io.inverno.mod</groupId>
<artifactId>inverno-boot</artifactId>
</dependency>
<dependency>
<groupId>io.inverno.mod</groupId>
<artifactId>inverno-security-jose</artifactId>
</dependency>
</dependencies>
</project>
Using Gradle:
compile 'io.inverno.mod:inverno-security-jose:1.13.0'
The security-jose module is an Inverno module which exposes four services:
- the jwkService used to manage JSON Web Keys.
- the jwsService used to sign and verify JSON Web signature tokens.
- the jwsService used to encrypt and decrypt JSON Web signature tokens.
- the jwtService used to create JSON Web tokens as JWS or JWE.
It also provides JOSE object media type converters (e.g. application/jose, application/jose+json, application/jwk+json...) which can be used to decode (parse, verify, decrypt) JWS, JWE or JWK.
It can be easily composed in another Inverno module, as shown above, to get these services injected where they are needed, but it can also be used in any other application which requires JOSE support. Media type converters might however be required to automatically convert payloads inside JWS or JWE token based on the content type, they can be provided explicitly when creating the module.
Explicit encoders and decoders can also be used to convert payloads, it is then completely possible to run the module without specifying media type converters.
A Jose module instance embeddable in any Java application and able to handle application/json or text/plain payloads can be obtained as follows:
// Exported in the 'boot' module
JsonStringMediaTypeConverter jsonConverter = new JsonStringMediaTypeConverter(new JacksonStringConverter(new ObjectMapper()));
TextStringMediaTypeConverter textConverter = new TextStringMediaTypeConverter(new StringConverter());
// Build Jose module
Jose jose = new Jose.Builder(List.of(jsonConverter, textConverter)).build();
// Initialize Jose module
jose.start();
// Create, load or store JSON Web keys
JWKService jwkService = jose.jwkService();
...
// Create, sign and verify JSON Web Signature tokens
JWSService jwsService = jose.jwsService();
...
// Create, encrypt and decrypt JSON Web encryption tokens
JWEService jweService = jose.jweService();
...
// Create JSON Web Token as JWS or JWE
JWTService jwtService = jose.jwtService();
...
// Destroy Jose module
jose.stop();
Although it is recommended to compose the security-jose module with the boot module inside an Inverno application so as not to have to deal with dependency injection or module's lifecycle, it is completely feasible to use JOSE services in any Java application as shown above, even those which do not use the Java module system.
The API is quite complete and supports advanced features such as automatic key resolution by JWK key id or X.509 thumbprints (from a Java key store or other trusted repositories), a JWK store to store frequently used keys, JWK certificate path validation, JWK Set resolution, JWE compression... Before seeing all this in details, let's quickly see how to create JSON Web Keys and use them to create and read JWS, JWE or JWT tokens.
A JSON Web Key (JWK) represents a cryptographic key used to sign/verify or encrypt/decrypt JWS or JWE tokens. The following example shows how to create a simple symmetric octet key using HS256 signature algorithm:
// Injected or obtained from a 'Jose' instance
JWKService jwkService = ...
/*
* {
* "alg":"HS512",
* "k":"h92UNTmd5NpTl5UUalbp03z4AygiLZrDYHOaSjwjYQ_fma8_aO6A8MwOUjJGJyFEGPLJ46ujcTLlKoO_AjK3UQ",
* "kty":"oct",
* "kid":"octKey"
* }
*/
Mono<? extends OCTJWK> octKey = jwkService.oct().generator()
.keyId("octKey")
.algorithm(OCTAlgorithm.HS512.getAlgorithm())
.generate()
.cache();
The API is fully reactive, subscribing multiple times to the Mono returned by the key generator would result in multiple keys being generated which is why cache() was used to make sure one single key is generated and returned. The key thus obtained can then be used to sign or verify JWS tokens.
A JSON Web Signature token (JWS) is composed of a header, a payload and a payload signature. The header basically specifies the information needed to verify the payload signature. A JWS token then provides integrity protection since it is not possible to modify the payload, which is unencrypted and fully readable, without breaking the signature.
The following example shows how to create a JWS token with a simple text payload using previous symmetric key:
// Injected or obtained from a 'Jose' instance
JWSService jwsService = ...
/*
* {
* "header":{
* "alg":"HS512",
* "cty":"text/plain",
* "kid":"octKey"
* },
* "payload":"This is a simple payload",
* "signature":"mwq--Ke2Om3zA2y1F9cQlw5SyFPzhkvwoRaaezbzqifL5joJWuJEddPbtFDKLaBUD9Ufwi6R6IFbbOe-nxkr4w"
* }
*/
Mono<JWS<String>> jws = jwsService.builder(String.class, octKey)
.header(header -> header
.keyId("octKey")
.algorithm(OCTAlgorithm.HS512.getAlgorithm())
.contentType(MediaTypes.TEXT_PLAIN)
)
.payload("This is a simple payload")
.build();
// eyJjdHkiOiJ0ZXh0L3BsYWluIiwia2lkIjoib2N0S2V5IiwiYWxnIjoiSFM1MTIifQ.VGhpcyBpcyBhIHNpbXBsZSBwYXlsb2Fk.mwq--Ke2Om3zA2y1F9cQlw5SyFPzhkvwoRaaezbzqifL5joJWuJEddPbtFDKLaBUD9Ufwi6R6IFbbOe-nxkr4w
String jwsCompact = jws.block().toCompact();
The JWS content type must be set in order to determine which media type converters to use to convert the payload. If you don't want to include the content type property (
cty) in the resulting JWS, the content type can also be specified on thebuild()method. An explicitFunction<T, Mono<String>>payload encoder can also be specified on thebuild()method in order to bypass media type converters.
The compact representation of the JWS token can then be used to communicate integrity protected data to a recipient sharing the same symmetric key. A JWS token compact representation is parsed and validated as follows:
Mono<JWS<String>> jws = jwsService.reader(String.class, octKey)
.read(compactJWS);
// Returns "This is a simple payload" or throw a JWSReadException if the token is invalid
jws.block().getPayload();
A JSON Web Encryption token (JWE) provides privacy in addition to integrity by encrypting the payload. It is composed of a header which specifies how to decrypt and verify the cipher text, an encrypted key (used for digital signature and encryption), an initialization vector, the cipher text and an authentication tag.
The following example shows how to load an RSA key pair into a JWK, use it to create a JWE token and read its compact representation:
// Injected or obtained from a 'Jose' instance
JWEService jweService = ...
/*
* From RFC7516 Section A.1:
* {
* "n":"oahUIoWw0K0usKNuOR6H4wkf4oBUXHTxRvgb48E-BVvxkeDNjbC4he8rUWcJoZmds2h7M70imEVhRU5djINXtqllXI4DFqcI1DgjT9LewND8MW2Krf3Spsk_ZkoFnilakGygTwpZ3uesH-PFABNIUYpOiN15dsQRkgr0vEhxN92i2asbOenSZeyaxziK72UwxrrKoExv6kc5twXTq4h-QChLOln0_mtUZwfsRaMStPs6mS6XrgxnxbWhojf663tuEQueGC-FCMfra36C9knDFGzKsNa7LZK2djYgyD3JR_MB_4NUJW_TqOQtwHYbxevoJArm-L5StowjzGy-_bq6Gw",
* "e":"AQAB","d":"kLdtIj6GbDks_ApCSTYQtelcNttlKiOyPzMrXHeI-yk1F7-kpDxY4-WY5NWV5KntaEeXS1j82E375xxhWMHXyvjYecPT9fpwR_M9gV8n9Hrh2anTpTD93Dt62ypW3yDsJzBnTnrYu1iwWRgBKrEYY46qAZIrA2xAwnm2X7uGR1hghkqDp0Vqj3kbSCz1XyfCs6_LehBwtxHIyh8Ripy40p24moOAbgxVw3rxT_vlt3UVe4WO3JkJOzlpUf-KTVI2Ptgm-dARxTEtE-id-4OJr0h-K-VFs3VSndVTIznSxfyrj8ILL6MG_Uv8YAu7VILSB3lOW085-4qE3DzgrTjgyQ",
* "p":"1r52Xk46c-LsfB5P442p7atdPUrxQSy4mti_tZI3Mgf2EuFVbUoDBvaRQ-SWxkbkmoEzL7JXroSBjSrK3YIQgYdMgyAEPTPjXv_hI2_1eTSPVZfzL0lffNn03IXqWF5MDFuoUYE0hzb2vhrlN_rKrbfDIwUbTrjjgieRbwC6Cl0",
* "q":"wLb35x7hmQWZsWJmB_vle87ihgZ19S8lBEROLIsZG4ayZVe9Hi9gDVCOBmUDdaDYVTSNx_8Fyw1YYa9XGrGnDew00J28cRUoeBB_jKI1oma0Orv1T9aXIWxKwd4gvxFImOWr3QRL9KEBRzk2RatUBnmDZJTIAfwTs0g68UZHvtc",
* "dp":"ZK-YwE7diUh0qR1tR7w8WHtolDx3MZ_OTowiFvgfeQ3SiresXjm9gZ5KLhMXvo-uz-KUJWDxS5pFQ_M0evdo1dKiRTjVw_x4NyqyXPM5nULPkcpU827rnpZzAJKpdhWAgqrXGKAECQH0Xt4taznjnd_zVpAmZZq60WPMBMfKcuE",
* "dq":"Dq0gfgJ1DdFGXiLvQEZnuKEN0UUmsJBxkjydc3j4ZYdBiMRAy86x0vHCjywcMlYYg4yoC4YZa9hNVcsjqA3FeiL19rk8g6Qn29Tt0cj8qqyFpz9vNDBUfCAiJVeESOjJDZPYHdHY8v1b-o-Z2X5tvLx-TCekf7oxyeKDUqKWjis",
* "qi":"VIMpMYbPf47dT1w_zDUXfPimsSegnMOA1zTaX7aGk_8urY6R8-ZW1FxU7AlWAyLWybqq6t16VFd7hQd0y6flUK4SlOydB61gwanOsXGOAOv82cHq0E3eL4HrtZkUuKvnPrMnsUUFlfUdybVzxyjz9JF_XyaY14ardLSjf4L_FNY",
* "kty":"RSA",
* "kid":"rsaKey"
* }
*/
Mono<? extends RSAJWK> rsaKey = jwkService.rsa().builder()
.keyId("rsaKey")
.modulus("oahUIoWw0K0usKNuOR6H4wkf4oBUXHTxRvgb48E-BVvxkeDNjbC4he8rUWcJoZmds2h7M70imEVhRU5djINXtqllXI4DFqcI1DgjT9LewND8MW2Krf3Spsk_ZkoFnilakGygTwpZ3uesH-PFABNIUYpOiN15dsQRkgr0vEhxN92i2asbOenSZeyaxziK72UwxrrKoExv6kc5twXTq4h-QChLOln0_mtUZwfsRaMStPs6mS6XrgxnxbWhojf663tuEQueGC-FCMfra36C9knDFGzKsNa7LZK2djYgyD3JR_MB_4NUJW_TqOQtwHYbxevoJArm-L5StowjzGy-_bq6Gw")
.publicExponent("AQAB")
.privateExponent("kLdtIj6GbDks_ApCSTYQtelcNttlKiOyPzMrXHeI-yk1F7-kpDxY4-WY5NWV5KntaEeXS1j82E375xxhWMHXyvjYecPT9fpwR_M9gV8n9Hrh2anTpTD93Dt62ypW3yDsJzBnTnrYu1iwWRgBKrEYY46qAZIrA2xAwnm2X7uGR1hghkqDp0Vqj3kbSCz1XyfCs6_LehBwtxHIyh8Ripy40p24moOAbgxVw3rxT_vlt3UVe4WO3JkJOzlpUf-KTVI2Ptgm-dARxTEtE-id-4OJr0h-K-VFs3VSndVTIznSxfyrj8ILL6MG_Uv8YAu7VILSB3lOW085-4qE3DzgrTjgyQ")
.firstPrimeFactor("1r52Xk46c-LsfB5P442p7atdPUrxQSy4mti_tZI3Mgf2EuFVbUoDBvaRQ-SWxkbkmoEzL7JXroSBjSrK3YIQgYdMgyAEPTPjXv_hI2_1eTSPVZfzL0lffNn03IXqWF5MDFuoUYE0hzb2vhrlN_rKrbfDIwUbTrjjgieRbwC6Cl0")
.secondPrimeFactor("wLb35x7hmQWZsWJmB_vle87ihgZ19S8lBEROLIsZG4ayZVe9Hi9gDVCOBmUDdaDYVTSNx_8Fyw1YYa9XGrGnDew00J28cRUoeBB_jKI1oma0Orv1T9aXIWxKwd4gvxFImOWr3QRL9KEBRzk2RatUBnmDZJTIAfwTs0g68UZHvtc")
.firstFactorExponent("ZK-YwE7diUh0qR1tR7w8WHtolDx3MZ_OTowiFvgfeQ3SiresXjm9gZ5KLhMXvo-uz-KUJWDxS5pFQ_M0evdo1dKiRTjVw_x4NyqyXPM5nULPkcpU827rnpZzAJKpdhWAgqrXGKAECQH0Xt4taznjnd_zVpAmZZq60WPMBMfKcuE")
.secondFactorExponent("Dq0gfgJ1DdFGXiLvQEZnuKEN0UUmsJBxkjydc3j4ZYdBiMRAy86x0vHCjywcMlYYg4yoC4YZa9hNVcsjqA3FeiL19rk8g6Qn29Tt0cj8qqyFpz9vNDBUfCAiJVeESOjJDZPYHdHY8v1b-o-Z2X5tvLx-TCekf7oxyeKDUqKWjis")
.firstCoefficient("VIMpMYbPf47dT1w_zDUXfPimsSegnMOA1zTaX7aGk_8urY6R8-ZW1FxU7AlWAyLWybqq6t16VFd7hQd0y6flUK4SlOydB61gwanOsXGOAOv82cHq0E3eL4HrtZkUuKvnPrMnsUUFlfUdybVzxyjz9JF_XyaY14ardLSjf4L_FNY")
.build()
.cache();
/*
* {
* "header":{
* "enc":"A256GCM",
* "alg":"RSA-OAEP",
* "cty":"text/plain",
* "kid":"rsaKey"
* },
* "payload":"This is a simple payload",
* "initializationVector":"97ZuhWEQOygN7T3g",
* "authenticationTag":"_e-vSUwj5LawcnXROqKvmQ",
* "encryptedKey":"VOk1HQDwucfkljliz8RzxvuKXX_B6sTMwZbwKJztZjL0Ga8i3yrRl_4jumBTKBIyWMDdZYxcbHtkzZQhQDFJVpvNcf1QxEryhe3OnFOEF2BGJDPwSYc-AVmAq01gHrUaTF02xvWntfvzu3ePq5vVHl4eiL72POVdoN9w8ck4HaOjeoooYcrkaV8l15cYurXsJ8oo_KQ40SBmKnK99CRrqR1QggPscTpE1QeVj2Z9tw5A3rqYGbCX2d2QwP-zc7w5o1bsuB5qE99i0iAKtMwEdaz6iC97nDry8Vo2uSPf3YviwpzmLbbwJlb_bHhl1aeTZaNQl9JLvxvqCDQehdAx7g",
* "cipherText":"YFPMGQXbmI5ZWZXkpH04vEWsBLCmBJ4G"
* }
*/
Mono<JWE<String>> jwe = jweService.builder(String.class, rsaKey)
.header(header -> header
.keyId("rsaKey")
.algorithm("RSA-OAEP")
.encryptionAlgorithm("A256GCM")
)
.payload("This is a simple payload")
.build(MediaTypes.TEXT_PLAIN);
// eyJlbmMiOiJBMjU2R0NNIiwiYWxnIjoiUlNBLU9BRVAiLCJjdHkiOiJ0ZXh0L3BsYWluIiwia2lkIjoicnNhS2V5In0.EG3dFsn0MAxWRadls1UHpmfNFspczXldNTwr9LfO8BZXsliEJJ8J9-Z25oFnpaI7q3lXazNg06C9upJW2ZiDg2hmmqoCzYD7xdFEz_YkgO7_92tPxCm0XSGZJUtX1d8gpJBoIQWmPCmO6vVveoCds-kmtTQEigokSewKmkIQyOQcyAhLT5y_gkL0JrKLTPjTKGept7dl9uTzuZenWi-5apdVynDhOkraOkCSu8ahVPPPSf5s9aHUS8th-pjWAtS7OFwMOrjLzYXmcqdNPAYM0Pcg88Fw_uI8J7I6tzDInV31rVZ9pDlVarmVSYhS9Rfa91gZaba-onCiFURceUaeOg.im9v2BnFnFp_uGtX.VItnFUA2xtrgrO-Fs-LukV0RZbRUrNkv.eFgbb8i1olfIkSHFM8IkXA
String jweCompact = jwe.block().toCompact();
Mono<JWE<String>> jwe = jweService.reader(String.class, rsaKey)
.read(jweCompact);
// Returns "This is a simple payload" or throw a JWEReadException if the token is invalid
jwe.block().getPayload();
In above example, the RSA public key was used to encrypt a generated symmetric key (using RSA-OAEP algorithm) which is used to encrypt the payload (using A256GCM algorithm) and the RSA private key was used to decrypt that encryption key and use it to decrypt and validate the token.
A JSON Web Token (JWT) can be a JWS or a JWE with a JWT Claims Set as payload.
The following example shows how to create and validate a JWT expiring in ten minutes from now using previous symmetric key:
// Injected or obtained from a 'Jose' instance
JWTService jwtService = ...
/*
* {
* "header":{
* "typ":"JWT",
* "kid":"octKey",
* "alg":"HS512"
* },
* "payload":{
* "iss":"john",
* "exp":1659346862,
* "http://example.com/is_root":true
* },
* "signature":"hX_m668usLB1DHGW4cD2NJ1UzCs3T6sGCa0ctvGTkresiZ87iIeKnY0-EoIvWmDy3SY69rGLMsbsEjsru1QdZw"
* }
*/
Mono<JWS<JWTClaimsSet>> jwt = jwtService.jwsBuilder(octKey)
.header(header -> header
.keyId("octKey")
.algorithm("HS512")
.type("JWT")
)
.payload(JWTClaimsSet.of("john", ZonedDateTime.now().plusMinutes(10).toEpochSecond())
.addCustomClaim("http://example.com/is_root", true)
.build()
)
.build();
// eyJ0eXAiOiJKV1QiLCJraWQiOiJvY3RLZXkiLCJhbGciOiJIUzUxMiJ9.eyJpc3MiOiJqb2huIiwiZXhwIjoxNjU5MzQ2ODYyLCJodHRwOi8vZXhhbXBsZS5jb20vaXNfcm9vdCI6dHJ1ZX0.hX_m668usLB1DHGW4cD2NJ1UzCs3T6sGCa0ctvGTkresiZ87iIeKnY0-EoIvWmDy3SY69rGLMsbsEjsru1QdZw
String jwtCompact = jwt.block().toCompact();
Mono<JWS<JWTClaimsSet>> jwt = jwtService.jwsReader(octKey)
.read(compactJWT);
// Throw a JWSReadException if the signature is invalid or an InvalidJWTException if the JWT Claims set is invalid (e.g. expired, inactive...)
jwt.block().getPayload().ifInvalidThrow();
Note that here we didn't have to specify the content type since a JWT payload is always
application/json.
JWK Service
The JWK service is used to build, generate or read JSON Web Keys (JWK) which represent cryptographic keys as specified by RFC 7517. A JWK is meant to be used to sign or verify the signature part in a JWS, derive, encrypt/decrypt or wrap/unwrap the content encryption key in a JWE or encrypt or decrypt a JWE. It is characterized by a set of properties:
kty(key type) which identifies the cryptographic algorithm family used with the key (e.g. RSA, EC...).use(public use) which identifies the intended use of the public key (signature or encryption).key_ops(key operations) which identifies the operations for which the key is intended to be used (e.g. sign, verify, encrypt, decrypt...).alg(algorithm) which identifies the algorithm intended for use with the key (e.g. HS256).kid(key id) which identifies the key in issuer and recipient systems.x5u(X.509 URL) which is a URI pointing to a resource for an X.509 public key certificate or certificate chain (the public key when considering asymmetric JWK).x5c(X.509 certificate chain) which contains a chain of one or more PKIX certificates (the public key when considering asymmetric JWK).x5tanx5t#S256(X.509 thumbprints) which are Base64 encoded X.509 certificate thumbprint used to uniquely identifies a key (the public key when considering asymmetric JWK).
Depending on the key type and more particularly the cryptographic algorithm family, additional properties may be required (e.g. the name of an elliptic curve, the modulus of an RSA public key...).
A JWK can be symmetrical or asymmetrical composed of a public and private key pair and respectively used in symmetrical (e.g. HMAC, AES...) or asymmetrical (e.g. Elliptic Curve, RSA...) cryptographic algorithms as specified by RFC 7518. The specification differentiates three types of algorithms:
- Digital Signatures and MACs which are used to digitally sign or create a MAC of a JWS.
- Key Management which are used to derive or encrypt/decrypt the Content Encryption Key (CEK) used to encrypt a JWE.
- Content Encryption which are used to encrypt and identity-protect a JWE using a CEK.
The JWK interface exposes common JWK properties and provides JWASigner, JWAKeyManager or JWACipher instances for any of these cryptographic operations assuming they are supported by the JWK. For instance, an ECJWK which supports Elliptic-Curve algorithms cannot be used for content encryption, but it can be used to digitally sign content and decrypt or derive keys, a JWKProcessingException shall be thrown when trying to obtain a signer, a key manager or a cipher when the JWK does not support it, when JWK properties are not consistent with the requested algorithm or if the requested algorithm is not of the requested type.
ECJWK ecJWK = jwkService.ec().generator()
.curve(ECCurve.P_256.getCurve())
.generate()
.block();
// Throw a JWKProcessingException since Elliptic-curve algorithms cannot be used to encrypt data
ecJWK.cipher();
// Throw a JWKProcessingException since no algorithm was specified in the JWK
ecJWK.signer();
// Throw a JWKProcessingException since ES512 algorithm is not a key management algorithm
ecJWK.keyManager(ECAlgorithm.ES512.getAlgorithm());
// Throw a JWKProcessingException since ES512 algorithm is not consistent with curve P_256 (P_512 is expected)
ecJWK.signer(ECAlgorithm.ES512.getAlgorithm());
// Return a key manager using ECDH ES algorithm on curve P_256
ecJWK.keyManager(ECAlgorithm.ECDH_ES.getAlgorithm());
OCTJWK octJWK = jwkService.oct().generator()
.algorithm(OCTAlgorithm.HS512.getAlgorithm())
.generate()
.block();
// Throw a JWKProcessingException since HS256 algorithm is requested which is not consistent with HS512 algorithm specified in the JWK
octJWK.signer(OCTAlgorithm.HS256.getAlgorithm());
// Return a signer using HS512 algorithm
octJWK.signer();
A SymmetricJWK exposes a symmetric secret key whereas an AsymmetricJWK exposes a public and private key pair.
A JWK can be minified using method minified() which returns a JWK containing required minimal properties as specified by RFC 7638. A JWK thumbprint can be created using method toJWKThumbprint() which allows to specify the message digest (defaults to SHA-256) to use to digest the minified JWK. A JWK thumbprint can be used as key id to uniquely identify a JWK.
A JWK can be converted to a public JWK using method toPublicJWK() which removes any sensitive properties: in case of a SymmetricJWK the secret key value is removed and in case of an AsymmetricJWK the private key value and any related information are removed.
Private
JWKcontaining sensitive data shall never be communicated unprotected, most of the time the public representation shall be enough for a recipient to resolve the key to use to verify or decrypt a JWS or a JWE.
A JWK can be trusted or untrusted depending on how the key was resolved by the JWK service. For instance, a JWK built from an X.509 certificate chain (x5c or x5u) whose path could not be validated will be considered untrusted. Digital signature or content decryption will eventually fail in JWS and JWE services when using an untrusted key. It is possible to explicitly trust a key using method trust() when its authenticity could be determined using external means.
The JWKService bean uses JWKFactory implementations to generate, build or read JWKs, they are injected into the service when the module is initialized. Standard implementations supporting Elliptic-curve, RSA, Octet, Edward-Curve, extended Elliptic-Curve and PBES2 keys are provided and injected by default as defined by RFC 7518 and RFC 8037. Additional JWKFactory implementations can be added when building the module to extend the module's capabilities and support extra signature, encryption or key management algorithms.
Standard built-in factories are directly exposed on the JWKService in order to quikly generate or build specific JWK:
// Return the ECJWKFactory
jwkService.ec()...
// Return the RSAJWKFactory
jwkService.rsa()...
// Return the OCTJWKFactory
jwkService.oct()...
// Return the EdECJWKFactory
jwkService.edec()...
// Return the XECJWKFactory
jwkService.xec()...
// Return the PBES2JWKFactory
jwkService.pbes2()...
External factories cannot be exposed explicitly by the
JWKServiceinterface. When reading or generating aJWK, The JWK service basically retains all factories that supports the requested key type and algorithm, including external ones. Multiple JWKs built by different factories might then be returned byread()andgenerate()methods.
The JWKService interface also exposes methods for reading JWK JSON representations. For instance the following example shows how to resolve and read a JWK Set JSON resource located at a specific URIs as defined by RFC 7517 Section 5:
// Return one or more JWKs
Publisher<? extends JWK> read = jwkService.read(URI.create("https://host/jwks.json"));
JWK Factory
A JWKFactory allows to generate a JWK using a JWKGenerator, build a JWK using a JWKBuilder and read a JWK from a JSON representation.
Generating JWK
A JWKGenerator is used to generate a new JWK. Depending on the type (symmetric or asymmetric) this results in the creation of a secret key or a public and private key pair matching the key type and algorithm specified in the generator instance.
For instance, a symmetric octet key can be generated as follows:
JWKService jwkService = ...
OCTJWK mySymmetricKey = jwkService.oct().generator()
.keyId("mySymmetricKey")
.algorithm(OCTAlgorithm.HS512.getAlgorithm())
.keySize(24)
.generate()
.block();
An asymmetric RSA key pair can be generated as follows:
JWKService jwkService = ...
Mono<? extends RSAJWK> myAsymmetricKey = jwkService.rsa().generator()
.keyId("myAsymmetricKey")
.algorithm(RSAAlgorithm.PS256.getAlgorithm())
.generate()
.cache();
Note how
cache()was used to transform the resultingMonointo a hot source and prevent generating a new key each time it is being subscribed.
Building JWK
A JWKBuilder is used to build a JWK from a set of properties as defined by RFC 7517. A JWK builder does not simply create a JWK instance filled with the provided properties, it can also directly resolve the JWK from a JWKStore or resolve keys (secret, public or private) using a JWKKeyResolver and determines whether the resulting JWK is consistent and can be trusted.
The default
JWKKeyResolverimplementation uses a Java Key Store to resolve keys corresponding to the key id or X.509 thumbprints properties in that order. The Java Key Store location is specified in the module's configuration (JOSEConfiguration).
In practice, a JWK is resolved as follows:
- The builder first tries to get a matching
JWKin the module'sJWKStorefrom the key id, the X.509 SHA-1 or the X.509 SHA-256 thumbprints in that order. If a matchingJWKis found the process stops and theJWKreturned. - If no matching
JWKwas found, it tries to resolve the secret key or the public and private key pair from the key id, X.509 SHA-1 or X.509 SHA-256 thumbprints in that order using the module'sJWKKeyResolver. - X.509 certificates chain (
x5c), if any, is validated using module'sX509JWKCertPathValidatorand corresponding public key value is extracted. - X.509 certificates chain URI (
x5u), if any, is resolved using module'sJWKURLResolverand validated using module'sX509JWKCertPathValidatorand corresponding public key value is extracted. - It then checks that all information are consistent (i.e. specified key values match the ones resolved with the
JWKKeyResolver, and the ones extracted from X.509 certificates). - It finally returns a consistent JWK which is trusted when key values were resolved with the
JWKKeyResolver(which is assumed to be trusted) or when the X.509 certificate path have been validated (i.e. a certificate in the chain is trusted).
Any issue detected during that process results in a JWKProcessingException. X.509 certificates chain resolution as well as certificate path validation are disabled by default (x5c and x5u are simply ignored) and can be activated by setting properties resolve_x5u and validate_certificate to true in the module's configuration (JOSEConfiguration).
Automatic resolution of X.509 certificates URI can be dangerous and might be considered as a threat which is why this is disabled by default.
The following example shows how to build an RSAJWK with a public and private key pair by specifying each property:
RSAJWK rsaKey = jwkService.rsa().builder()
.keyId("rsaKey")
.modulus("oahUIoWw0K0usKNuOR6H4wkf4oBUXHTxRvgb48E-BVvxkeDNjbC4he8rUWcJoZmds2h7M70imEVhRU5djINXtqllXI4DFqcI1DgjT9LewND8MW2Krf3Spsk_ZkoFnilakGygTwpZ3uesH-PFABNIUYpOiN15dsQRkgr0vEhxN92i2asbOenSZeyaxziK72UwxrrKoExv6kc5twXTq4h-QChLOln0_mtUZwfsRaMStPs6mS6XrgxnxbWhojf663tuEQueGC-FCMfra36C9knDFGzKsNa7LZK2djYgyD3JR_MB_4NUJW_TqOQtwHYbxevoJArm-L5StowjzGy-_bq6Gw")
.publicExponent("AQAB")
.privateExponent("kLdtIj6GbDks_ApCSTYQtelcNttlKiOyPzMrXHeI-yk1F7-kpDxY4-WY5NWV5KntaEeXS1j82E375xxhWMHXyvjYecPT9fpwR_M9gV8n9Hrh2anTpTD93Dt62ypW3yDsJzBnTnrYu1iwWRgBKrEYY46qAZIrA2xAwnm2X7uGR1hghkqDp0Vqj3kbSCz1XyfCs6_LehBwtxHIyh8Ripy40p24moOAbgxVw3rxT_vlt3UVe4WO3JkJOzlpUf-KTVI2Ptgm-dARxTEtE-id-4OJr0h-K-VFs3VSndVTIznSxfyrj8ILL6MG_Uv8YAu7VILSB3lOW085-4qE3DzgrTjgyQ")
.firstPrimeFactor("1r52Xk46c-LsfB5P442p7atdPUrxQSy4mti_tZI3Mgf2EuFVbUoDBvaRQ-SWxkbkmoEzL7JXroSBjSrK3YIQgYdMgyAEPTPjXv_hI2_1eTSPVZfzL0lffNn03IXqWF5MDFuoUYE0hzb2vhrlN_rKrbfDIwUbTrjjgieRbwC6Cl0")
.secondPrimeFactor("wLb35x7hmQWZsWJmB_vle87ihgZ19S8lBEROLIsZG4ayZVe9Hi9gDVCOBmUDdaDYVTSNx_8Fyw1YYa9XGrGnDew00J28cRUoeBB_jKI1oma0Orv1T9aXIWxKwd4gvxFImOWr3QRL9KEBRzk2RatUBnmDZJTIAfwTs0g68UZHvtc")
.firstFactorExponent("ZK-YwE7diUh0qR1tR7w8WHtolDx3MZ_OTowiFvgfeQ3SiresXjm9gZ5KLhMXvo-uz-KUJWDxS5pFQ_M0evdo1dKiRTjVw_x4NyqyXPM5nULPkcpU827rnpZzAJKpdhWAgqrXGKAECQH0Xt4taznjnd_zVpAmZZq60WPMBMfKcuE")
.secondFactorExponent("Dq0gfgJ1DdFGXiLvQEZnuKEN0UUmsJBxkjydc3j4ZYdBiMRAy86x0vHCjywcMlYYg4yoC4YZa9hNVcsjqA3FeiL19rk8g6Qn29Tt0cj8qqyFpz9vNDBUfCAiJVeESOjJDZPYHdHY8v1b-o-Z2X5tvLx-TCekf7oxyeKDUqKWjis")
.firstCoefficient("VIMpMYbPf47dT1w_zDUXfPimsSegnMOA1zTaX7aGk_8urY6R8-ZW1FxU7AlWAyLWybqq6t16VFd7hQd0y6flUK4SlOydB61gwanOsXGOAOv82cHq0E3eL4HrtZkUuKvnPrMnsUUFlfUdybVzxyjz9JF_XyaY14ardLSjf4L_FNY")
.build()
.block();
If we assumed that rsaKey is not stored in the module's JWKStore and that public and private keys are also not stored in the module's Java Key Store, the resulting RSAKey is therefore untrusted since the provided information could not be authenticated.
An untrusted JWK cannot be used to digitally sign, encrypt or derive keys. If we know by external means that the provided information can be trusted after all, we can explicitly trust the JWK as follows:
rsaKey.trust();
// The JWK is now trusted
...
Note that this can be considered unsafe and should be used with extra care.
Now if we assume that rsaKey is stored in the module's JWKStore, the key can be built, or in that case simply loaded, as follows:
RSAJWK rsaKey = jwkService.rsa().builder()
.keyId("rsaKey")
.build()
.block();
In that case, the returned JWK is trusted as it comes from a trusted JWKStore.
Finally, if the rsaKey is not stored in the module's JWKStore, but a public and private key pair is stored in the module's Java Key Store, the JWK can be loaded in the exact same way:
RSAJWK rsaKey = jwkService.rsa().builder()
.keyId("rsaKey")
.build()
.block();
There is however a noticeable difference between the two, when a JWK is resolved from the module's JWKStore, properties specified in the builder other than the key id or X.509 thumbprints are simply ignored and no further consistency check is performed. On the other hand, when keys are resolved using the module's JWKKeyResolver, the properties specified in the builder must be consistent. The purpose of the JWKStore is to optimize the resolution of frequently used keys which is incompatible with systematic consistency check.
Please refer to JWK Store and JWK Key Resolution to better understand how JWK and key resolution work.
Reading JWK
A JWK is read from a JSON representation in a similar way as the one described for the JWK builder. The JSON object is basically parsed in a map of properties which are then injected in a JWKBuilder which is used to build the resulting JWK.
The following example shows how to parse the JSON representation of the RSAJWK built in previous section:
String rsaJwkJSON = "{\n"
+ " \"n\":\"oahUIoWw0K0usKNuOR6H4wkf4oBUXHTxRvgb48E-BVvxkeDNjbC4he8rUWcJoZmds2h7M70imEVhRU5djINXtqllXI4DFqcI1DgjT9LewND8MW2Krf3Spsk_ZkoFnilakGygTwpZ3uesH-PFABNIUYpOiN15dsQRkgr0vEhxN92i2asbOenSZeyaxziK72UwxrrKoExv6kc5twXTq4h-QChLOln0_mtUZwfsRaMStPs6mS6XrgxnxbWhojf663tuEQueGC-FCMfra36C9knDFGzKsNa7LZK2djYgyD3JR_MB_4NUJW_TqOQtwHYbxevoJArm-L5StowjzGy-_bq6Gw\",\n"
+ " \"e\":\"AQAB\",\"d\":\"kLdtIj6GbDks_ApCSTYQtelcNttlKiOyPzMrXHeI-yk1F7-kpDxY4-WY5NWV5KntaEeXS1j82E375xxhWMHXyvjYecPT9fpwR_M9gV8n9Hrh2anTpTD93Dt62ypW3yDsJzBnTnrYu1iwWRgBKrEYY46qAZIrA2xAwnm2X7uGR1hghkqDp0Vqj3kbSCz1XyfCs6_LehBwtxHIyh8Ripy40p24moOAbgxVw3rxT_vlt3UVe4WO3JkJOzlpUf-KTVI2Ptgm-dARxTEtE-id-4OJr0h-K-VFs3VSndVTIznSxfyrj8ILL6MG_Uv8YAu7VILSB3lOW085-4qE3DzgrTjgyQ\",\n"
+ " \"p\":\"1r52Xk46c-LsfB5P442p7atdPUrxQSy4mti_tZI3Mgf2EuFVbUoDBvaRQ-SWxkbkmoEzL7JXroSBjSrK3YIQgYdMgyAEPTPjXv_hI2_1eTSPVZfzL0lffNn03IXqWF5MDFuoUYE0hzb2vhrlN_rKrbfDIwUbTrjjgieRbwC6Cl0\",\n"
+ " \"q\":\"wLb35x7hmQWZsWJmB_vle87ihgZ19S8lBEROLIsZG4ayZVe9Hi9gDVCOBmUDdaDYVTSNx_8Fyw1YYa9XGrGnDew00J28cRUoeBB_jKI1oma0Orv1T9aXIWxKwd4gvxFImOWr3QRL9KEBRzk2RatUBnmDZJTIAfwTs0g68UZHvtc\",\n"
+ " \"dp\":\"ZK-YwE7diUh0qR1tR7w8WHtolDx3MZ_OTowiFvgfeQ3SiresXjm9gZ5KLhMXvo-uz-KUJWDxS5pFQ_M0evdo1dKiRTjVw_x4NyqyXPM5nULPkcpU827rnpZzAJKpdhWAgqrXGKAECQH0Xt4taznjnd_zVpAmZZq60WPMBMfKcuE\",\n"
+ " \"dq\":\"Dq0gfgJ1DdFGXiLvQEZnuKEN0UUmsJBxkjydc3j4ZYdBiMRAy86x0vHCjywcMlYYg4yoC4YZa9hNVcsjqA3FeiL19rk8g6Qn29Tt0cj8qqyFpz9vNDBUfCAiJVeESOjJDZPYHdHY8v1b-o-Z2X5tvLx-TCekf7oxyeKDUqKWjis\",\n"
+ " \"qi\":\"VIMpMYbPf47dT1w_zDUXfPimsSegnMOA1zTaX7aGk_8urY6R8-ZW1FxU7AlWAyLWybqq6t16VFd7hQd0y6flUK4SlOydB61gwanOsXGOAOv82cHq0E3eL4HrtZkUuKvnPrMnsUUFlfUdybVzxyjz9JF_XyaY14ardLSjf4L_FNY\",\n"
+ " \"kty\":\"RSA\",\n"
+ " \"kid\":\"rsaKey\"\n"
+ "}";
RSAJWK rsaKey = jwkService.rsa().read(rsaJwkJSON).block();
The same rules as the ones described for the JWK builder apply. In above code the resulting JWK is untrusted. Assuming a rsaKey JWK is stored in the module's JWKStore, the following code shall return a workable JWK:
String rsaJwkJSON = "{\n"
+ " \"kid\":\"rsaKey\"\n"
+ "}";
RSAJWK rsaKey = jwkService.rsa().read(rsaJwkJSON).block();
Note that we did not have to specify the key type here since we are directly using the
RSAJWKFactoryto read the JSON representation. We could have invoked theread()method on theJWKServiceinstead but the key type would then have been required in order to determine which JWK factory to use.
JWK Store
The security-jose module uses a JWKStore to store and load frequently used keys. By default, the module uses a no-op implementation but more effective implementations can be injected when creating the module.
The purpose of the JWKStore is to optimize key resolution when loading keys while creating or reading JWS or JWE. As soon as a key is matched by a key id, an X.509 SHA-1 or X.509 SHA-256 thumbprint, the key shall be returned and no further processing performed, including consistency checks.
Note that this actually goes a bit against RFC 7517 for which inconsistent JWK must be rejected but this is a fair optimization as the returned
JWKshall always be consistent.
The JWKStore interface exposes methods getByKeyId(), getBy509CertificateSHA1Thumbprint() and getByX509CertificateSHA256Thumbprint() which are respectively used by JWKBuilder implementation to resolve JWK by key id, X.509 SHA-1 and X.509 SHA-256 thumbprints. The set() and remove() methods are used to add or remove JWK instances.
The InMemoryJWKStore is a simple implementation that stores keys in concurrent hash maps, the following wrapper bean can be defined in a module to override the default no-op implementation:
@Wrapper
@Bean
public class JWKStoreWrapper implements Supplier<JWKStore> {
@Override
public JWKStore get() {
return new InMemoryJWKStore();
}
}
Or it can be injected directly in the module's builder if the module is created and initialized explicitly:
Jose jose = new Jose.Builder(List.of(jsonConverter, textConverter)).setJwkStore(new InMemoryJWKStore()).build();
jose.start();
...
jose.stop();
The JWKStore is exposed in the JWKService, a JWK can be stored as follows:
jwkService.oct().generator()
.keyId("octKey")
.algorithm(OCTAlgorithm.HS512.getAlgorithm())
.generate()
.map(JWK::trust)
.flatMap(jwkService.store()::set)
.block();
Since keys resolved from the JWKStore are usually used when validating or decrypting JWS or JWE, they should all be trusted to avoid errors.
The
InMemoryJWKStoreis a basic implementation that does not check this condition before storing an instance but more advanced implementations should definitely consider rejecting untrusted keys. Whatever the solution, processing will eventually fail when using an untrusted key.
JWK Key resolution
When building or reading a JWK, actual keys (secret, public and private) can be resolved by key id, X.509 SHA-1 or X.509 SHA-256 thumbprints in a JWKBuilder implementation using the module's JWKKeyResolver.
The module provides a default implementation that look up keys in a Java Key Store whose location is specified in the module's configuration. Key resolution will be disabled if the key store configuration is missing.
Let's assume we have a Java Key Store keystore.jks accessible with password password, the following configuration allows the default JWKKeyResolver implementation to resolve keys from that key store:
### configuration.cprops
io.inverno.example.app_jose.appConfiguration {
jose {
key_store = "file:/path/to/keytstore.jks"
key_store_password = "password"
}
}
Unlike the JWKStore, a JWKProcessingException is thrown when resolved keys are not consistent with the properties specified in the JWK builder.
Custom JWKKeyResolver implementation can be provided to override the default behaviour by defining a bean in the module or by directly injecting the instance in the module's builder when the module is created and initialized explicitly:
Jose jose = new Jose.Builder(List.of(jsonConverter, textConverter)).setJwkKeyResolver(new CustomJWKKeyResolver()).build();
JWK Set resolution
The JWKService can be used to resolve multiple keys from a URI pointing to a JWK Set resource as defined by RFC 7517 Section 5.
For instance, the keys defined in a JWK Set at location https://server.example.com/keys.jwks can be resolved as follows:
Publisher<? extends JWK> read = jwkService.read(URI.create("https://server.example.com/keys.jwks"));
The JWKService delegates to the module's JWKURLResolver to resolve the resource as a map of properties, the default implementation uses a ResourceService which must be injected into the module for the feature to be activated.
A complete
ResourceServiceimplementation supporting common URI schemes (file:/,http://,classpath:...) is provided in the boot module.
JWK set resolution is also used as a last resort to resolve keys when building or reading JWS or JWE with property jku, this behaviour is disabled by default and must be activated explicitly in the module's configuration (JOSEConfiguration) by setting resolve_jku property to true:
### configuration.cprops
io.inverno.example.app_jose.appConfiguration {
jose {
resolve_jku = true
}
}
Automatic resolution of JWK Set URL can be dangerous and might be considered as a threat which is why this is disabled by default.
JWK instances obtained that way from external JWK Set resources are considered untrusted by default, and therefore cannot be used to build or read JWS or JWE, unless locations (i.e. URIs) are explicitly as a trusted listed in the module's configuration (JOSEConfiguration) in trusted_jku property.
For instance, the following configuration can be set to trust keys resolved from https://server.example.com/keys.jwks:
### configuration.cprops
io.inverno.example.app_jose.appConfiguration {
jose {
trusted_jku = "https://server.example.com/keys.jwks"
}
}
Certificate path validation
When building or reading a JWK with an X.509 certificates chain or X.509 certificates chain URI, it is possible to validate the certificates chain in order to determine whether the resulting JWK can be trusted.
An X.509 certificate is considered trusted if any of the certificate in the chain is trusted. An X509JWKCertPathValidator is used in JWKBuilder implementations to validate resolved certificates chains.
The default implementation uses a PKIX CertPathValidator with PKIXParameters defining the trusted certificates, these parameters are provided by the JWKPKIXParameters wrapper bean which uses the trust store of the JDK by default. This bean is overridable and custom PKIXParameters can be provided as well by defining a bean in the module or by directly injecting the instance in the module's builder when the module is created and initialized explicitly:
CertStore customTrustStore = ...
Jose jose = new Jose.Builder(List.of(jsonConverter, textConverter)).setJwkPKIXParameters(new JWKPKIXParameters(customTrustStore).get()).build();
Certificate path resolution is disabled by default and must be activated explicitly in the module's configuration (JOSEConfiguration) by setting validate_certificate property to true:
### configuration.cprops
io.inverno.example.app_jose.appConfiguration {
jose {
validate_certificate = true
}
}
JSON Web Algorithms
The security-jose module fully supports algorithms specified in RFC 7518 JSON Web Algorithm (JWA), RFC 8037 and RFC 8812 and used to sign/verify, encrypt/decrypt and derive content encryption keys. They are grouped into categories with associated JWK implementations and JWAAlgorithm enum listing the algorithms and defining the parameters required to create corresponding JWASigner, JWACipher and JWAKeyManager.
The JWA interface is the base type extended by all JWA algorithms including JWASigner for digital signature algorithms, JWACipher for encryption algorithms and JWAKeyManager for key management algorithms.
The JWASigner interface exposes methods sign() and verify() used to respectively sign and verify some arbitrary data.
byte[] payload = "This is a payload".getBytes();
JWASigner signer = ...
byte[] signature = signer.sign(payload);
if(signer.verify(payload, signature)) {
...
}
The JWACipher interface exposes methods encrypt() and decrypt() to respectively encrypt and decrypt some arbitrary data. Encryption requires additional authentication data and a SecureRandom for random number generation and returns encrypted data composed of a cipher text, an initialization vector and an authentication tag. Decryption requires the additional authentication data, the cipher text, the initialization vector and the authentication tag (which are basically the components of a JWE).
byte[] payload = "This is a payload".getBytes();
// Specified in RFC 7516
byte[] aad = ...
JWACipher cipher = ...
JWACipher.EncryptedData encryptedData = cipher.encrypt(payload, aad);
byte[] decryptedPayload = cipher.decrypt(encryptedData.getCipherText(), aad, encryptedData.getInitializationVector(), encryptedData.getAuthenticationTag());
Key management algorithms are used to determine the Content Encryption Key (CEK) used to encrypt a JWE, they are further divided into DirectJWAKeyManager for algorithms that derives the content encryption key which is not encrypted, EncryptingJWAKeyManager for algorithms that encrypt/decrypt the content encryption key and WrappingJWAKeyManager for algorithms that wrap/unwrap the content encryption key.
Key management algorithm usually requires specific parameters passed in the JOSE header, as a result methods exposed by key managers usually require the algorithm and a map of parameters.
A DirectJWAKeyManager is used to derive the CEK on both ends using parameters specified in a JOSE header.
// e.g. Ephemeral public key (epk), Agreement PartyUInfo (apu), Agreement PartyVInfo (apv) when using ECDH-ES algorithm
Map<String, Object> parameters = ...
DirectJWAKeyManager directKeyManager = ...
DirectJWAKeyManager.DirectCEK directCEK = directKeyManager.deriveCEK("ECDH-ES", parameters);
OCTJWK cek = directCEK.getEncryptionKey();
When using a direct key management algorithm, the encrypted key part of the JWE is empty since the CEK is derived and not encrypted or wrapped.
An EncryptingJWAKeyManager is used to encrypt and decrypt the CEK.
// e.g. PBES2 Salt Input (p2s), PBES2 Count (p2c) when using PBES2-HS256+A128KW algorithm
Map<String, Object> parameters = ...
// Generated when building a JWE
JWK cek = ...
EncryptingJWAKeyManager encryptingKeyManager = ...
EncryptingJWAKeyManager.EncryptedCEK encryptedCEK = encryptingKeyManager.encryptCEK(cek, parameters);
byte[] encryptedKey = encryptedCEK.getEncryptedKey();
JWK decryptedCEK = encryptingKeyManager.decryptCEK(encryptedKey, "PBES2-HS256+A128KW", parameters);
A WrappingJWAKeyManager is used to wrap and unwrap the CEK.
Map<String, Object> parameters = ...
// Generated when building a JWE
JWK cek = ...
WrappingJWAKeyManager wrappingKeyManager = ...
WrappingJWAKeyManager.WrappedCEK wrappedCEK = wrappingKeyManager.wrapCEK(cek, parameters);
byte[] wrappedKey = wrappedCEK.getWrappedKey();
JWK unwrappedCEK = wrappingKeyManager.unwrapCEK(wrappedKey, "A192KW", parameters);
Although signers, ciphers and key managers are usually used indirectly when building or reading JWS or JWE, but they can also be used directly as shown above.
Octet
Octet algorithms are based on a shared secret key, they are listed in the OCTAlgorithm enum.
The following example shows how to obtain an A128GCM JWACipher from a generated OCTJWK:
JWACipher cipher = jwkService.oct().generator()
.algorithm(OCTAlgorithm.A128GCM.getAlgorithm())
.generate()
.block()
.cipher();
Elliptic Curve
Elliptic-curve algorithms are based on a public and private key pair and using a specific Elliptic curve (P-256, P-384, P-521 defined in ECCurve enum), they are listed in the ECAlgorithm enum.
Elliptic-curve cryptography has the advantage of producing smaller signatures than RSA for the same level of protection.
The following example shows how to obtain an ES384 JWASigner from a generated ECJWK using default P-256 curve:
JWAsigner signer = jwkService.ec().generator()
.algorithm(ECAlgorithm.ES384.getAlgorithm())
.generate()
.block()
.signer();
RSA
RSA algorithms are based on a public and private key pair, they are listed in the RSAAlgorithm enum.
The following example shows how to obtain an RSA_OAEP JWAKeyManager (EncryptingJWAKeyManager) from a generated RSAWK:
JWAKeyManager keyManager = jwkService.rsa().generator()
.algorithm(RSAAlgorithm.RSA_OAEP.getAlgorithm())
.generate()
.block()
.keyManager();
PBES2
PBES2 algorithms are based on a shared secret key, namely a password, they are listed in the PBES2Algorithm enum.
They are usually used for the password-based encryption of the CEK in a JWE.
The following example shows how to obtain a PBES2-HS256+A128KW JWAKeyManager (EncryptingJWAKeyManager) from a generated PBES2JWK:
JWAKeyManager keyManager = jwkService.pbes2().generator()
.algorithm(PBES2Algorithm.PBES2_HS256_A128KW.getAlgorithm())
.length(32) // generate a 32 characters long password
.generate()
.block()
.keyManager();
Edward-Curve
Edward-curve algorithms are based on a public and private key pair and using a specific Edward-curve (Ed25519, Ed448, X25519, X448 defined in OKPCurve), they are listed in the EdECalgorithm enum.
The following example shows how to obtain an Ed25519 JWASigner from a generated EdECJWK:
JWAsigner signer = jwkService.edec().generator()
.algorithm(EdECAlgorithm.EDDSA_ED25519.getAlgorithm())
.generate()
.block()
.signer();
Extended Elliptic Curve
Extended elliptic-curve algorithms are based on a public and private key pair, they are listed in the XECAlgorithm enum.
These algorithms basically combine ECDH_ES algorithms with elliptic-curve algorithms to wrap the CEK in a JWE.
The following example shows how to obtain an ECDH-ES+A128KW JWAKeyManager (WrappingJWAKeyManager) from a generated XECJWK:
̀java jwkService.xec().generator() .algorithm(XECAlgorithm.ECDH_ES_A128KW.getAlgorithm()) .curve(OKPCurve.X25519.getCurve()) .generate() .block() .keyManager(); ̀
JWS Service
The JWS service is used to build or read JWS represented using the compact or the JSON notation as defined by RFC 7515.
The JWSService bean is used to create JWSBuilder or JsonJWSBuilder instances to build JWS using the compact or the JSON notation and JWSReader or JsonJWSReader instances to read JWS serialized using the compact or JSON notation.
A JWS allows to communicate integrity protected content using digital signatures or message authentication codes (MACs). It is composed of three parts:
- a JOSE header which specifies how to understand (i.e. type, content type...), sign or verify the JWS.
- a payload which is digitally signed in the JWS.
- a signature which is essentially the digital signature of the concatenation of the header and the payload.
A JWS is obtained from a JWSBuilder or a JWSReader, the JWS interface exposes the header, the payload and the signature. It can be serialized using the compact notation as follows:
JWS<?> jws = ...
// <header>.<payload>.<signature>
// e.g. eyJ0eXAiOiJKV1QiLA0KICJhbGciOiJIUzI1NiJ9.eyJpc3MiOiJqb2UiLA0KICJleHAiOjEzMDA4MTkzODAsDQogImh0dHA6Ly9leGFtcGxlLmNvbS9pc19yb290Ijp0cnVlfQ.dBjftJeZ4CVP-mB92K27uhbUJU1p1r_wW1gFWFOEjXk
String jwsCompact = jws.toCompact();
A JsonJWS is obtained from a JsonJWSBuilder or a JsonJWSReader, the JsonJWS interface exposes the payload and the list of signatures. It can be serialized using the JSON notation as follows:
JsonJWS<?, ?> jsonJWS = ...
/*
* RFC 7515 Appendix A.6
*
* {
* "payload": "eyJpc3MiOiJqb2UiLA0KICJleHAiOjEzMDA4MTkzODAsDQogImh0dHA6Ly9leGFtcGxlLmNvbS9pc19yb290Ijp0cnVlfQ",
* "signatures": [
* {
* "protected":"eyJhbGciOiJSUzI1NiJ9",
* "header": {
* "kid":"2010-12-29"
* },
* "signature": "cC4hiUPoj9Eetdgtv3hF80EGrhuB__dzERat0XF9g2VtQgr9PJbu3XOiZj5RZ
* mh7AAuHIm4Bh-0Qc_lF5YKt_O8W2Fp5jujGbds9uJdbF9CUAr7t1dnZcAcQjb
* KBYNX4BAynRFdiuB--f_nZLgrnbyTyWzO75vRK5h6xBArLIARNPvkSjtQBMHl
* b1L07Qe7K0GarZRmB_eSN9383LcOLn6_dO--xi12jzDwusC-eOkHWEsqtFZES
* c6BfI7noOPqvhJ1phCnvWh6IeYI2w9QOYEUipUTI8np6LbgGY9Fs98rqVt5AX
* LIhWkWywlVmtVrBp0igcN_IoypGlUPQGe77Rw"
* },
* {
* "protected":"eyJhbGciOiJFUzI1NiJ9",
* "header": {
* "kid":"e9bc097a-ce51-4036-9562-d2ade882db0d"
* },
* "signature": "DtEhU3ljbEg8L38VWAfUAqOyKAM6-Xx-F4GawxaepmXFCgfTjDxw5djxLa8IS
* lSApmWQxfKTUJqPP3-Kg6NU1Q"
* }
* ]
* }
*/
String jwsJson = jsonJWS.toJson();
The detached compact representation as specified by RFC 7797 is also supported and can be used when large payloads communicated by external means are considered.
JWS<?> jws = ...
// <header>..<signature>
// e.g. eyJhbGciOiJFUzUxMiJ9..AdwMgeerwtHoh-l192l60hp9wAHZFVJbLfD_UxMi70cwnZOYaRI1bKPWROc-mZZqwqT2SI-KGDKB34XO0aw_7XdtAG8GaSwFKdCAPZgoXD2YBJZCPEX3xKpRwcdOO8KpEHwJjyqOgzDO7iKvU8vcnwNrmxYbSW9ERBXukOXolLzeO_Jn
String jwsDetachedCompact = jws.toDetachedCompact();
The most common representation is by far the compact representation which can be safely used in URLs. On the other hand, the JSON notation can be used to target multiple systems with various JWKs.
A JWS offers integrity protection of its content using a digital signature, as a result, building or reading a JWS requires a JWK supporting digital signature algorithms.
Building JWS
A JWSBuilder is used to create JWS, it is obtained by invoking one of the builder() methods on the JWSService bean. The actual payload type can be specified explicitly in the method as well as the JWK to use to digitally sign the JWS.
The builder() method actually accepts a publisher of JWK which means multiple keys can be considered when building the JWS. If keys are not specified, they are resolved from the JOSE header parameters using the JWK service. When building a JWS, the JWSBuilder basically retains the first trusted JWK that was able to sign the JWS. The retained JWK is exposed in the resulting JWSHeader. It is important to note that untrusted JWK are filtered out. A JOSEObjectBuildException is thrown if no suitable keys could be found.
A JWSbuilder uses media type converters injected in the module to encode the JWS payload based on the content type which can be either specified in the JOSE header (cty), or when invoking the build() method. An explicit Function<T, Mono<String>> encoder can also be specified in order to bypass media type converters.
A specific encoder basically overrides the content type specified in
build()method which overrides the content type specified in the JOSE header.
The digital signature is computed by applying a signature algorithm to the JWS signing input composed of the JWS header and the serialized payload.
The following example shows how to build a JWS with a generated JWK and a payload serialized as application/json using corresponding media type converter:
// Injected or obtained from a 'Jose' instance
JWKService jwkService = ...
JWSService jwsService = ...
Mono<? extends OCTJWK> key = jwkService.oct().generator()
.keyId("keyId")
.algorithm(OCTAlgorithm.HS256.getAlgorithm())
.generate()
.cache();
JWS<Message> jws = jwsService.builder(Message.class, key)
.header(header -> header
.keyId("keyId")
.algorithm(OCTAlgorithm.HS256.getAlgorithm())
)
.payload(new Message("John", "Hello world!"))
.build(MediaTypes.APPLICATION_JSON)
.block();
// eyJhbGciOiJIUzI1NiIsImtpZCI6ImtleUlkIn0.eyJhdXRob3IiOiJKb2huIiwibWVzc2FnZSI6IkhlbGxvIHdvcmxkISJ9.aSRmKH3ZiTGm2MrKBLqBJH-d-rBEt5bWPY6TEC15B7s
String jwsCompact = jws.toCompact();
Assuming the JWK can be resolved by the JWKService using the key id (from module's JWKStore or JWKKeyResolver), the key can be omitted when creating the builder:
// Using an 'InMemoryJWKStore', we can store the key so it can be resolved by key id by the 'JWKService'
key.map(JWK::trust).map(jwkService.store()::set).block();
// Key 'keyId' is then automatically resolved
JWS<Message> jws = jwsService.builder(Message.class)
...
The JWS JSON representation as defined by RFC 7515 Section 7.2 is a JWS representation that is neither optimized nor URL-safe. This notation can hardly be compared to the compact notation, and it shall be used for very different purposes, for instance to communicate digitally signed or MACed content in JSON using different keys and algorithms to one or more recipients.
A JsonJWSBuilder is used to create JsonJWS with multiple signatures following the JSON representation specification, it is obtained by invoking one of the jsonBuilder() methods on the JWSService bean. Since a JsonJWS might have multiple signatures using different keys and algorithms, only the payload type can be specified when creating the builder, keys will be provided or resolved later in the process.
A JsonJWS is created in a similar way as for a JWS with one payload but multiple JOSE headers to create multiple signatures. The JOSE header is then divided into an unprotected header and a protected headers which, unlike the unprotected header, is included in the digital signature. Protected and unprotected headers must be disjoint and content related parameters such as the type (typ) or the content type (cty) must be consistent across all signature headers. Some sensitive parameters such as the algorithm (alg) must also be integrity protected and therefore specified exclusively in the protected header. A JWSBuildException shall be thrown in case of invalid or inconsistent signature headers. Keys must be provided explicitly or resolved automatically for each signature to be able to compute the digital signature.
The following example shows how to build a JsonJWS with two signatures using generated keys and a payload encoded using an explicit encoder:
// Injected or obtained from a 'Jose' instance
JWKService jwkService = ...
JWSService jwsService = ...
Mono<? extends OCTJWK> key1 = jwkService.oct().generator()
.keyId("key1")
.algorithm(OCTAlgorithm.HS256.getAlgorithm())
.generate()
.cache();
Mono<? extends RSAJWK> key2 = jwkService.rsa().generator()
.keyId("key2")
.algorithm(RSAAlgorithm.RS256.getAlgorithm())
.generate()
.cache();
JsonJWS<Message, BuiltSignature<Message>> jsonJWS = jwsService.jsonBuilder(Message.class)
.signature(
protectedHeader -> protectedHeader
.keyId("key1")
.algorithm(OCTAlgorithm.HS256.getAlgorithm()),
unprotectedHeader -> {},
key1
)
.signature(
protectedHeader -> protectedHeader
.keyId("key2")
.algorithm(RSAAlgorithm.RS256.getAlgorithm()),
unprotectedHeader -> {},
key2
)
.payload(new Message("Alice", "Hi John!"))
.build(message -> Mono.just(message.getAuthor() + " > " + message.getMessage()))
.block();
/*
* {
* "signatures": [
* {
* "header": {
* "kid": "key1",
* "cty": "text/plain"
* },
* "signature": "u38wYs0v1M-zgw0lr2Gw3PKRALPxWH6I4wfpLFF_E3I",
* "protected": "eyJhbGciOiJIUzI1NiJ9"
* },
* {
* "header": {
* "kid": "key2",
* "cty": "text/plain"
* },
* "signature": "X6J77kf7sXW_7j7tLvgwJR2hy2kvDjuEGdT-1WU_Po2Z0sMPvHJd9LRdgYWUCn10V6
* xgNatDQuwEnegOrIOVTI2yN6_T74rQY1-VWO8kESg_MyGRoieC3s6beQAt0JdWKgSs
* xNZjCbRLTu_bxTpIl90j2MgPNHiL8ox2uDwA3pg-6cgEzswMQx6x_KQ-e3VPuqdiSd
* 6PNeFNiYN-s9xBTlN_m-0k8MDHSzQ612Ms3Q1ox2gONdpVG3wcoIPX63zaRmt-a3r6
* KReL9bPBs1hCRHxp6ermxwJRf0yjKfo2KH2fWV_wMiPsCdbJSlIL3MPreR0yi5iVDu
* iXK-yWoJ2XOg",
* "protected": "eyJhbGciOiJSUzI1NiJ9"
* }
* ],
* "payload": "QWxpY2UgPiBIaSBKb2huIQ"
* }
*/
String jwsJson = jsonJWS.toJson();
In above code, we can see that the payload is common to all signatures which explains why content related parameters must be consistent across all signatures and to make this clear the content type was specified in the common unprotected header. Each resulting unprotected headers then contain the key id and the JWS content type whereas protected headers, encoded in Base64, contain the algorithms that were used to digitally sign the JWS.
The JsonJWS interface exposes the payload as well as the JWS instances corresponding to each signature.
Message message = jsonJWS.getPayload();
List<JWS> jwsSignatures = jsonJWS.getSignatures().stream()
.map(signature -> signature.getJWS())
.collect(Collectors.toList());
Note that the
JWSinstances thus obtained are deduced from the JSON representation which makes a difference between protected and unprotected headers, as a result the actual header used in the signature corresponds to the protected header but theJWSHeaderexposed in theJWSresults from the merge of the protected and unprotected headers.
Reading JWS
A JWSReader is used to read JWS compact representations, it is obtained by invoking one of the reader() methods on the JWSService bean. The expected payload type must be specified explicitly in the method and the JWK to use to verify the JWS signature can be specified as well.
As for the JWSBuilder, a JWSReader can consider multiple keys to verify a JWS signature. If keys are not specified, they are resolved from the JOSE header parameters using the JWK service. When reading a JWS, the JWSReader basically uses provided or resolved trusted JWK in sequence to verify the signature and stops when the signature could be verified. As for the JWSBuilder, untrusted JWK are filtered out and a JOSEObjectReadException is thrown if no suitable keys could be found. A JWSReadException with aggregated errors (getSuppressed()) is thrown when reading an invalid JWS.
A JWSReader also uses media type converters injected in the module to decode the JWS payload based on the JWS content type defined in the JOSE header (cty) or explicitly specified when invoking the read() method. An explicit Function<String, Mono<T>> decoder can also be specified in order to bypass media type converters.
A specific decoder basically overrides the content type specified in
read()method which overrides the content type in the JOSE header.
The following example shows how to read a JWS compact representation by decoding the application/json payload as specified in the JOSE header using the corresponding media type converter:
// Injected or obtained from a 'Jose' instance
JWKService jwkService = ...
JWSService jwsService = ...
Mono<? extends OCTJWK> key = jwkService.oct().builder()
.keyId("keyId")
.algorithm(OCTAlgorithm.HS256.getAlgorithm())
.keyValue("xqf1haCsSJGuueZivcq4YafdWw6n5CH2BTT6vDwUSaM")
.build()
.cache();
String jwsCompact = "eyJhbGciOiJIUzI1NiIsImtpZCI6ImtleUlkIiwiY3R5IjoiYXBwbGljYXRpb24vanNvbiJ9."
+ "eyJhdXRob3IiOiJCaWxsIiwibWVzc2FnZSI6IkhleSEifQ."
+ "pNS2tZmB20ezMA-twecOhobDk3H5AgWyh-m5eV5xE14";
JWS<Message> jws = jwsService.reader(Message.class, key)
.read(jwsCompact)
.block();
// Bill says Hey!
Message message = jws.getPayload();
Assuming the JWK can be resolved by the JWKService using the key id (from module's JWKStore or JWKKeyResolver), the key can be omitted when creating the reader:
// Using an 'InMemoryJWKStore', we can store the key so it can be resolved by key id by the 'JWKService'
key.map(JWK::trust).map(jwkService.store()::set).block();
// Key 'keyId' is then automatically resolved
JWS<Message> jws = jwsService.reader(Message.class)
...
A JsonJWSReader is used to read JWS JSON representations as defined by RFC 7515 Section 7.2, it is obtained by invoking one of the jsonReader() methods on the JWSService bean. Since a JsonJWS might have multiple signatures using different keys and algorithms, only the payload type must be specified when creating the reader. A JsonJWS is basically read without verifying signatures which must later be verified individually, keys can then be specified explicitly or automatically resolved. A JsonJWS can be considered valid if one signature could be verified.
The
JsonJWSinstance returned by aJsonJWSReaderactually differs from the one returned by aJsonJWSBuilder, a builtJsonJWSexposesJsonJWS.BuiltSignaturewhich exposes a validJWSwhereas a readJsonJWSexposesJsonJWS.ReadSignaturewhich exposesreadJWS()methods to actually verify the signature and return the correspondingJWS.
The following example shows how to read and verify a JWS JSON representation with two signatures, the payload being decoded using an explicit decoder:
// Injected or obtained from a 'Jose' instance
JWKService jwkService = ...
JWSService jwsService = ...
Mono<? extends ECJWK> key2 = jwkService.ec().builder()
.keyId("key2")
.algorithm(ECAlgorithm.ES256.getAlgorithm())
.curve(ECCurve.P_256.getCurve())
.xCoordinate("f83OJ3D2xF1Bg8vub9tLe1gHMzV76e8Tus9uPHvRVEU")
.yCoordinate("x_FEzRu9m36HLN_tue659LNpXW6pCyStikYjKIWI5a0")
.eccPrivateKey("jpsQnnGQmL-YBIffH1136cspYG6-0iY7X1fCE9-E9LI")
.build()
.cache();
String jwsJson = "{"
+ " \"signatures\": ["
+ " {"
+ " \"header\": {"
+ " \"cty\": \"text/plain\","
+ " \"kid\": \"key1\""
+ " },"
+ " \"signature\": \"PxhpMkmTep5obGFZv50OsRGA-e7-fxhUmWdUyLC74ms\","
+ " \"protected\": \"eyJhbGciOiJIUzI1NiJ9\""
+ " },"
+ " {"
+ " \"header\": {"
+ " \"cty\": \"text/plain\","
+ " \"kid\": \"key2\""
+ " },"
+ " \"signature\": \"KqjGSxiBD5GhwFhLs8H_RBg8nXsKtp4nj5PsdxCzd0ZqMed874ZAxTgnyd0KmQEZwmYvvgM-o8NC9VdIWalMvw\","
+ " \"protected\": \"eyJhbGciOiJFUzI1NiJ9\""
+ " }"
+ " ],"
+ " \"payload\": \"TGluZGEgPiBTaGFsbCB3ZSBiZWdpbj8\""
+ "}";
JsonJWS<Message, ReadSignature<Message>> jsonJWS = jwsService.jsonReader(Message.class)
.read(jwsJson, p ->
Mono.fromSupplier(() -> {
int separatorIndex = p.indexOf(">");
return new Message(p.substring(0, separatorIndex - 1), p.substring(separatorIndex + 2));
})
)
.block();
// Return as soon as one of the signatures could have been verified with key2
JWS<Message> verifiedJWS = Flux.fromIterable(jsonJWS.getSignatures())
.flatMap(signature -> signature.readJWS(key2).onErrorResume(e -> Mono.empty()))
.blockFirst();
if(verifiedJWS != null) {
// Linda says Shall we begin?
Message message = verifiedJWS.getPayload();
}
In above code, the verified JWS should correspond to the second signature since we used key2 to verify the JsonJWS signatures.
As defined by RFC 7515, custom parameters listed in the critical header parameter (crit) and present in the JOSE header must be fully understood by the application for the JWS to be valid. The parameters actually processed by and application and therefore understood can be specified on the JWSReader which throws a JOSEObjectReadException when encountering unknown critical parameters.
In the following example, the JWSReader is set up to understand custom parameter http://example.com/application_parameter which allows it to read the specified JWS:
Mono<? extends OCTJWK> key = jwkService.oct().builder()
.keyId("keyId")
.algorithm(OCTAlgorithm.HS256.getAlgorithm())
.keyValue("xqf1haCsSJGuueZivcq4YafdWw6n5CH2BTT6vDwUSaM")
.build()
.cache();
/*
* {
* "header": {
* "alg": "HS256",
* "kid": "keyId",
* "crit": [
* "http://example.com/application_parameter"
* ],
* "http://example.com/application_parameter": true
* },
* "payload": "Lorem ipsum",
* "signature": "aQMWohoxZWOcpYVm04FBJwGc7fBO4xzUKVJz9qfjpxc"
* }
*/
String jwsCompact = "eyJhbGciOiJIUzI1NiIsImtpZCI6ImtleUlkIiwiY3JpdCI6WyJodHRwOi8vZXhhbXBsZS5jb20vYXBwbGljYXRpb25fcGFyYW1ldGVyIl0sImh0dHA6Ly9leGFtcGxlLmNvbS9hcHBsaWNhdGlvbl9wYXJhbWV0ZXIiOnRydWV9."
+ "TG9yZW0gaXBzdW0."
+ "aQMWohoxZWOcpYVm04FBJwGc7fBO4xzUKVJz9qfjpxc";
JWS<String> jws = jwsService.reader(String.class, key)
.processedParameters("http://example.com/application_parameter")
.read(jwsCompact, MediaTypes.TEXT_PLAIN)
.block();
JWE Service
The JWE service is used to build or read JWE represented using the compact or the JSON notation as defined by RFC 7516.
The JWEService bean is used to create JWEBuilder or JsonJWEBuilder instances to build JWE using the compact or the JSON notation and JWEReader or JsonJWEReader instances to read JWE serialized using the compact or JSON notation.
A JWE allows to communicate encrypted content using cryptographic algorithms that guarantees both integrity and confidentiality. It is composed of five parts:
- a JOSE header which specifies how to understand (i.e. type, content type...), encrypt or decrypt the JWE content.
- an encrypted key which corresponds to the content encryption key used to encrypt the JWE content.
- an initialization vector used when encrypting the JWE content.
- a cipher text which results from the authenticated encryption of the JWE content.
- an authentication tag which ensures the integrity of the cipher text.
A JWE is obtained from a JWEBuilder or a JWEReader, the JWE interface exposes the header, the encrypted key, the initialization vector, the cipher text, the authentication tag and the payload. It can be serialized using the compact notation as follows:
JWE<?> jwe = ...
// <header>.<encrypted_key>.<initialization_vector>.<cipher_text>.<authentication_tag>
// e.g. eyJhbGciOiJBMTI4S1ciLCJlbmMiOiJBMTI4Q0JDLUhTMjU2In0.6KB707dM9YTIgHtLvtgWQ8mKwboJW3of9locizkDTHzBC2IlrT1oOQ.AxY8DCtDaGlsbGljb3RoZQ.KDlTtXchhZTGufMYmOYGS4HffxPSUrfmqCHXaI9wOGY.U0m_YmjN04DJvceFICbCVQ
String jweCompact = jwe.toCompact();
A JsonJWE is obtained from a JsonJWEBuilder or a JsonJWEReader, the JsonJWE interface exposes protected and unprotected headers, the initialization vector, the additional authentication data, the cipher text, the authentication tag and the list of recipients. It can be serialized using the JSON notation as follows:
JsonJWE<?, ?> jsonJWE = ...
/*
* RFC 7516 Appendix A.4
*
* {
* "protected": "eyJlbmMiOiJBMTI4Q0JDLUhTMjU2In0",
* "unprotected": {
* "jku": "https://server.example.com/keys.jwks"
* },
* "recipients": [
* {
* "header": {
* "alg":"RSA1_5",
* "kid":"2011-04-29"
* },
* "encrypted_key": "UGhIOguC7IuEvf_NPVaXsGMoLOmwvc1GyqlIKOK1nN94nHPoltGRhWhw7Zx0-
* kFm1NJn8LE9XShH59_i8J0PH5ZZyNfGy2xGdULU7sHNF6Gp2vPLgNZ__deLKx
* GHZ7PcHALUzoOegEI-8E66jX2E4zyJKx-YxzZIItRzC5hlRirb6Y5Cl_p-ko3
* YvkkysZIFNPccxRU7qve1WYPxqbb2Yw8kZqa2rMWI5ng8OtvzlV7elprCbuPh
* cCdZ6XDP0_F8rkXds2vE4X-ncOIM8hAYHHi29NX0mcKiRaD0-D-ljQTP-cFPg
* wCp6X-nZZd9OHBv-B3oWh2TbqmScqXMR4gp_A"
* },
* {
* "header": {
* "alg":"A128KW",
* "kid":"7"
* },
* "encrypted_key": "6KB707dM9YTIgHtLvtgWQ8mKwboJW3of9locizkDTHzBC2IlrT1oOQ"
* }
* ],
* "iv": "AxY8DCtDaGlsbGljb3RoZQ",
* "ciphertext": "KDlTtXchhZTGufMYmOYGS4HffxPSUrfmqCHXaI9wOGY",
* "tag": "Mz-VPPyU4RlcuYv1IwIvzw"
* }
*/
String jweJson = jsonJWE.toJson();
The most common representation is by far the compact representation which can be safely used in URLs. On the other hand, the JSON notation can be used to target multiple systems with various JWKs.
A JWE offers integrity and confidentiality of its content using authenticated encryption, it requires two algorithms:
- the algorithm (
alg) used to encrypt/decrypt, wrap/unwrap or derive a content encryption key (CEK) - the encryption algorithm used to actually encrypt/decrypt the content using the CEK.
The CEK is either generated or derived when building a JWE and resolved when reading a JWE using a key management algorithm. As a result, building or reading a JWE requires a JWK supporting key management algorithms.
Building JWE
A JWEBuilder is used to create JWE, it is obtained by invoking one of the builder() methods on the JWEService bean. The actual payload type can be specified explicitly in the method as well as the JWK to use to encrypt, wrap or derive the content encryption key used to encrypt the JWE.
The builder() method actually accepts a publisher of JWK which means multiple keys can be considered when building the JWE. If keys are not specified, they are resolved from the JOSE header parameters using the JWK service. When building a JWE, the JWEBuilder basically retains the first trusted JWK that was able to encrypt the content encryption key. The retained JWK is exposed in the resulting JWEHeader. It is important to note that untrusted JWK are filtered out. A JOSEObjectBuildException is thrown if no suitable keys could be found.
A JWEbuilder uses media type converters injected in the module to encode the JWE payload based on the content type which can be either specified in the JOSE header (cty), or when invoking the build() method. An explicit Function<T, Mono<String>> encoder can also be specified in order to bypass media type converters.
A specific encoder basically overrides the content type specified in
build()method which overrides the content type specified in the JOSE header.
The JWE content are encrypted using a generated content encryption key (CEK) or directly using the provided or resolved JWK in case of direct encryption (i.e. alg=dir). The CEK (if any) is encrypted, wrapped or derived using the provided or resolved JWK and included in the resulting JWE with the initialization vector that was generated and used during the authenticated encryption and the resulting authentication tag so that a recipient has all the information required to decrypt the CEK and eventually verify and decrypt the JWE.
The following example shows how to build a JWE with a generated JWK and a payload serialized as application/json using corresponding media type converter:
// Injected or obtained from a 'Jose' instance
JWKService jwkService = ...
JWEService jweService = ...
Mono<? extends OCTJWK> key = jwkService.oct().generator()
.keyId("keyId")
.algorithm(OCTAlgorithm.A256GCMKW.getAlgorithm())
.generate()
.cache();
JWE<Message> jwe = jweService.builder(Message.class, key)
.header(header -> header
.keyId("keyId")
.algorithm(OCTAlgorithm.A256GCMKW.getAlgorithm())
.encryptionAlgorithm(OCTAlgorithm.A128CBC_HS256.getAlgorithm())
)
.payload(new Message("John", "Hello world!"))
.build(MediaTypes.APPLICATION_JSON)
.block();
// eyJlbmMiOiJBMTI4Q0JDLUhTMjU2IiwiYWxnIjoiQTI1NkdDTUtXIiwia2lkIjoia2V5SWQiLCJ0YWciOiJ3b2RKcDJSbThPOEdGWG9PUWZvaTdnIiwiaXYiOiJpYmFfakkzSDRyWUdfcUQtIn0.Barv9ju_JgIBugTD3TtKGA6OyqadZ635rkw6rfpeR7s.QH1HhZKhKWrPzJtfSLRjUQ.gUXtGvVzvwopFh0ZgUlZGB2zOdsFjUG0u2Rih_JNsryDIAkpD_LMDDNYTh2ZRgm1.EgQt9XxCfFDRho5mPAXQRQ
String jweCompact = jwe.toCompact();
Assuming the JWK can be resolved by the JWKService using the key id (from module's JWKStore or JWKKeyResolver), the key can be omitted when creating the builder:
// Using an 'InMemoryJWKStore', we can store the key so it can be resolved by key id by the 'JWKService'
key.map(JWK::trust).map(jwkService.store()::set).block();
// Key 'keyId' is then automatically resolved
JWE<Message> jwe = jweService.builder(Message.class)
...
The JWE JSON representation as defined by RFC 7516 Section 7.2 is a JWE representation that is neither optimized nor URL-safe. This notation can hardly be compared to the compact notation, and it shall be used for very different purposes, for instance to communicate encrypted content in JSON using different keys and algorithms to one or more recipients.
A JsonJWEBuilder is used to create JsonJWE with multiple recipients following the JSON representation specification, it is obtained by invoking one of the jsonBuilder() methods on the JWEService bean. Since a JsonJWE might have multiple recipients with different encrypted content using different keys and algorithms, only the payload type can be specified when creating the builder, keys will be provided or resolved later in the process.
A JsonJWE is created from common protected and unprotected headers, one payload and multiple recipients with unprotected headers used to encrypt the JWE using different keys. Unlike unprotected headers, the common protected header is included in the additional authentication data used during the authenticated encryption of the JWE. Common headers and per recipient header must be disjoint and content related parameters such as the type (typ) or the content type (cty) must be consistent across all recipient headers. A JWEBuildException shall be thrown in case of invalid or inconsistent recipient headers. The encryption algorithm parameter (enc) must also be consistent across all recipients since the cipher text, the initialization vector, the authentication tag and the content encryption key used to encrypt the JWE are common to all recipients (the JWE is actually encrypted once), it is however encrypted, wrapped or derived per recipient using different keys explicitly provided or automatically resolved for each recipient. In case of a direct encryption or direct key agreement algorithm, the algorithm parameter (alg) must also be consistent across all recipients.
In the particular case of a direct encryption, a
JsonJWEis really not different from a regular JWE since all recipients have then to share the same encryption key.
The following example shows how to build a JsonJWE with two recipients using generated keys and a payload encoded as text/plain using an explicit encoder:
// Injected or obtained from a 'Jose' instance
JWKService jwkService = ...
JWEService jweService = ...
Mono<? extends RSAJWK> key1 = jwkService.rsa().generator()
.keyId("key1")
.algorithm(RSAAlgorithm.RSA1_5.getAlgorithm())
.generate()
.cache();
Mono<? extends OCTJWK> key2 = jwkService.oct().generator()
.keyId("key2")
.algorithm(OCTAlgorithm.A128KW.getAlgorithm())
.generate()
.cache();
JsonJWE<Message, BuiltRecipient<Message>> jsonJWE = jweService.jsonBuilder(Message.class)
.headers(
protectedHeader -> protectedHeader
.encryptionAlgorithm(OCTAlgorithm.A128CBC_HS256.getAlgorithm()),
unprotectedHeader -> {}
)
.payload(new Message("Alice", "Hi John!"))
.recipient(
header -> header
.keyId("key1")
.algorithm(RSAAlgorithm.RSA1_5.getAlgorithm()),
key1
)
.recipient(
header -> header
.keyId("key2")
.algorithm(OCTAlgorithm.A128KW.getAlgorithm()),
key2
)
.build(message -> Mono.just(message.getAuthor() + " > " + message.getMessage()))
.block();
/*
* {
* "unprotected": {
* },
* "ciphertext": "n8hpXBhxZ9brlm465Ipey9kpCHyOxDfR-qNzRh32KQM",
* "recipients": [
* {
* "header": {
* "alg": "RSA1_5",
* "kid": "key1"
* },
* "encrypted_key": "ItwxvAJqMh_kGeJ9jmHPm1NJ1Kod-TmAwsm5IbZDy54uB6U1eGQZKQzzLTMGMM
* UUf6G96kT35Vv__L2fr6k8INlGOi3ae5YDnRmVwOpD74pffQn3FFcoxx68_xSu
* DWDHMRbyEqHFur-DZy2O-yb0Odna7qg7kmAz0wv9VSOHpfRWj8wB4w7g4zg4jI
* 5IztiTX587fCtw7YuiBYnNEUzCrddUoBAAphWHiilez25lvOdhjvyyMNAT-j_5
* 8FDIQGgqUY0uLE48-gKF2alnrIkjk_9H9Cg_99mBEyls5EAnRq3aGiJz7wPJR3
* 1Qtl54c8IUDLtqNXKaB8qsk5taYV5hlQ"
* },
* {
* "header": {
* "alg": "A128KW",
* "kid": "key2"
* },
* "encrypted_key": "srvZC3EPaEYkfHkTp21-mzBHA17gjuof6-NTWdg7unHsPK1rnp1eFQ"
* }
* ],
* "iv": "bBb7jcsxoRcPpKahEPCvwA",
* "tag": "u7dD-MwLkfA4SfuRjvVmdQ",
* "protected": "eyJlbmMiOiJBMTI4Q0JDLUhTMjU2In0"
* }
*/
String jweJson = jsonJWE.toJson();
In above code, we can see that the cipher text is common to all recipients which explains why content related parameters and the encryption algorithm must be consistent across all recipients and to make this clear the encryption algorithm was specified in the common protected header, encoded in Base64. Unprotected headers in each recipient then specify the key id and the algorithm to use to resolve the content encryption key in order to decrypt the JWE.
The JsonJWE interface exposes the common protected and unprotected headers, the cipher text, the initialization vector, the additional authentication data and the authentication tag as well as the JWE instances corresponding to each recipient.
List<JWE<Message>> jweRecipients = jsonJWE.getRecipients().stream()
.map(recipient -> recipient.getJWE())
.collect(Collectors.toList());
Note that the
JWEinstances thus obtained are deduced from the JSON representation which makes a difference between protected and unprotected headers, as a result the actual header used in the additional authentication data corresponds to the protected header but theJWEHeaderexposed in theJWEresults from the merge of the common protected and unprotected headers and the recipient unprotected header.
Reading JWE
A JWEReader is used to read JWE compact representations, it is obtained by invoking one of the reader() methods on the JWEService bean. The expected payload type must be specified explicitly in the method and the JWK to use to decrypt, unwrap or derive the content encryption key, actually used to decrypt the JWE, can be specified as well.
As for the JWEBuilder, a JWEReader can consider multiple keys to decrypt, unwrap or derive the content encryption key used to encrypt the JWE. If keys are not specified, they are resolved from the JOSE header parameters using the JWK service. When reading a JWE, the JWEReader basically uses provided or resolved trusted JWK in sequence to resolve the content encryption key and stops when the CEK could be resolved. As for the JWEBuilder, untrusted JWK are filtered out and a JOSEObjectReadException is thrown if no suitable keys could be found. A JWEReadException with aggregated errors (getSuppressed()) is thrown when reading an invalid JWE.
A JWEReader also uses media type converters injected in the module to decode the JWE payload based on the JWE content type defined in the JOSE header (cty) or explicitly specified when invoking the read() method. An explicit Function<String, Mono<T>> decoder can also be specified in order to bypass media type converters.
A specific decoder basically overrides the content type specified in
read()method which overrides the content type in the JOSE header.
The following example shows how to read a JWE compact representation by decoding the application/json payload as specified in the JOSE header using the corresponding media type converter:
// Injected or obtained from a 'Jose' instance
JWKService jwkService = ...
JWEService jweService = ...
Mono<? extends OCTJWK> key = jwkService.oct().builder()
.keyId("keyId")
.algorithm(OCTAlgorithm.A256GCMKW.getAlgorithm())
.keyValue("GkilETj3L4jpinuRiaNq6zd7-_1JPbfU9DY3xHl9HEE")
.build()
.cache();
String jweCompact = "eyJlbmMiOiJBMTI4Q0JDLUhTMjU2IiwiYWxnIjoiQTI1NkdDTUtXIiwia2lkIjoia2V5SWQiLCJjdHkiOiJhcHBsaWNhdGlvbi9qc29uIiwidGFnIjoiYUtlc2VBelZoenh5Vk9pRVNvVEdoQSIsIml2IjoieEJFSTlYeHBDVTZwcVVSaCJ9."
+ "MNYqpQCQPrUSZTwP-C7kUCGOFqFGGciUU2qW54jc3NM."
+ "_nfKSroUwjqzdJcPETt-ow."
+ "1dL8rLmhKF7hqVNzQf5oWPOSZN7Z_V46w0UvIBDuFjH5pqvhbs4ltrTsk6E_NF-y."
+ "RJ8QOGLuT2fz5VrzG1EHbg";
JWE<Message> jwe = jweService.reader(Message.class, key)
.read(jweCompact)
.block();
// Bill says Hey!
Message message = jwe.getPayload();
Assuming the JWK can be resolved by the JWKService using the key id (from module's JWKStore or JWKKeyResolver), the key can be omitted when creating the reader:
// Using an 'InMemoryJWKStore', we can store the key so it can be resolved by key id by the 'JWKService'
key.map(JWK::trust).map(jwkService.store()::set).block();
// Key 'keyId' is then automatically resolved
JWE<Message> jwe = jweService.reader(Message.class)
...
A JsonJWEReader is used to read JWE JSON representations as defined by RFC 7516 Section 7.2, it is obtained by invoking one of the jsonReader() methods on the JWEService bean. Since a JsonJWE might have multiple recipients using different keys and algorithms, only the payload type must be specified when creating the reader. A JsonJWE is basically read without decrypting the JWE content which must be decrypted for each recipient individually, keys can then be specified explicitly or automatically resolved. A JsonJWE can be considered valid if the content could be verified and decrypted for at least one recipient.
The
JsonJWEinstance returned by aJsonJWEReaderactually differs from the one returned by aJsonJWEBuilder, a builtJsonJWEexposesJsonJWE.BuiltRecipientwhich exposes a validJWEwhereas a readJsonJWEexposesJsonJWE.ReadRecipientwhich exposesreadJWE()methods to actually verify and decrypt the JWE content and return the correspondingJWE.
The following example shows how to read and decrypt a JWE JSON representation with two recipients, the payload being decoded using an explicit decoder:
// Injected or obtained from a 'Jose' instance
JWKService jwkService = ...
JWEService jweService = ...
Mono<? extends OCTJWK> key2 = jwkService.oct().builder()
.keyValue("GawgguFyGrWKav7AX4VKUg")
.build()
.cache();
String jweJson = "{"
+ " \"unprotected\": {"
+ " },"
+ " \"ciphertext\": \"2jtWSZdL-TJGyktUwldH4sphYuz2VbseUS9el_vh_tU\","
+ " \"recipients\": ["
+ " {"
+ " \"header\": {"
+ " \"alg\": \"RSA1_5\","
+ " \"kid\": \"key1\""
+ " },"
+ " \"encrypted_key\": \"kIHuM-OZU1wvmb6ocdDsn1ljF11kIbfvv9y7XpTPGfdYeaz2AhJvpHfPZ6LKk5-yDfHAVWTXz_RbgjPATURNKyu0hdogfWBWXEpQEk8WaBafI8kSk0GzhJrR2tcXhrxs0xWPMthjfZ38zNql1oZuL9pzUZ3PicNhcCXD2XN52kw7VGMvPus8r89orY4q2l_xA65wkxHtG3JDG9Je_CidYuX_PXHqMkrbszsUPbyCspPIRTP5yWMeFmMp8KiEnyGaQITt0vZuea4u3tWuhX0Wa2AN74qesuArMhx81NWxaMnuDNrF6eQFIQw4QJ41MqVchHRAoXYKQvB8DYce9fHhPQ\""
+ " },"
+ " {"
+ " \"header\": {"
+ " \"alg\": \"A128KW\","
+ " \"kid\": \"key2\""
+ " },"
+ " \"encrypted_key\": \"OSMIf3Elx-NmfzP1Y_aZbae6k6yU2rl7o2uHd7v3lHgS4UjJURVYTQ\""
+ " }"
+ " ],"
+ " \"iv\": \"vrCX8Yr9oOs--KiBtkQ6kw\","
+ " \"tag\": \"gHpLPXRRDjUNJ1HDivaSTg\","
+ " \"protected\": \"eyJlbmMiOiJBMTI4Q0JDLUhTMjU2In0\""
+ "}";
JsonJWE<Message, ReadRecipient<Message>> readJsonJWE = jweService.jsonReader(Message.class)
.read(jweJson, payload ->
Mono.fromSupplier(() -> {
int separatorIndex = payload.indexOf(">");
return new Message(payload.substring(0, separatorIndex - 1), payload.substring(separatorIndex + 2));
})
)
.block();
// Return as soon as one of the recipients could have been verified and decrypted with key2
JWE<Message> decryptedJWE = Flux.fromIterable(readJsonJWE.getRecipients())
.flatMap(recipient -> recipient.readJWE(key2).onErrorResume(e -> Mono.empty()))
.blockFirst();
if(decryptedJWE != null) {
// Linda says Shall we begin?
Message message = decryptedJWE.getPayload();
}
In above code, the decrypted JWE should correspond to the second recipient since we used key2 to resolve the content encryption key.
As defined by RFC 7516, custom parameters listed in the critical header parameter (crit) and present in the JOSE header must be fully understood by the application for the JWE to be valid. The parameters actually processed by and application and therefore understood can be specified on the JWEReader which throws a JOSEObjectReadException when encountering unknown critical parameters.
In the following example, the JWEReader is set up to understand custom parameter http://example.com/application_parameter which allows it to read the specified JWE:
Mono<? extends OCTJWK> key = jwkService.oct().builder()
.keyId("keyId")
.algorithm(OCTAlgorithm.A256GCMKW.getAlgorithm())
.keyValue("GkilETj3L4jpinuRiaNq6zd7-_1JPbfU9DY3xHl9HEE")
.build()
.cache();
/*
* {
* "header": {
* "enc": "A128CBC-HS256",
* "alg": "A256GCMKW",
* "kid": "keyId",
* "crit": [
* "http://example.com/application_parameter"
* ],
* "http://example.com/application_parameter": true,
* "tag": "pq1OChvU6GZcMDLZqTEo0Q",
* "iv": "VcuwU871tvGMGOHB"
* },
* "payload": "Lorem ipsum",
* "initializationVector": "i1GTQ9xyOL89vza7hNCiAQ",
* "authenticationTag": "5EiKTUS272wTHd978QOuHQ",
* "encryptedKey": "Aq7NWm_h4LmGjJynbUYOO7O9juKlUMFWXS_HMpAAR1g",
* "cipherText": "mDeuwt3QO199_h6diPwu_w"
* }
*/
String jweCompact = "eyJlbmMiOiJBMTI4Q0JDLUhTMjU2IiwiYWxnIjoiQTI1NkdDTUtXIiwia2lkIjoia2V5SWQiLCJjcml0IjpbImh0dHA6Ly9leGFtcGxlLmNvbS9hcHBsaWNhdGlvbl9wYXJhbWV0ZXIiXSwiaHR0cDovL2V4YW1wbGUuY29tL2FwcGxpY2F0aW9uX3BhcmFtZXRlciI6dHJ1ZSwidGFnIjoicHExT0NodlU2R1pjTURMWnFURW8wUSIsIml2IjoiVmN1d1U4NzF0dkdNR09IQiJ9."
+ "Aq7NWm_h4LmGjJynbUYOO7O9juKlUMFWXS_HMpAAR1g."
+ "i1GTQ9xyOL89vza7hNCiAQ."
+ "mDeuwt3QO199_h6diPwu_w."
+ "5EiKTUS272wTHd978QOuHQ";
JWE<String> jwe = jweService.reader(String.class, key)
.processedParameters("http://example.com/application_parameter")
.read(jweCompact, MediaTypes.TEXT_PLAIN)
.block();
JWT Service
The JWT service is used to build or read JWT represented using a URL-safe compact notation as defined by RFC 7519. A JSON Web Token is a particular type of JWS or JWE that is used to securely transfer claims between two parties.
In practice, a JWT is created or read just like a JWS or a JWE with type JWT and a JSON payload of type JWTClaimsSet representing a set of claims.
The JWTService bean is used to create specific JWSBuilder or JWEBuilder instances for building JWT as JWS or JWE and specific JWSReader or JWEReader instances for reading JWS and JWE with JWTClaimsSet payloads serialized using the compact notation.
JWT claims set
A JWT claims set represents a JSON object whose members are the claims conveyed by the JWT as defined by RFC 7519 which also specifies registered claim names. For instance, the issuer (iss) claim identifies the principal that issued the JWT, the expiration time claim (exp) identifies the expiration time on or after which the JWT must not be accepted for processing... A JWT is therefore validated by first verifying or decrypting the enclosing JWS or JWE and then by validating the JWT claims set, a JWT must be rejected if for instance the expiration time has passed.
The JWTClaimsSet interface is used to represent the JWT payload in a JWS or a JWE, it exposes the registered claims and allows to specify custom claims.
The following example shows how to create a JWTClaimsSet with an issuer and a custom claim and which expires in a day:
JWTClaimsSet jwtClaimsSet = JWTClaimsSet.of("joe", ZonedDateTime.now().plusDays(1).toEpochSecond())
.addCustomClaim("http://example.com/is_root", true)
.build();
A JWTClaimsSet can be validated in multiple ways:
if(jwtClaimsSet.isValid()) {
}
// Run an action only if the JWT claims set is valid
jwtClaimsSet.ifValid(() -> {
...
});
// Run an action the JWT claims set is valid and another action if it is not
jwtClaimsSet.ifValidOrElse(
() -> {
// Valid
...
},
() -> {
// Invalid
...
}
);
// Throws an InvalidJWTException if the JWT claims set is invalid
jwtClaimsSet.ifInvalidThrow();
// Throws the provided exception if the JWT claims set is invalid
jwtClaimsSet.ifInvalidThrow(() -> new CustomException("Invalid credentials"));
A JWTClaimsSet validates expiration time and not before claims by default, additional JWTClaimsSetValidator can be added as well by invoking validate() or setValidators() methods.
In the following example, a validator is added to check that the issuer is iss, an InvalidJWTException is thrown if the issuer claim does not match:
jwtClaimsSet.validate(JWTClaimsSetValidator.issuer("iss"));
// Throws an InvalidJWTException since issuer 'joe' does not match the expected 'iss'
jwtClaimsSet.ifInvalidThrow();
It is then possible to provide custom validation logic using multiple
JWTClaimsSetValidator, but theJWTClaimsSetinterface can also be itself extended to better reflect application specificities by exposing application specific claims or specific validation logic.
Building JWT
The JWTService bean exposes jwsBuilder() and jweBuilder() methods used to obtain specific JWSBuilder or JWEBuilder for creating JWT as JWS or JWE with JWTClaimsSet payloads. The builders thus obtained follow the exact same rules as defined by the JWS service and the JWE service with the following exceptions: the type (typ) and the content type (cty) are always considered to be JWT and application/json since the JWT claims set is defined as a JSON object. A JWTBuildException is thrown when a type other than JWT (the type can be omitted) or a content type (no content type is allowed) are specified in the JOSE header.
The following example shows how to create a JWT as a JWS using a generated key:
// Injected or obtained from a 'Jose' instance
JWKService jwkService = ...
JWTService jwtService = ...
Mono<? extends OCTJWK> key = jwkService.oct().generator()
.generate()
.cache();
/*
* {
* "iss":"joe",
* "exp":1691133731,
* "http://example.com/is_root":true
* }
*/
JWTClaimsSet claims = JWTClaimsSet.of("joe", ZonedDateTime.now().plusYears(1).toEpochSecond())
.addCustomClaim("http://example.com/is_root", true)
.build();
JWS<JWTClaimsSet> jwts = jwtService.jwsBuilder(key)
.header(header -> header
.algorithm(OCTAlgorithm.HS256.getAlgorithm())
.type("JWT")
)
.payload(claims)
.build()
.block();
// eyJ0eXAiOiJKV1QiLCJhbGciOiJIUzI1NiJ9.eyJpc3MiOiJqb2UiLCJleHAiOjE2OTExMzM3NzQsImh0dHA6Ly9leGFtcGxlLmNvbS9pc19yb290Ijp0cnVlfQ.4fEhUpbK4aNhgZB0XL_UiJV9k5pLw35MT1zIjq4oCro
String jwtsCompact = jwts.toCompact();
The following example shows how to create a JWT as a JWE using a generated key:
// Injected or obtained from a 'Jose' instance
JWKService jwkService = ...
JWTService jwtService = ...
Mono<? extends ECJWK> key = jwkService.ec().generator()
.keyId("keyId")
.algorithm(ECAlgorithm.ECDH_ES.getAlgorithm())
.curve(ECCurve.P_256.getCurve())
.generate()
.cache();
/*
* {
* "iss":"joe",
* "exp":1691133731,
* "http://example.com/is_root":true
* }
*/
JWTClaimsSet claims = JWTClaimsSet.of("joe", ZonedDateTime.now().plusYears(1).toEpochSecond())
.addCustomClaim("http://example.com/is_root", true)
.build();
JWE<JWTClaimsSet> jwte = jwtService.jweBuilder(key)
.header(header -> header
.algorithm(ECAlgorithm.ECDH_ES.getAlgorithm())
.encryptionAlgorithm(OCTAlgorithm.A256GCM.getAlgorithm())
.type("JWT")
)
.payload(claims)
.build()
.block();
// eyJlbmMiOiJBMjU2R0NNIiwidHlwIjoiSldUIiwiYWxnIjoiRUNESC1FUyIsImVwayI6eyJjcnYiOiJQLTI1NiIsIngiOiIxdVc4VlAxVzhDazZ6dERIMWRjYnk3NzRfVXU4X1RvalNKZEJSMVpRaFRNIiwieSI6InBGRG1KZDJXTS1jZGcxVHdMR0FkaldUSURrRW1xc2lmMWJfV0tKMWRWSnciLCJrdHkiOiJFQyJ9fQ..zhhYytTdGNvPajvU.j-Edyx9DpIdHGrCYiH20cjLKORhw95bXBJSEQPVjDe7wRfYFUvfch43X4HI3fKYSxIWgjIACM3ynqQwu7Ta3cQ.3PDSOt-SdNyCEqYRD8P0hA
String jwteCompact = jwte.toCompact();
By default, the JWT service creates
JWSBuilderandJWEBuilderfor building JWT withJWTClaimsSetpayload type, in order to obtain builders for customJWTClaimsSettypes, the type must be explicitly specified when creating the builder.
Reading JWT
The JWTService bean exposes jwsReader() and jweReader() methods used to obtain specific JWSReader or JWEReader for reading JWT as JWS or JWE with JWTClaimsSet payloads. The builders thus obtained follow the exact same rules as defined by the JWS service and the JWE service with the following exceptions: the type (typ) must be JWT and no content type (cty) is allowed. A JWTReadException is thrown when a type other than JWT or a content type are specified in the JOSE header.
The following example shows how to read a JWT as a JWS:
// Injected or obtained from a 'Jose' instance
JWKService jwkService = ...
JWTService jwtService = ...
Mono<? extends OCTJWK> key = jwkService.oct().builder()
.keyId("keyId")
.algorithm(OCTAlgorithm.HS256.getAlgorithm())
.keyValue("xqf1haCsSJGuueZivcq4YafdWw6n5CH2BTT6vDwUSaM")
.build()
.cache();
String jwtsCompact = "eyJ0eXAiOiJKV1QiLCJhbGciOiJIUzI1NiJ9."
+ "eyJpc3MiOiJqb2UiLCJleHAiOjE2OTExMzMyMTMsImh0dHA6Ly9leGFtcGxlLmNvbS9pc19yb290Ijp0cnVlfQ."
+ "4p0_3W8DBrjTpw2e2KI1__v-6QOT_5dWIMKbfsSvTo0";
JWTClaimsSet validClaims = jwtService.jwsReader(key)
.read(jwtsCompact)
.map(JWS::getPayload)
.filter(JWTClaimsSet::isValid)
.block();
The following example shows how to read a JWT as a JWE:
// Injected or obtained from a 'Jose' instance
JWKService jwkService = ...
JWTService jwtService = ...
Mono<? extends ECJWK> key = jwkService.ec().builder()
.keyId("keyId")
.algorithm(ECAlgorithm.ECDH_ES.getAlgorithm())
.curve(ECCurve.P_256.getCurve())
.xCoordinate("a9HrKi7kwXR0EumziK_B5ZRlsk7QbXGPJfx_c3OGoZs")
.yCoordinate("fixJ3kr2abu0huetFyhs0OMqd3_M6xMIKE8hr3FggOM")
.eccPrivateKey("VCSeZseVoZ1E4TyWmRqD0nt5I_ipSbKfXcRHQSTPqUw")
.build()
.cache();
// The encrypted key is empty since ECDH_ES is a direct key agreement
jwteCompact = "eyJlbmMiOiJBMjU2R0NNIiwidHlwIjoiSldUIiwiYWxnIjoiRUNESC1FUyIsImVwayI6eyJjcnYiOiJQLTI1NiIsIngiOiJ6bEczQzVwUEtZVG4yVHpiZlJZYm5KOTZTai0yNDJGeTlwVVRmUWN0MUlzIiwieSI6IkUyeE9hNnNlb0dJVHpkRHdxVjZlT2NIc2dzNmI2M082NlJVWXlsV2N6LTgiLCJrdHkiOiJFQyJ9fQ."
+ "."
+ "_1eQRi8ukFZDwa27."
+ "WjPLHYGHu1zpg3QSbhB9ciraoRU7UXpeJJXz76UZAkwJ-rxEXwkimnflTnEymG_oK1i7hKwCANRhqWwr22GqNg."
+ "Zos43NFBxdh_brO1ae-7vA";
JWTClaimsSet validClaims = jwtService.jweReader(key)
.read(jwteCompact)
.map(JWE::getPayload)
.filter(JWTClaimsSet::isValid)
.block();
By default, the JWT service creates
JWSReaderandJWEReaderfor reading JWT withJWTClaimsSetpayload type, in order to obtain readers for customJWTClaimsSettypes, the type must be explicitly specified when creating the reader.
JOSE Media Type Converters
The module also exposes a set of MediaTypeConverter<String> for converting JOSE media types as defined by RFC 7515 Section 9.2, RFC 7517 Section 8.5 and RFC 7519 Section 10.3. It currently supports: application/jose, application/jose+json, application/jwk+json, application/jwk-set+json and application/jwt.
JOSE media type converters are basically used to convert JWK, JWS, JWE or JWT serialized using the compact or the JSON notation. They rely on the module's services to decode an input into corresponding JOSE object (JWK, JWS, JWE or JWT), as a result a JWS or a JWE are verified and decrypted by the converters which throw ConverterException in case of invalid inputs. In the specific case of a JWT, the validation of the decoded JWTClaimsSet is not performed and left to the application.
These media types converters are also used by module services when converting JOSE payloads. It is then possible to wrap any JOSE object in a JWS or a JWE using compact or JSON serialization. A typical use cases consist in wrapping a JWK or a JWKSet in a JWE to securely communicate keys.
The following example shows how to create a JWE conveying multiple JWK:
// Injected or obtained from a 'Jose' instance
JWKService jwkService = ...
JWEService jweService = ...
OCTJWK key1 = jwkService.oct().builder()
.keyId("key1")
.algorithm(OCTAlgorithm.A256GCMKW.getAlgorithm())
.keyValue("GkilETj3L4jpinuRiaNq6zd7-_1JPbfU9DY3xHl9HEE")
.build()
.block();
OCTJWK key2 = jwkService.oct().builder()
.keyId("key2")
.algorithm(OCTAlgorithm.HS256.getAlgorithm())
.keyValue("xqf1haCsSJGuueZivcq4YafdWw6n5CH2BTT6vDwUSaM")
.build()
.block();
JWKSet jwkSet = new JWKSet(key1, key2);
Mono<? extends ECJWK> key = jwkService.ec().builder()
.keyId("keyId")
.algorithm(ECAlgorithm.ECDH_ES.getAlgorithm())
.curve(ECCurve.P_256.getCurve())
.xCoordinate("a9HrKi7kwXR0EumziK_B5ZRlsk7QbXGPJfx_c3OGoZs")
.yCoordinate("fixJ3kr2abu0huetFyhs0OMqd3_M6xMIKE8hr3FggOM")
.eccPrivateKey("VCSeZseVoZ1E4TyWmRqD0nt5I_ipSbKfXcRHQSTPqUw")
.build()
.cache();
JWE<JWKSet> jwe = jweService.builder(JWKSet.class, key)
.header(header -> header
.algorithm(ECAlgorithm.ECDH_ES.getAlgorithm())
.encryptionAlgorithm(OCTAlgorithm.A128GCM.getAlgorithm())
.contentType(MediaTypes.APPLICATION_JWK_SET_JSON)
)
.payload(jwkSet)
.build()
.block();
// eyJlbmMiOiJBMTI4R0NNIiwiY3R5IjoiYXBwbGljYXRpb24vandrLXNldCtqc29uIiwiYWxnIjoiRUNESC1FUyIsImVwayI6eyJjcnYiOiJQLTI1NiIsIngiOiJPcW5NbjBKcDNQcGZ6VlFCQW1ZanU2MVEwWUNkUHJuMkI3eW5ZdlRLN3FJIiwieSI6ImhZXzI2am9tS1QzX2QzaGQ2VVNRSm1zSjV5blBtaDN5QmRkZVdHbEs5ZDgiLCJrdHkiOiJFQyJ9fQ..XvpO0GyH44d8GeWc.5aV-epA4DaoWAD84EyYqFnaFv2HtQJlNF33jwSIuxHaMG0nK1Cm6yKcdzzC4e1pG1FNY7wg9SI_JlkFDYqjp6EuMe64vFUOiPCj28QtPaafEx7jOt5nbGNRvzBZJdDWQbhlZomXL7cKzLjfYpv8Y4SWPzcua6FJMSH7DoZwUZfKZDzDk_-2fpXvE_LLw7rTbi8Vltm9AClzmy2QS1tu5R4hY5E9Ew5QIWC06IErtldHF_y_oZIy7iSxf55GjgBVs0roFkA.OujlTScT9qOM6wWsFJMUlA
String jweCompact = jwe.toCompact();
The resulting compact JWE containing encrypted keys can then be conveyed to a recipient which can decrypt the keys with the shared secret key.
// Injected or obtained from a 'Jose' instance
JWEService jweService = ...
jweCompact = "eyJlbmMiOiJBMTI4R0NNIiwiY3R5IjoiYXBwbGljYXRpb24vandrLXNldCtqc29uIiwiYWxnIjoiRUNESC1FUyIsImVwayI6eyJjcnYiOiJQLTI1NiIsIngiOiJPcW5NbjBKcDNQcGZ6VlFCQW1ZanU2MVEwWUNkUHJuMkI3eW5ZdlRLN3FJIiwieSI6ImhZXzI2am9tS1QzX2QzaGQ2VVNRSm1zSjV5blBtaDN5QmRkZVdHbEs5ZDgiLCJrdHkiOiJFQyJ9fQ."
+ "."
+ "XvpO0GyH44d8GeWc."
+ "5aV-epA4DaoWAD84EyYqFnaFv2HtQJlNF33jwSIuxHaMG0nK1Cm6yKcdzzC4e1pG1FNY7wg9SI_JlkFDYqjp6EuMe64vFUOiPCj28QtPaafEx7jOt5nbGNRvzBZJdDWQbhlZomXL7cKzLjfYpv8Y4SWPzcua6FJMSH7DoZwUZfKZDzDk_-2fpXvE_LLw7rTbi8Vltm9AClzmy2QS1tu5R4hY5E9Ew5QIWC06IErtldHF_y_oZIy7iSxf55GjgBVs0roFkA."
+ "OujlTScT9qOM6wWsFJMUlA";
jwkSet = jweService.reader(JWKSet.class, key)
.read(jweCompact)
.map(JWE::getPayload)
.block();
The following example shows how to wrap a received JWS in a JWE in order to add confidentiality protection:
// Injected or obtained from a 'Jose' instance
JWKService jwkService = null;
JWSService jwsService = null;
JWEService jweService = null;
jwkService.oct().builder()
.keyId("jwsKey")
.algorithm(OCTAlgorithm.HS256.getAlgorithm())
.keyValue("xqf1haCsSJGuueZivcq4YafdWw6n5CH2BTT6vDwUSaM")
.build()
.map(JWK::trust)
.flatMap(jwkService.store()::set)
.block();
jwkService.oct().builder()
.keyId("jweKey")
.algorithm(OCTAlgorithm.A256GCMKW.getAlgorithm())
.keyValue("GkilETj3L4jpinuRiaNq6zd7-_1JPbfU9DY3xHl9HEE")
.build()
.map(JWK::trust)
.flatMap(jwkService.store()::set)
.block();
String jwsCompact = "eyJhbGciOiJIUzI1NiIsImtpZCI6Imp3c0tleSIsImN0eSI6ImFwcGxpY2F0aW9uL2pzb24ifQ."
+ "eyJhdXRob3IiOiJNYXJjZWwiLCJtZXNzYWdlIjoiRmluYWxseSEifQ."
+ "wjnBucCNvQXHtL8QBWuXbutRECtIhazISQhR0NfYOQs";
JWS<Message> block = jwsService.reader(Message.class)
.read(jwsCompact)
.block();
JWE<JWS<Message>> jwe = jwsService.reader(Message.class)
.read(jwsCompact)
.flatMap(jws -> jweService.<JWS<Message>>builder(Types.type(JWS.class).type(Message.class).and().build())
.header(header -> header
.keyId("jweKey")
.algorithm(OCTAlgorithm.A256GCMKW.getAlgorithm())
.encryptionAlgorithm(OCTAlgorithm.A128CBC_HS256.getAlgorithm())
.contentType(MediaTypes.APPLICATION_JOSE)
)
.payload(jws)
.build()
)
.block();
// eyJlbmMiOiJBMTI4Q0JDLUhTMjU2IiwiYWxnIjoiQTI1NkdDTUtXIiwia2lkIjoiandlS2V5IiwiY3R5IjoiYXBwbGljYXRpb24vam9zZSIsInRhZyI6IlBjT2tjZWNsNUswaW92a2hnMEhwUEEiLCJpdiI6InFNMUtfeHhIcmZocXFuRFMifQ.LLn2scpDiAdRRSFIrvTXTXsVwQp9mSH4dPv1I-IruFM.LfCNkDe5r3eE2Kjadmpkww.5AjCbDExRhRsLy-iXX2RAavfXVWFEcinKcXu3t_BObnC4mzgxmaqvfwUC8QMu8KM8C3gjt36Qa89nqajVYmJwRrZ0ZMoH68JgXvp2npIEdJSruL3CqTHm3ObK5-7TbYLP1K3t9v995wOIAajUsXaHfpNODqAsFlc83A6wwxv37WVq4mWy-WZ7ZwIpwHY5semqMxv0FbpNMPtkLaG0JzqYLnzH7yaT2DSBQKIxlCZ0hc.ZML3thQjah7dtXdv17LJXA
String jweCompact = jwe.toCompact();
In above example, we choose to store the jwsKey and jweKey in the module's JWKStore, although we could have specified keys explicitly to read the JWS and build the JWE, converters can only rely on key resolution based on the JOSE header parameters and as a result a recipient which would like to decode above compact JWE must make sure keys can be resolved using the JWKStore, the JWKKeyResolver or the JWKURLResolver.
// Injected or obtained from a 'Jose' instance
JWSService jwsService = null;
JWEService jweService = null;
jweCompact = "eyJlbmMiOiJBMTI4Q0JDLUhTMjU2IiwiYWxnIjoiQTI1NkdDTUtXIiwia2lkIjoiandlS2V5IiwiY3R5IjoiYXBwbGljYXRpb24vam9zZSIsInRhZyI6IlBjT2tjZWNsNUswaW92a2hnMEhwUEEiLCJpdiI6InFNMUtfeHhIcmZocXFuRFMifQ."
+ "LLn2scpDiAdRRSFIrvTXTXsVwQp9mSH4dPv1I-IruFM."
+ "LfCNkDe5r3eE2Kjadmpkww."
+ "5AjCbDExRhRsLy-iXX2RAavfXVWFEcinKcXu3t_BObnC4mzgxmaqvfwUC8QMu8KM8C3gjt36Qa89nqajVYmJwRrZ0ZMoH68JgXvp2npIEdJSruL3CqTHm3ObK5-7TbYLP1K3t9v995wOIAajUsXaHfpNODqAsFlc83A6wwxv37WVq4mWy-WZ7ZwIpwHY5semqMxv0FbpNMPtkLaG0JzqYLnzH7yaT2DSBQKIxlCZ0hc."
+ "ZML3thQjah7dtXdv17LJXA";
/// Here we assume keys 'jwsKey' and 'jweKey' can be resolved by the 'JWSService' and the 'JWEService'
// Marcel says Finally!
Message message = jweService.<JWS<Message>>reader(Types.type(JWS.class).type(Message.class).and().build())
.read(jweCompact)
.map(JWE::getPayload)
.map(JWS::getPayload)
.block();
Inverno Build Tools
The Inverno Build Tools module provides an API for running, packaging and distributing Java modular applications.
A Java modular project is usually a Java module with dependencies which are not always clean Java modules (i.e. with a module descriptor). The Java ecosystem hasn't fully embraced the Java module system yet and as a result applications or libraries can still depend on automatic modules (i.e. with no module descriptor but with an Automatic-Module-Name entry in their MANIFEST.MF), which is the most common, or on unnamed modules (i.e. with no module descriptor and no Automatic-Module-Name entry in their MANIFEST.MF) which are becoming more and more rare but still exists. This situation poses multiple problems.
An unnamed module is barely usable: because it can't be named in a deterministic way, it can't be referenced in a module descriptor. However, they can be sometimes useful at runtime (e.g. WebJars) which is why it is interesting to be able to reference them in a deterministic way if only to add them to the module path.
The JDK now provides tools such as jlink or jpackage which can generate optimized native Java runtime with the exact dependencies required to run an application. Unfortunately these only works when an application and all its dependencies are clean Java modules.
The Inverno Build Tools module solves that issue by modularizing any automatic or unnamed dependencies defined in a Java modular project.
It also allows to create application container images that can be loaded to the local Docker container or to a remote image registry.
The API has been designed to be easily integrated with build tools (e.g. Maven, Gradle...), as such it is not operating on the source code but on the compiled classes of a modular projects and its dependencies as JAR archives.
As it heavily relies on tools such as jdeps, jmod, jlink or jpackage to modularize application dependencies, run and package runtimes and applications images, the module requires JDK 15+.
In order to use the Inverno Build Tools module, we need to declare a dependency in the module descriptor:
module io.inverno.example.app {
...
requires io.inverno.tool.buildtools;
...
}
And also declare that dependency in the build descriptor:
Using Maven:
<project>
<dependencies>
<dependency>
<groupId>io.inverno.tool</groupId>
<artifactId>inverno-build-tools</artifactId>
</dependency>
</dependencies>
</project>
Using Gradle:
...
compile 'io.inverno.tool:inverno-build-tools:1.6.0'
...
Project and Dependencies
The API defines the Project class and the Dependency interface which must be implemented in order to integrate with a build tool or more simply to invoke the tools.
The Project provides the group, the name and the version, which define a fully qualified name for the project, as well the path to the project's compiled classes and the set of dependencies. Just like the project, a Dependency is fully qualified with a group, a name and a version but unlike the project it provides the path to the dependency JAR archive.
Build Tasks
A build Task represents a step in a build process which can be seen as a chain of dependent tasks executed one after the other.
The Project is the entry point to create any build process which usually starts with the modularization of project dependencies. The modularizeDependencies() method returns a ModularizeDependenciesTask from which other task can be executed.
Tasks are configured and chained fluently. The execute() method is invoked on the final task to execute the whole build process starting with the first task and returning the final task result. Intermediary tasks results can be accessed by applying the doOnComplete() method on the tasks.
This example shows how to build a project server runtime while accessing the project Jmod's path:
Project project = ...
project.modularizeDependencies()
.buildJmod()
.mainClass("io.inverno.example.Main")
.doOnComplete(jmodPath -> {
// Do something useful with the Jmod
})
.buildRuntime()
.vm("server")
.execute();
The following graph of tasks shows all the possible paths:
Project
├── modularizeDependencies()
│ ├── start()
│ ├── run()
│ └── buildJmod()
│ └── buildRuntime()
│ ├── archive()
│ └── packageApplication()
│ ├── archive()
│ └── containerize()
└── stop()
ModularizeDependenciesTask
The ModularizeDependenciesTask is the first task in any build process, it scans all automatic and unnamed module dependencies, generates module-info.java descriptors for each of them, compile those descriptors and finally repackages the dependencies as clean Java module JAR archives. Subsequent tasks will rely on these modularized dependencies to build application runtime or package the application.
It returns the paths to the modularized dependencies JAR archives:
Project project = ...
Set<Path> modularizedJars = project
.modularizeDependencies()
.execute();
Modules descriptors are generated using JDK's jdeps command which basically analyzes classes in the original JAR archive but this process is not always accurate, especially for modules using reflection or services. Such use cases usually result in errors when the generated descriptor is compiled. The task provides two ways to overcome this issue:
It is possible to provide clean descriptors explicitly for specific modules in such situations bypassing the descriptor generation. In the following code, the moduleOverridesPath() specifies the path to overriding module descriptors [moduleName]/module-info.java:
Project project = ...
Set<Path> modularizedJars = project
.modularizeDependencies()
.moduleOverridesPath(Path.of("path/to/modules/descriptors"))
.execute();
Another way it to let the generation goes through and provide specific directive overrides to fix/complete the generation. In the following example, the directives provided for io.inverno.example.SampleModule are merged with the generated descriptor:
Project project = ...
Set<Path> modularizedJars = project
.modularizeDependencies()
.moduleOverrides(List.of(
new ModuleInfo(
"io.inverno.example.SampleModule", // module name
false, // open module
null, // imports directives
null, // requires directives
null, // exports directives
null, // opens directives
List.of(new ModuleInfo.UsesDirective("io.inverno.example.SomeService")), // uses directives
null // provides directives
)
))
.execute();
RunTask
The RunTask is chained after the ModularizeDependenciesTask, it allows to run the project application in a forked JVM. The project module must define a main class (i.e. a class with a main() method).
The following example runs the project, launching the module's default main class which is automatically resolved:
Project project = ...
project
.modularizeDependencies()
.run()
.execute();
The execute() method blocks the invoking thread as it waits for the project application to terminate.
If more than one main class is defined in the module, the main class to launch must be specified explicitly, otherwise the task execution will fail:
Project project = ...
project
.modularizeDependencies()
.run()
.mainClass("io.inverno.example.MainClassToLaunch")
.execute();
Arguments, VM options and/or the application working path can be specified as follows:
Project project = ...
project
.modularizeDependencies()
.run()
.workingPath(Path.of("path/to/working"))
.vmOptions("-DsomeProperty=1234")
.arguments("arg1 arg2")
.execute();
Although it is always possible to run an application with a mix of modular and non-modular dependencies, the advantage of running the application with modularized dependencies is that it only uses the module path and non-modular dependencies are no longer grouped into the
ALL-UNNAMEDmodule, this fully embraces the Java module system.
DebugTask
The DebugTask is chained after the ModularizeDependenciesTask, it is identical to the RunTask, the only difference being that it adds debugging VM options to be able to attach a debugger to the process.
The following example runs the project in debug mode and waiting for a debugger to be attached on port 8000:
Project project = ...
project
.modularizeDependencies()
.debug()
.execute();
The debug port, whether to suspend the execution until a debugger is attached, as well as any RunTask options can be specified as follows:
Project project = ...
project
.modularizeDependencies()
.debug()
.port(9000)
.suspend(false)
.mainClass("io.inverno.example.MainClassToLaunch")
.vmOptions("-DsomeProperty=1234")
.execute();
StartTask
Just like the RunTask the StartTask is chained to the ModularizeDependenciesTask and runs the project application in a forked VM. But unlike the RunTask the invoking thread doesn't wait for the application to terminate, the execute() returns the pid once it has determined that the application has started.
This task allows to control the project application execution and possibly interacts with the application from the invoking thread.
In order to determine when the application has started, the task expects the application to create a pid file once it is ready. If the task can't find that pid file after a specific timeout, the task terminates the forked process and raises an error. The ̀StopTaskwhich is used to stop the project application also uses that pid file to determine the process to which aSIGINT` signal must be sent.
An application can be started as follows:
Project project = ...
project
.modularizeDependencies()
.start()
.execute();
By default, that task looks for the pid file in the working directory at [WORKING_PATH]/[PROJECT_NAME].pid and waits 60 seconds before terminating the process raise a timeout error, alternate pid file path and timeout can be provided by configuration, as well as execution parameters such as arguments or VM options:
Project project = ...
project
.modularizeDependencies()
.start()
.pidfile(Path.of("path/to/pidfile")
.timeout(30000)
.vmOptions("-DsomeProperty=1234")
.arguments("arg1 arg2")
.execute();
StopTask
The StopTask is the only task not to be chained to the ModularizeDependenciesTask, it is obtained directly from the Project and it is used to gracefully stop a project application started with the StartTask. It gets the pid of the application process to stop from the application pidfile.
If the task fails to stop gracefully the process within a given timeout, it will try to kill the process during the same timeout before raising an error.
The project application can be stopped as follows:
Project project = ...
project
.stop()
.execute();
By default, the task looks for the pif file in the working directory at [WORKING_PATH]/[PROJECT_NAME].pid and waits 60 seconds for the process to stop, these can also be specified by configuration:
Project project = ...
project
.stop()
.pidfile(Path.of("path/to/pidfile")
.timeout(30000)
.execute();
BuildJmodTask
The BuildJmodTask is chained to the ModularizeDependenciesTask, it used to create a jmod archive of the project module.
The project jmod archive is created as follows:
Project project = ...
project
.modularizeDependencies()
.buildJmod()
.execute();
The task relies on JDK's jmod tool and as such it provides options to include configuration files, legal resources or manuals inside the archive. The module's main class, if any, can also be specified or automatically resolved:
Project project = ...
project
.modularizeDependencies()
.buildJmod()
.resolveMainClass(true)
.configurationPath(Path.of("path/to/config)
.legalPath(Path.of("path/to/legal)
.manPath(Path.of("path/to/manual)
.execute();
Note that if the module defines several main class, the task will raise an error asking to specify the main class explicitly:
Project project = ...
project
.modularizeDependencies()
.buildJmod()
.mainClass("io.inverno.example.MainClass")
.execute();
BuildRuntimeTask
The BuildRuntimeTask is chained to the BuildJmodTask, it is used to create an optimized runtime image which contains the project module and its exact dependency modules including JDK's modules. A runtime image can be used to compile or run Java applications with a reduced footprint Java runtime, but it is especially required to create native application images.
A project application runtime image can be created as follows:
Project project = ...
project
.modularizeDependencies()
.buildJmod()
.buildRuntime()
.execute();
The task relies on JDK's jlink tool, it is then possible to configure how the runtime image is generated:
Project project = ...
project
.modularizeDependencies()
.buildJmod()
.buildRuntime()
.addModules("io.inverno.example.module1, io.inverno.example.module2") // --add-modules
.addOptions("-DsomeProperty=1234") // VM options
.compress(2) // 2=ZIP
.stripDebug(true) // Remove debug information
.stripNativeCommands(false) // Do not include native commands in the image: java, keytool...
.vm("server") // Optimize for server application
.execute();
Application launchers can also be generated in which case native commands must be included in the image (i.e. java), the stripNativeCommands option must then be set to false. Unlike the PackageApplicationTask which generates native launchers, runtime launchers are simple shell scripts invoking the runtime's java command to launch a particular main class in a module bundled in the runtime image.
Project project = ...
project
.modularizeDependencies()
.buildJmod()
.buildRuntime()
.stripNativeCommands(false)
.launchers(BuildRuntimeTask.Launcher.of("myApp", "io.inverno.example.myapp", "io.inverno.example.MyAppMain"))
.execute();
A runtime image generated with a launcher should have the following structure:
.
├── bin
│ ├── myApp
│ ├── java
│ ├── jrunscript
│ ├── keytool
│ └── rmiregistry
├── conf
│ └── ...
├── include
│ └── ...
├── legal
│ └── ...
├── lib
│ └── ...
├── man
│ └── ...
└── release
Note that a runtime image is native as it embeds a JVM which relates to the building environment as a result an image generated on a Linux environment can't run on a Windows environment.
PackageApplicationTask
The PackageApplicationTask is chained to the BuildRuntimeTask, it is used to create a self-contained Java application image including project launchers, the project application module, all its dependencies and an optimized Java runtime all packaged in a native OS specific package (e.g. .deb, .msi, .dmg...). Unlike a runtime image which can be created without application launchers, an application image requires at least one launcher otherwise it wouldn't be considered an application, as a result a main class must be defined, ideally in the project application module so it can be automatically resolved.
A project application module defining a main class can be packaged in a Debian archive as follows:
Project project = ...
project
.modularizeDependencies()
.buildJmod()
.buildRuntime()
.packageApplication()
.types(Set.of(PackageApplicationTask.PackageType.DEB))
.execute();
The task relies on JDK's jpackage tool, and it exposes most of its options:
Project project = ...
project
.modularizeDependencies()
.buildJmod()
.buildRuntime()
.packageApplication()
.copyright("Copyright 2021 Inverno")
.vendor("Inverno")
.licensePath(Path.of("path/to/license")
.resourcesPath(Path.of("path/to/resources")
.execute();
The application image is also built on top of the runtime image, itself built on top of the jmod archive which were generated by previous tasks, it then inherits information such as configurations, legals and manuals...
Application launchers are native binaries starting the JVM, at least one launcher must be specified to generate an application image. If none is specified, the task will try to automatically create one looking for a main class in the project application module.
Launchers can be specified explicitly as follows:
Project project = ...
project
.modularizeDependencies()
.buildJmod()
.buildRuntime()
.packageApplication()
.launchers(Set.of(new PackageApplicationTask.Launcher() {
public Optional<String> getName() {
return Optional.of("myApp");
}
public Optional<String> getDescription() {
return Optional.of("This is my application");
}
public Optional<String> getModule() {
return Optional.of("io.inverno.example.myapp");
}
public Optional<String> getMainClass() {
return Optional.of("io.inverno.example.MyAppMain");
}
public Optional<Path> getIconPath() {
return Optional.of(Path.of("path/to/icon"));
}
public boolean isLauncherAsService() {
return true;
}
...
}))
.execute();
The task can also automatically generate as many launchers as there are main classes in the project application module, launcher names being the class names:
Project project = ...
project
.modularizeDependencies()
.buildJmod()
.buildRuntime()
.packageApplication()
.automaticLaunchers(true)
.execute();
OS specific configuration can also be specified when generating OS specific packages. For instance, a Linux configuration can be provided as follows:
Project project = ...
project
.modularizeDependencies()
.buildJmod()
.buildRuntime()
.packageApplication()
.linuxConfiguration(new PackageApplicationTask.LinuxConfiguration() {
public Optional<String> getPackageName() {
return Optional.of("myApp");
}
public Optional<String> getDebMaintainer() {
return Optional.of("John Smith");
}
...
})
.execute();
The task generates the application image to a folder (jpackage's
app-imagetype) or to OS specific package formats such as.deb,.msi,.dmg... In order to package the application image in a portable archive format (e.g.zip,tar.gz...), theArchiveTaskmust be chained.
Just like a runtime image, an application image is native and tight to the building environment, a Linux application image can't run on a Windows environment. Cross-platform is also not supported by jpackage so a Windows application image can't be built on a Linux environment.
ArchiveTask
The ArchiveTask is chained to the BuildRuntimeTask or the PackageApplicationTask in order to respectively package the runtime image or the application image into a portable archive format (e.g. zip, tar.gz...).
A project runtime can be packaged in a .zip archive as follows:
Project project = ...
project
.modularizeDependencies()
.buildJmod()
.buildRuntime()
.archive()
.formats("zip")
.execute();
A project application image can be packaged in a tar.gz archive as follows:
Project project = ...
project
.modularizeDependencies()
.buildJmod()
.buildRuntime()
.packageApplication()
.archive()
.formats("tar.gz")
.execute();
By default, within the archive the image is placed in a folder named after the project's final name, but it is possible to override this and explicitly specify where to place the image in the archive:
Project project = ...
project
.modularizeDependencies()
.buildJmod()
.buildRuntime()
.packageApplication()
.archive()
.prefix("some/path")
.formats("tar.bz2")
.execute();
ContainerizeTask
The ContainerizeTask is chained to the PackageApplicationTask it is used to create a container image of the project application image so it can be run in a container. The resulting image can be packaged in a portable .tar archive, loaded into the local Docker daemon or published to a remote container image registry.
A .tar archive containing the project application container image can be generated as follows:
Project project = ...
project
.modularizeDependencies()
.buildJmod()
.buildRuntime()
.packageApplication()
.containerize()
.execute();
Note that the image is generated in OCI format, in order to generate a .tar archive that can be loaded in a Docker daemon, the format must be set explicitly:
Project project = ...
project
.modularizeDependencies()
.buildJmod()
.buildRuntime()
.packageApplication()
.containerize()
.format(ContainerizeTask.Format.Docker)
.execute();
The .tar thus obtained can be loaded to a Docker daemon as follows:
$ docker load --input myApp-1.0.0-SNAPSHOT-container_linux_amd64.tar
The container image can also be directly loaded to the local Docker daemon by selecting the Docker target:
Project project = ...
project
.modularizeDependencies()
.buildJmod()
.buildRuntime()
.packageApplication()
.containerize()
.target(ContainerizeTask.Target.DOCKER)
.execute();
The task can be configured to push the image to a registry:
Project project = ...
project
.modularizeDependencies()
.buildJmod()
.buildRuntime()
.packageApplication()
.containerize()
.registry("docker.io")
.repository("my-docker-id")
.registryUsername("username")
.registryPassword("password")
.execute();
The task also supports options to configure the resulting container image:
Project project = ...
project
.modularizeDependencies()
.buildJmod()
.buildRuntime()
.packageApplication()
.containerize()
.from("ubuntu:24.04")
.labels(Map.of("io.inverno.category", "example"))
.ports(8080)
.volumes(Set.of("/opt/my-app/logs"))
.user("user")
.environment(Map.of("INVERNO_PROFILE", "prod"))
.execute();
Inverno gRPC Protoc plugin
The Inverno gRPC Protoc plugin is a protoc plugin for generating Inverno gRPC client and server stubs from service definitions in Protocol buffers files.
It can be used with the Protocol Buffers Maven plugin or directly with the protoc executable.
Let's consider following Protocol buffers file:
syntax = "proto3";
option java_multiple_files = true;
option java_package = "test.hello";
option java_outer_classname = "HelloWorldProto";
package test;
/*
* <p>
* This is a hello service.
* </p>
*
* <p>
* It is called Greeter and has 2 methods:
* </p>
*
* <ul>
* <li>SayHello</li>
* <li>SayHelloClientStreaming</li>
* <li>SayHelloServerStreaming</li>
* <li>SayHelloBidirectionalStreaming</li>
* </ul>
*
*/
service Greeter {
/*
* <p>
* Says hello to someone
* </p>
*/
rpc SayHello (HelloRequest) returns (HelloResponse) {}
/*
* <p>
* Says hello to eveyrbody
* </p>
*/
rpc SayHellos (stream HelloRequest) returns (stream HelloResponse) {}
}
/*
* Hello request.
*/
message HelloRequest {
string name = 1;
}
/*
* Hello response.
*/
message HelloResponse {
string message = 1;
}
Generates gRPC stubs with Maven
In order to generate Inverno client or server stubs from .proto interface description files, the Protocol Buffers Maven plugin must be declared in the pom.xml of your project.
<project>
<build>
<extensions>
<extension>
<groupId>kr.motd.maven</groupId>
<artifactId>os-maven-plugin</artifactId>
</extension>
</extensions>
<plugins>
<plugin>
<groupId>org.xolstice.maven.plugins</groupId>
<artifactId>protobuf-maven-plugin</artifactId>
<extensions>true</extensions>
<executions>
<execution>
<goals>
<goal>compile</goal>
<goal>test-compile</goal>
</goals>
</execution>
</executions>
<configuration>
<protocArtifact>com.google.protobuf:protoc:${version.protobuf}:exe:${os.detected.classifier}</protocArtifact>
<protocPlugins>
<protocPlugin>
<id>inverno-grpc-protoc-plugin</id>
<groupId>io.inverno.tool</groupId>
<artifactId>inverno-grpc-protoc-plugin</artifactId>
<version>${version.inverno.tools}</version>
<mainClass>io.inverno.tool.grpc.protocplugin.InvernoGrpcProtocPlugin</mainClass>
<args>--client --server</args>
</protocPlugin>
</protocPlugins>
</configuration>
</plugin>
</plugins>
</build>
</project>
Maven plugins and artifact versions in above example are all provided in the Inverno parent or dependencies poms.
The arguments passed to the plugin specify whether client stubs, server stubs or both must be generated from .proto files under src/main/proto (compile goal) or src/test/proto (test-compile goal). Java sources are generated to ${project.build.directory}/generated-sources/protobuf/java or ${project.build.directory}/generated-test-sources/protobuf/java by default.
The plugin is executed when building the project (generate-sources and generate-test-sources phases)
$ ls src/main/proto
helloworld.proto
$ mvn compile
...
[INFO] --- protobuf:0.6.1:compile (default) @ inverno-example-grpc-client ---
[INFO] Building protoc plugin: inverno-grpc-protoc-plugin
[INFO] Compiling 1 proto file(s) to /home/jkuhn/Devel/git/winter/inverno-examples/inverno-example-grpc-client/target/generated-sources/protobuf/java
...
$ tree target/generated-sources/protobuf/java
target/generated-sources/protobuf/java
└── test
└── hello
├── GreeterGrpcClient.java
├── GreeterGrpcRoutesConfigurer.java
├── HelloRequest.java
├── HelloRequestOrBuilder.java
├── HelloResponse.java
├── HelloResponseOrBuilder.java
└── HelloWorldProto.java
3 directories, 7 files
Please refer to protobuf-maven-plugin: https://github.com/xolstice/protobuf-maven-plugin documentation to learn how to configure the Protocol buffer compiler.
Generates gRPC stubs with protoc
The Inverno gRPC protoc plugin can also be directly passed to protoc.exe, we first need to package the plugin in a native Java application.
From the plugin source folder, we have to run:
$ mvn inverno:package-app
...
[═════════════════════════════════════════════ 100 % ════════════════════════════════════════════] Project application created
[INFO] ------------------------------------------------------------------------
[INFO] BUILD SUCCESS
[INFO] ------------------------------------------------------------------------
[INFO] Total time: 19.974 s
[INFO] Finished at: 2024-04-08T16:29:13+02:00
[INFO] ------------------------------------------------------------------------
This should generate a native plugin launcher under target/inverno-grpc-protoc-plugin-${plugin.version}-application_${os.classifier}/bin/inverno-grpc-protoc-plugin which has been configured to generate both client and server stubs.
It can be passed to protoc.exe command as follows:
$ protoc.exe --java_out=out foc/helloworld.proto --plugin=protoc-gen-grpc=./target/inverno-grpc-protoc-plugin-${plugin.version}-application_${os.classifier}/bin/inverno-grpc-protoc-plugin --grpc_out=out
$ tree out
out
└── test
└── hello
├── GreeterGrpcClient.java
├── GreeterGrpcRoutesConfigurer.java
├── HelloRequest.java
├── HelloRequestOrBuilder.java
├── HelloResponse.java
├── HelloResponseOrBuilder.java
└── HelloWorldProto.java
3 directories, 7 files
Using gRPC client stub
The plugin generates one client stub per service, in our example we have defined one service: Greeter, the plugin should have generated the message types classes and GreeterGrpcClient class used to invoke service methods.
The client application module requires the boot module, the gRPC client module, the HTTP client module, the Web client module and one or more HTTP discovery modules (this is required by the Web client module):
<project>
<dependencies>
<dependency>
<groupId>io.inverno.mod</groupId>
<artifactId>inverno-boot</artifactId>
</dependency>
<dependency>
<groupId>io.inverno.mod</groupId>
<artifactId>inverno-grpc-client</artifactId>
</dependency>
<dependency>
<groupId>io.inverno.mod</groupId>
<artifactId>inverno-http-client</artifactId>
</dependency>
<dependency>
<groupId>io.inverno.mod</groupId>
<artifactId>inverno-web-client</artifactId>
</dependency>
<dependency>
<groupId>io.inverno.mod</groupId>
<artifactId>inverno-discovery-http</artifactId>
</dependency>
</dependencies>
</project>
@io.inverno.core.annotation.Module
module io.inverno.example.app_grpc_client {
requires io.inverno.mod.boot;
requires io.inverno.mod.grpc.client;
requires io.inverno.mod.http.client;
requires io.inverno.mod.discovery.http;
requires io.inverno.mod.web.client;
}
The GreeterGrpcClient class provides two base implementations for creating client beans based on the HttpClient or the WebClient. The GreeterGrpcClient.Web class is based on the WebClient, it is recommended for most cases as it abstracts service discovery and connection management, and it also allows to specify the exchange context type eventually aggregated in the global context by the Inverno Web compiler plugin. As for the GreeterGrpcClient.Http, it is based on the HttpClient and directly creates or uses an externally provided Endpoint to connect to the server, it should be favoured when there is a need to handle connections explicitly.
Depending on the needs of an application, one can create a bean implementing one, the other or both:
package io.inverno.example.app_grpc_client;
import examples.GreeterGrpcClient;
import examples.HelloReply;
import examples.HelloRequest;
import io.inverno.core.annotation.Bean;
import io.inverno.core.v1.Application;
import io.inverno.mod.discovery.ServiceID;
import io.inverno.mod.grpc.client.GrpcClient;
import io.inverno.mod.http.base.ExchangeContext;
import io.inverno.mod.http.client.HttpClient;
import io.inverno.mod.web.client.WebClient;
public class Main {
@Bean
public static class HttpGreeterGrpcClient extends GreeterGrpcClient.Http {
public HttpGreeterGrpcClient(HttpClient httpClient, GrpcClient grpcClient) {
super(httpClient, grpcClient);
}
}
@Bean
public static class WebGreeterGrpcClient extends GreeterGrpcClient.Web<ExchangeContext> {
public WebGreeterGrpcClient(WebClient<? extends ExchangeContext> webClient, GrpcClient grpcClient) {
super(ServiceID.of("http://127.0.0.1:8080"), webClient, grpcClient);
}
}
public static void main(String[] args) {
App_grpc_client app_grpc_client = Application.run(new App_grpc_client.Builder());
try {
// Using the HttpClient based implementation, the stub must be closed explicitly to close connections
try(GreeterGrpcClient.HttpClientStub<ExchangeContext> stub = app_grpc_client.httpGreeterGrpcClient().createStub("127.0.0.1", 8080)) {
HelloReply response = stub
.sayHello(HelloRequest.newBuilder()
.setName("Bob")
.build()
)
.block();
}
// Using the WebClient based implementation, connections are closed by the WebClient when the application module is stopped
HelloReply response = app_grpc_client.webGreeterGrpcClient()
.sayHello(HelloRequest.newBuilder()
.setName("Bob")
.build()
)
.block();
}
finally {
app_grpc_client.stop();
}
}
}
It is also possible to create derived instances with specific metadata.
Using the HttpClient based implementation:
try(GreeterGrpcClient.HttpClientStub<ExchangeContext> stub = app_grpc_client.httpGreeterGrpcClient().createStub("127.0.0.1", 8080)) {
HelloReply response = stub
.withMetadata(metadata -> metadata.messageEncoding("gzip"))
.sayHello(HelloRequest.newBuilder()
.setName("Bob")
.build()
)
.block();
}
Using the WebClient based implementation:
HelloReply response = app_grpc_client.webGreeterGrpcClient()
.withMetadata(metadata -> metadata.messageEncoding("gzip"))
.sayHello(HelloRequest.newBuilder()
.setName("Bob")
.build()
)
.block();
You should only specify
--clientargument to the plugin to only generate client stubs.
Implementing gRPC services
The plugin generates one server stub per service, in our example we have defined one service: Greeter, the plugin should have generated the message types classes and GreeterGrpcRoutesConfigurer class used to implement service methods.
The generated stub is a Web routes configurer, The server application module then requires the boot module, the Web server module and the gRPC server module:
<project>
<dependencies>
<dependency>
<groupId>io.inverno.mod</groupId>
<artifactId>inverno-boot</artifactId>
</dependency>
<dependency>
<groupId>io.inverno.mod</groupId>
<artifactId>inverno-web-server</artifactId>
</dependency>
<dependency>
<groupId>io.inverno.mod</groupId>
<artifactId>inverno-grpc-server</artifactId>
</dependency>
</dependencies>
</project>
@io.inverno.core.annotation.Module
module io.inverno.example.app_grpc_server {
requires io.inverno.mod.boot;
requires io.inverno.mod.grpc.server;
requires io.inverno.mod.web.server;
}
The GreeterGrpcRoutesConfigurer is an abstract Web routes configurer that must be implemented and exposed as a bean in the application module in order for the gRPC service method endpoints to be registered in the Web server.
By default, service methods are implemented by throwing UnsupportedOperationException, they can be implemented as follows:
package io.inverno.example.app_grpc_server;
import io.inverno.http.base.ExchangeContext;
import org.reactivestreams.Publisher;
import test.hello.GreeterGrpcRoutesConfigurer;
import test.hello.HelloRequest;
import test.hello.HelloResponse;
import reactor.core.publisher.Flux;
import reactor.core.publisher.Mono;
@Bean( visibility = Visibility.PRIVATE )
public class GreeterController extends GreeterGrpcRoutesConfigurer<ExchangeContext> {
@Override
public Mono<HelloResponse> sayHello(HelloRequest request) {
return Mono.just(HelloResponse.newBuilder().setMessage("Hello " + request.getName()).build());
}
@Override
public Publisher<HelloReply> sayHellos(Publisher<HelloRequest> request) {
return Flux.from(request)
.map(helloRequest -> HelloResponse.newBuilder().setMessage("Hello " + helloRequest.getName()).build());
}
}
GRPC request and response metadata can also be accessed or set as follows:
package io.inverno.example.app_grpc_server;
import io.inverno.mod.http.base.ExchangeContext;
import io.inverno.mod.grpc.server.GrpcExchange;
import org.reactivestreams.Publisher;
import test.hello.GreeterGrpcRoutesConfigurer;
import test.hello.HelloRequest;
import test.hello.HelloResponse;
import reactor.core.publisher.Flux;
import reactor.core.publisher.Mono;
@Bean( visibility = Visibility.PRIVATE )
public class GreeterController extends GreeterGrpcRoutesConfigurer<ExchangeContext> {
@Override
public void sayHello(GrpcExchange.Unary<ExchangeContext, HelloRequest, HelloReply> grpcExchange) {
String encoding = grpxExchange.request().metadata().encoding().orElse("identity");
grpxExchange.response()
.metadata(metadata -> metadata.encoding(encoding))
.value(grpcExchange.request().value().map(request -> HelloResponse.newBuilder().setMessage("Hello " + request.getName()).build()));
}
@Override
public void sayHello(GrpcExchange.BidirectionalStreaming<ExchangeContext, HelloRequest, HelloReply> grpcExchange) {
String encoding = grpxExchange.request().metadata().encoding().orElse("identity");
grpxExchange.response()
.metadata(metadata -> metadata.encoding(encoding))
.stream(Flux.from(grpcExchange.request().stream()).map(request -> HelloResponse.newBuilder().setMessage("Hello " + request.getName()).build()));
}
}
You should only specify
--serverargument to the plugin to only generate server stubs.
io.inverno.tool.maven
The Inverno Maven Plugin is used to run, package and distribute modular applications and Inverno applications in particular. It relies on a set of Java tools to build native runtime or application images as well as Docker or OCI images for modular Java projects.
Usage
Considering a modular application project, the Inverno Maven plugin is used to run, start, stop an application or build project images. There are three types of images that can be built using the plugin:
- runtime image is a custom Java runtime containing a set of modules and their dependencies.
- application image is a native self-contained Java application including all the necessary dependencies to run the project application without the need of a Java runtime.
- container image is a Docker or OCI container image that can be packaged as a
.tararchive or directly loaded on a Docker daemon or pushed to a container registry.
The plugin is a Maven implementation of the Inverno Build Tools, it can be used to build any Java modular application project and Inverno application in particular.
Run a module application project
The inverno:run goal is used to execute the modular application defined in the project from the command line.
$ mvn inverno:run
The application is first modularized which means that any non-modular dependency is modularized by generating an appropriate module descriptor in order for the application to run with a module path and not a class path (and certainly not both).
The application is executed in a forked process, application arguments can be passed on the command line as follows:
$ mvn inverno:run -Dinverno.run.arguments='--some.configuration=\"hello\"'
Actual arguments are determined by splitting the parameter value around spaces. There are several options to declare an argument which contains spaces:
- it can be escaped:
Hello\ World- it can be quoted:
"Hello World"or'Hello World'Since quotes or double quotes are used as delimiters, they might need to be escaped as well to declare an argument that contains some:
I\'m\ happy,"I'm happy",'I\'m happy'.
The way quotes are escaped greatly depends on the operating system. Above examples refers to Unix systems with proper shells, please look for the right documentation if you are using a different one.
VM options can be specified as follows:
$ mvn inverno:run -Dinverno.exec.vmOptions="-Xms2G -Xmx2G"
By default, the plugin will detect the main class of the application, but it is also possible to specify it explicitly in case multiple main classes exist in the project module.
$ mvn inverno:run -Dinverno.exec.mainClass=io.inverno.example.Main
When building an Inverno application, a pidfile is normally created when the application is started under
${project.build.directory}/maven-invernodirectory, it indicates the pid of the process running the application. If the build exits while the application is still running or if the pidfile was not properly removed after the application has exited, it might be necessary to manually kill the process and/or remove the pidfile.
Debug a module application project
The inverno:debug goal is used to execute the modular application defined in the project from the command line with JVM debug options (e.g. -Xdebug -Xrunjdwp:transport=dt_socket,server=y,suspend=y,address=localhost:8000).
$ mvn inverno:debug
...
Listening for transport dt_socket at address: 8000
...
This goal is similar to the inverno:run goal and accepts the same arguments:
$ mvn inverno:debug -Dinverno.exec.vmOptions="-Xms2G -Xmx2G" -Dinverno.exec.mainClass="io.inverno.example.Main" -Dinverno.debug.arguments='--some.configuration=\"hello\"'
The debug port and whether to suspend or not the execution until a debugger is attached can also be specified:
$ mvn inverno:debug -Dinverno.debug.port=9000 -Dinverno.debug.suspend=false
Start and stop the application for integration testing
The inverno:start and inverno:stop goals are used together to start and stop the application while not blocking the Maven build process which can then execute other goals targeting the running application such as integration tests.
They are bound to the pre-integration-test and pre-integration-test phases respectively:
<project>
<build>
<plugins>
<plugin>
<groupId>io.inverno.tool</groupId>
<artifactId>inverno-maven-plugin</artifactId>
<executions>
<execution>
<id>start</id>
<phase>pre-integration-test</phase>
<goals>
<goal>start</goal>
</goals>
</execution>
<execution>
<id>stop</id>
<phase>post-integration-test</phase>
<goals>
<goal>stop</goal>
</goals>
</execution>
</executions>
</plugin>
</plugins>
</build>
</project>
In order to detect when the application has started, the start goal waits for a pidfile containing the application pid to be created by the application. If the application doesn't create that pidfile, the goal eventually times out and the build fails.
Build a runtime image
A runtime image is a custom Java runtime distribution containing specific modules and their dependencies. Such image is used as a base for generating application image, but it can also be distributed as a lightweight Java runtime specific to the project module.
The inverno:build-runtime goal assemble the project module and its dependencies.
<project>
<build>
<plugins>
<plugin>
<groupId>io.inverno.tool</groupId>
<artifactId>inverno-maven-plugin</artifactId>
<executions>
<execution>
<id>build-runtime</id>
<phase>package</phase>
<goals>
<goal>build-runtime</goal>
</goals>
<configuration>
<vm>server</vm>
<addModules>jdk.jdwp.agent,jdk.crypto.ec</addModules>
<vmOptions>-Xms2G -Xmx2G -XX:+UseNUMA -XX:+UseParallelGC</vmOptions>
<archiveFormats>
<archiveFormat>zip</archiveFormat>
<archiveFormat>tar.gz</archiveFormat>
<archiveFormat>tar.bz2</archiveFormat>
</archiveFormats>
</configuration>
</execution>
</executions>
</plugin>
</plugins>
</build>
</project>
By default, the project module and its dependencies are included in the resulting image, this include JDK's modules such as java.base, in the previous example we've also explicitly added the jdk.jdwp.agent to support remote debugging and jdk.crypto.ec to support TLS communications.
The resulting image is packaged to the formats defined in the configuration and attached, by default, to the Maven project as a result they are installed and published along with the project .jar.
Package an application
An application image is built using the inverno:package-app goal which generates a native platform-specific application package.
<project>
<build>
<plugins>
<plugin>
<groupId>io.inverno.tool</groupId>
<artifactId>inverno-maven-plugin</artifactId>
<executions>
<execution>
<id>package-application</id>
<phase>package</phase>
<goals>
<goal>package-app</goal>
</goals>
<configuration>
<vm>server</vm>
<addModules>jdk.jdwp.agent,jdk.crypto.ec</addModules>
<launchers>
<launcher>
<name>app</name>
<vmOptions>-Xms2G -Xmx2G -XX:+UseNUMA -XX:+UseParallelGC</vmOptions>
</launcher>
</launchers>
<packageTypes>
<packageType>deb</packageType>
</packageTypes>
<archiveFormat>
<archiveFormat>zip</archiveFormat>
</archiveFormat>
</configuration>
</execution>
</executions>
</plugin>
</plugins>
</build>
</project>
The inverno:package-app goal is very similar to the inverno:build-runtime goal except that the resulting image provides a native application launcher, and it can be packaged in a platform-specific format. For instance, we can generate a .deb on a Linux platform or a .exe or .msi installer on a Windows platform or a .dmg on a macOS platform. The resulting package can be installed on these platforms in a standard way.
This goal uses
jpackagetool which is an incubating feature in JDK<16, if you intend to build an application image with an old JDK, you'll need to explicitly add thejdk.incubator.jpackagemodule inMAVEN_OPTS:$ export MAVEN_OPTS="--add-modules jdk.incubator.jpackage"
Package an application container image
A container image can be built in a TAR archive using the inverno:package-image goal which basically build an application image and package it in a container image.
<project>
<build>
<plugins>
<plugin>
<groupId>io.inverno.tool</groupId>
<artifactId>inverno-maven-plugin</artifactId>
<executions>
<execution>
<id>package-image</id>
<phase>package</phase>
<goals>
<goal>package-image</goal>
</goals>
<configuration>
<vm>server</vm>
<addModules>jdk.jdwp.agent,jdk.crypto.ec</addModules>
<executable>app</executable>
<launchers>
<launcher>
<name>app</name>
<vmOptions>-Xms2G -Xmx2G -XX:+UseNUMA -XX:+UseParallelGC</vmOptions>
</launcher>
</launchers>
<repository>example</repository>
</configuration>
</execution>
</executions>
</plugin>
</plugins>
</build>
</project>
The resulting image reference is defined by ${registry}/${repository}/${name}:${project.version}, the registry and the repository are optional and the name default to the project artifact id.
The resulting image can then be loaded in a docker daemon:
$ docker load --input target/example-1.0.0-SNAPSHOT-container_linux_amd64.tar
As for
package-appgoal, this goal usesjpackagetool so if you intend to use a JDK<16 you'll need to explicitly add thejdk.incubator.jpackagemodule inMAVEN_OPTS:$ export MAVEN_OPTS="--add-modules jdk.incubator.jpackage"
Install an application container image to a Docker daemon
The inverno:install-image goal is used to build a container image and load it to a Docker daemon using the Docker CLI.
<project>
<build>
<plugins>
<plugin>
<groupId>io.inverno.tool</groupId>
<artifactId>inverno-maven-plugin</artifactId>
<executions>
<execution>
<id>install-image</id>
<phase>install</phase>
<goals>
<goal>install-image</goal>
</goals>
<configuration>
<vm>server</vm>
<addModules>jdk.jdwp.agent,jdk.crypto.ec</addModules>
<executable>app</executable>
<launchers>
<launcher>
<name>app</name>
<vmOptions>-Xms2G -Xmx2G -XX:+UseNUMA -XX:+UseParallelGC</vmOptions>
</launcher>
</launchers>
<repository>example</repository>
</configuration>
</execution>
</executions>
</plugin>
</plugins>
</build>
</project>
By default, the docker command is used, but it is possible to specify the path to the Docker CLI in the inverno.container.docker.executable parameter.
As for
package-appgoal, this goal usesjpackagetool so if you intend to use a JDK<16 you'll need to explicitly add thejdk.incubator.jpackagemodule inMAVEN_OPTS:$ export MAVEN_OPTS="--add-modules jdk.incubator.jpackage"
Deploy an application container image to a registry
The inverno:deploy-image goal builds a container image and deploy it to an image registry.
<project>
<build>
<plugins>
<plugin>
<groupId>io.inverno.tool</groupId>
<artifactId>inverno-maven-plugin</artifactId>
<executions>
<execution>
<id>deploy-image</id>
<phase>deploy</phase>
<goals>
<goal>deploy-image</goal>
</goals>
<configuration>
<vm>server</vm>
<addModules>jdk.jdwp.agent,jdk.crypto.ec</addModules>
<executable>app</executable>
<launchers>
<launcher>
<name>app</name>
<vmOptions>-Xms2G -Xmx2G -XX:+UseNUMA -XX:+UseParallelGC</vmOptions>
</launcher>
</launchers>
<registryUsername>user</registryUsername>
<registryPassword>password</registryPassword>
<registry>gcr.io</registry>
<repository>example</repository>
</configuration>
</execution>
</executions>
</plugin>
</plugins>
</build>
</project>
By default, the registry points to the Docker hub docker.io but another registry can be specified, gcr.io in our example.
As for
package-appgoal, this goal usesjpackagetool so if you intend to use a JDK<16 you'll need to explicitly add thejdk.incubator.jpackagemodule inMAVEN_OPTS:$ export MAVEN_OPTS="--add-modules jdk.incubator.jpackage"
Goals
Overview
- inverno:build-runtime Builds the project runtime image.
- inverno:debug Debugs the project application.
- inverno:deploy-image Builds and deploys the project application container image to an image registry.
- inverno:help Display help information on inverno-maven-plugin.
- inverno:install-image Builds and installs the project application container image to the local Docker daemon.
- inverno:package-app Builds and packages the project application image.
- inverno:package-image Builds and packages the project application container image in a TAR archive.
- inverno:run Runs the project application.
- inverno:start Starts the project application without blocking the Maven build.
- inverno:stop Stops the project application that has been previously started using the start goal.
inverno:build-runtime
Full name:
io.inverno.tool:inverno-maven-plugin:1.6.0:build-runtime
Description:
Builds the project runtime image.
A runtime image is a custom Java runtime containing a set of modules and their dependencies.
Attributes:
- Requires a Maven project to be executed.
- Requires dependency resolution of artifacts in scope: compile+runtime.
- Requires dependency collection of artifacts in scope: compile+runtime.
- Since version: 1.0.
- Binds by default to the lifecycle phase: package.
Required parameters
| Name | Type | Description |
|---|---|---|
| archiveFormats | String> | A list of archive formats to generate (e.g. zip, tar.gz...)
|
| attach | boolean | Attaches the resulting image archives to the project to install them in the local Maven repository and deploy them to remote repositories.
|
Optional parameters
| Name | Type | Description |
|---|---|---|
| addModules | String | The modules to add to the resulting runtime.
|
| addOptions | String | The options to prepend before any other options when invoking the JVM in the resulting runtime.
|
| addUnnamedModules | boolean | Adds unnamed modules when generating the runtime.
|
| archivePrefix | String | The path to the runtime image within the archive.
|
| bindServices | boolean | Links in service provider modules and their dependencies.
|
| compress | String | The compress level of the resulting image: 0=No compression, 1=constant string sharing, 2=ZIP.
|
| configurationDirectory | File | A directory containing user-editable configuration files that will be copied to the resulting runtime.
|
| excludeArtifactIds | String | Comma separated list of Artifact names to exclude.
|
| excludeClassifiers | String | Comma separated list of Classifiers to exclude. Empty String indicates don't exclude anything (default).
|
| excludeGroupIds | String | Comma separated list of GroupId Names to exclude.
|
| excludeScope | String | Scope to exclude. An Empty string indicates no scopes (default).
|
| ignoreSigningInformation | boolean | Suppresses a fatal error when signed modular JARs are linked in the runtime.
|
| includeArtifactIds | String | Comma separated list of Artifact names to include. Empty String indicates include everything (default).
|
| includeClassifiers | String | Comma separated list of Classifiers to include. Empty String indicates include everything (default).
|
| includeGroupIds | String | Comma separated list of GroupIds to include. Empty String indicates include everything (default).
|
| includeScope | String | Scope to include. An Empty string indicates all scopes (default). The scopes being interpreted are the scopes as Maven sees them, not as specified in the pom. In summary:
|
| launchers | RuntimeLauncherParameters> | A list of launchers to include in the resulting runtime.
|
| legalDirectory | File | A directory containing legal notices that will be copied to the resulting runtime.
|
| manDirectory | File | A directory containing man pages that will be copied to the resulting runtime.
|
| moduleOverrides | ModuleInfoParameters> | A list of module-info.java overrides that will be merged into the generated module descriptors for unnamed or automatic modules.
|
| moduleOverridesDirectory | File | A directory containing module descriptors to use to modularize unnamed or automatic dependency modules and which replace the ones that are otherwise generated.
|
| progressBar | boolean | Displays a progress bar.
|
| projectMainClass | String | The main class in the project module to use when building the project JMOD package.
|
| resolveProjectMainClass | boolean | Resolves the project main class when not specified explicitly.
|
| skip | boolean | Skips the generation of the runtime.
|
| stripDebug | boolean | Strips debug information from the resulting runtime.
|
| stripNativeCommands | boolean | Strips native command (e.g. java...) from the resulting runtime.
|
| vm | String | Selects the HotSpot VM in the output image defined as: "client" / "server" / "minimal" / "all".
|
Parameter details
<addModules>
The modules to add to the resulting runtime.
- Type: java.lang.String
- Required: no
- User property: inverno.runtime.addModules
<addOptions>
The options to prepend before any other options when invoking the JVM in the resulting runtime.
- Type: java.lang.String
- Required: no
- User property: inverno.runtime.addOptions
<addUnnamedModules>
Adds unnamed modules when generating the runtime.
- Type: boolean
- Required: no
- User property: inverno.runtime.addUnnamedModules
- Default: true
<archiveFormats>
A list of archive formats to generate (e.g. zip, tar.gz...)
- Type: java.util.Set<java.lang.String>
- Required: yes
- User property: inverno.runtime.archiveFormats
<archivePrefix>
The path to the runtime image within the archive.
- Type: java.lang.String
- Required: no
- User property: inverno.runtime.archivePrefix
- Default: ${project.build.finalName}
<attach>
Attaches the resulting image archives to the project to install them in the local Maven repository and deploy them to remote repositories.
- Type: boolean
- Required: yes
- User property: inverno.attach
- Default: true
<bindServices>
Links in service provider modules and their dependencies.
- Type: boolean
- Required: no
- User property: inverno.runtime.bindServices
- Default: false
<compress>
The compress level of the resulting image: 0=No compression, 1=constant string sharing, 2=ZIP.
- Type: java.lang.String
- Required: no
- User property: inverno.runtime.compress
<configurationDirectory>
A directory containing user-editable configuration files that will be copied to the resulting runtime.
- Type: java.io.File
- Required: no
- User property: inverno.runtime.configurationDirectory
- Default: ${project.basedir}/src/main/conf/
<excludeArtifactIds>
Comma separated list of Artifact names to exclude.
- Type: java.lang.String
- Required: no
- User property: inverno.runtime.excludeArtifactIds
<excludeClassifiers>
Comma separated list of Classifiers to exclude. Empty String indicates don't exclude anything (default).
- Type: java.lang.String
- Required: no
- User property: inverno.runtime.excludeClassifiers
<excludeGroupIds>
Comma separated list of GroupId Names to exclude.
- Type: java.lang.String
- Required: no
- User property: inverno.runtime.excludeGroupIds
<excludeScope>
Scope to exclude. An Empty string indicates no scopes (default).
- Type: java.lang.String
- Required: no
- User property: inverno.runtime.excludeScope
<ignoreSigningInformation>
Suppresses a fatal error when signed modular JARs are linked in the runtime.
- Type: boolean
- Required: no
- User property: inverno.runtime.ignoreSigningInformation
- Default: false
<includeArtifactIds>
Comma separated list of Artifact names to include. Empty String indicates include everything (default).
- Type: java.lang.String
- Required: no
- User property: inverno.runtime.includeArtifactIds
<includeClassifiers>
Comma separated list of Classifiers to include. Empty String indicates include everything (default).
- Type: java.lang.String
- Required: no
- User property: inverno.runtime.includeClassifiers
<includeGroupIds>
Comma separated list of GroupIds to include. Empty String indicates include everything (default).
- Type: java.lang.String
- Required: no
- User property: inverno.runtime.includeGroupIds
<includeScope>
Scope to include. An Empty string indicates all scopes (default). The scopes being interpreted are the scopes as Maven sees them, not as specified in the pom. In summary:
- runtime scope gives runtime and compile dependencies,
- compile scope gives compile, provided, and system dependencies,
- test (default) scope gives all dependencies,
- provided scope just gives provided dependencies,
- system scope just gives system dependencies.
- Type: java.lang.String
- Required: no
- User property: inverno.runtime.includeScope
<launchers>
A list of launchers to include in the resulting runtime.
- Type: java.util.List<io.inverno.tool.maven.RuntimeLauncherParameters>
- Required: no
<legalDirectory>
A directory containing legal notices that will be copied to the resulting runtime.
- Type: java.io.File
- Required: no
- User property: inverno.runtime.legalDirectory
- Default: ${project.basedir}/src/main/legal/
<manDirectory>
A directory containing man pages that will be copied to the resulting runtime.
- Type: java.io.File
- Required: no
- User property: inverno.runtime.manDirectory
- Default: ${project.basedir}/src/main/man/
<moduleOverrides>
A list of module-info.java overrides that will be merged into the generated module descriptors for unnamed or automatic modules.
- Type: java.util.List<io.inverno.tool.maven.ModuleInfoParameters>
- Required: no
<moduleOverridesDirectory>
A directory containing module descriptors to use to modularize unnamed or automatic dependency modules and which replace the ones that are otherwise generated.
- Type: java.io.File
- Required: no
- User property: inverno.moduleOverridesDirectory
- Default: ${project.basedir}/src/modules/
<progressBar>
Displays a progress bar.
- Type: boolean
- Required: no
- User property: inverno.progressBar
- Default: true
<projectMainClass>
The main class in the project module to use when building the project JMOD package.
- Type: java.lang.String
- Required: no
- User property: inverno.runtime.mainClass
<resolveProjectMainClass>
Resolves the project main class when not specified explicitly.
- Type: boolean
- Required: no
- User property: inverno.runtime.resolveMainClass
- Default: false
<skip>
Skips the generation of the runtime.
- Type: boolean
- Required: no
- User property: inverno.runtime.skip
<stripDebug>
Strips debug information from the resulting runtime.
- Type: boolean
- Required: no
- User property: inverno.runtime.stripDebug
- Default: true
<stripNativeCommands>
Strips native command (e.g. java...) from the resulting runtime.
- Type: boolean
- Required: no
- User property: inverno.runtime.stripNativeCommands
- Default: true
<vm>
Selects the HotSpot VM in the output image defined as: "client" / "server" / "minimal" / "all".
- Type: java.lang.String
- Required: no
- User property: inverno.runtime.vm
inverno:debug
Full name:
io.inverno.tool:inverno-maven-plugin:1.6.0:debug
Description:
Debugs the project application.
Attributes:
- Requires a Maven project to be executed.
- Requires dependency resolution of artifacts in scope: compile+runtime.
- Requires dependency collection of artifacts in scope: compile+runtime.
- Since version: 1.4.
- Binds by default to the lifecycle phase: validate.
Optional parameters
| Name | Type | Description |
|---|---|---|
| addUnnamedModules | boolean | Adds the unnamed modules when executing the application.
|
| arguments | String | The arguments to pass to the application.
|
| commandLineArguments | String | The command line arguments to pass to the application. This parameter overrides arguments when specified.
|
| mainClass | String | The main class to use to run the application. If not specified, one of the main class in the project module is automatically selected.
|
| moduleOverrides | ModuleInfoParameters> | A list of module-info.java overrides that will be merged into the generated module descriptors for unnamed or automatic modules.
|
| moduleOverridesDirectory | File | A directory containing module descriptors to use to modularize unnamed or automatic dependency modules and which replace the ones that are otherwise generated.
|
| port | int | The debug port.
|
| progressBar | boolean | Displays a progress bar.
|
| skip | boolean | Skips the execution.
|
| suspend | boolean | Indicates whether to suspend execution until a debugger is attached.
|
| vmOptions | String | The VM options to use when executing the application.
|
| workingDirectory | File | The working directory of the application.
|
Parameter details
<addUnnamedModules>
Adds the unnamed modules when executing the application.
- Type: boolean
- Required: no
- User property: inverno.exec.addUnnamedModules
- Default: true
<arguments>
The arguments to pass to the application.
- Type: java.lang.String
- Required: no
<commandLineArguments>
The command line arguments to pass to the application. This parameter overrides arguments when specified.
- Type: java.lang.String
- Required: no
- User property: inverno.debug.arguments
<mainClass>
The main class to use to run the application. If not specified, one of the main class in the project module is automatically selected.
- Type: java.lang.String
- Required: no
- User property: inverno.exec.mainClass
<moduleOverrides>
A list of module-info.java overrides that will be merged into the generated module descriptors for unnamed or automatic modules.
- Type: java.util.List<io.inverno.tool.maven.ModuleInfoParameters>
- Required: no
<moduleOverridesDirectory>
A directory containing module descriptors to use to modularize unnamed or automatic dependency modules and which replace the ones that are otherwise generated.
- Type: java.io.File
- Required: no
- User property: inverno.moduleOverridesDirectory
- Default: ${project.basedir}/src/modules/
<port>
The debug port.
- Type: int
- Required: no
- User property: inverno.debug.port
- Default: 8000
<progressBar>
Displays a progress bar.
- Type: boolean
- Required: no
- User property: inverno.progressBar
- Default: true
<skip>
Skips the execution.
- Type: boolean
- Required: no
- User property: inverno.debug.skip
<suspend>
Indicates whether to suspend execution until a debugger is attached.
- Type: boolean
- Required: no
- User property: inverno.debug.suspend
- Default: true
<vmOptions>
The VM options to use when executing the application.
- Type: java.lang.String
- Required: no
- User property: inverno.exec.vmOptions
- Default: -Dlog4j2.simplelogLevel=INFO -Dlog4j2.level=INFO
<workingDirectory>
The working directory of the application.
- Type: java.io.File
- Required: no
- User property: inverno.exec.workingDirectory
- Default: ${project.build.directory}/maven-inverno/working
inverno:deploy-image
Full name:
io.inverno.tool:inverno-maven-plugin:1.6.0:deploy-image
Description:
Builds and deploys the project application container image to an image registry.
Attributes:
- Requires a Maven project to be executed.
- Requires dependency resolution of artifacts in scope: compile+runtime.
- Requires dependency collection of artifacts in scope: compile+runtime.
- Since version: 1.4.
- Binds by default to the lifecycle phase: install.
Required parameters
| Name | Type | Description |
|---|---|---|
| archiveFormats | String> | A list of archive formats to generate (e.g. zip, tar.gz...)
|
| attach | boolean | Attaches the resulting image archives to the project to install them in the local Maven repository and deploy them to remote repositories.
|
| executable | String | The executable in the application image to use as image entry point. The specified name should correspond to a declared application image launchers or the project artifact id if no launcher was specified.
|
| from | String | The base container image.
|
Optional parameters
| Name | Type | Description |
|---|---|---|
| aboutURL | String | The application's home page URL.
|
| addModules | String | The modules to add to the resulting runtime.
|
| addOptions | String | The options to prepend before any other options when invoking the JVM in the resulting runtime.
|
| addUnnamedModules | boolean | Adds unnamed modules when generating the runtime.
|
| archivePrefix | String | The path to the runtime image within the archive.
|
| automaticLaunchers | boolean | Enables the automatic generation of launchers based on the main classes extracted from the application module. If enabled, a launcher is generated for all main classes other than the main launcher.
|
| bindServices | boolean | Links in service provider modules and their dependencies.
|
| compress | String | The compress level of the resulting image: 0=No compression, 1=constant string sharing, 2=ZIP.
|
| configurationDirectory | File | A directory containing user-editable configuration files that will be copied to the resulting runtime.
|
| contentFiles | File> | Files to add to the application payload.
|
| copyright | String | The application copyright.
|
| environment | String> | The container's environment variables.
|
| excludeArtifactIds | String | Comma separated list of Artifact names to exclude.
|
| excludeClassifiers | String | Comma separated list of Classifiers to exclude. Empty String indicates don't exclude anything (default).
|
| excludeGroupIds | String | Comma separated list of GroupId Names to exclude.
|
| excludeScope | String | Scope to exclude. An Empty string indicates no scopes (default).
|
| ignoreSigningInformation | boolean | Suppresses a fatal error when signed modular JARs are linked in the runtime.
|
| imageFormat | Format | The format of the container image.
|
| includeArtifactIds | String | Comma separated list of Artifact names to include. Empty String indicates include everything (default).
|
| includeClassifiers | String | Comma separated list of Classifiers to include. Empty String indicates include everything (default).
|
| includeGroupIds | String | Comma separated list of GroupIds to include. Empty String indicates include everything (default).
|
| includeScope | String | Scope to include. An Empty string indicates all scopes (default). The scopes being interpreted are the scopes as Maven sees them, not as specified in the pom. In summary:
|
| installDirectory | String | Absolute path of the installation directory of the application on OS X or Linux. Relative sub-path of the installation location of the application such as "Program Files" or "AppData" on Windows.
|
| labels | String> | The labels to apply to the container image.
|
| launchers | ApplicationLauncherParameters> | The specific list of launchers to include in the resulting application. The first launcher in the list will be considered as the main launcher.
|
| legalDirectory | File | A directory containing legal notices that will be copied to the resulting runtime.
|
| licenseFile | File | The path to the application license file.
|
| linuxConfiguration | LinuxConfigurationParameters | Linux specific configuration.
|
| macOSConfiguration | MacOSConfigurationParameters | MacOS specific configuration.
|
| manDirectory | File | A directory containing man pages that will be copied to the resulting runtime.
|
| moduleOverrides | ModuleInfoParameters> | A list of module-info.java overrides that will be merged into the generated module descriptors for unnamed or automatic modules.
|
| moduleOverridesDirectory | File | A directory containing module descriptors to use to modularize unnamed or automatic dependency modules and which replace the ones that are otherwise generated.
|
| packageTypes | String> | A list of package types to generate (e.g. rpm, deb, exe, msi, dmg pkg...)
|
| ports | String> | The ports exposed by the container at runtime defined as: port_number [ "/" udp/tcp ] .
|
| progressBar | boolean | Displays a progress bar.
|
| projectMainClass | String | The main class in the project module to use when building the project JMOD package.
|
| registry | String | The registry part of the target image reference defined as: ${registry}/${repository}/${name}:${project.version}
|
| registryPassword | String | The password to use to authenticate to the registry.
|
| registryUsername | String | The username to use to authenticate to the registry.
|
| repository | String | The repository part of the target image reference defined as: ${registry}/${repository}/${name}:${project.version}
|
| resolveProjectMainClass | boolean | Resolves the project main class when not specified explicitly.
|
| resourceDirectory | File | The path to resources that override resulting package resources.
|
| skip | boolean | Skips the build and deployment of the container image.
|
| stripDebug | boolean | Strips debug information from the resulting runtime.
|
| stripNativeCommands | boolean | Strips native command (e.g. java...) from the resulting runtime.
|
| user | String | The user and group used to run the container defined as: user / uid [ ":" group / gid ].
|
| vendor | String | The application vendor.
|
| vm | String | Selects the HotSpot VM in the output image defined as: "client" / "server" / "minimal" / "all".
|
| volumes | String> | The container's mount points.
|
| windowsConfiguration | WindowsConfigurationParameters | Windows specific configuration.
|
Parameter details
<aboutURL>
The application's home page URL.
- Type: java.lang.String
- Required: no
- User property: inverno.app.aboutURL
- Default: ${project.url}
<addModules>
The modules to add to the resulting runtime.
- Type: java.lang.String
- Required: no
- User property: inverno.runtime.addModules
<addOptions>
The options to prepend before any other options when invoking the JVM in the resulting runtime.
- Type: java.lang.String
- Required: no
- User property: inverno.runtime.addOptions
<addUnnamedModules>
Adds unnamed modules when generating the runtime.
- Type: boolean
- Required: no
- User property: inverno.runtime.addUnnamedModules
- Default: true
<archiveFormats>
A list of archive formats to generate (e.g. zip, tar.gz...)
- Type: java.util.Set<java.lang.String>
- Required: yes
- User property: inverno.runtime.archiveFormats
<archivePrefix>
The path to the runtime image within the archive.
- Type: java.lang.String
- Required: no
- User property: inverno.runtime.archivePrefix
- Default: ${project.build.finalName}
<attach>
Attaches the resulting image archives to the project to install them in the local Maven repository and deploy them to remote repositories.
- Type: boolean
- Required: yes
- User property: inverno.attach
- Default: true
<automaticLaunchers>
Enables the automatic generation of launchers based on the main classes extracted from the application module. If enabled, a launcher is generated for all main classes other than the main launcher.
- Type: boolean
- Required: no
- User property: inverno.app.automaticLaunchers
- Default: false
<bindServices>
Links in service provider modules and their dependencies.
- Type: boolean
- Required: no
- User property: inverno.runtime.bindServices
- Default: false
<compress>
The compress level of the resulting image: 0=No compression, 1=constant string sharing, 2=ZIP.
- Type: java.lang.String
- Required: no
- User property: inverno.runtime.compress
<configurationDirectory>
A directory containing user-editable configuration files that will be copied to the resulting runtime.
- Type: java.io.File
- Required: no
- User property: inverno.runtime.configurationDirectory
- Default: ${project.basedir}/src/main/conf/
<contentFiles>
Files to add to the application payload.
- Type: java.util.List<java.io.File>
- Required: no
- User property: inverno.app.contentFiles
<copyright>
The application copyright.
- Type: java.lang.String
- Required: no
- User property: inverno.app.copyright
<environment>
The container's environment variables.
- Type: java.util.Map<java.lang.String, java.lang.String>
- Required: no
<excludeArtifactIds>
Comma separated list of Artifact names to exclude.
- Type: java.lang.String
- Required: no
- User property: inverno.runtime.excludeArtifactIds
<excludeClassifiers>
Comma separated list of Classifiers to exclude. Empty String indicates don't exclude anything (default).
- Type: java.lang.String
- Required: no
- User property: inverno.runtime.excludeClassifiers
<excludeGroupIds>
Comma separated list of GroupId Names to exclude.
- Type: java.lang.String
- Required: no
- User property: inverno.runtime.excludeGroupIds
<excludeScope>
Scope to exclude. An Empty string indicates no scopes (default).
- Type: java.lang.String
- Required: no
- User property: inverno.runtime.excludeScope
<executable>
The executable in the application image to use as image entry point. The specified name should correspond to a declared application image launchers or the project artifact id if no launcher was specified.
- Type: java.lang.String
- Required: yes
- User property: inverno.container.executable
- Default: ${project.artifactId}
<from>
The base container image.
- Type: java.lang.String
- Required: yes
- User property: inverno.container.from
- Default: debian:buster-slim
<ignoreSigningInformation>
Suppresses a fatal error when signed modular JARs are linked in the runtime.
- Type: boolean
- Required: no
- User property: inverno.runtime.ignoreSigningInformation
- Default: false
<imageFormat>
The format of the container image.
- Type: io.inverno.tool.buildtools.ContainerizeTask$Format
- Required: no
- User property: inverno.container.imageFormat
- Default: Docker
<includeArtifactIds>
Comma separated list of Artifact names to include. Empty String indicates include everything (default).
- Type: java.lang.String
- Required: no
- User property: inverno.runtime.includeArtifactIds
<includeClassifiers>
Comma separated list of Classifiers to include. Empty String indicates include everything (default).
- Type: java.lang.String
- Required: no
- User property: inverno.runtime.includeClassifiers
<includeGroupIds>
Comma separated list of GroupIds to include. Empty String indicates include everything (default).
- Type: java.lang.String
- Required: no
- User property: inverno.runtime.includeGroupIds
<includeScope>
Scope to include. An Empty string indicates all scopes (default). The scopes being interpreted are the scopes as Maven sees them, not as specified in the pom. In summary:
- runtime scope gives runtime and compile dependencies,
- compile scope gives compile, provided, and system dependencies,
- test (default) scope gives all dependencies,
- provided scope just gives provided dependencies,
- system scope just gives system dependencies.
- Type: java.lang.String
- Required: no
- User property: inverno.runtime.includeScope
<installDirectory>
Absolute path of the installation directory of the application on OS X or Linux. Relative sub-path of the installation location of the application such as "Program Files" or "AppData" on Windows.
- Type: java.lang.String
- Required: no
- User property: inverno.app.installDirectory
<labels>
The labels to apply to the container image.
- Type: java.util.Map<java.lang.String, java.lang.String>
- Required: no
<launchers>
The specific list of launchers to include in the resulting application. The first launcher in the list will be considered as the main launcher.
- Type: java.util.List<io.inverno.tool.maven.ApplicationLauncherParameters>
- Required: no
<legalDirectory>
A directory containing legal notices that will be copied to the resulting runtime.
- Type: java.io.File
- Required: no
- User property: inverno.runtime.legalDirectory
- Default: ${project.basedir}/src/main/legal/
<licenseFile>
The path to the application license file.
- Type: java.io.File
- Required: no
- User property: inverno.app.licenseFile
- Default: ${project.basedir}/LICENSE
<linuxConfiguration>
Linux specific configuration.
- Type: io.inverno.tool.maven.LinuxConfigurationParameters
- Required: no
<macOSConfiguration>
MacOS specific configuration.
- Type: io.inverno.tool.maven.MacOSConfigurationParameters
- Required: no
<manDirectory>
A directory containing man pages that will be copied to the resulting runtime.
- Type: java.io.File
- Required: no
- User property: inverno.runtime.manDirectory
- Default: ${project.basedir}/src/main/man/
<moduleOverrides>
A list of module-info.java overrides that will be merged into the generated module descriptors for unnamed or automatic modules.
- Type: java.util.List<io.inverno.tool.maven.ModuleInfoParameters>
- Required: no
<moduleOverridesDirectory>
A directory containing module descriptors to use to modularize unnamed or automatic dependency modules and which replace the ones that are otherwise generated.
- Type: java.io.File
- Required: no
- User property: inverno.moduleOverridesDirectory
- Default: ${project.basedir}/src/modules/
<packageTypes>
A list of package types to generate (e.g. rpm, deb, exe, msi, dmg pkg...)
- Type: java.util.Set<java.lang.String>
- Required: no
- User property: inverno.app.packageTypes
<ports>
The ports exposed by the container at runtime defined as: port_number [ "/" udp/tcp ] .
- Type: java.util.Set<java.lang.String>
- Required: no
<progressBar>
Displays a progress bar.
- Type: boolean
- Required: no
- User property: inverno.progressBar
- Default: true
<projectMainClass>
The main class in the project module to use when building the project JMOD package.
- Type: java.lang.String
- Required: no
- User property: inverno.runtime.mainClass
<registry>
The registry part of the target image reference defined as: ${registry}/${repository}/${name}:${project.version}
- Type: java.lang.String
- Required: no
- User property: inverno.container.registry
<registryPassword>
The password to use to authenticate to the registry.
- Type: java.lang.String
- Required: no
- User property: inverno.container.registryPassword
<registryUsername>
The username to use to authenticate to the registry.
- Type: java.lang.String
- Required: no
- User property: inverno.container.registryUsername
<repository>
The repository part of the target image reference defined as: ${registry}/${repository}/${name}:${project.version}
- Type: java.lang.String
- Required: no
- User property: inverno.container.repository
<resolveProjectMainClass>
Resolves the project main class when not specified explicitly.
- Type: boolean
- Required: no
- User property: inverno.runtime.resolveMainClass
- Default: false
<resourceDirectory>
The path to resources that override resulting package resources.
- Type: java.io.File
- Required: no
- User property: inverno.app.resourceDirectory
<skip>
Skips the build and deployment of the container image.
- Type: boolean
- Required: no
- User property: inverno.image.install.skip
<stripDebug>
Strips debug information from the resulting runtime.
- Type: boolean
- Required: no
- User property: inverno.runtime.stripDebug
- Default: true
<stripNativeCommands>
Strips native command (e.g. java...) from the resulting runtime.
- Type: boolean
- Required: no
- User property: inverno.runtime.stripNativeCommands
- Default: true
<user>
The user and group used to run the container defined as: user / uid [ ":" group / gid ].
- Type: java.lang.String
- Required: no
<vendor>
The application vendor.
- Type: java.lang.String
- Required: no
- User property: inverno.app.vendor
- Default: ${project.organization.name}
<vm>
Selects the HotSpot VM in the output image defined as: "client" / "server" / "minimal" / "all".
- Type: java.lang.String
- Required: no
- User property: inverno.runtime.vm
<volumes>
The container's mount points.
- Type: java.util.Set<java.lang.String>
- Required: no
<windowsConfiguration>
Windows specific configuration.
- Type: io.inverno.tool.maven.WindowsConfigurationParameters
- Required: no
inverno:help
Full name:
io.inverno.tool:inverno-maven-plugin:1.6.0:help
Description:
Display help information on inverno-maven-plugin. Call mvn inverno:help -Ddetail=true -Dgoal=<goal-name> to display parameter details.
Attributes:
Optional parameters
| Name | Type | Description |
|---|---|---|
| detail | boolean | If true, display all settable properties for each goal.
|
| goal | String | The name of the goal for which to show help. If unspecified, all goals will be displayed.
|
| indentSize | int | The number of spaces per indentation level, should be positive.
|
| lineLength | int | The maximum length of a display line, should be positive.
|
Parameter details
<detail>
If true, display all settable properties for each goal.
- Type: boolean
- Required: no
- User property: detail
- Default: false
<goal>
The name of the goal for which to show help. If unspecified, all goals will be displayed.
- Type: java.lang.String
- Required: no
- User property: goal
<indentSize>
The number of spaces per indentation level, should be positive.
- Type: int
- Required: no
- User property: indentSize
- Default: 2
<lineLength>
The maximum length of a display line, should be positive.
- Type: int
- Required: no
- User property: lineLength
- Default: 80
inverno:install-image
Full name:
io.inverno.tool:inverno-maven-plugin:1.6.0:install-image
Description:
Builds and installs the project application container image to the local Docker daemon.
Attributes:
- Requires a Maven project to be executed.
- Requires dependency resolution of artifacts in scope: compile+runtime.
- Requires dependency collection of artifacts in scope: compile+runtime.
- Since version: 1.4.
- Binds by default to the lifecycle phase: install.
Required parameters
| Name | Type | Description |
|---|---|---|
| archiveFormats | String> | A list of archive formats to generate (e.g. zip, tar.gz...)
|
| attach | boolean | Attaches the resulting image archives to the project to install them in the local Maven repository and deploy them to remote repositories.
|
| executable | String | The executable in the application image to use as image entry point. The specified name should correspond to a declared application image launchers or the project artifact id if no launcher was specified.
|
| from | String | The base container image.
|
Optional parameters
| Name | Type | Description |
|---|---|---|
| aboutURL | String | The application's home page URL.
|
| addModules | String | The modules to add to the resulting runtime.
|
| addOptions | String | The options to prepend before any other options when invoking the JVM in the resulting runtime.
|
| addUnnamedModules | boolean | Adds unnamed modules when generating the runtime.
|
| archivePrefix | String | The path to the runtime image within the archive.
|
| automaticLaunchers | boolean | Enables the automatic generation of launchers based on the main classes extracted from the application module. If enabled, a launcher is generated for all main classes other than the main launcher.
|
| bindServices | boolean | Links in service provider modules and their dependencies.
|
| compress | String | The compress level of the resulting image: 0=No compression, 1=constant string sharing, 2=ZIP.
|
| configurationDirectory | File | A directory containing user-editable configuration files that will be copied to the resulting runtime.
|
| contentFiles | File> | Files to add to the application payload.
|
| copyright | String | The application copyright.
|
| dockerEnvironment | String> | The Docker environment variables used by the Docker CLI executable.
|
| dockerExecutableFile | File | The path to the Docker CLI executable used to load the image in the Docker daemon.
|
| environment | String> | The container's environment variables.
|
| excludeArtifactIds | String | Comma separated list of Artifact names to exclude.
|
| excludeClassifiers | String | Comma separated list of Classifiers to exclude. Empty String indicates don't exclude anything (default).
|
| excludeGroupIds | String | Comma separated list of GroupId Names to exclude.
|
| excludeScope | String | Scope to exclude. An Empty string indicates no scopes (default).
|
| ignoreSigningInformation | boolean | Suppresses a fatal error when signed modular JARs are linked in the runtime.
|
| imageFormat | Format | The format of the container image.
|
| includeArtifactIds | String | Comma separated list of Artifact names to include. Empty String indicates include everything (default).
|
| includeClassifiers | String | Comma separated list of Classifiers to include. Empty String indicates include everything (default).
|
| includeGroupIds | String | Comma separated list of GroupIds to include. Empty String indicates include everything (default).
|
| includeScope | String | Scope to include. An Empty string indicates all scopes (default). The scopes being interpreted are the scopes as Maven sees them, not as specified in the pom. In summary:
|
| installDirectory | String | Absolute path of the installation directory of the application on OS X or Linux. Relative sub-path of the installation location of the application such as "Program Files" or "AppData" on Windows.
|
| labels | String> | The labels to apply to the container image.
|
| launchers | ApplicationLauncherParameters> | The specific list of launchers to include in the resulting application. The first launcher in the list will be considered as the main launcher.
|
| legalDirectory | File | A directory containing legal notices that will be copied to the resulting runtime.
|
| licenseFile | File | The path to the application license file.
|
| linuxConfiguration | LinuxConfigurationParameters | Linux specific configuration.
|
| macOSConfiguration | MacOSConfigurationParameters | MacOS specific configuration.
|
| manDirectory | File | A directory containing man pages that will be copied to the resulting runtime.
|
| moduleOverrides | ModuleInfoParameters> | A list of module-info.java overrides that will be merged into the generated module descriptors for unnamed or automatic modules.
|
| moduleOverridesDirectory | File | A directory containing module descriptors to use to modularize unnamed or automatic dependency modules and which replace the ones that are otherwise generated.
|
| packageTypes | String> | A list of package types to generate (e.g. rpm, deb, exe, msi, dmg pkg...)
|
| ports | String> | The ports exposed by the container at runtime defined as: port_number [ "/" udp/tcp ] .
|
| progressBar | boolean | Displays a progress bar.
|
| projectMainClass | String | The main class in the project module to use when building the project JMOD package.
|
| registry | String | The registry part of the target image reference defined as: ${registry}/${repository}/${name}:${project.version}
|
| repository | String | The repository part of the target image reference defined as: ${registry}/${repository}/${name}:${project.version}
|
| resolveProjectMainClass | boolean | Resolves the project main class when not specified explicitly.
|
| resourceDirectory | File | The path to resources that override resulting package resources.
|
| skip | boolean | Skips the build and installation of the container image.
|
| stripDebug | boolean | Strips debug information from the resulting runtime.
|
| stripNativeCommands | boolean | Strips native command (e.g. java...) from the resulting runtime.
|
| user | String | The user and group used to run the container defined as: user / uid [ ":" group / gid ].
|
| vendor | String | The application vendor.
|
| vm | String | Selects the HotSpot VM in the output image defined as: "client" / "server" / "minimal" / "all".
|
| volumes | String> | The container's mount points.
|
| windowsConfiguration | WindowsConfigurationParameters | Windows specific configuration.
|
Parameter details
<aboutURL>
The application's home page URL.
- Type: java.lang.String
- Required: no
- User property: inverno.app.aboutURL
- Default: ${project.url}
<addModules>
The modules to add to the resulting runtime.
- Type: java.lang.String
- Required: no
- User property: inverno.runtime.addModules
<addOptions>
The options to prepend before any other options when invoking the JVM in the resulting runtime.
- Type: java.lang.String
- Required: no
- User property: inverno.runtime.addOptions
<addUnnamedModules>
Adds unnamed modules when generating the runtime.
- Type: boolean
- Required: no
- User property: inverno.runtime.addUnnamedModules
- Default: true
<archiveFormats>
A list of archive formats to generate (e.g. zip, tar.gz...)
- Type: java.util.Set<java.lang.String>
- Required: yes
- User property: inverno.runtime.archiveFormats
<archivePrefix>
The path to the runtime image within the archive.
- Type: java.lang.String
- Required: no
- User property: inverno.runtime.archivePrefix
- Default: ${project.build.finalName}
<attach>
Attaches the resulting image archives to the project to install them in the local Maven repository and deploy them to remote repositories.
- Type: boolean
- Required: yes
- User property: inverno.attach
- Default: true
<automaticLaunchers>
Enables the automatic generation of launchers based on the main classes extracted from the application module. If enabled, a launcher is generated for all main classes other than the main launcher.
- Type: boolean
- Required: no
- User property: inverno.app.automaticLaunchers
- Default: false
<bindServices>
Links in service provider modules and their dependencies.
- Type: boolean
- Required: no
- User property: inverno.runtime.bindServices
- Default: false
<compress>
The compress level of the resulting image: 0=No compression, 1=constant string sharing, 2=ZIP.
- Type: java.lang.String
- Required: no
- User property: inverno.runtime.compress
<configurationDirectory>
A directory containing user-editable configuration files that will be copied to the resulting runtime.
- Type: java.io.File
- Required: no
- User property: inverno.runtime.configurationDirectory
- Default: ${project.basedir}/src/main/conf/
<contentFiles>
Files to add to the application payload.
- Type: java.util.List<java.io.File>
- Required: no
- User property: inverno.app.contentFiles
<copyright>
The application copyright.
- Type: java.lang.String
- Required: no
- User property: inverno.app.copyright
<dockerEnvironment>
The Docker environment variables used by the Docker CLI executable.
- Type: java.util.Map<java.lang.String, java.lang.String>
- Required: no
<dockerExecutableFile>
The path to the Docker CLI executable used to load the image in the Docker daemon.
- Type: java.io.File
- Required: no
- User property: inverno.container.dockerExecutable
<environment>
The container's environment variables.
- Type: java.util.Map<java.lang.String, java.lang.String>
- Required: no
<excludeArtifactIds>
Comma separated list of Artifact names to exclude.
- Type: java.lang.String
- Required: no
- User property: inverno.runtime.excludeArtifactIds
<excludeClassifiers>
Comma separated list of Classifiers to exclude. Empty String indicates don't exclude anything (default).
- Type: java.lang.String
- Required: no
- User property: inverno.runtime.excludeClassifiers
<excludeGroupIds>
Comma separated list of GroupId Names to exclude.
- Type: java.lang.String
- Required: no
- User property: inverno.runtime.excludeGroupIds
<excludeScope>
Scope to exclude. An Empty string indicates no scopes (default).
- Type: java.lang.String
- Required: no
- User property: inverno.runtime.excludeScope
<executable>
The executable in the application image to use as image entry point. The specified name should correspond to a declared application image launchers or the project artifact id if no launcher was specified.
- Type: java.lang.String
- Required: yes
- User property: inverno.container.executable
- Default: ${project.artifactId}
<from>
The base container image.
- Type: java.lang.String
- Required: yes
- User property: inverno.container.from
- Default: debian:buster-slim
<ignoreSigningInformation>
Suppresses a fatal error when signed modular JARs are linked in the runtime.
- Type: boolean
- Required: no
- User property: inverno.runtime.ignoreSigningInformation
- Default: false
<imageFormat>
The format of the container image.
- Type: io.inverno.tool.buildtools.ContainerizeTask$Format
- Required: no
- User property: inverno.container.imageFormat
- Default: Docker
<includeArtifactIds>
Comma separated list of Artifact names to include. Empty String indicates include everything (default).
- Type: java.lang.String
- Required: no
- User property: inverno.runtime.includeArtifactIds
<includeClassifiers>
Comma separated list of Classifiers to include. Empty String indicates include everything (default).
- Type: java.lang.String
- Required: no
- User property: inverno.runtime.includeClassifiers
<includeGroupIds>
Comma separated list of GroupIds to include. Empty String indicates include everything (default).
- Type: java.lang.String
- Required: no
- User property: inverno.runtime.includeGroupIds
<includeScope>
Scope to include. An Empty string indicates all scopes (default). The scopes being interpreted are the scopes as Maven sees them, not as specified in the pom. In summary:
- runtime scope gives runtime and compile dependencies,
- compile scope gives compile, provided, and system dependencies,
- test (default) scope gives all dependencies,
- provided scope just gives provided dependencies,
- system scope just gives system dependencies.
- Type: java.lang.String
- Required: no
- User property: inverno.runtime.includeScope
<installDirectory>
Absolute path of the installation directory of the application on OS X or Linux. Relative sub-path of the installation location of the application such as "Program Files" or "AppData" on Windows.
- Type: java.lang.String
- Required: no
- User property: inverno.app.installDirectory
<labels>
The labels to apply to the container image.
- Type: java.util.Map<java.lang.String, java.lang.String>
- Required: no
<launchers>
The specific list of launchers to include in the resulting application. The first launcher in the list will be considered as the main launcher.
- Type: java.util.List<io.inverno.tool.maven.ApplicationLauncherParameters>
- Required: no
<legalDirectory>
A directory containing legal notices that will be copied to the resulting runtime.
- Type: java.io.File
- Required: no
- User property: inverno.runtime.legalDirectory
- Default: ${project.basedir}/src/main/legal/
<licenseFile>
The path to the application license file.
- Type: java.io.File
- Required: no
- User property: inverno.app.licenseFile
- Default: ${project.basedir}/LICENSE
<linuxConfiguration>
Linux specific configuration.
- Type: io.inverno.tool.maven.LinuxConfigurationParameters
- Required: no
<macOSConfiguration>
MacOS specific configuration.
- Type: io.inverno.tool.maven.MacOSConfigurationParameters
- Required: no
<manDirectory>
A directory containing man pages that will be copied to the resulting runtime.
- Type: java.io.File
- Required: no
- User property: inverno.runtime.manDirectory
- Default: ${project.basedir}/src/main/man/
<moduleOverrides>
A list of module-info.java overrides that will be merged into the generated module descriptors for unnamed or automatic modules.
- Type: java.util.List<io.inverno.tool.maven.ModuleInfoParameters>
- Required: no
<moduleOverridesDirectory>
A directory containing module descriptors to use to modularize unnamed or automatic dependency modules and which replace the ones that are otherwise generated.
- Type: java.io.File
- Required: no
- User property: inverno.moduleOverridesDirectory
- Default: ${project.basedir}/src/modules/
<packageTypes>
A list of package types to generate (e.g. rpm, deb, exe, msi, dmg pkg...)
- Type: java.util.Set<java.lang.String>
- Required: no
- User property: inverno.app.packageTypes
<ports>
The ports exposed by the container at runtime defined as: port_number [ "/" udp/tcp ] .
- Type: java.util.Set<java.lang.String>
- Required: no
<progressBar>
Displays a progress bar.
- Type: boolean
- Required: no
- User property: inverno.progressBar
- Default: true
<projectMainClass>
The main class in the project module to use when building the project JMOD package.
- Type: java.lang.String
- Required: no
- User property: inverno.runtime.mainClass
<registry>
The registry part of the target image reference defined as: ${registry}/${repository}/${name}:${project.version}
- Type: java.lang.String
- Required: no
- User property: inverno.container.registry
<repository>
The repository part of the target image reference defined as: ${registry}/${repository}/${name}:${project.version}
- Type: java.lang.String
- Required: no
- User property: inverno.container.repository
<resolveProjectMainClass>
Resolves the project main class when not specified explicitly.
- Type: boolean
- Required: no
- User property: inverno.runtime.resolveMainClass
- Default: false
<resourceDirectory>
The path to resources that override resulting package resources.
- Type: java.io.File
- Required: no
- User property: inverno.app.resourceDirectory
<skip>
Skips the build and installation of the container image.
- Type: boolean
- Required: no
- User property: inverno.image.install.skip
<stripDebug>
Strips debug information from the resulting runtime.
- Type: boolean
- Required: no
- User property: inverno.runtime.stripDebug
- Default: true
<stripNativeCommands>
Strips native command (e.g. java...) from the resulting runtime.
- Type: boolean
- Required: no
- User property: inverno.runtime.stripNativeCommands
- Default: true
<user>
The user and group used to run the container defined as: user / uid [ ":" group / gid ].
- Type: java.lang.String
- Required: no
<vendor>
The application vendor.
- Type: java.lang.String
- Required: no
- User property: inverno.app.vendor
- Default: ${project.organization.name}
<vm>
Selects the HotSpot VM in the output image defined as: "client" / "server" / "minimal" / "all".
- Type: java.lang.String
- Required: no
- User property: inverno.runtime.vm
<volumes>
The container's mount points.
- Type: java.util.Set<java.lang.String>
- Required: no
<windowsConfiguration>
Windows specific configuration.
- Type: io.inverno.tool.maven.WindowsConfigurationParameters
- Required: no
inverno:package-app
Full name:
io.inverno.tool:inverno-maven-plugin:1.6.0:package-app
Description:
Builds and packages the project application image.
A project application package is a native self-contained Java application including all the necessary dependencies. It can be used to distribute a complete application.
Attributes:
- Requires a Maven project to be executed.
- Requires dependency resolution of artifacts in scope: compile+runtime.
- Requires dependency collection of artifacts in scope: compile+runtime.
- Since version: 1.4.
- Binds by default to the lifecycle phase: package.
Required parameters
| Name | Type | Description |
|---|---|---|
| archiveFormats | String> | A list of archive formats to generate (e.g. zip, tar.gz...)
|
| attach | boolean | Attaches the resulting image archives to the project to install them in the local Maven repository and deploy them to remote repositories.
|
Optional parameters
| Name | Type | Description |
|---|---|---|
| aboutURL | String | The application's home page URL.
|
| addModules | String | The modules to add to the resulting runtime.
|
| addOptions | String | The options to prepend before any other options when invoking the JVM in the resulting runtime.
|
| addUnnamedModules | boolean | Adds unnamed modules when generating the runtime.
|
| archivePrefix | String | The path to the runtime image within the archive.
|
| automaticLaunchers | boolean | Enables the automatic generation of launchers based on the main classes extracted from the application module. If enabled, a launcher is generated for all main classes other than the main launcher.
|
| bindServices | boolean | Links in service provider modules and their dependencies.
|
| compress | String | The compress level of the resulting image: 0=No compression, 1=constant string sharing, 2=ZIP.
|
| configurationDirectory | File | A directory containing user-editable configuration files that will be copied to the resulting runtime.
|
| contentFiles | File> | Files to add to the application payload.
|
| copyright | String | The application copyright.
|
| excludeArtifactIds | String | Comma separated list of Artifact names to exclude.
|
| excludeClassifiers | String | Comma separated list of Classifiers to exclude. Empty String indicates don't exclude anything (default).
|
| excludeGroupIds | String | Comma separated list of GroupId Names to exclude.
|
| excludeScope | String | Scope to exclude. An Empty string indicates no scopes (default).
|
| ignoreSigningInformation | boolean | Suppresses a fatal error when signed modular JARs are linked in the runtime.
|
| includeArtifactIds | String | Comma separated list of Artifact names to include. Empty String indicates include everything (default).
|
| includeClassifiers | String | Comma separated list of Classifiers to include. Empty String indicates include everything (default).
|
| includeGroupIds | String | Comma separated list of GroupIds to include. Empty String indicates include everything (default).
|
| includeScope | String | Scope to include. An Empty string indicates all scopes (default). The scopes being interpreted are the scopes as Maven sees them, not as specified in the pom. In summary:
|
| installDirectory | String | Absolute path of the installation directory of the application on OS X or Linux. Relative sub-path of the installation location of the application such as "Program Files" or "AppData" on Windows.
|
| launchers | ApplicationLauncherParameters> | The specific list of launchers to include in the resulting application. The first launcher in the list will be considered as the main launcher.
|
| legalDirectory | File | A directory containing legal notices that will be copied to the resulting runtime.
|
| licenseFile | File | The path to the application license file.
|
| linuxConfiguration | LinuxConfigurationParameters | Linux specific configuration.
|
| macOSConfiguration | MacOSConfigurationParameters | MacOS specific configuration.
|
| manDirectory | File | A directory containing man pages that will be copied to the resulting runtime.
|
| moduleOverrides | ModuleInfoParameters> | A list of module-info.java overrides that will be merged into the generated module descriptors for unnamed or automatic modules.
|
| moduleOverridesDirectory | File | A directory containing module descriptors to use to modularize unnamed or automatic dependency modules and which replace the ones that are otherwise generated.
|
| packageTypes | String> | A list of package types to generate (e.g. rpm, deb, exe, msi, dmg pkg...)
|
| progressBar | boolean | Displays a progress bar.
|
| projectMainClass | String | The main class in the project module to use when building the project JMOD package.
|
| resolveProjectMainClass | boolean | Resolves the project main class when not specified explicitly.
|
| resourceDirectory | File | The path to resources that override resulting package resources.
|
| skip | boolean | Skips the build and packaging of the application image.
|
| stripDebug | boolean | Strips debug information from the resulting runtime.
|
| stripNativeCommands | boolean | Strips native command (e.g. java...) from the resulting runtime.
|
| vendor | String | The application vendor.
|
| vm | String | Selects the HotSpot VM in the output image defined as: "client" / "server" / "minimal" / "all".
|
| windowsConfiguration | WindowsConfigurationParameters | Windows specific configuration.
|
Parameter details
<aboutURL>
The application's home page URL.
- Type: java.lang.String
- Required: no
- User property: inverno.app.aboutURL
- Default: ${project.url}
<addModules>
The modules to add to the resulting runtime.
- Type: java.lang.String
- Required: no
- User property: inverno.runtime.addModules
<addOptions>
The options to prepend before any other options when invoking the JVM in the resulting runtime.
- Type: java.lang.String
- Required: no
- User property: inverno.runtime.addOptions
<addUnnamedModules>
Adds unnamed modules when generating the runtime.
- Type: boolean
- Required: no
- User property: inverno.runtime.addUnnamedModules
- Default: true
<archiveFormats>
A list of archive formats to generate (e.g. zip, tar.gz...)
- Type: java.util.Set<java.lang.String>
- Required: yes
- User property: inverno.runtime.archiveFormats
<archivePrefix>
The path to the runtime image within the archive.
- Type: java.lang.String
- Required: no
- User property: inverno.runtime.archivePrefix
- Default: ${project.build.finalName}
<attach>
Attaches the resulting image archives to the project to install them in the local Maven repository and deploy them to remote repositories.
- Type: boolean
- Required: yes
- User property: inverno.attach
- Default: true
<automaticLaunchers>
Enables the automatic generation of launchers based on the main classes extracted from the application module. If enabled, a launcher is generated for all main classes other than the main launcher.
- Type: boolean
- Required: no
- User property: inverno.app.automaticLaunchers
- Default: false
<bindServices>
Links in service provider modules and their dependencies.
- Type: boolean
- Required: no
- User property: inverno.runtime.bindServices
- Default: false
<compress>
The compress level of the resulting image: 0=No compression, 1=constant string sharing, 2=ZIP.
- Type: java.lang.String
- Required: no
- User property: inverno.runtime.compress
<configurationDirectory>
A directory containing user-editable configuration files that will be copied to the resulting runtime.
- Type: java.io.File
- Required: no
- User property: inverno.runtime.configurationDirectory
- Default: ${project.basedir}/src/main/conf/
<contentFiles>
Files to add to the application payload.
- Type: java.util.List<java.io.File>
- Required: no
- User property: inverno.app.contentFiles
<copyright>
The application copyright.
- Type: java.lang.String
- Required: no
- User property: inverno.app.copyright
<excludeArtifactIds>
Comma separated list of Artifact names to exclude.
- Type: java.lang.String
- Required: no
- User property: inverno.runtime.excludeArtifactIds
<excludeClassifiers>
Comma separated list of Classifiers to exclude. Empty String indicates don't exclude anything (default).
- Type: java.lang.String
- Required: no
- User property: inverno.runtime.excludeClassifiers
<excludeGroupIds>
Comma separated list of GroupId Names to exclude.
- Type: java.lang.String
- Required: no
- User property: inverno.runtime.excludeGroupIds
<excludeScope>
Scope to exclude. An Empty string indicates no scopes (default).
- Type: java.lang.String
- Required: no
- User property: inverno.runtime.excludeScope
<ignoreSigningInformation>
Suppresses a fatal error when signed modular JARs are linked in the runtime.
- Type: boolean
- Required: no
- User property: inverno.runtime.ignoreSigningInformation
- Default: false
<includeArtifactIds>
Comma separated list of Artifact names to include. Empty String indicates include everything (default).
- Type: java.lang.String
- Required: no
- User property: inverno.runtime.includeArtifactIds
<includeClassifiers>
Comma separated list of Classifiers to include. Empty String indicates include everything (default).
- Type: java.lang.String
- Required: no
- User property: inverno.runtime.includeClassifiers
<includeGroupIds>
Comma separated list of GroupIds to include. Empty String indicates include everything (default).
- Type: java.lang.String
- Required: no
- User property: inverno.runtime.includeGroupIds
<includeScope>
Scope to include. An Empty string indicates all scopes (default). The scopes being interpreted are the scopes as Maven sees them, not as specified in the pom. In summary:
- runtime scope gives runtime and compile dependencies,
- compile scope gives compile, provided, and system dependencies,
- test (default) scope gives all dependencies,
- provided scope just gives provided dependencies,
- system scope just gives system dependencies.
- Type: java.lang.String
- Required: no
- User property: inverno.runtime.includeScope
<installDirectory>
Absolute path of the installation directory of the application on OS X or Linux. Relative sub-path of the installation location of the application such as "Program Files" or "AppData" on Windows.
- Type: java.lang.String
- Required: no
- User property: inverno.app.installDirectory
<launchers>
The specific list of launchers to include in the resulting application. The first launcher in the list will be considered as the main launcher.
- Type: java.util.List<io.inverno.tool.maven.ApplicationLauncherParameters>
- Required: no
<legalDirectory>
A directory containing legal notices that will be copied to the resulting runtime.
- Type: java.io.File
- Required: no
- User property: inverno.runtime.legalDirectory
- Default: ${project.basedir}/src/main/legal/
<licenseFile>
The path to the application license file.
- Type: java.io.File
- Required: no
- User property: inverno.app.licenseFile
- Default: ${project.basedir}/LICENSE
<linuxConfiguration>
Linux specific configuration.
- Type: io.inverno.tool.maven.LinuxConfigurationParameters
- Required: no
<macOSConfiguration>
MacOS specific configuration.
- Type: io.inverno.tool.maven.MacOSConfigurationParameters
- Required: no
<manDirectory>
A directory containing man pages that will be copied to the resulting runtime.
- Type: java.io.File
- Required: no
- User property: inverno.runtime.manDirectory
- Default: ${project.basedir}/src/main/man/
<moduleOverrides>
A list of module-info.java overrides that will be merged into the generated module descriptors for unnamed or automatic modules.
- Type: java.util.List<io.inverno.tool.maven.ModuleInfoParameters>
- Required: no
<moduleOverridesDirectory>
A directory containing module descriptors to use to modularize unnamed or automatic dependency modules and which replace the ones that are otherwise generated.
- Type: java.io.File
- Required: no
- User property: inverno.moduleOverridesDirectory
- Default: ${project.basedir}/src/modules/
<packageTypes>
A list of package types to generate (e.g. rpm, deb, exe, msi, dmg pkg...)
- Type: java.util.Set<java.lang.String>
- Required: no
- User property: inverno.app.packageTypes
<progressBar>
Displays a progress bar.
- Type: boolean
- Required: no
- User property: inverno.progressBar
- Default: true
<projectMainClass>
The main class in the project module to use when building the project JMOD package.
- Type: java.lang.String
- Required: no
- User property: inverno.runtime.mainClass
<resolveProjectMainClass>
Resolves the project main class when not specified explicitly.
- Type: boolean
- Required: no
- User property: inverno.runtime.resolveMainClass
- Default: false
<resourceDirectory>
The path to resources that override resulting package resources.
- Type: java.io.File
- Required: no
- User property: inverno.app.resourceDirectory
<skip>
Skips the build and packaging of the application image.
- Type: boolean
- Required: no
- User property: inverno.app.skip
<stripDebug>
Strips debug information from the resulting runtime.
- Type: boolean
- Required: no
- User property: inverno.runtime.stripDebug
- Default: true
<stripNativeCommands>
Strips native command (e.g. java...) from the resulting runtime.
- Type: boolean
- Required: no
- User property: inverno.runtime.stripNativeCommands
- Default: true
<vendor>
The application vendor.
- Type: java.lang.String
- Required: no
- User property: inverno.app.vendor
- Default: ${project.organization.name}
<vm>
Selects the HotSpot VM in the output image defined as: "client" / "server" / "minimal" / "all".
- Type: java.lang.String
- Required: no
- User property: inverno.runtime.vm
<windowsConfiguration>
Windows specific configuration.
- Type: io.inverno.tool.maven.WindowsConfigurationParameters
- Required: no
inverno:package-image
Full name:
io.inverno.tool:inverno-maven-plugin:1.6.0:package-image
Description:
Builds and packages the project application container image in a TAR archive.
Attributes:
- Requires a Maven project to be executed.
- Requires dependency resolution of artifacts in scope: compile+runtime.
- Requires dependency collection of artifacts in scope: compile+runtime.
- Since version: 1.4.
- Binds by default to the lifecycle phase: package.
Required parameters
| Name | Type | Description |
|---|---|---|
| archiveFormats | String> | A list of archive formats to generate (e.g. zip, tar.gz...)
|
| attach | boolean | Attaches the resulting image archives to the project to install them in the local Maven repository and deploy them to remote repositories.
|
| executable | String | The executable in the application image to use as image entry point. The specified name should correspond to a declared application image launchers or the project artifact id if no launcher was specified.
|
| from | String | The base container image.
|
Optional parameters
| Name | Type | Description |
|---|---|---|
| aboutURL | String | The application's home page URL.
|
| addModules | String | The modules to add to the resulting runtime.
|
| addOptions | String | The options to prepend before any other options when invoking the JVM in the resulting runtime.
|
| addUnnamedModules | boolean | Adds unnamed modules when generating the runtime.
|
| archivePrefix | String | The path to the runtime image within the archive.
|
| automaticLaunchers | boolean | Enables the automatic generation of launchers based on the main classes extracted from the application module. If enabled, a launcher is generated for all main classes other than the main launcher.
|
| bindServices | boolean | Links in service provider modules and their dependencies.
|
| compress | String | The compress level of the resulting image: 0=No compression, 1=constant string sharing, 2=ZIP.
|
| configurationDirectory | File | A directory containing user-editable configuration files that will be copied to the resulting runtime.
|
| contentFiles | File> | Files to add to the application payload.
|
| copyright | String | The application copyright.
|
| environment | String> | The container's environment variables.
|
| excludeArtifactIds | String | Comma separated list of Artifact names to exclude.
|
| excludeClassifiers | String | Comma separated list of Classifiers to exclude. Empty String indicates don't exclude anything (default).
|
| excludeGroupIds | String | Comma separated list of GroupId Names to exclude.
|
| excludeScope | String | Scope to exclude. An Empty string indicates no scopes (default).
|
| ignoreSigningInformation | boolean | Suppresses a fatal error when signed modular JARs are linked in the runtime.
|
| imageFormat | Format | The format of the container image.
|
| includeArtifactIds | String | Comma separated list of Artifact names to include. Empty String indicates include everything (default).
|
| includeClassifiers | String | Comma separated list of Classifiers to include. Empty String indicates include everything (default).
|
| includeGroupIds | String | Comma separated list of GroupIds to include. Empty String indicates include everything (default).
|
| includeScope | String | Scope to include. An Empty string indicates all scopes (default). The scopes being interpreted are the scopes as Maven sees them, not as specified in the pom. In summary:
|
| installDirectory | String | Absolute path of the installation directory of the application on OS X or Linux. Relative sub-path of the installation location of the application such as "Program Files" or "AppData" on Windows.
|
| labels | String> | The labels to apply to the container image.
|
| launchers | ApplicationLauncherParameters> | The specific list of launchers to include in the resulting application. The first launcher in the list will be considered as the main launcher.
|
| legalDirectory | File | A directory containing legal notices that will be copied to the resulting runtime.
|
| licenseFile | File | The path to the application license file.
|
| linuxConfiguration | LinuxConfigurationParameters | Linux specific configuration.
|
| macOSConfiguration | MacOSConfigurationParameters | MacOS specific configuration.
|
| manDirectory | File | A directory containing man pages that will be copied to the resulting runtime.
|
| moduleOverrides | ModuleInfoParameters> | A list of module-info.java overrides that will be merged into the generated module descriptors for unnamed or automatic modules.
|
| moduleOverridesDirectory | File | A directory containing module descriptors to use to modularize unnamed or automatic dependency modules and which replace the ones that are otherwise generated.
|
| packageTypes | String> | A list of package types to generate (e.g. rpm, deb, exe, msi, dmg pkg...)
|
| ports | String> | The ports exposed by the container at runtime defined as: port_number [ "/" udp/tcp ] .
|
| progressBar | boolean | Displays a progress bar.
|
| projectMainClass | String | The main class in the project module to use when building the project JMOD package.
|
| registry | String | The registry part of the target image reference defined as: ${registry}/${repository}/${name}:${project.version}
|
| repository | String | The repository part of the target image reference defined as: ${registry}/${repository}/${name}:${project.version}
|
| resolveProjectMainClass | boolean | Resolves the project main class when not specified explicitly.
|
| resourceDirectory | File | The path to resources that override resulting package resources.
|
| skip | boolean | Skips the build and packaging of the container image.
|
| stripDebug | boolean | Strips debug information from the resulting runtime.
|
| stripNativeCommands | boolean | Strips native command (e.g. java...) from the resulting runtime.
|
| user | String | The user and group used to run the container defined as: user / uid [ ":" group / gid ].
|
| vendor | String | The application vendor.
|
| vm | String | Selects the HotSpot VM in the output image defined as: "client" / "server" / "minimal" / "all".
|
| volumes | String> | The container's mount points.
|
| windowsConfiguration | WindowsConfigurationParameters | Windows specific configuration.
|
Parameter details
<aboutURL>
The application's home page URL.
- Type: java.lang.String
- Required: no
- User property: inverno.app.aboutURL
- Default: ${project.url}
<addModules>
The modules to add to the resulting runtime.
- Type: java.lang.String
- Required: no
- User property: inverno.runtime.addModules
<addOptions>
The options to prepend before any other options when invoking the JVM in the resulting runtime.
- Type: java.lang.String
- Required: no
- User property: inverno.runtime.addOptions
<addUnnamedModules>
Adds unnamed modules when generating the runtime.
- Type: boolean
- Required: no
- User property: inverno.runtime.addUnnamedModules
- Default: true
<archiveFormats>
A list of archive formats to generate (e.g. zip, tar.gz...)
- Type: java.util.Set<java.lang.String>
- Required: yes
- User property: inverno.runtime.archiveFormats
<archivePrefix>
The path to the runtime image within the archive.
- Type: java.lang.String
- Required: no
- User property: inverno.runtime.archivePrefix
- Default: ${project.build.finalName}
<attach>
Attaches the resulting image archives to the project to install them in the local Maven repository and deploy them to remote repositories.
- Type: boolean
- Required: yes
- User property: inverno.attach
- Default: true
<automaticLaunchers>
Enables the automatic generation of launchers based on the main classes extracted from the application module. If enabled, a launcher is generated for all main classes other than the main launcher.
- Type: boolean
- Required: no
- User property: inverno.app.automaticLaunchers
- Default: false
<bindServices>
Links in service provider modules and their dependencies.
- Type: boolean
- Required: no
- User property: inverno.runtime.bindServices
- Default: false
<compress>
The compress level of the resulting image: 0=No compression, 1=constant string sharing, 2=ZIP.
- Type: java.lang.String
- Required: no
- User property: inverno.runtime.compress
<configurationDirectory>
A directory containing user-editable configuration files that will be copied to the resulting runtime.
- Type: java.io.File
- Required: no
- User property: inverno.runtime.configurationDirectory
- Default: ${project.basedir}/src/main/conf/
<contentFiles>
Files to add to the application payload.
- Type: java.util.List<java.io.File>
- Required: no
- User property: inverno.app.contentFiles
<copyright>
The application copyright.
- Type: java.lang.String
- Required: no
- User property: inverno.app.copyright
<environment>
The container's environment variables.
- Type: java.util.Map<java.lang.String, java.lang.String>
- Required: no
<excludeArtifactIds>
Comma separated list of Artifact names to exclude.
- Type: java.lang.String
- Required: no
- User property: inverno.runtime.excludeArtifactIds
<excludeClassifiers>
Comma separated list of Classifiers to exclude. Empty String indicates don't exclude anything (default).
- Type: java.lang.String
- Required: no
- User property: inverno.runtime.excludeClassifiers
<excludeGroupIds>
Comma separated list of GroupId Names to exclude.
- Type: java.lang.String
- Required: no
- User property: inverno.runtime.excludeGroupIds
<excludeScope>
Scope to exclude. An Empty string indicates no scopes (default).
- Type: java.lang.String
- Required: no
- User property: inverno.runtime.excludeScope
<executable>
The executable in the application image to use as image entry point. The specified name should correspond to a declared application image launchers or the project artifact id if no launcher was specified.
- Type: java.lang.String
- Required: yes
- User property: inverno.container.executable
- Default: ${project.artifactId}
<from>
The base container image.
- Type: java.lang.String
- Required: yes
- User property: inverno.container.from
- Default: debian:buster-slim
<ignoreSigningInformation>
Suppresses a fatal error when signed modular JARs are linked in the runtime.
- Type: boolean
- Required: no
- User property: inverno.runtime.ignoreSigningInformation
- Default: false
<imageFormat>
The format of the container image.
- Type: io.inverno.tool.buildtools.ContainerizeTask$Format
- Required: no
- User property: inverno.container.imageFormat
- Default: Docker
<includeArtifactIds>
Comma separated list of Artifact names to include. Empty String indicates include everything (default).
- Type: java.lang.String
- Required: no
- User property: inverno.runtime.includeArtifactIds
<includeClassifiers>
Comma separated list of Classifiers to include. Empty String indicates include everything (default).
- Type: java.lang.String
- Required: no
- User property: inverno.runtime.includeClassifiers
<includeGroupIds>
Comma separated list of GroupIds to include. Empty String indicates include everything (default).
- Type: java.lang.String
- Required: no
- User property: inverno.runtime.includeGroupIds
<includeScope>
Scope to include. An Empty string indicates all scopes (default). The scopes being interpreted are the scopes as Maven sees them, not as specified in the pom. In summary:
- runtime scope gives runtime and compile dependencies,
- compile scope gives compile, provided, and system dependencies,
- test (default) scope gives all dependencies,
- provided scope just gives provided dependencies,
- system scope just gives system dependencies.
- Type: java.lang.String
- Required: no
- User property: inverno.runtime.includeScope
<installDirectory>
Absolute path of the installation directory of the application on OS X or Linux. Relative sub-path of the installation location of the application such as "Program Files" or "AppData" on Windows.
- Type: java.lang.String
- Required: no
- User property: inverno.app.installDirectory
<labels>
The labels to apply to the container image.
- Type: java.util.Map<java.lang.String, java.lang.String>
- Required: no
<launchers>
The specific list of launchers to include in the resulting application. The first launcher in the list will be considered as the main launcher.
- Type: java.util.List<io.inverno.tool.maven.ApplicationLauncherParameters>
- Required: no
<legalDirectory>
A directory containing legal notices that will be copied to the resulting runtime.
- Type: java.io.File
- Required: no
- User property: inverno.runtime.legalDirectory
- Default: ${project.basedir}/src/main/legal/
<licenseFile>
The path to the application license file.
- Type: java.io.File
- Required: no
- User property: inverno.app.licenseFile
- Default: ${project.basedir}/LICENSE
<linuxConfiguration>
Linux specific configuration.
- Type: io.inverno.tool.maven.LinuxConfigurationParameters
- Required: no
<macOSConfiguration>
MacOS specific configuration.
- Type: io.inverno.tool.maven.MacOSConfigurationParameters
- Required: no
<manDirectory>
A directory containing man pages that will be copied to the resulting runtime.
- Type: java.io.File
- Required: no
- User property: inverno.runtime.manDirectory
- Default: ${project.basedir}/src/main/man/
<moduleOverrides>
A list of module-info.java overrides that will be merged into the generated module descriptors for unnamed or automatic modules.
- Type: java.util.List<io.inverno.tool.maven.ModuleInfoParameters>
- Required: no
<moduleOverridesDirectory>
A directory containing module descriptors to use to modularize unnamed or automatic dependency modules and which replace the ones that are otherwise generated.
- Type: java.io.File
- Required: no
- User property: inverno.moduleOverridesDirectory
- Default: ${project.basedir}/src/modules/
<packageTypes>
A list of package types to generate (e.g. rpm, deb, exe, msi, dmg pkg...)
- Type: java.util.Set<java.lang.String>
- Required: no
- User property: inverno.app.packageTypes
<ports>
The ports exposed by the container at runtime defined as: port_number [ "/" udp/tcp ] .
- Type: java.util.Set<java.lang.String>
- Required: no
<progressBar>
Displays a progress bar.
- Type: boolean
- Required: no
- User property: inverno.progressBar
- Default: true
<projectMainClass>
The main class in the project module to use when building the project JMOD package.
- Type: java.lang.String
- Required: no
- User property: inverno.runtime.mainClass
<registry>
The registry part of the target image reference defined as: ${registry}/${repository}/${name}:${project.version}
- Type: java.lang.String
- Required: no
- User property: inverno.container.registry
<repository>
The repository part of the target image reference defined as: ${registry}/${repository}/${name}:${project.version}
- Type: java.lang.String
- Required: no
- User property: inverno.container.repository
<resolveProjectMainClass>
Resolves the project main class when not specified explicitly.
- Type: boolean
- Required: no
- User property: inverno.runtime.resolveMainClass
- Default: false
<resourceDirectory>
The path to resources that override resulting package resources.
- Type: java.io.File
- Required: no
- User property: inverno.app.resourceDirectory
<skip>
Skips the build and packaging of the container image.
- Type: boolean
- Required: no
- User property: inverno.image.package.skip
<stripDebug>
Strips debug information from the resulting runtime.
- Type: boolean
- Required: no
- User property: inverno.runtime.stripDebug
- Default: true
<stripNativeCommands>
Strips native command (e.g. java...) from the resulting runtime.
- Type: boolean
- Required: no
- User property: inverno.runtime.stripNativeCommands
- Default: true
<user>
The user and group used to run the container defined as: user / uid [ ":" group / gid ].
- Type: java.lang.String
- Required: no
<vendor>
The application vendor.
- Type: java.lang.String
- Required: no
- User property: inverno.app.vendor
- Default: ${project.organization.name}
<vm>
Selects the HotSpot VM in the output image defined as: "client" / "server" / "minimal" / "all".
- Type: java.lang.String
- Required: no
- User property: inverno.runtime.vm
<volumes>
The container's mount points.
- Type: java.util.Set<java.lang.String>
- Required: no
<windowsConfiguration>
Windows specific configuration.
- Type: io.inverno.tool.maven.WindowsConfigurationParameters
- Required: no
inverno:run
Full name:
io.inverno.tool:inverno-maven-plugin:1.6.0:run
Description:
Runs the project application.
Attributes:
- Requires a Maven project to be executed.
- Requires dependency resolution of artifacts in scope: compile+runtime.
- Requires dependency collection of artifacts in scope: compile+runtime.
- Since version: 1.0.
- Binds by default to the lifecycle phase: validate.
Optional parameters
| Name | Type | Description |
|---|---|---|
| addUnnamedModules | boolean | Adds the unnamed modules when executing the application.
|
| arguments | String | The arguments to pass to the application.
|
| commandLineArguments | String | The command line arguments to pass to the application. This parameter overrides arguments when specified.
|
| mainClass | String | The main class to use to run the application. If not specified, one of the main class in the project module is automatically selected.
|
| moduleOverrides | ModuleInfoParameters> | A list of module-info.java overrides that will be merged into the generated module descriptors for unnamed or automatic modules.
|
| moduleOverridesDirectory | File | A directory containing module descriptors to use to modularize unnamed or automatic dependency modules and which replace the ones that are otherwise generated.
|
| progressBar | boolean | Displays a progress bar.
|
| skip | boolean | Skips the execution.
|
| vmOptions | String | The VM options to use when executing the application.
|
| workingDirectory | File | The working directory of the application.
|
Parameter details
<addUnnamedModules>
Adds the unnamed modules when executing the application.
- Type: boolean
- Required: no
- User property: inverno.exec.addUnnamedModules
- Default: true
<arguments>
The arguments to pass to the application.
- Type: java.lang.String
- Required: no
<commandLineArguments>
The command line arguments to pass to the application. This parameter overrides arguments when specified.
- Type: java.lang.String
- Required: no
- User property: inverno.run.arguments
<mainClass>
The main class to use to run the application. If not specified, one of the main class in the project module is automatically selected.
- Type: java.lang.String
- Required: no
- User property: inverno.exec.mainClass
<moduleOverrides>
A list of module-info.java overrides that will be merged into the generated module descriptors for unnamed or automatic modules.
- Type: java.util.List<io.inverno.tool.maven.ModuleInfoParameters>
- Required: no
<moduleOverridesDirectory>
A directory containing module descriptors to use to modularize unnamed or automatic dependency modules and which replace the ones that are otherwise generated.
- Type: java.io.File
- Required: no
- User property: inverno.moduleOverridesDirectory
- Default: ${project.basedir}/src/modules/
<progressBar>
Displays a progress bar.
- Type: boolean
- Required: no
- User property: inverno.progressBar
- Default: true
<skip>
Skips the execution.
- Type: boolean
- Required: no
- User property: inverno.run.skip
<vmOptions>
The VM options to use when executing the application.
- Type: java.lang.String
- Required: no
- User property: inverno.exec.vmOptions
- Default: -Dlog4j2.simplelogLevel=INFO -Dlog4j2.level=INFO
<workingDirectory>
The working directory of the application.
- Type: java.io.File
- Required: no
- User property: inverno.exec.workingDirectory
- Default: ${project.build.directory}/maven-inverno/working
inverno:start
Full name:
io.inverno.tool:inverno-maven-plugin:1.6.0:start
Description:
Starts the project application without blocking the Maven build.
This goal is used together with the stop goal in the pre-integration-test and post-integration-test phases to run integration tests.
Attributes:
- Requires a Maven project to be executed.
- Requires dependency resolution of artifacts in scope: compile+runtime.
- Requires dependency collection of artifacts in scope: compile+runtime.
- Since version: 1.0.
- Binds by default to the lifecycle phase: pre-integration-test.
Optional parameters
| Name | Type | Description |
|---|---|---|
| addUnnamedModules | boolean | Adds the unnamed modules when executing the application.
|
| arguments | String | The arguments to pass to the application.
|
| mainClass | String | The main class to use to run the application. If not specified, one of the main class in the project module is automatically selected.
|
| moduleOverrides | ModuleInfoParameters> | A list of module-info.java overrides that will be merged into the generated module descriptors for unnamed or automatic modules.
|
| moduleOverridesDirectory | File | A directory containing module descriptors to use to modularize unnamed or automatic dependency modules and which replace the ones that are otherwise generated.
|
| progressBar | boolean | Displays a progress bar.
|
| skip | boolean | Skips the execution.
|
| timeout | long | The amount of time in milliseconds to wait for the application to start.
|
| vmOptions | String | The VM options to use when executing the application.
|
| workingDirectory | File | The working directory of the application.
|
Parameter details
<addUnnamedModules>
Adds the unnamed modules when executing the application.
- Type: boolean
- Required: no
- User property: inverno.exec.addUnnamedModules
- Default: true
<arguments>
The arguments to pass to the application.
- Type: java.lang.String
- Required: no
<mainClass>
The main class to use to run the application. If not specified, one of the main class in the project module is automatically selected.
- Type: java.lang.String
- Required: no
- User property: inverno.exec.mainClass
<moduleOverrides>
A list of module-info.java overrides that will be merged into the generated module descriptors for unnamed or automatic modules.
- Type: java.util.List<io.inverno.tool.maven.ModuleInfoParameters>
- Required: no
<moduleOverridesDirectory>
A directory containing module descriptors to use to modularize unnamed or automatic dependency modules and which replace the ones that are otherwise generated.
- Type: java.io.File
- Required: no
- User property: inverno.moduleOverridesDirectory
- Default: ${project.basedir}/src/modules/
<progressBar>
Displays a progress bar.
- Type: boolean
- Required: no
- User property: inverno.progressBar
- Default: true
<skip>
Skips the execution.
- Type: boolean
- Required: no
- User property: inverno.start.skip
<timeout>
The amount of time in milliseconds to wait for the application to start.
- Type: long
- Required: no
- User property: inverno.start.timeout
<vmOptions>
The VM options to use when executing the application.
- Type: java.lang.String
- Required: no
- User property: inverno.exec.vmOptions
- Default: -Dlog4j2.simplelogLevel=INFO -Dlog4j2.level=INFO
<workingDirectory>
The working directory of the application.
- Type: java.io.File
- Required: no
- User property: inverno.exec.workingDirectory
- Default: ${project.build.directory}/maven-inverno/working
inverno:stop
Full name:
io.inverno.tool:inverno-maven-plugin:1.6.0:stop
Description:
Stops the project application that has been previously started using the start goal.
This goal is used together with the start goal in the pre-integration-test and post-integration-test phases to run integration tests.
Attributes:
- Requires a Maven project to be executed.
- Since version: 1.0.
- Binds by default to the lifecycle phase: post-integration-test.
Optional parameters
| Name | Type | Description |
|---|---|---|
| moduleOverrides | ModuleInfoParameters> | A list of module-info.java overrides that will be merged into the generated module descriptors for unnamed or automatic modules.
|
| moduleOverridesDirectory | File | A directory containing module descriptors to use to modularize unnamed or automatic dependency modules and which replace the ones that are otherwise generated.
|
| progressBar | boolean | Displays a progress bar.
|
| skip | boolean | Skips the execution.
|
| timeout | long | The amount of time in milliseconds to wait for the application to stop.
|
Parameter details
<moduleOverrides>
A list of module-info.java overrides that will be merged into the generated module descriptors for unnamed or automatic modules.
- Type: java.util.List<io.inverno.tool.maven.ModuleInfoParameters>
- Required: no
<moduleOverridesDirectory>
A directory containing module descriptors to use to modularize unnamed or automatic dependency modules and which replace the ones that are otherwise generated.
- Type: java.io.File
- Required: no
- User property: inverno.moduleOverridesDirectory
- Default: ${project.basedir}/src/modules/
<progressBar>
Displays a progress bar.
- Type: boolean
- Required: no
- User property: inverno.progressBar
- Default: true
<skip>
Skips the execution.
- Type: boolean
- Required: no
- User property: inverno.stop.skip
<timeout>
The amount of time in milliseconds to wait for the application to stop.
- Type: long
- Required: no
- User property: inverno.stop.timeout
- Default: 60000
Inverno OSS Parent
![]()
The Inverno OSS parent POM provides OSS dependencies and plugin management to Inverno components and applications.
Dependencies
| GroupId | ArtifactId | Version |
|---|---|---|
| ch.qos.logback | logback-classic | 1.5.16 |
| com.aayushatharva.brotli4j | brotli4j | 1.18.0 |
| com.aayushatharva.brotli4j | native-linux-x86_64 | 1.18.0 |
| com.aayushatharva.brotli4j | native-osx-x86_64 | 1.18.0 |
| com.aayushatharva.brotli4j | native-windows-x86_64 | 1.18.0 |
| com.fasterxml.jackson.core | jackson-core | 2.18.2 |
| com.fasterxml.jackson.core | jackson-databind | 2.18.2 |
| com.fasterxml.jackson.datatype | jackson-datatype-jdk8 | 2.18.2 |
| com.fasterxml.jackson.datatype | jackson-datatype-jsr310 | 2.18.2 |
| com.fasterxml.jackson.module | jackson-module-afterburner | 2.18.2 |
| com.google.cloud.tools | jib-core | 0.27.2 |
| com.google.protobuf | protobuf-java | 4.29.3 |
| com.google.protobuf | protobuf-java-util | 4.29.3 |
| com.google.protobuf | protoc | 4.29.3 |
| com.google.protobuf | protoc | 4.29.3 |
| com.google.protobuf | protoc | 4.29.3 |
| com.google.protobuf | protoc | 4.29.3 |
| com.google.protobuf | protoc | 4.29.3 |
| com.google.protobuf | protoc | 4.29.3 |
| com.google.protobuf | protoc | 4.29.3 |
| com.google.protobuf | protoc | 4.29.3 |
| com.google.protobuf | protoc | 4.29.3 |
| com.google.protobuf | protoc | 4.29.3 |
| com.ongres.scram | client | 2.1 |
| commons-codec | commons-codec | 1.17.2 |
| commons-io | commons-io | 2.18.0 |
| io.lettuce | lettuce-core | 6.5.2.RELEASE |
| io.netty | netty-all | 4.1.117.Final |
| io.netty | netty-buffer | 4.1.117.Final |
| io.netty | netty-codec | 4.1.117.Final |
| io.netty | netty-codec-http | 4.1.117.Final |
| io.netty | netty-codec-http2 | 4.1.117.Final |
| io.netty | netty-common | 4.1.117.Final |
| io.netty | netty-handler | 4.1.117.Final |
| io.netty | netty-handler-proxy | 4.1.117.Final |
| io.netty | netty-resolver | 4.1.117.Final |
| io.netty | netty-resolver-dns | 4.1.117.Final |
| io.netty | netty-tcnative-boringssl-static | 2.0.69.Final |
| io.netty | netty-transport | 4.1.117.Final |
| io.netty | netty-transport-classes-epoll | 4.1.117.Final |
| io.netty | netty-transport-classes-kqueue | 4.1.117.Final |
| io.netty | netty-transport-native-epoll | 4.1.117.Final |
| io.netty | netty-transport-native-epoll | 4.1.117.Final |
| io.netty | netty-transport-native-epoll | 4.1.117.Final |
| io.netty | netty-transport-native-epoll | 4.1.117.Final |
| io.netty | netty-transport-native-kqueue | 4.1.117.Final |
| io.netty | netty-transport-native-kqueue | 4.1.117.Final |
| io.netty.incubator | netty-incubator-transport-classes-io_uring | 0.0.26.Final |
| io.netty.incubator | netty-incubator-transport-native-io_uring | 0.0.26.Final |
| io.netty.incubator | netty-incubator-transport-native-io_uring | 0.0.26.Final |
| io.netty.incubator | netty-incubator-transport-native-io_uring | 0.0.26.Final |
| io.projectreactor | reactor-core | 3.7.2 |
| io.vertx | vertx-core | 4.5.11 |
| io.vertx | vertx-db2-client | 4.5.11 |
| io.vertx | vertx-io_uring-incubator | 4.5.11 |
| io.vertx | vertx-mssql-client | 4.5.11 |
| io.vertx | vertx-mysql-client | 4.5.11 |
| io.vertx | vertx-pg-client | 4.5.11 |
| io.vertx | vertx-sql-client | 4.5.11 |
| kr.motd.maven | os-maven-plugin | 1.7.1 |
| net.java.dev.javacc | javacc | 7.0.13 |
| org.apache.commons | commons-compress | 1.27.1 |
| org.apache.commons | commons-lang3 | 3.17.0 |
| org.apache.commons | commons-text | 1.13.0 |
| org.apache.logging.log4j | log4j-api | 2.24.3 |
| org.apache.logging.log4j | log4j-core | 2.24.3 |
| org.apache.logging.log4j | log4j-iostreams | 2.24.3 |
| org.apache.logging.log4j | log4j-jul | 2.24.3 |
| org.apache.logging.log4j | log4j-layout-template-json | 2.24.3 |
| org.apache.logging.log4j | log4j-to-slf4j | 2.24.3 |
| org.apache.maven | maven-artifact | 3.6.0 |
| org.apache.maven | maven-compat | 3.6.0 |
| org.apache.maven | maven-core | 3.6.0 |
| org.apache.maven | maven-model | 3.6.0 |
| org.apache.maven | maven-plugin-api | 3.6.0 |
| org.apache.maven.plugin-tools | maven-plugin-annotations | 3.15.1 |
| org.apache.maven.shared | maven-common-artifact-filters | 3.4.0 |
| org.awaitility | awaitility | 4.2.2 |
| org.bouncycastle | bcjmail-jdk18on | 1.80 |
| org.bouncycastle | bcmail-jdk18on | 1.80 |
| org.bouncycastle | bcpg-jdk18on | 1.80 |
| org.bouncycastle | bcpkix-jdk18on | 1.80 |
| org.bouncycastle | bcprov-jdk18on | 1.80 |
| org.bouncycastle | bctls-jdk18on | 1.80 |
| org.bouncycastle | bcutil-jdk18on | 1.80 |
| org.junit | junit-bom | 5.11.4 |
| org.mockito | mockito-core | 5.15.2 |
| org.ow2.asm | asm | 9.7.1 |
| org.tukaani | xz | 1.10 |
| org.webjars | swagger-ui | 5.18.2 |
Maven Plugins
| GroupId | ArtifactId | Version |
|---|---|---|
| org.apache.maven.plugins | maven-antrun-plugin | 3.1.0 |
| org.apache.maven.plugins | maven-assembly-plugin | 3.7.1 |
| org.apache.maven.plugins | maven-clean-plugin | 3.4.0 |
| org.apache.maven.plugins | maven-compiler-plugin | 3.13.0 |
| org.apache.maven.plugins | maven-dependency-plugin | 3.8.1 |
| org.apache.maven.plugins | maven-deploy-plugin | 3.1.3 |
| org.apache.maven.plugins | maven-gpg-plugin | 3.2.7 |
| org.apache.maven.plugins | maven-install-plugin | 3.1.3 |
| org.apache.maven.plugins | maven-jar-plugin | 3.4.2 |
| org.apache.maven.plugins | maven-javadoc-plugin | 3.11.2 |
| org.apache.maven.plugins | maven-plugin-plugin | 3.15.1 |
| org.apache.maven.plugins | maven-resources-plugin | 3.3.1 |
| org.apache.maven.plugins | maven-shade-plugin | 3.6.0 |
| org.apache.maven.plugins | maven-source-plugin | 3.3.1 |
| org.apache.maven.plugins | maven-surefire-plugin | 3.5.2 |
| org.codehaus.mojo | exec-maven-plugin | 3.5.0 |
| org.graalvm.buildtools | native-maven-plugin | 0.10.4 |
| org.javacc.plugin | javacc-maven-plugin | 3.0.3 |
| org.sonatype.plugins | nexus-staging-maven-plugin | 1.7.0 |
| org.xolstice.maven.plugins | protobuf-maven-plugin | 0.6.1 |